
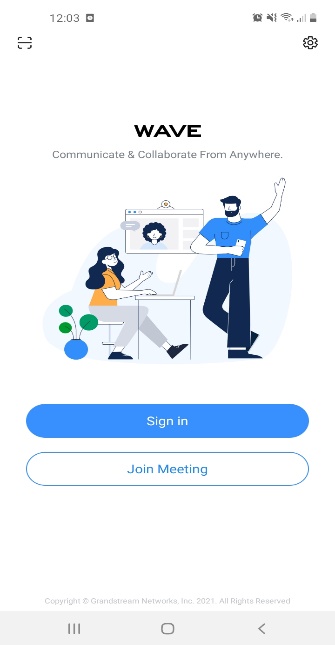
WELCOME
Thank you for using Grandstream Wave mobile app. Wave is a free mobile app that provides remote voice and video collaboration tools for businesses utilizing Grandstream’s UCM6300 series of IP PBXs. Ideal for remote and travelling workers, Wave offers an easy-to-use platform to remotely join, schedule and hold meetings, calls and conferences from mobile devices. It also allows UCM6300 series users to directly call other extensions, landlines, and mobile numbers. Wave is available for Android™ and iOS™ devices, can be quickly configured by scanning a QR Code produced by the UCM6300 series and is compatible with Grandstream’s UCM RemoteConnect cloud service to ensure fully secure remote connections. With Wave, businesses can provide remote workers with a powerful mobile app to meet and collaborate from anywhere, boosting communication and productivity for multi-location organizations.
PRODUCT OVERVIEW
Feature Highlights
- Supported by Android™ 8.0+ and iOS™ 11.0+ with 2G/3G/4G/5G and Wi-Fi networks.
- Voice channel switching between Bluetooth, mobile device, speakerphone and 3.5mm handset jack.
- Native integration with mobile devices including contacts and call history and ability to display SIP users’ online status
- LDAP support makes finding contacts easier
- Supports call display, voicemail, and call encryption
- Full integration with Grandstream’s UCM6300-series of IP PBXs, including creation of QR code for automatic login, call transfer, call recording from server, etc.
- Supports H.264
- Conveniently join meetings without logging in
- High quality point-to-point audio/video calling, jitter resilience up to 50% audio packet loss and 20% video packet loss
- Support schedule meeting and meeting now at anywhere anytime
- Built-in NAT traversal including automatic NAT discovery and TURN/ICE.
- Support basic chat features, including point-to-point chat and group chat features, sending document and emoji, starting video meeting in group chat, synchronizing group chat and meeting chat, etc.
Wave Technical Specifications
Protocols/Standards | SIP RFC3261, TCP/IP/UDP, RTP/RTCP, HTTP/HTTPS, DNS (A record, SRV, NAPTR), STUN/TURN/ICE, SIMPLE, LDAP, TLS, SRTP, IPv6 |
Network | Wi-Fi, 2G/3G/4G, 5G |
Display | 720P resolution or above |
Camera | Support mobile device’s forward or rear-facing cameras |
Bluetooth | Yes, with mobile device’s Bluetooth support |
Voice Codecs and Capabilities | Opus, G.711 A-law/U-law, G.722, G.726-32, G.729A/B, iLBC, GSM FEC 2.0 (pending), NACK Full-duplex speaker, AEC, AGC, Noise Reduction, PLC, Adaptive JIB |
DTMF | In-audio, RFC2833, SIP INFO |
Video Codecs and Capabilities | H.264,video resolution up to 1080P HD, on-screen-display, camera block, Video GS-FEC |
Telephony Features | Hold, mute, call transfer, audio meeting, video meeting |
Chat Function | Point-to-point chat/Group chat Supports to send text, emoji, document, picture; Forward message, copy message, reply message; Pin/unpin chat window, hide chat window, message prompt tone settings. |
Enterprise Features | LDAP, Presence, Call history, Contacts |
UCM Integration | Feature code synchronization, such as call forwarding, call park, call recording, meeting room, voicemail and etc. |
QoS | Layer 3 (ToS, DiffServ, MPLS) QoS |
Security | SIP over TLS, SRTP (128-bit and 256-bit), HTTPS |
Language | English, Simplified Chinese, French, Spanish (Latin America), Spanish (Spain), Italian, Greek, Arabic, Russian, German, Polish, Portuguese, Vietnamese, Thai, Czech, Turkish, Hebrew, Dutch, and Slovenian. |
Login | Supports login with SIP extension and User password. Supports login through QR code scan (using UCM6300-series of IP PBXs) |
Download/Upgrade | Available from Google Play Store and Apple iTunes App Store |
Table 1: Wave Technical Specifications
Please visit our website for more Wave application information and product documentations:
PREREQUISITES
Device Requirements
Operating system: Android™ 4.2+, iOS™10+
Hardware:Compatible with most Mobile phones and tablets running Android™ 4.2+ or iOS10+
Network:Wi-Fi, 2G, 3G, 4G, and 5G networks
Download and Installation
Wave app can be downloaded from Google Play or App Store and installed.
Click on the Wave app icon to open it.
Touchscreen Gestures
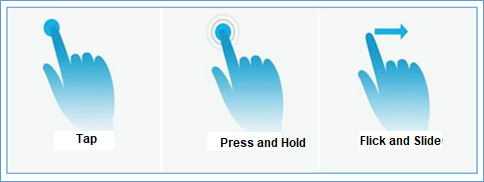
When using Wave app, users can manipulate above shown gestures to control the touchscreen.
- Tap: Touch the screen with a fingertip once to select or open a menu.
- Press and hold: Touch and hold the screen with one fingertip for about 2 seconds to bring up more operations.
- Flick and Slide: Slide a fingertip across the screen. For example, users can swipe up/down to scroll through a page or slide left/right to switch video feeds during video conference.
USING WAVE APP
Signing In Using Credentials
Step 1: After opening Wave app, tap on “Sign in” to open the login interface.
Step 2: Enter server address, account number and User password. Then click “Sign in”.
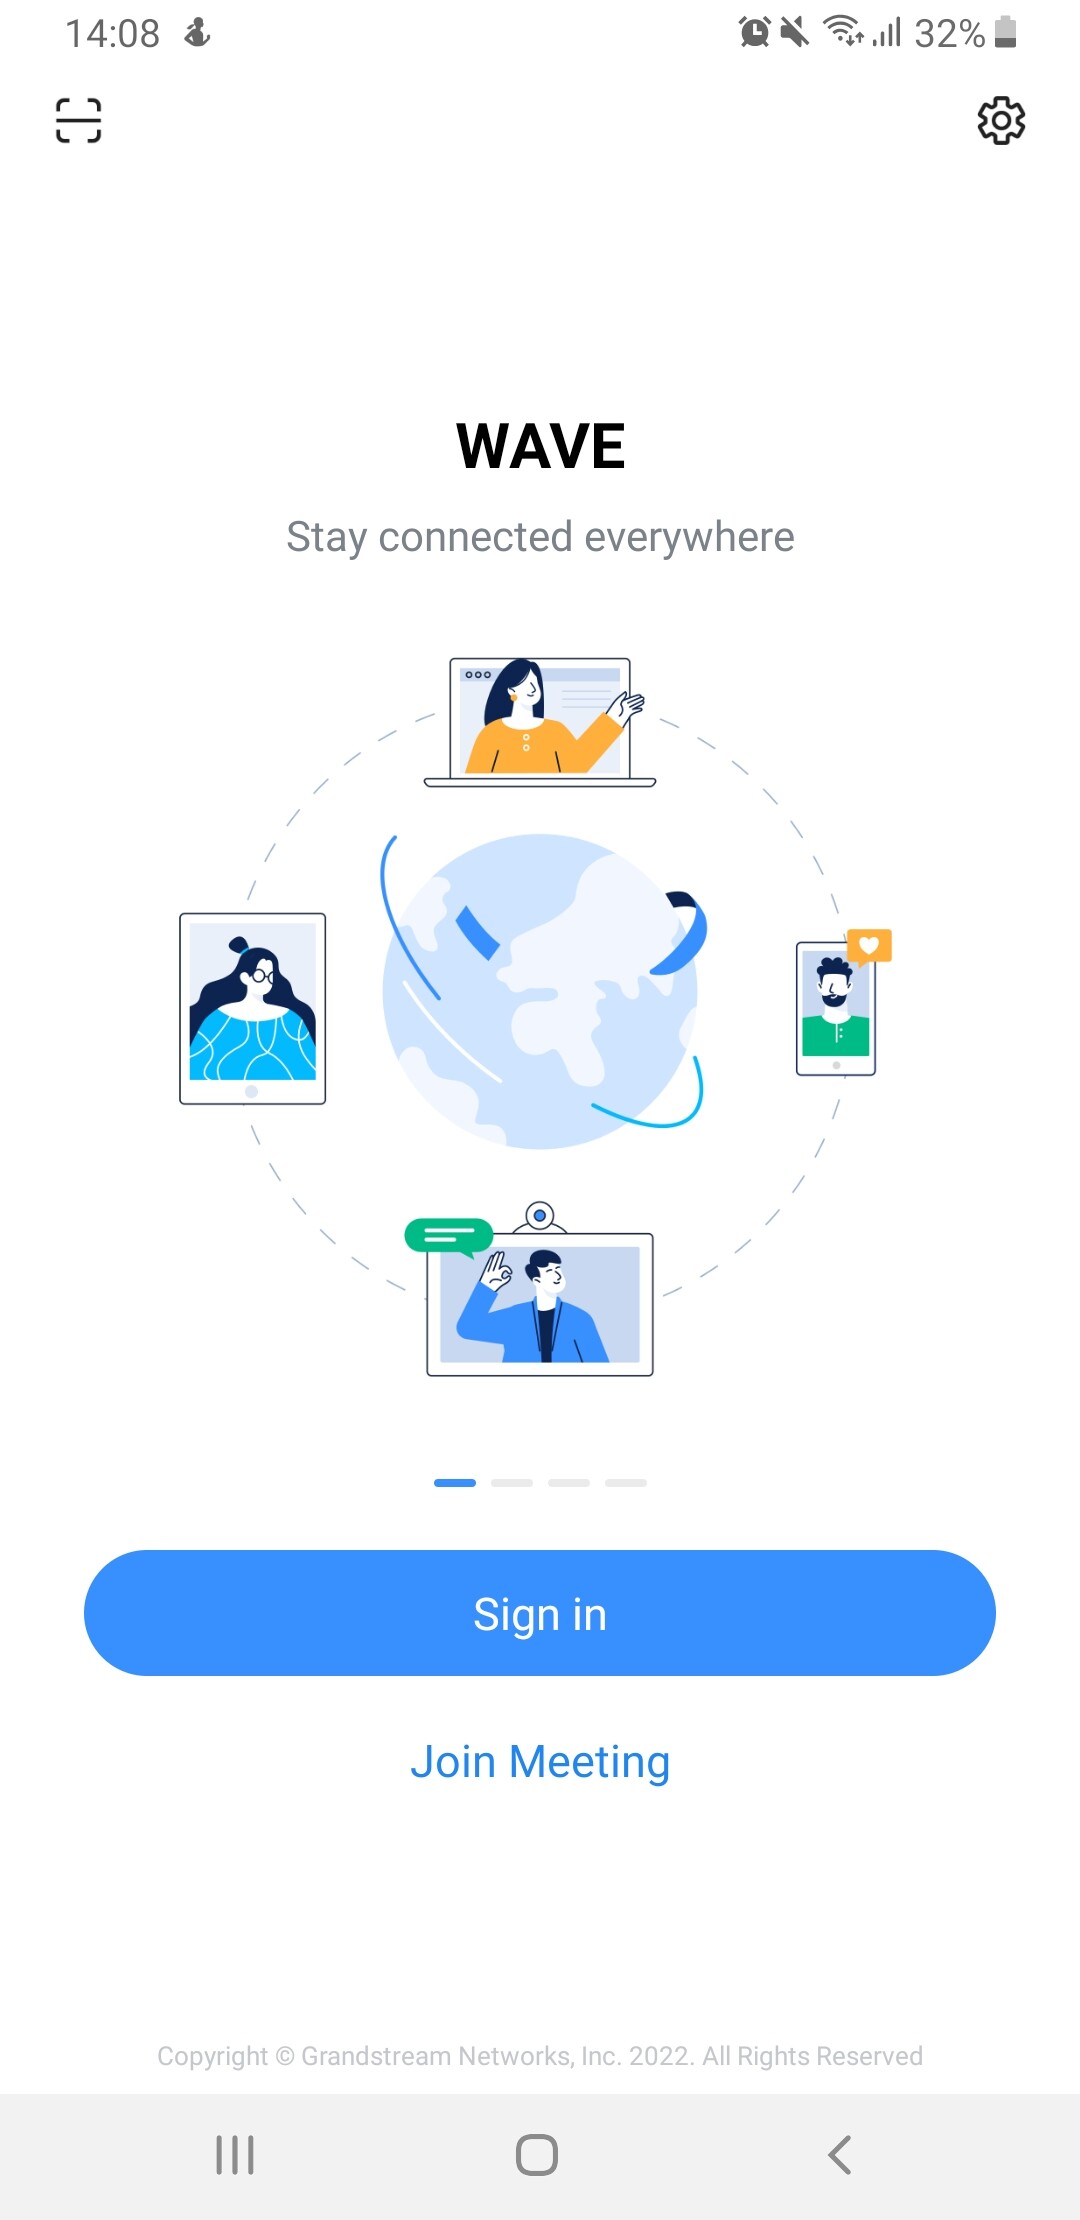

Signing In Using QR Code
The user can also tap to log in using the QR code provided in the Wave welcome email, or if the user has already open his/her account on Wave Desktop or Wave Web.
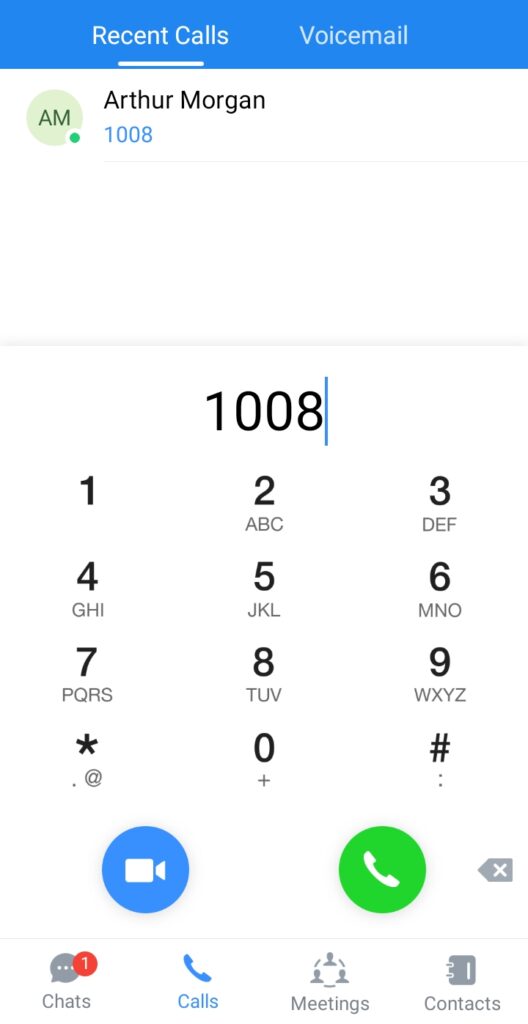
Making a Call
Step 1: Click on  on the bottom right corner of the app to bring up the dial pad.
Step 2: Enter the number to dial.
Step 3: Click on  to make a video call or click on
  to make an audio call.
Note: With the Wave app, users can dial other extensions and any other number allowed by the UCM server.
Redial
Users can quickly call the last dialed number as long as it exists in the call history.
Method 1: Open the dialing interface by tapping on the Dial tab.
Method 2: Tap on the pound key # on the dial pad to automatically call the last dialed number.
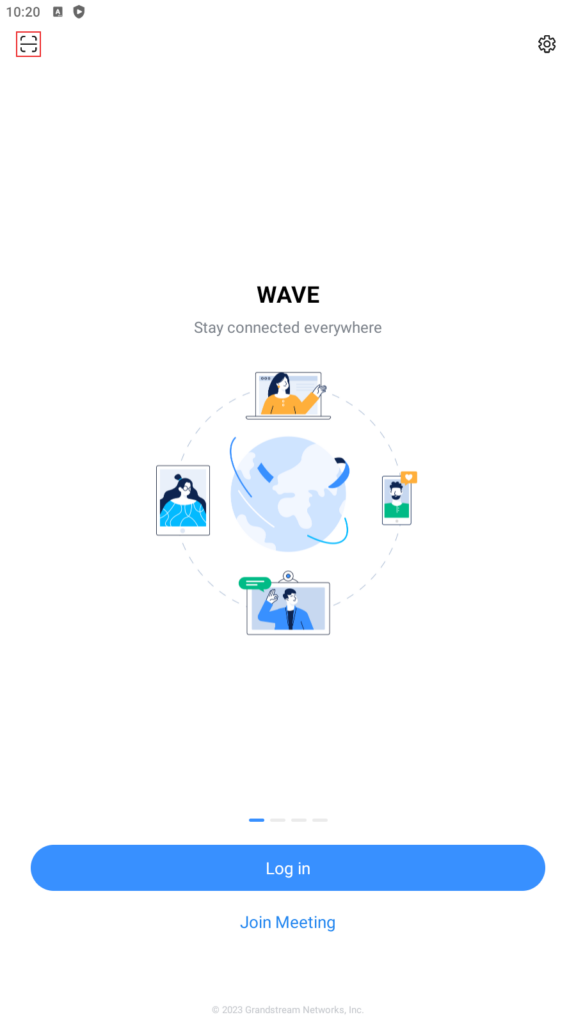
Call History
Call history is displayed on the Dial page. It displays all call history and voicemail messages in each Wave client for the Wave account.
- To hide the dial pad, swipe down on the page. Users will be able to view more call history entries.
- Click on the button on the bottom right corner of the app to bring up the dial pad.
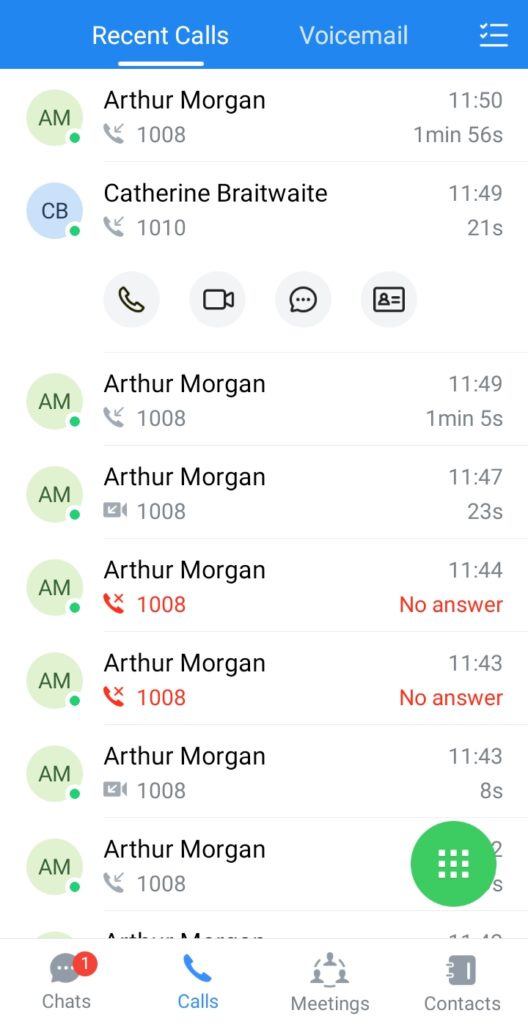
By clicking on ![]() the user can delete the entries in the call history tab.
the user can delete the entries in the call history tab.
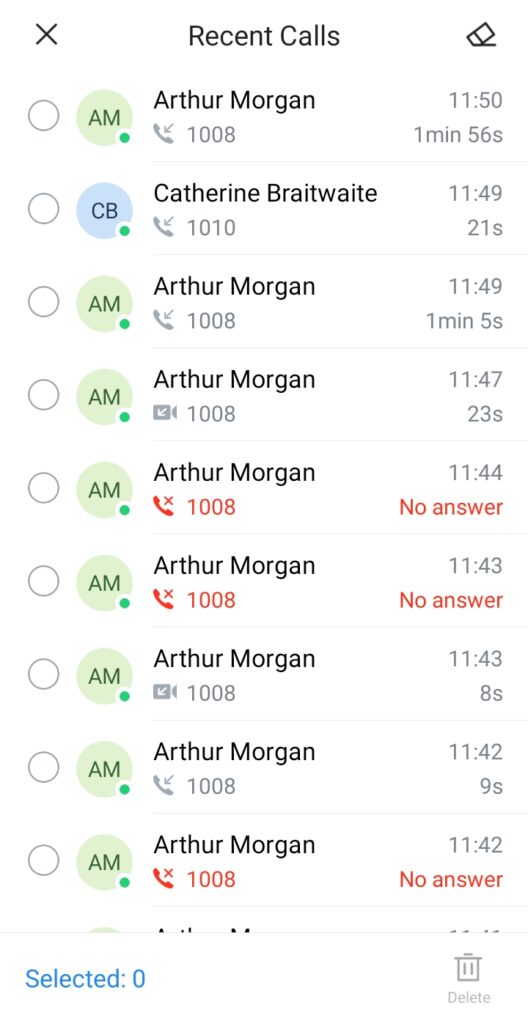
Select the entries that you want to delete and then tap on ![]() . To delete all the entries, tap
. To delete all the entries, tap ![]()
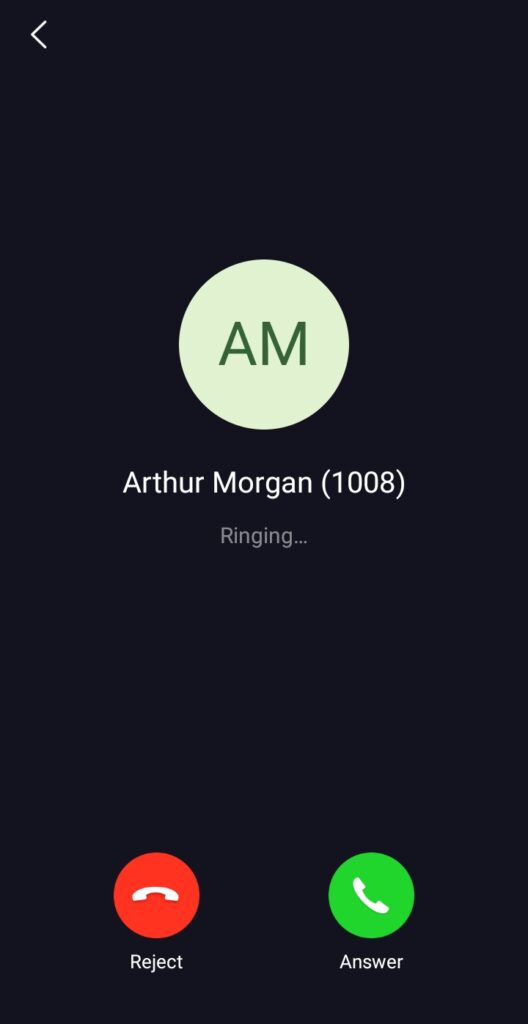
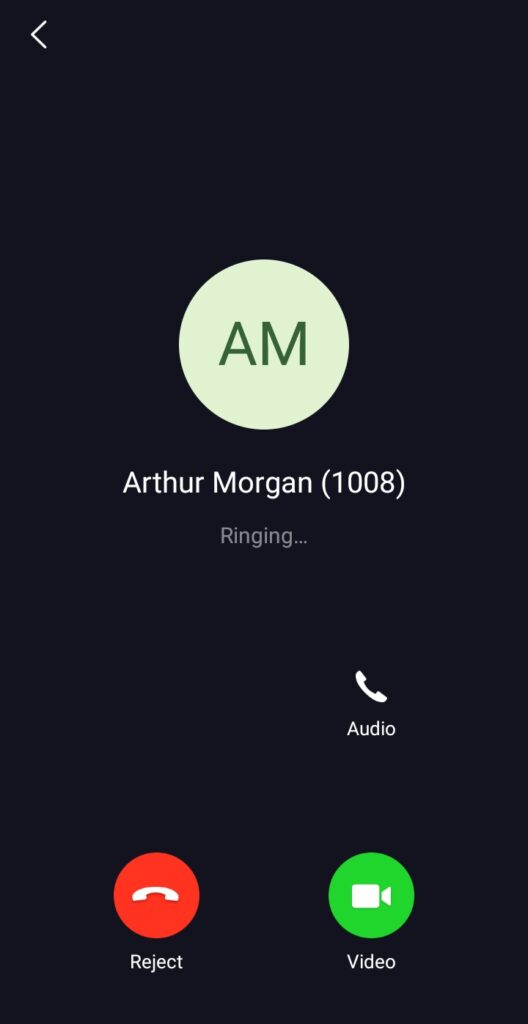
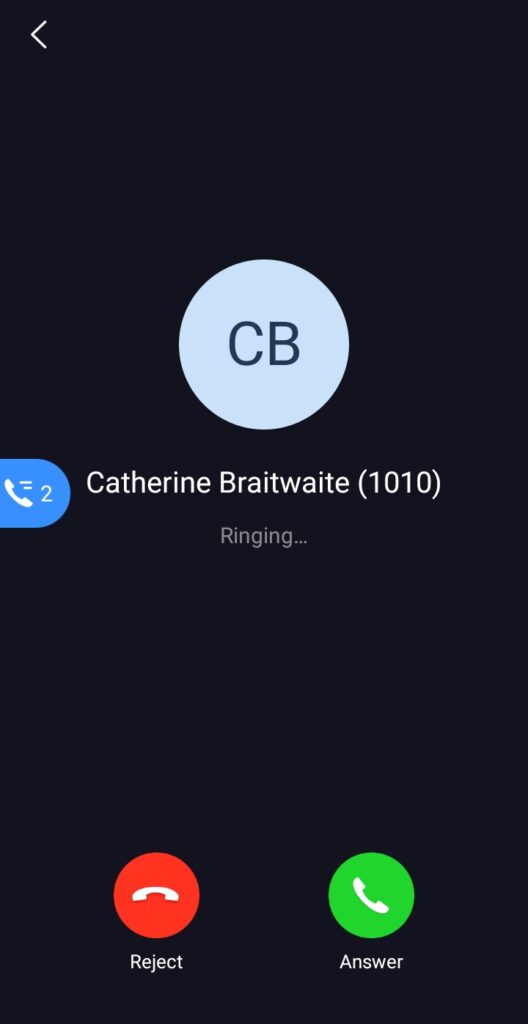
Answering a Call
While Wave is running in the background, incoming calls will ring the device and bring up the following screen shown in the images.
- For incoming audio calls, users can tap on
 to answer the call, or tap on
 to reject it.
 - For incoming video calls, an additional button
 is available to answer the call with video on.
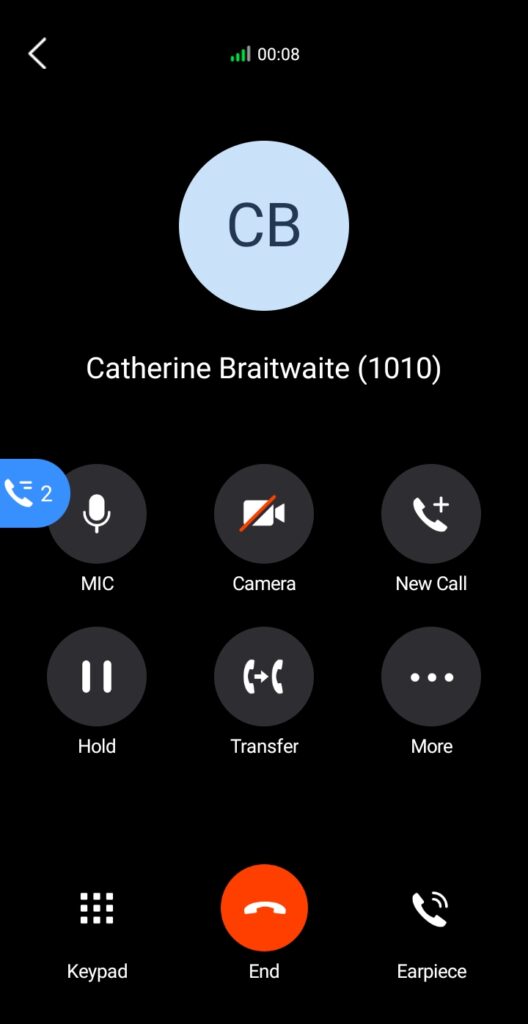
During a Call
During a call, users can hold/unhold the call, mute/unmute, bring up the dial pad to enter DTMF, switch audio channel and etc.
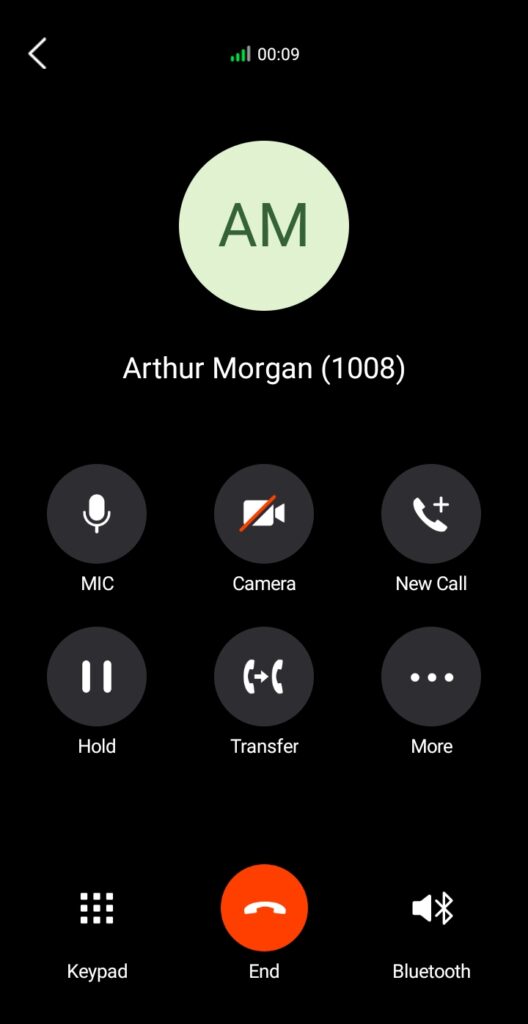
 Use speaker as audio channel. User can select to switch to earpiece, wired headset or Bluetooth headset.
 Use earpiece as audio channel. User can select to switch to speaker, wired headset or Bluetooth headset.
 End call:Tap to end the current call.
 Mute/unmute:Click to mute or unmute.
 Video on/off: After tapping on enable video, a video invitation will be sent to the remote party. If the remote party accepts, video feeds for both parties will be displayed.
 N-way conference. Click to add participants into conference.
 Hold/unhold: Tap on hold a call or retrieve a held call.
 Transfer: Click to transfer the call. Blind transfer and attended transfer are supported.
 DTMF: Tap to bring up dial pad and enter DTMF.
Call Waiting
Wave application supports call waiting; users can receive multiple calls at the same and switch between calls by following the below steps:
Step1: During a call, user receives a second call and answer it.
Step2: Click on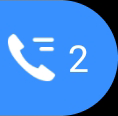 to switch to the other call.
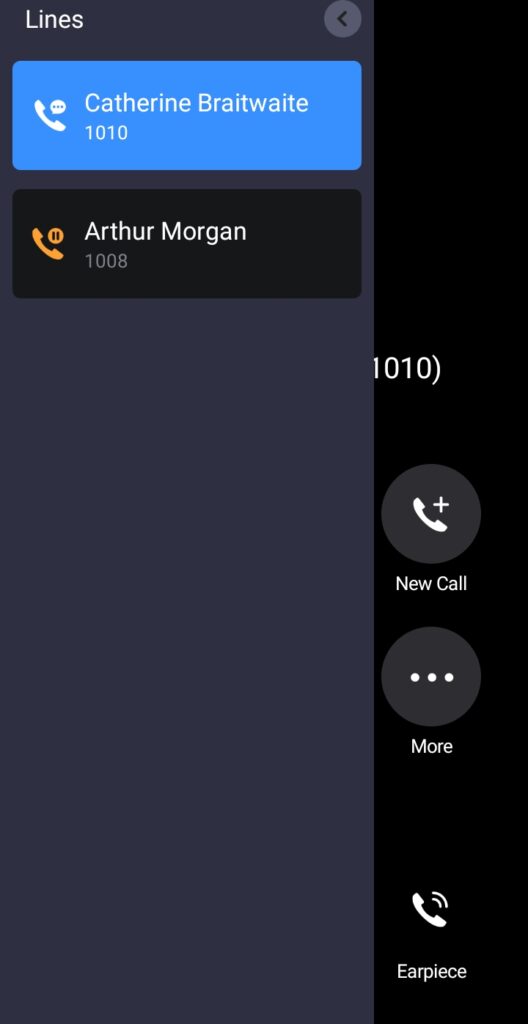
Hold/Unhold and Multiple Lines
Wave Mobile application supports up to 6 simultaneous lines. The user can hold each call or switch between them.
Step 1: During a call, tap on 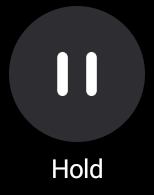 to put the call on hold.
Step 2: Tap on to resume the call
Step 3: The user can click the button to switch the call to the other line.
Mute
Step 1: During the call, tap on the Mute button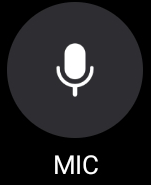 to mute your microphone. The remote party will no longer be able to hear you.
Step 2: Tap the unmute button 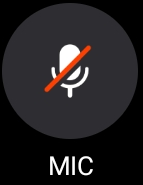 to unmute your microphone.
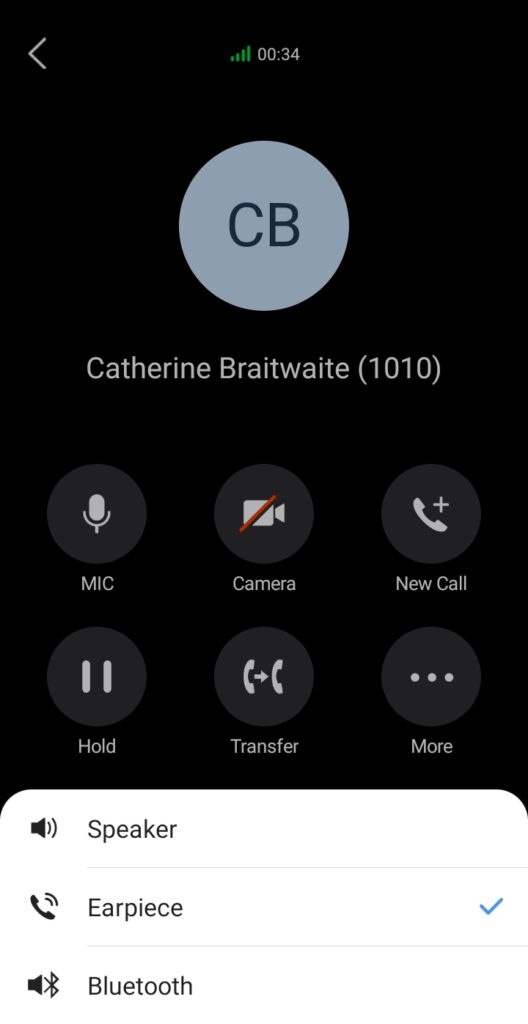
Switching Audio Channel
Wave Mobile application supports changing audio channel during calls. To perform this action, tap on ![]() icon at the top right corner of the application to bring up audio channel selections. The following options will be available:
icon at the top right corner of the application to bring up audio channel selections. The following options will be available:
 Use Bluetooth headset.
 Use wired headset.
 Use phone earpiece.
 Use phone speaker.
Missed Call
Missed calls will be indicated in the call log with the extension number highlighted in red with missed call icon right next to it![]()
Call Transfer
Wave app supports transferring calls from one party to another party. Blind transfer and attended transfer are supported. To initiate a transfer please refer to the screenshots below; and to understand how each type of transfer works, please refer to their respective sections below.
Step 1: Tap “Transfer” to initiate the transfer process
Step 2: Either enter an extension number or select a contact from the list of contacts.
If you entered an extension number, please select the type of transfer that you want to perform by clicking either ![]() or
or ![]() To start the transfer.
To start the transfer.

If you select a contact from the list of contacts, a menu will appear to select the type of transfer that the user desires to initiate.
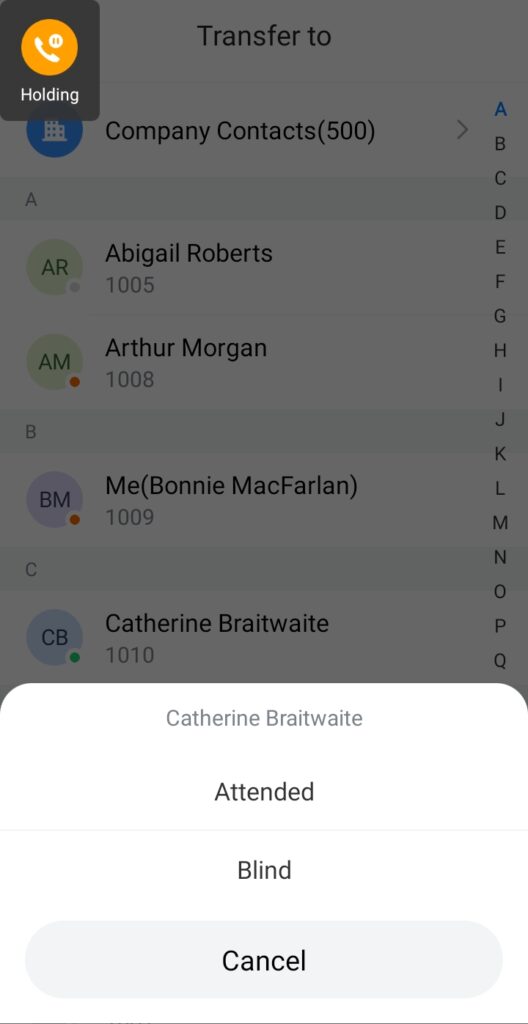
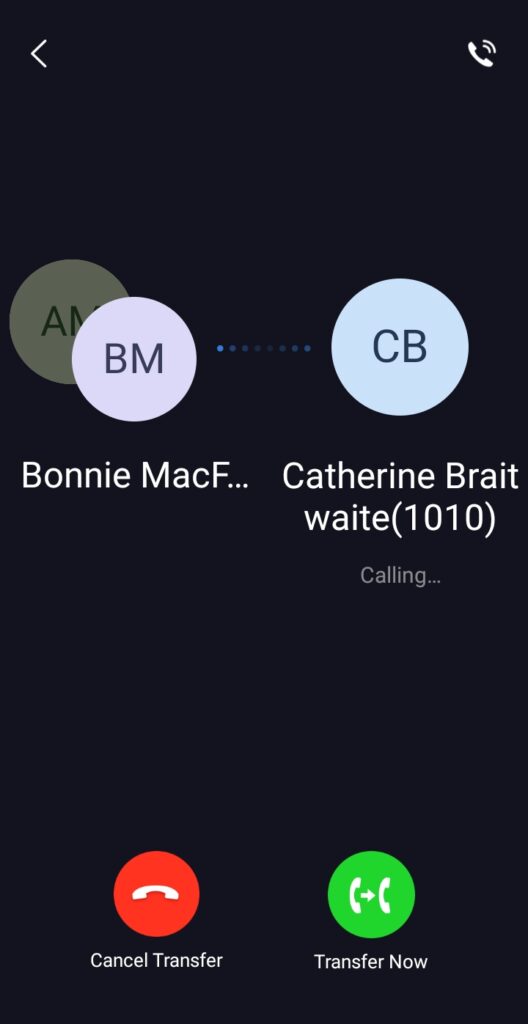
Step 3: As an example, we have picked Attended transfer, the user can either wait until the contact that the call transferred to picks up the call, or he can tap “Transfer now” to transfer and leave the call even before the contact transferred to picks up the call.
Blind Transfer
Step 1: Establish a call between User A and User B.
Step 2: Tap “Transfer” button.
Step 3: User A enters User C’s number to transfer the call to, then press “Attended” to transfer the call.
Step 4: User C rings. User B will be put on hold.
Step 5: If User C answers, the call between User A and User C will be established. User A can press END call button to complete the call transfer. The call is established between User B and User C.
Step 6: If User C does not answer the call, User C will continue ringing. Now User A can press END call button to complete the call transfer. When User C answers, the call will be established between User B and User C.
Attended Transfer
Step 1: Establish a call between User A and User B.
Step 2: Tap “Transfer” button.
Step 3: User A enters User C’s number to transfer the call to, then press “Attended” to transfer the call.
Step 4: User C rings. User B will be put on hold.
Step 5: If User C answers, the call between User A and User C will be established. User A can press END call button to complete call transfer. The call is established between User B and User C.
Step 6: If User C does not answer the call, User C will continue ringing. Now User A can press END call button to complete call transfer. When User C answers, the call will be established between User B and User C.
N-Way Conference
N-Way Conference allows users to add multiples parties to a conference call. No access codes are required. Below are the steps to follow:
Step 1: Dial or receive a call from the first party and accept the call.
Step 2: Tap “More” button.
Step 3: Select option “N-way conference”.
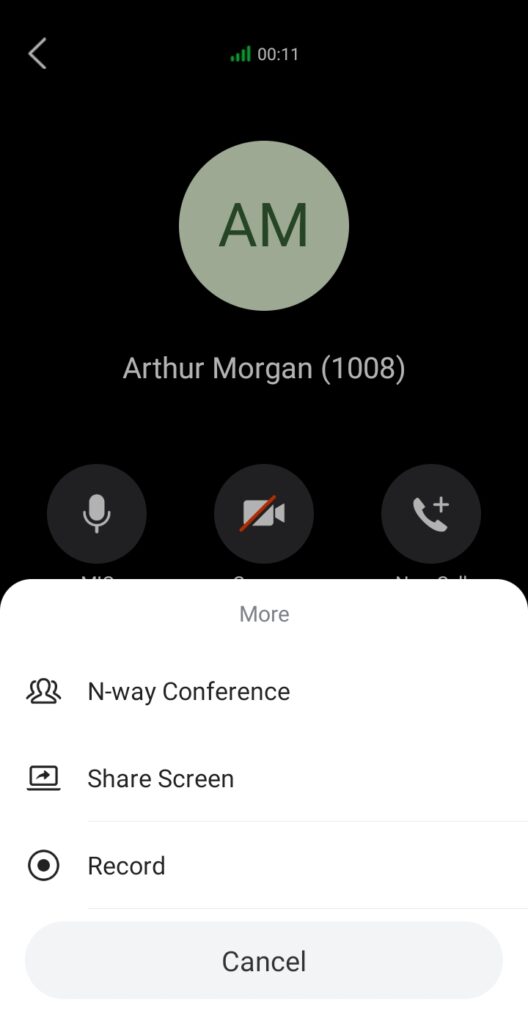
Step 4: The user will be redirected to the conference page where he can add more participants.
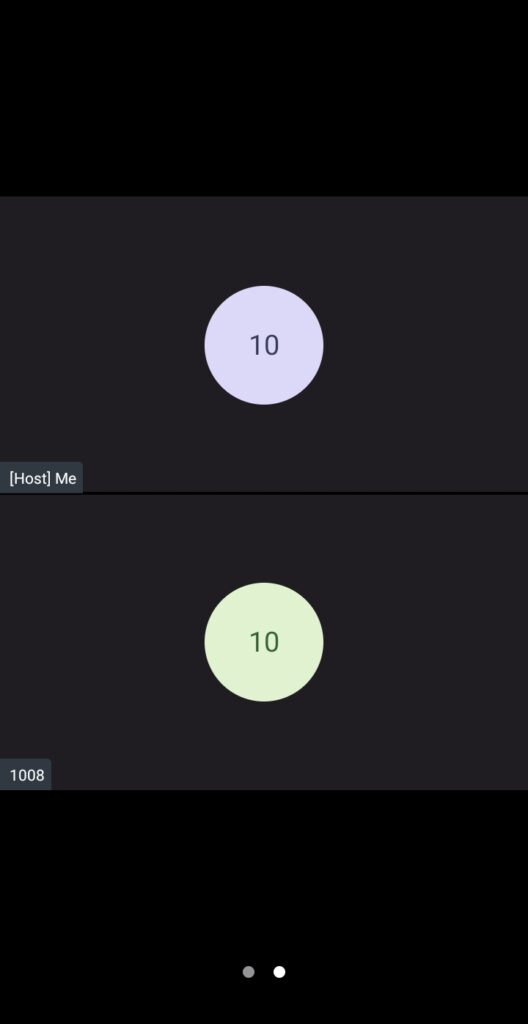
Step 5: To add more participants, click on ![]() then on
then on ![]() to bring more people to the call.
to bring more people to the call.
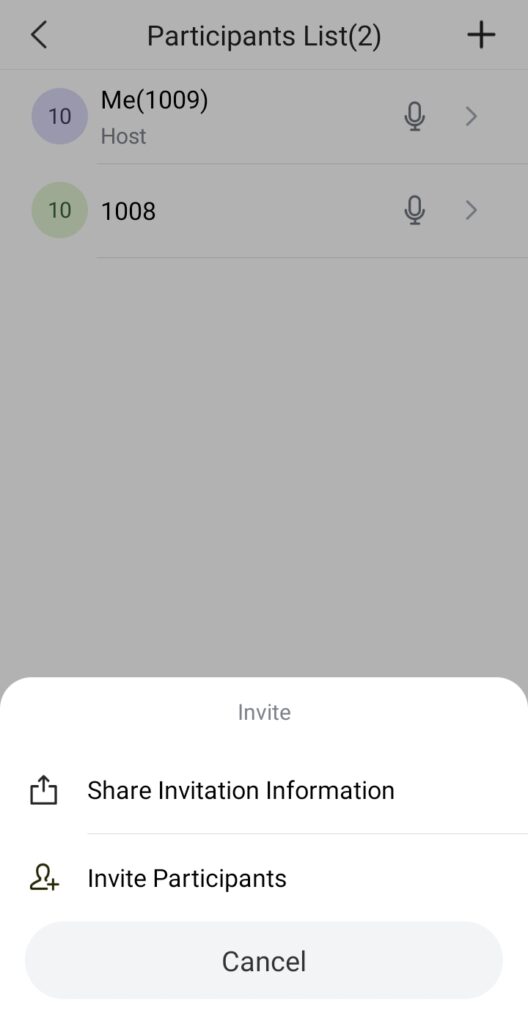
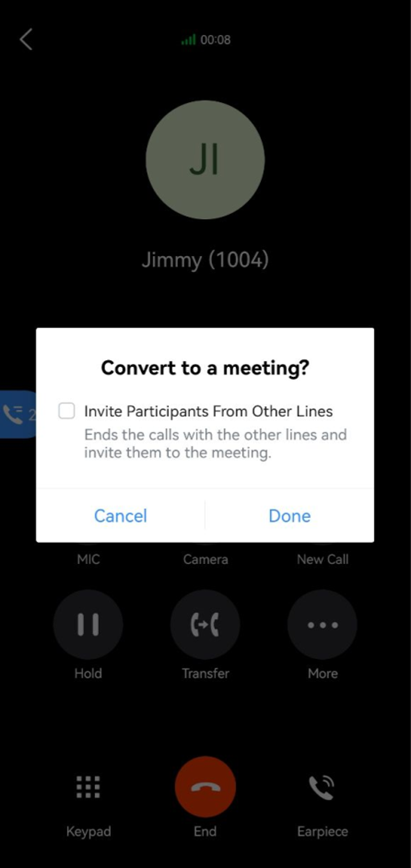
Step 6: Then select “Invite Participants”.
If there are calls already established on multiple lines, the user can quickly merge all the calls into one meeting by clicking on “N-way Conference” button. Once click, it will prompt to whether to invite all the other members from other lines, select that option then click “Done“.
Call Flip Function
Wave Desktop/Mobile/Web client and other desk phones can switch the ongoing calls between each client. For example, Wave mobile app and Wave Desktop client both have account 1003 logged in, and if the Wave mobile app user establishes the call between 1003 and 1004, the user can also transfer the active call to the Wave Desktop client, and the account 1004 owner will not notice that. Btw, if the user is using the desk phone, the user can dial *46 to implement the call flip function.
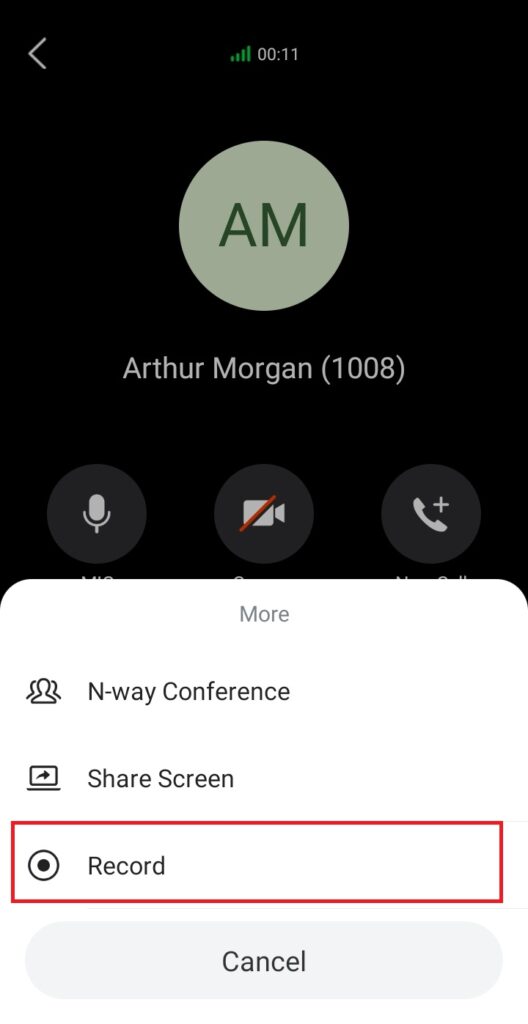
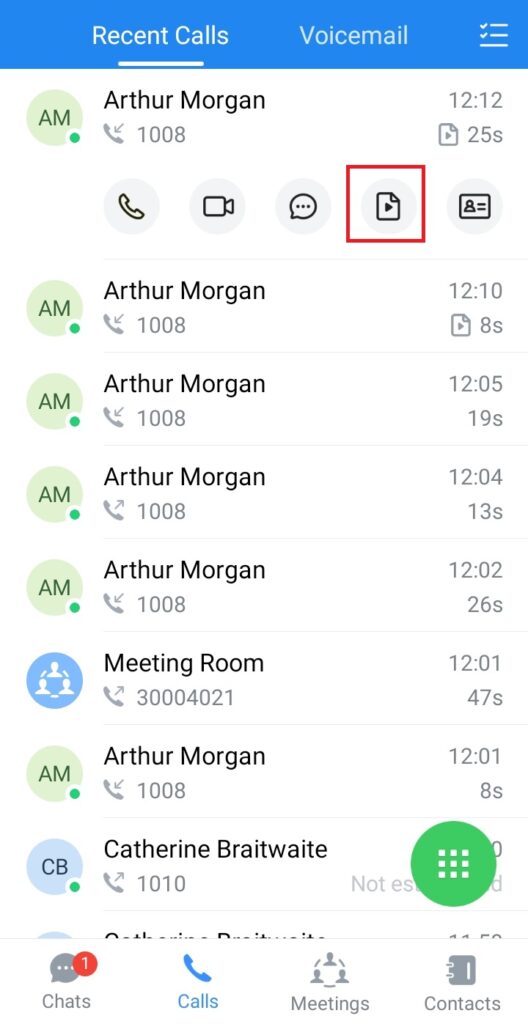
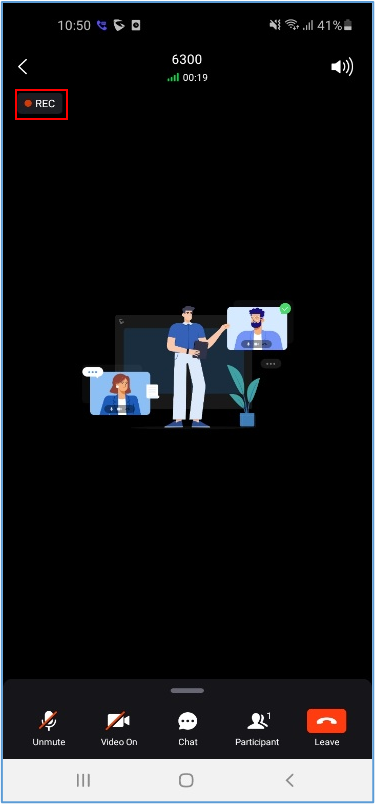
Record an Ongoing Call
The user can record a call even if the call has already started. To do that, swipe up from the bottom side of the screen to bring the options menu, then tap the recording button ![]() during the call to start recording the call. Once the call is ended, the user can click
during the call to start recording the call. Once the call is ended, the user can click ![]() button to view the recording files on the call history interface. Please see the screenshots below:
button to view the recording files on the call history interface. Please see the screenshots below:
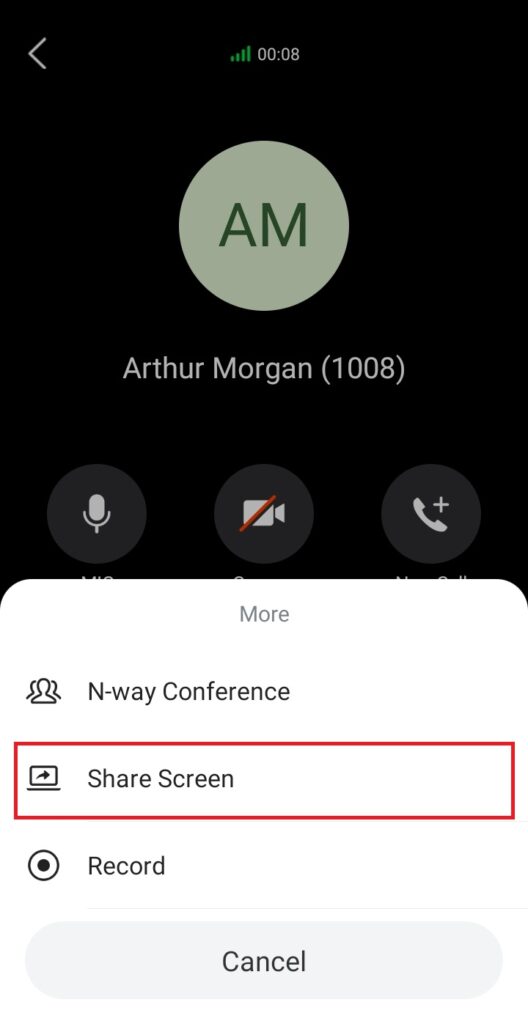
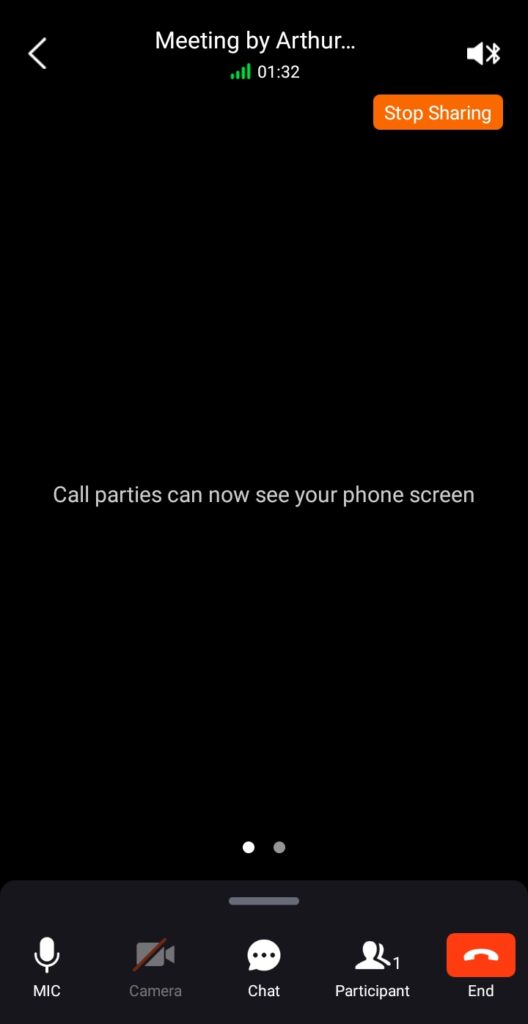
Screen Sharing
Using Wave mobile, the user can share the screen of his/her mobile phone for other users in one-to-one call or in a meeting. To do that, the user should swipe the contextual menu to reveal more options and select “Share Screen” as shown in the screenshot below:
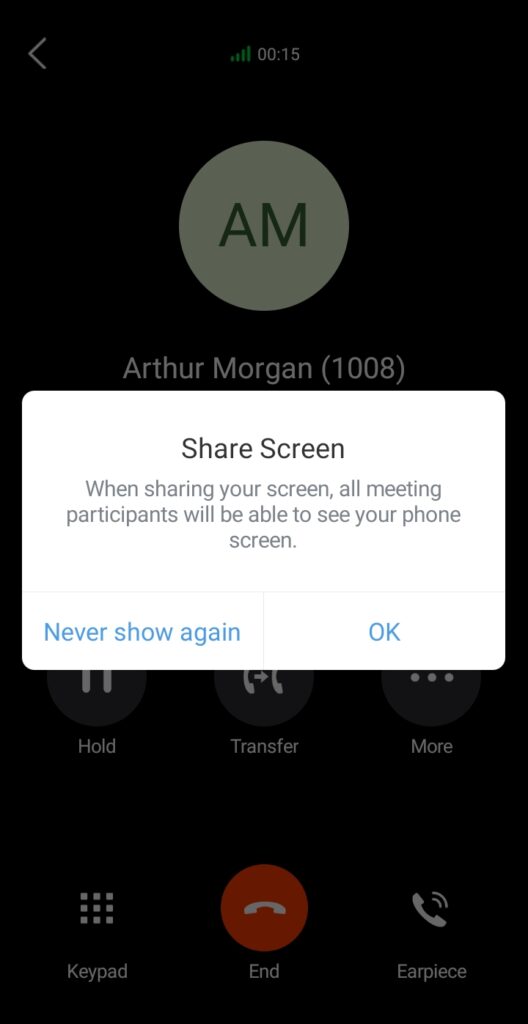
A prompt will appear telling the user that everyone in the meeting/call will be able to see the screen of the user. Click “OK” to confirm that you want to share the screen with the other users.
Then the screen-sharing will immediately start
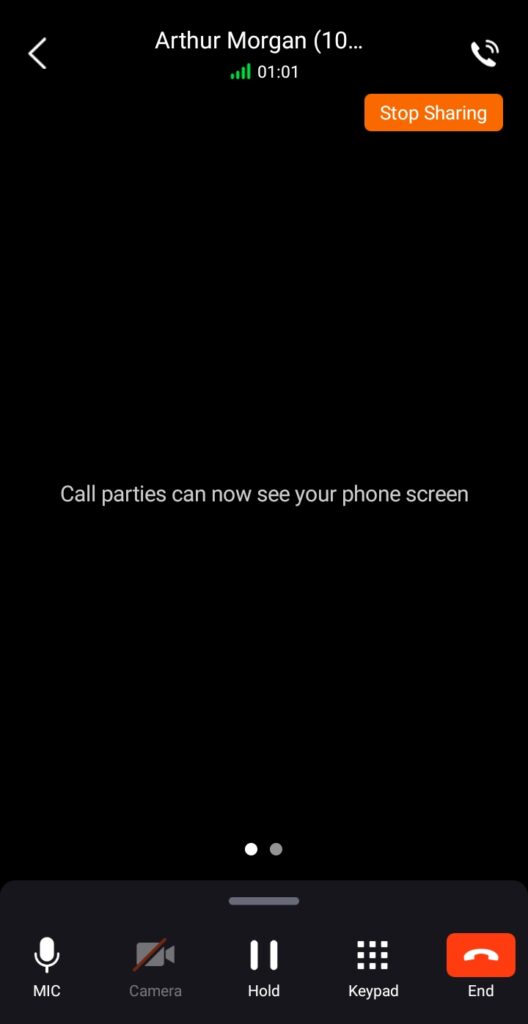
To end the screen-sharing please click on  .
.
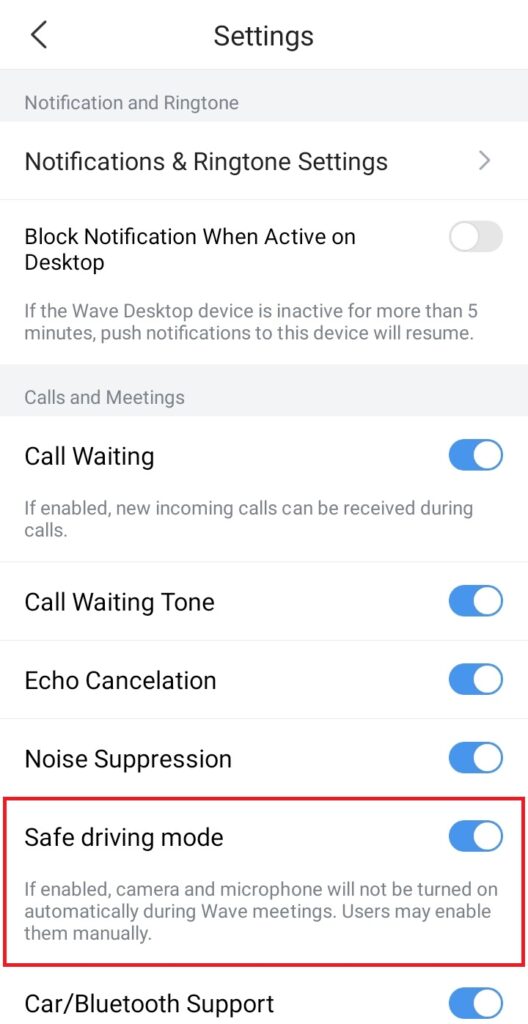
Safe Driving Mode
Wave has a safe driving mode which enables a reduced user interface to make it easier to access the main controls of Wave call/meeting. This feature has been introduced to remove any kind of distractions from Wave user interface. The camera will be turned off by default while this mode is enabled, and the user can use the button shown in the screenshot below to unmute and mute themself.
In the Wave meeting, the user can slide the meeting UI to the left side to access the safe driving mode. Please see the screenshot below:
Please make sure that safe driving mode has been enabled first by going to Wave settings as the screen below shows:
CHAT
Wave application supports single chat, group chat and meeting chat.
Single chat
In order to start single chat with a user, please follow the steps below:
Step 1: Go under Chats page and click on ![]()
Step 4: Start chatting.
Step 2: Select the type of contacts repertoire.
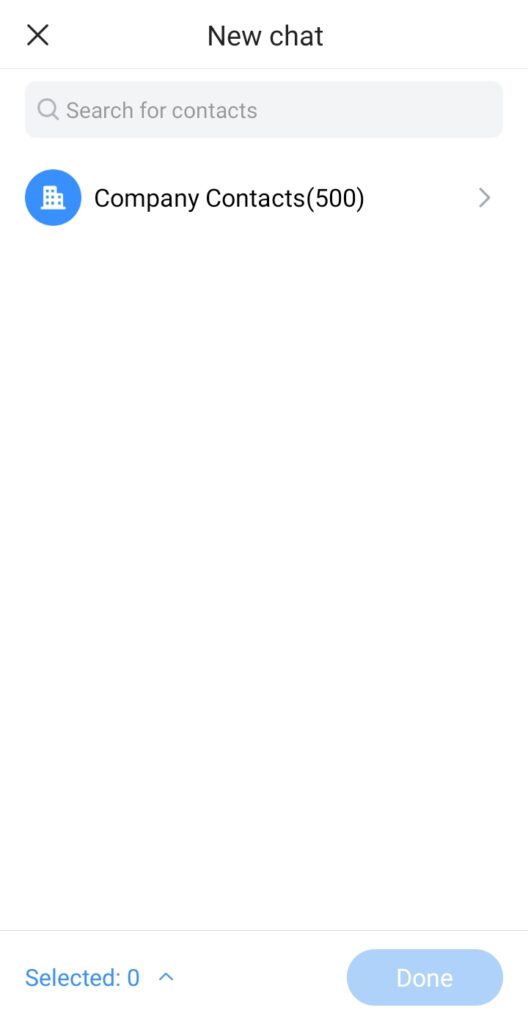
Step 3: Select a contact to send a message to, then click “OK”.
When a message is delivered, a small icon will appear next to the message ![]() . When the user reads the message, Wave will indicate that by showing a small icon
. When the user reads the message, Wave will indicate that by showing a small icon ![]() .
.
To delete a single chat, please tap and hold the chat you wish to delete, then tap Delete Chat.
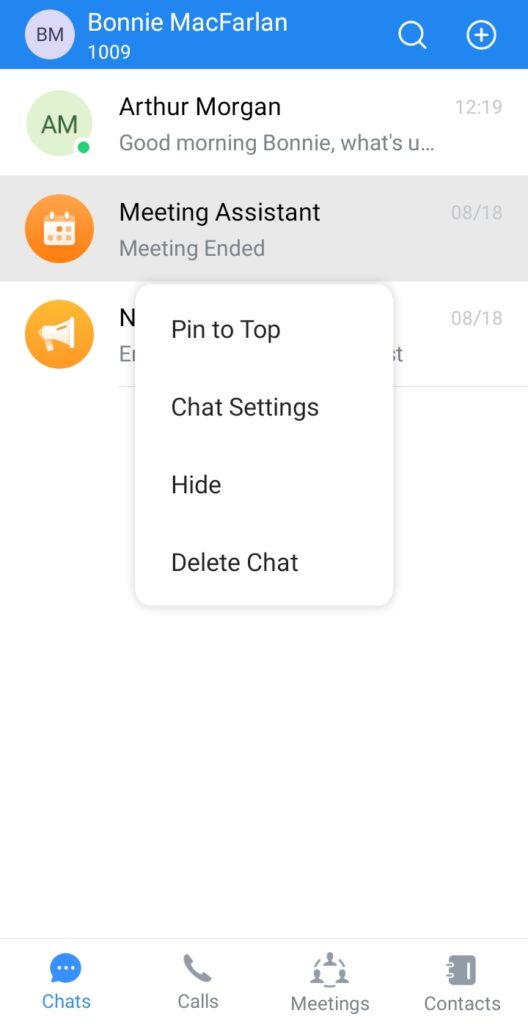
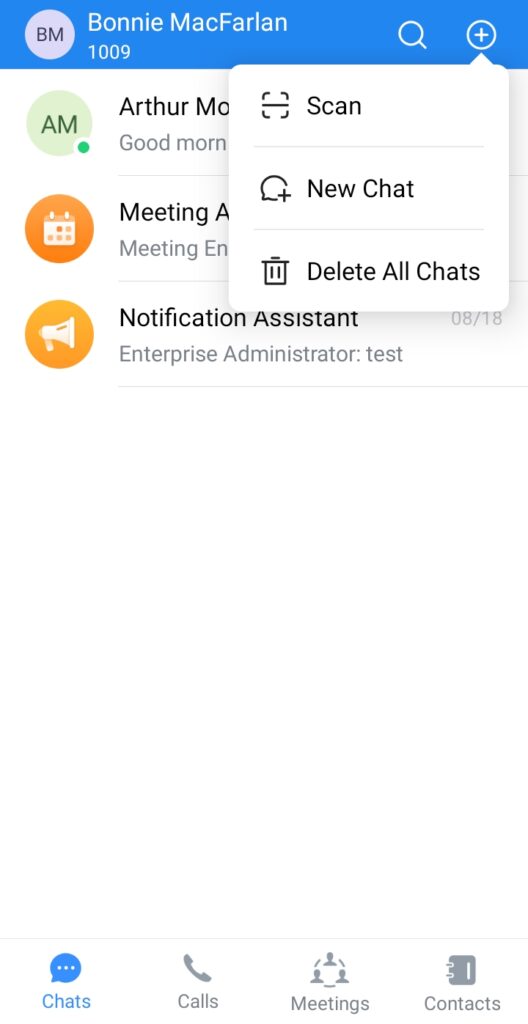
To delete all the chats at once, please tap on the plus icon on the top right corner of the screen. Then select Delete All Chats.
End to End Encryption Chat
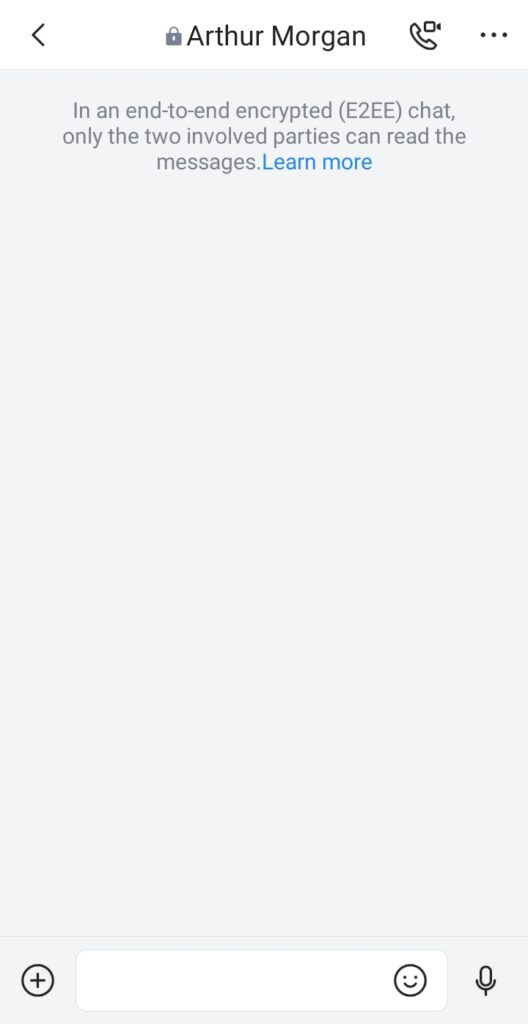
Wave supports end-to-end encryption which encrypts the messages from the terminal sending the messages and decrypts the message once it reaches the recipient’s terminal. This protects the confidentiality of the messages exchanged; this includes all the type of messages exchanged, text messages, images, documents and files, voice recordings etc… Wave uses advanced asymmetric encryption technology to ensure that nobody, other than the two involved parties, can read the messages.
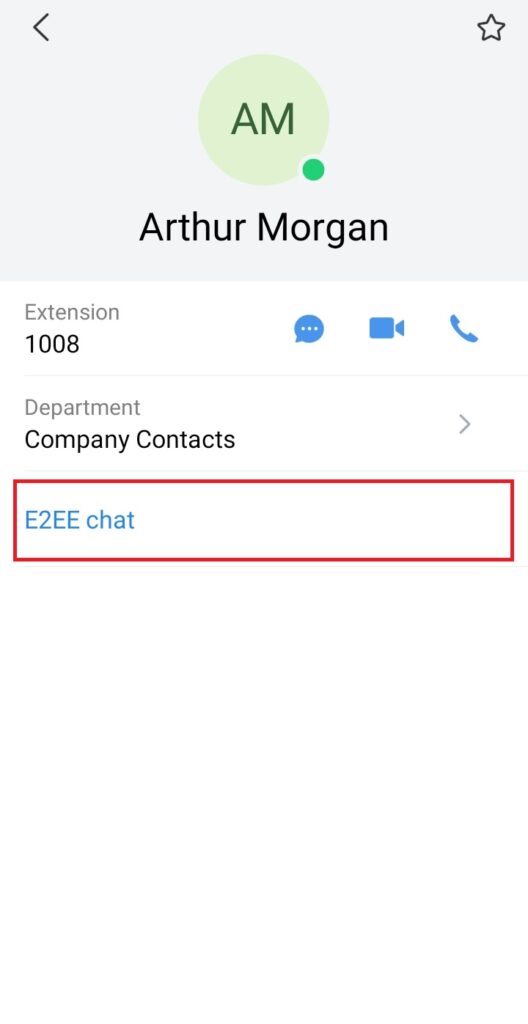
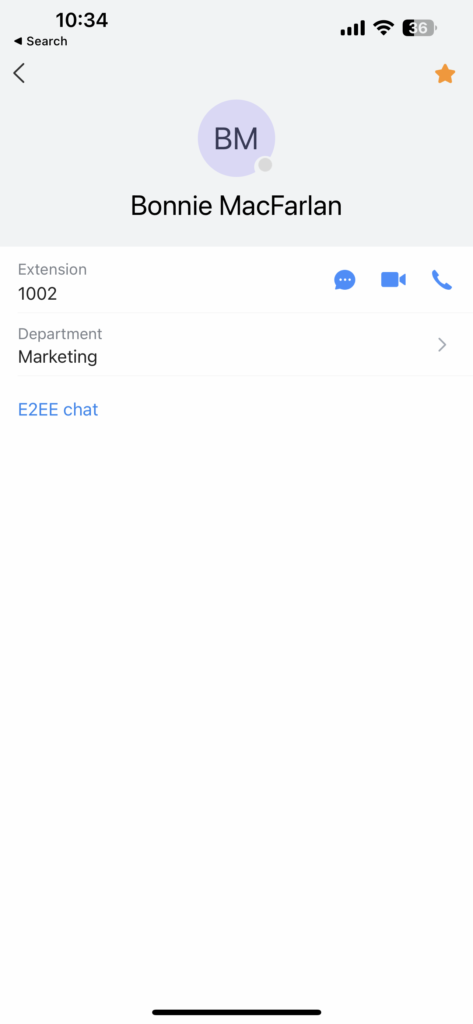
To start a single end-to-end encrypted chat please go to Contacts then select the contact you wish to message. Then click on ![]() and select E2EE chat as shown below in the screenshot.
and select E2EE chat as shown below in the screenshot.
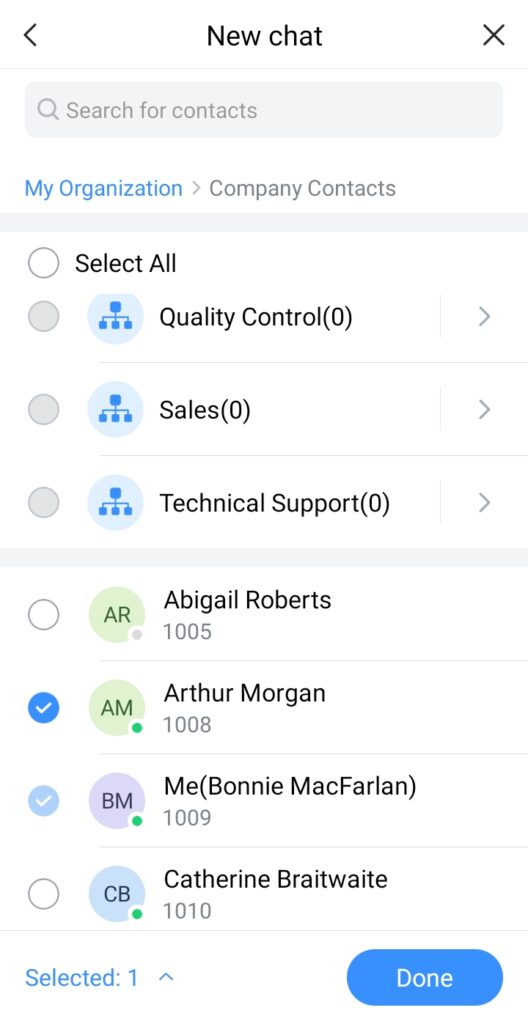
Group Chat
In order to Chat with multiple contacts at the same time, please follow the steps below:
Step 1: Go under Chats page and click on ![]()
Step 2: Select the contact repertoire.
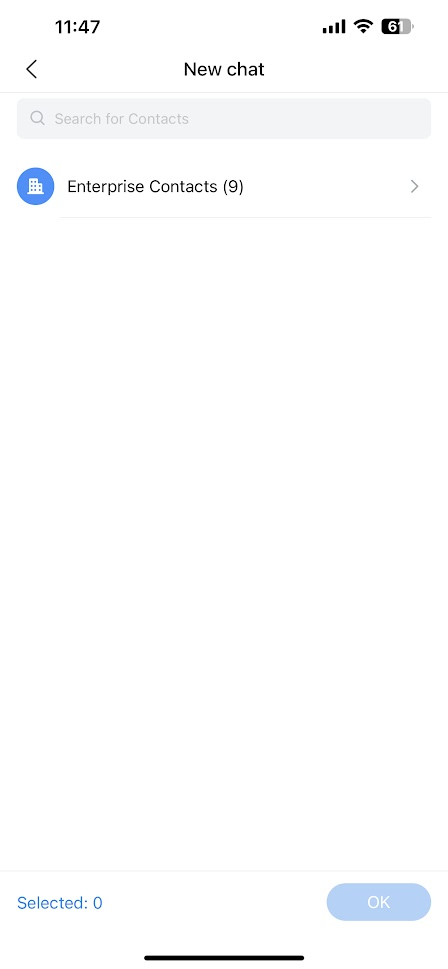
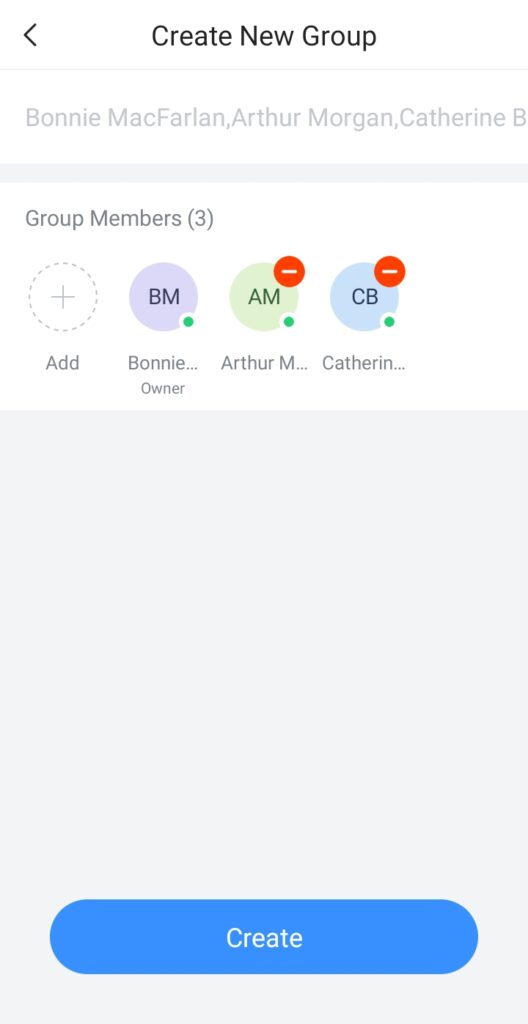
Step 3: Select the departments or the contacts that you wish to message in a group chat.

Step 4: Set a name for the group. Then click Create.
Step 5: Start chatting.
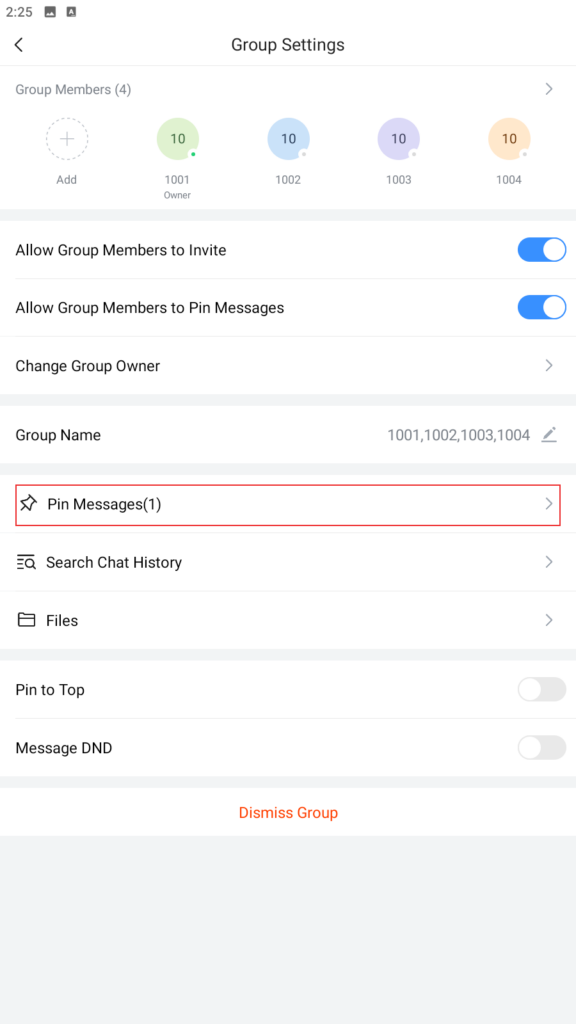
The chat group creator can access the group’s setting to allow or prohibit other user from inviting other members, as the screenshot below shows.
In the point-to-point chat and group chat, users can view the files list.
Click the button ![]() at the right upper corner of the interface to access to group settings interface.
at the right upper corner of the interface to access to group settings interface.

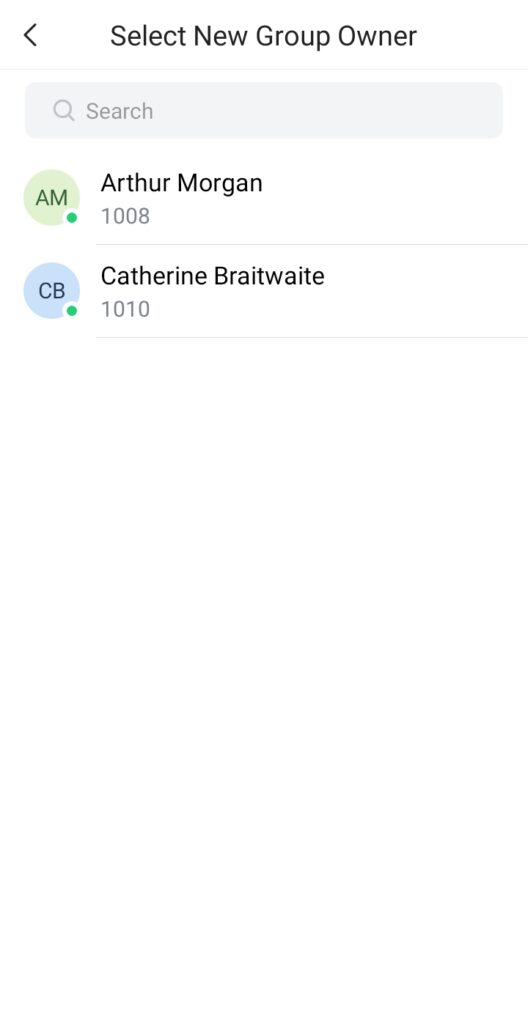
At any point the group owner can relegate his/her role to another member of the group, to do that please refer to the steps below:
Step 1: Click on the three dots at the top right corner of the application, then select “Change Group Owner”.
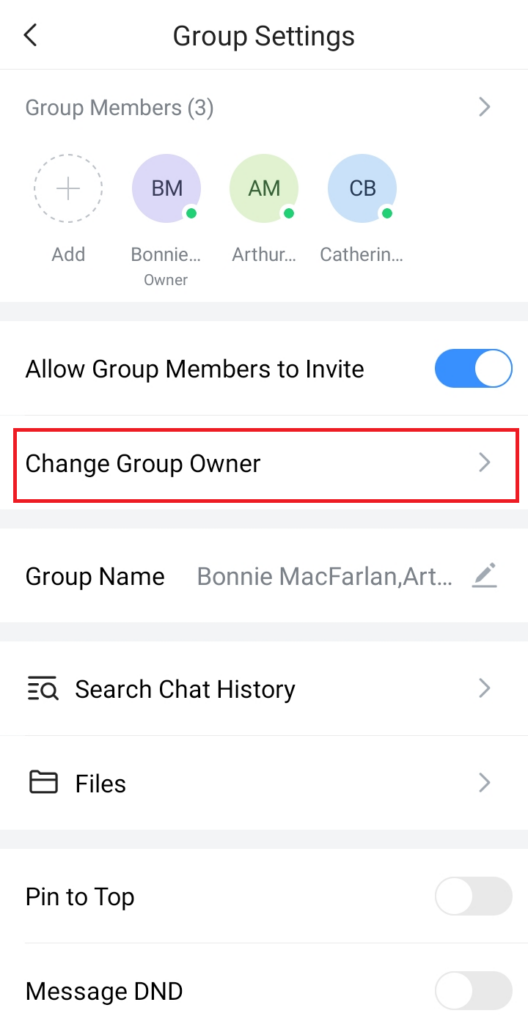
Step 2: The select the member to whom you want to relegate the group chat host.
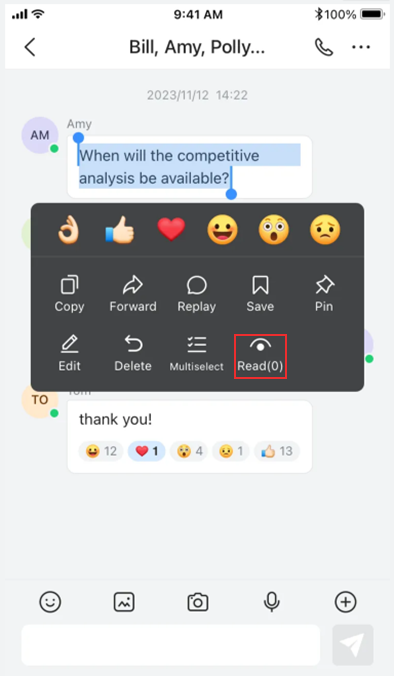
The message sender can view who has seen his/her message by tapping on the message then tapping on “Read” option to display the names of the users who have seen the message.
Meeting Chat
Participants can chat during audio/video meeting, by following steps below:
Step1: Start an audio/video meeting.
Step2: Click on  to initiate chatting with participants.
Step3: Start chatting.

Instant Messaging
In the chat interface, the application allows the user to send text, emoji, documents, voice messages and pictures.
- For the message contents in the chat interface, if the user long presses the contents, the user can copy/forward/reply/recall the contents/reply with emojis.
- Users can send quick replies with emojis. For example, if the user enters “[Smile]” in the chat window, the emoji 😀 will be shown directly.
- Users can record a short video for up to 15 seconds and send it to the current chat.
- Drag the chat window to the left, the user can pin/unpin/hide/set the group settings for the chatbox. If the user clicks the “Group Settings” button, the user can access the group settings interface to pin/unpin the chatbox and enable/disable DND for the new message notification.
- If the user has set the DND for the new message notification for the group chat, the new messages from the group will no longer be notified and reminded
Message Forwarding
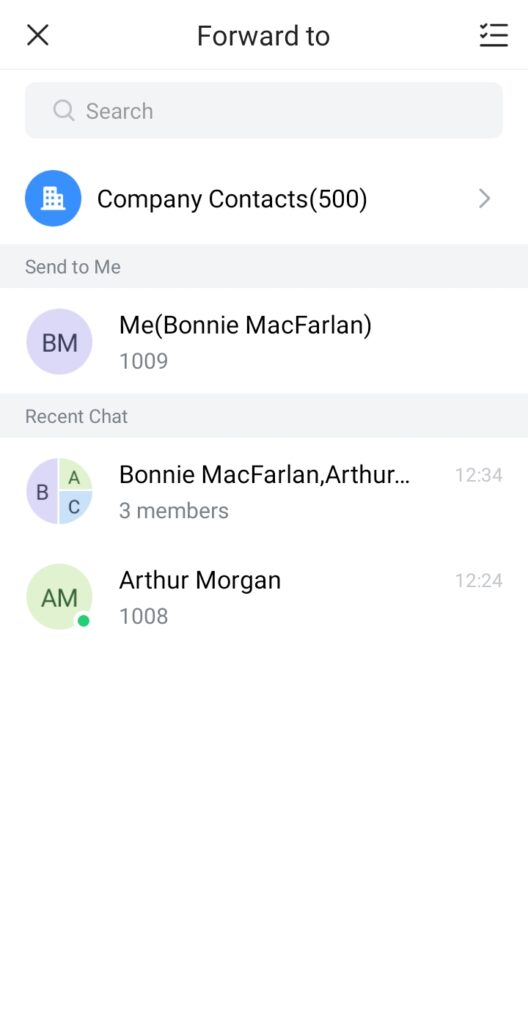
Wave allows forwarding one or multiple messages to one recipient or multiple recipients. Please follow the steps below.
Step 1: Long press the message that you want to send, then select Forward to forward one message. Or select Multi-choice to forward multiple messages.
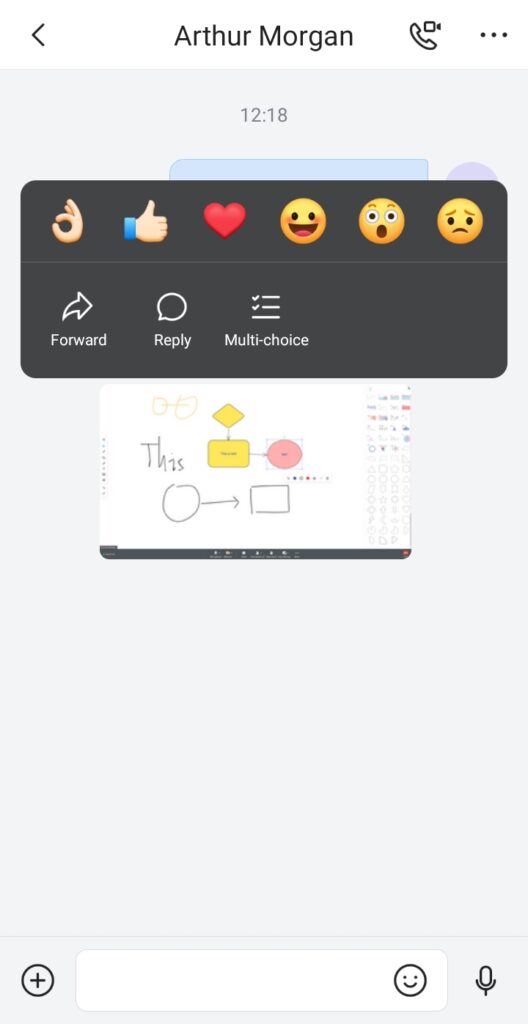
Step 2: Select the messages that you would like to forward then tap Forward one-by-one or Merge and Forward.
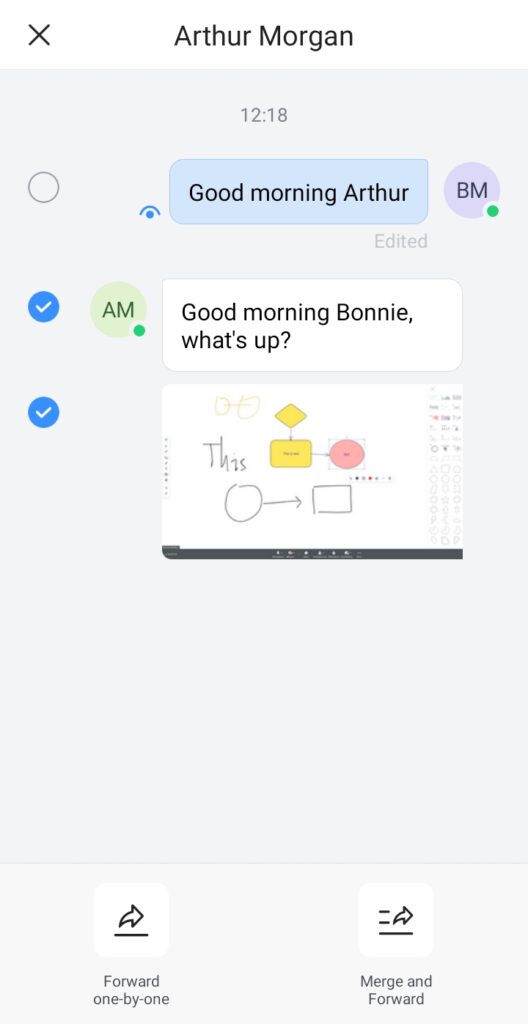
Step 3: Select one or multiple recipients of the forwarded messages.
Pin Message
Pin message feature allows the user to pin a message in a group for all the members of the group. To pin a message in group chat, press and hold the message, then a menu will appear, press “Pin” button ![]()
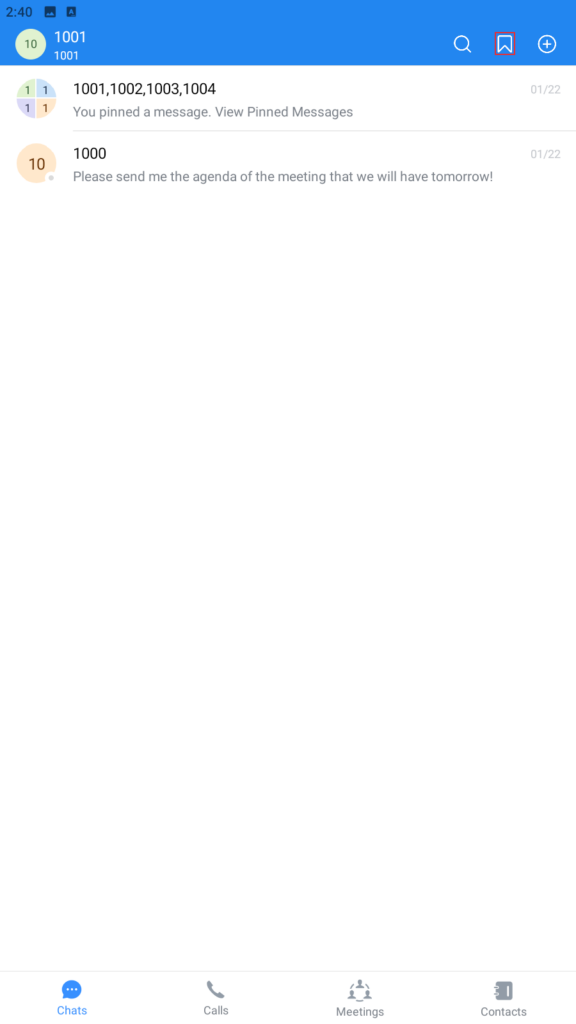
Once the message has been pinned, it will be displayed on the top of the group chat as shown in the figure below.
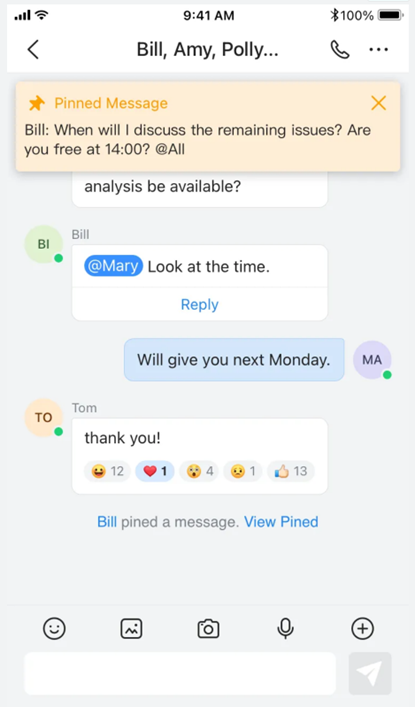
The user can view all the pinned message in a chat group, access the group settings using the three dots button on the top right corner of the conversation, then select “Pinned Messages“.
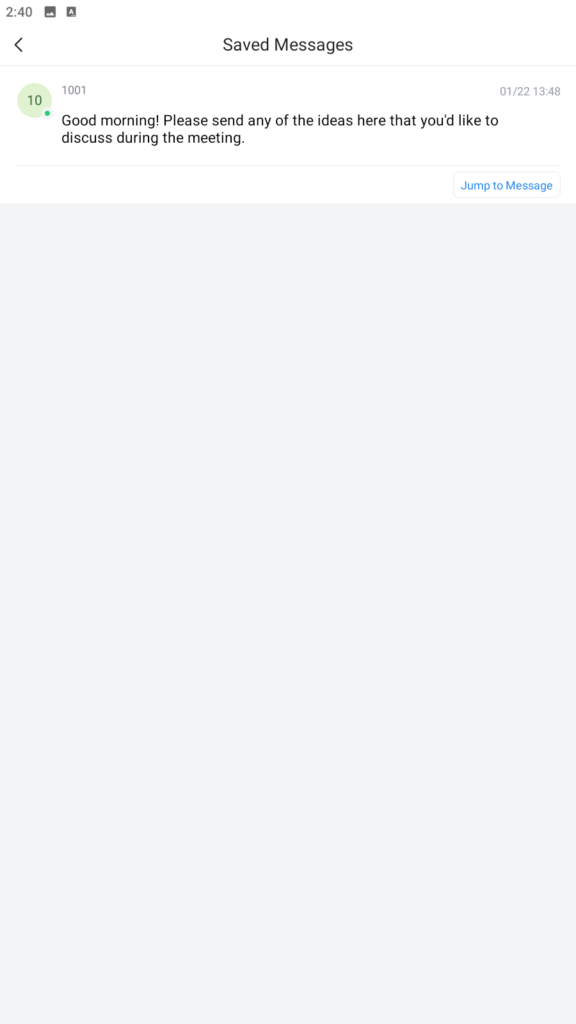
Save Message
To save a message from a specific discussion, you should press and hold the message you’d like to save, once the menu appears, tap on the save button ![]()
To view all the saved message, please click on the bookmark icon on top of the chat window, as show below.
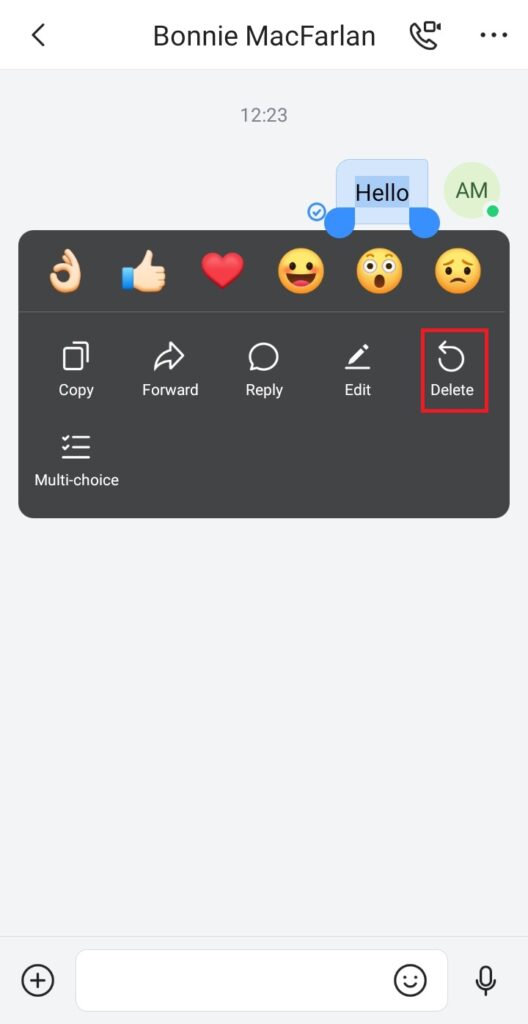
Delete Message
Step 1: In the chat interface, the user can select a message and long press on it then click “Delete” button to delete the message.
Step 2: After deleting the message, the remote party will delete the message synchronously.
Step 3: The deleted text can be re-edited by the user.
Note: After deleting the message, it will be deleted permanently, and the message cannot be recovered.
Voice Messages
Wave Mobile application supports recording and sending voice messages instantly in point-to-point chat or group chat. To use this feature please follow the instructions below
Step 1: Tap on the microphone icon in the chat window.
Step 2: Then tap and hold “Hold to Talk” to start recording
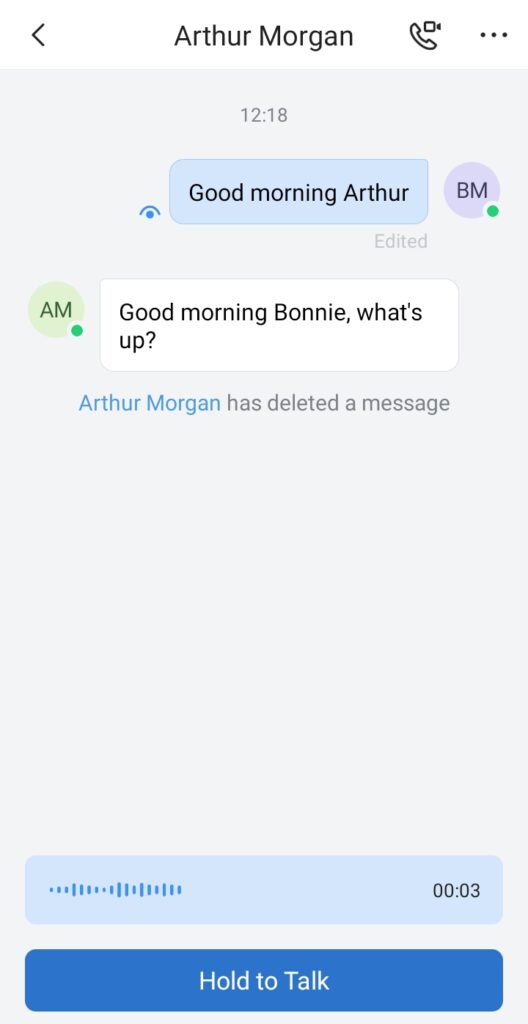
Step 3: Once your message has been recorded please tap on send message.
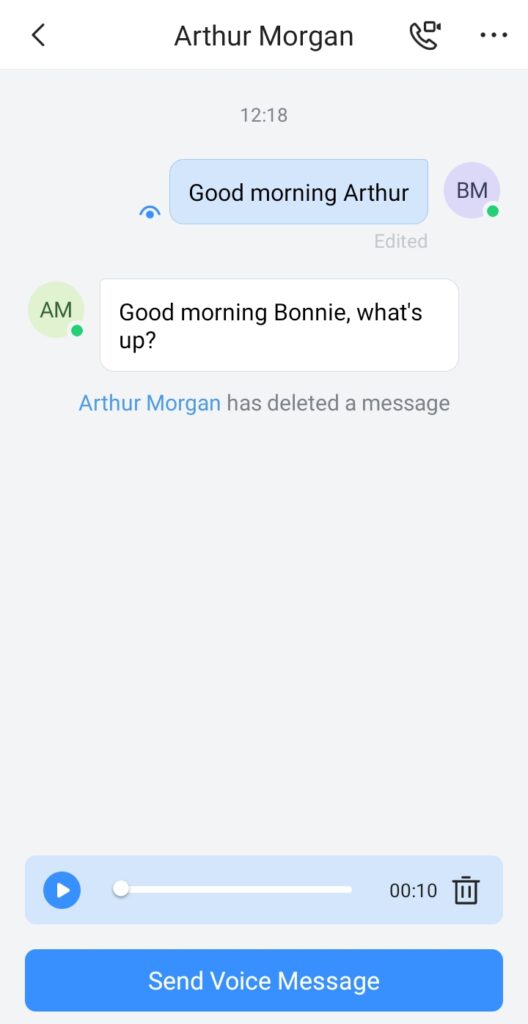
The voice note will be sent and it can be played be tapping the pay button.
Send an Image
You can also send an image to any contact or a group chat, to do so, tap the image icon as shown in the figure below:
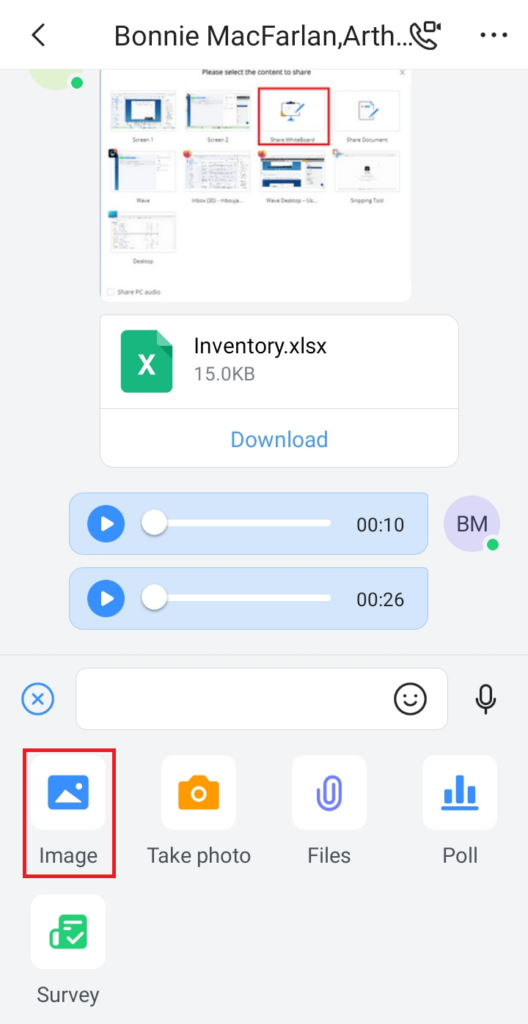
Then select an image and press send.
View an Image
To view an image in full screen on Wave, please tap to open the image.

When viewing an image, the user has three options on the bottom right of the screen.![]() : This button can be used to rotate the image clock-wise.
: This button can be used to rotate the image clock-wise.![]() : This button can be used to forward the image to another contact.
: This button can be used to forward the image to another contact.![]() : This button can be used to download the image to the smartphone.
: This button can be used to download the image to the smartphone.
Send a Link
You can also send a link to any contact or a group chat, to do so, just paste the link or type the link in the chat window.
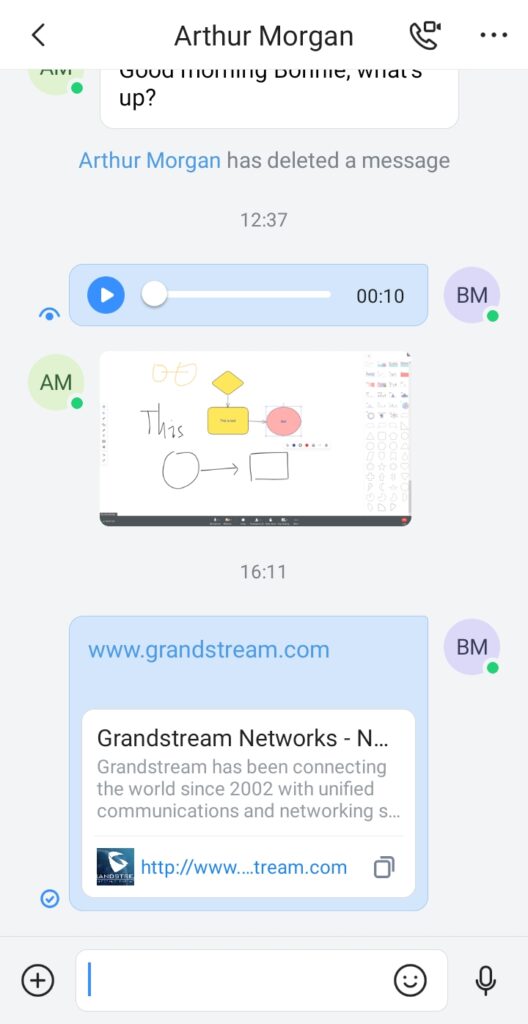
Preview link
You can preview links in chat messages, and you can click on a link in the Wave app to view the web page through a small popup window.
Group Settings
- In the group settings interface, the user can modify group name, add/delete group members, and leave/dismiss the group chat. The user can click the button
 at the right upper corner of the interface to access to group settings interface.
 - Modify Group Name: The user can click the group name to edit the group name.
- View All Group Members: The user can click “Group Members” option to view all group members.
- Delete Group Members: In the group member list, the user can long press a specific member icon and delete the group member. Only the group owner can operate.
- Add Group Member: The user can click button
 to add group members and select from the contacts.
 - Pin: The user can select this option and the current group chat window will be displayed at the top of the chat list.
- DND: The user can select this option and all new messages from this group chat will not be notified and reminded.
- Dismiss Group: The user can click this option to remove all members from the current group chat. All group chat history will be deleted. Only the group owner can operate.
- Leave Group: The group member can click to leave the group at any time and the group chat history will be deleted for this user.
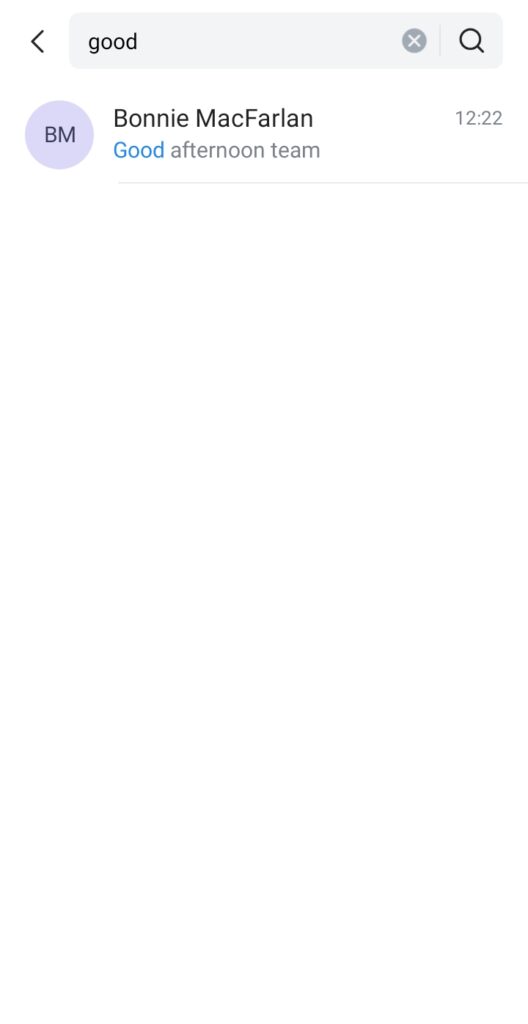
Search in a Chat History
Wave app allows searching within a discussion using keywords in order to find the information you are looking for and read the context in which it was relayed. To use the chat search functionality please follow the instruction below.
Step 1: Go to the conversation you wish to search in then tap on ![]() on the top right corner of the screen
on the top right corner of the screen
Step 2: Tap on “Search Chat History”
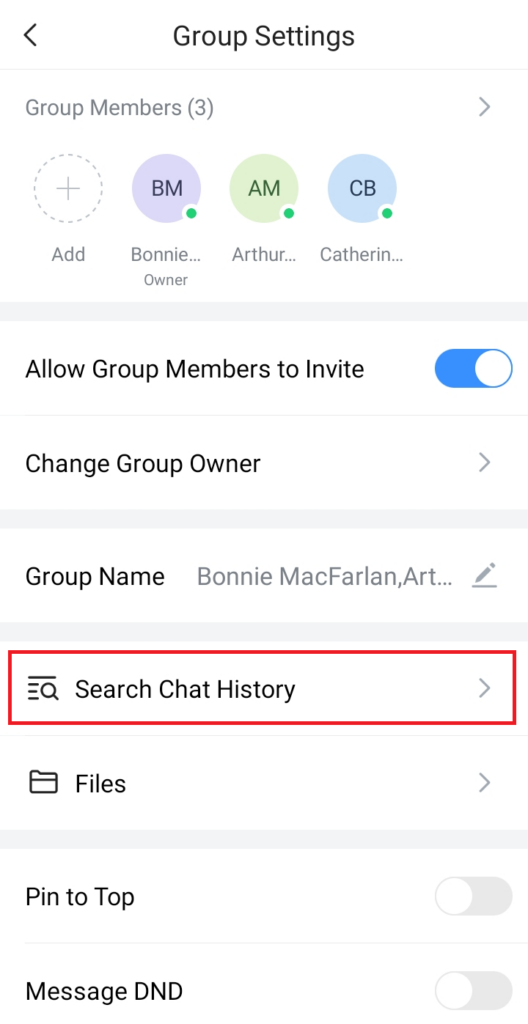
Step 3: In the search box, enter the keywords you’d like to search for, and the result will be displayed similarly to the screenshot below.
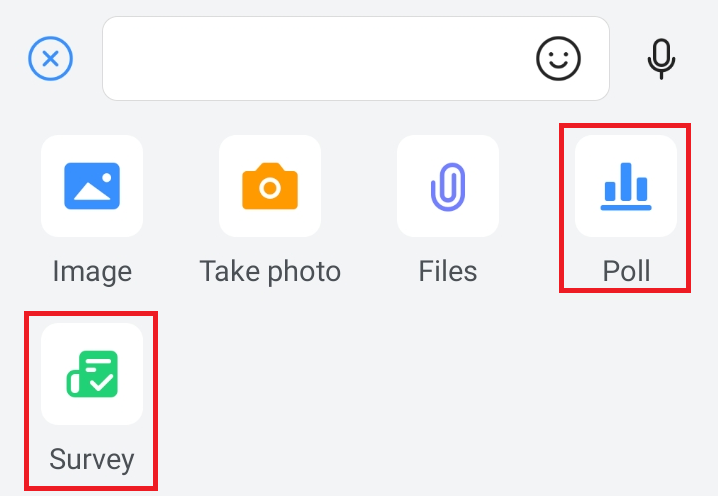
Create Poll/Survey
To create a poll or a survey, please tap on the plus button at the bottom right corner of the chat window.

Then choose either Poll or Survey.
- Create a Poll
To create a poll, tap  then click on
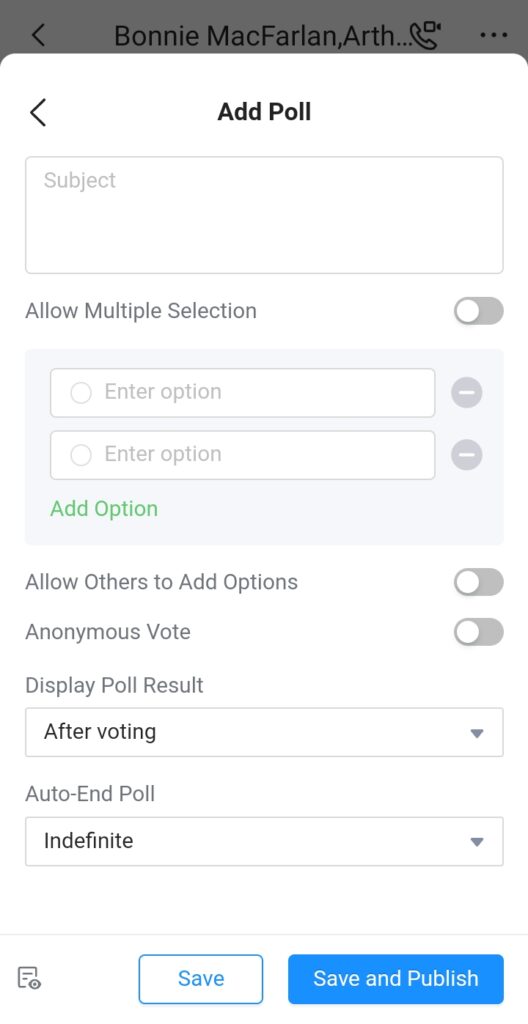
Enter the necessary information for the poll.
Subject | Enter the subject of the poll. |
Allow Multiple Selection | Allow voters to select multiple options when voting |
Add Option | Add an option to the poll. |
Allow Others to Add Options | Allow other users to add options when voting. |
Anonymous Vote | The voters names will not be displayed. |
Display Poll Result |
|
Auto-End Poll | This determines the time after which the poll will end. |
Then click on  to save the poll, or click on
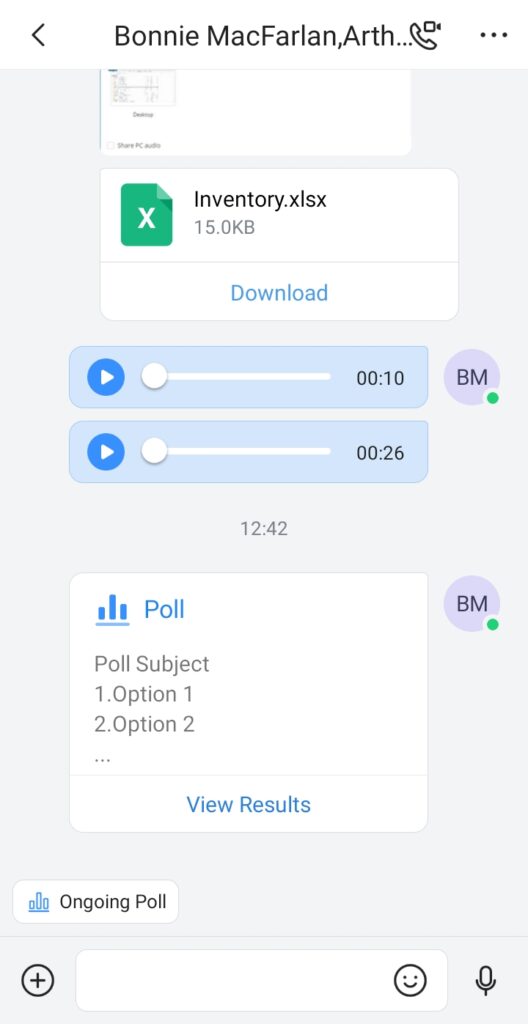
  to save and published the poll. The published poll will be posted to the conversation and will look like the following figure.
- Create a Survey
To create a Survey, please tap on 
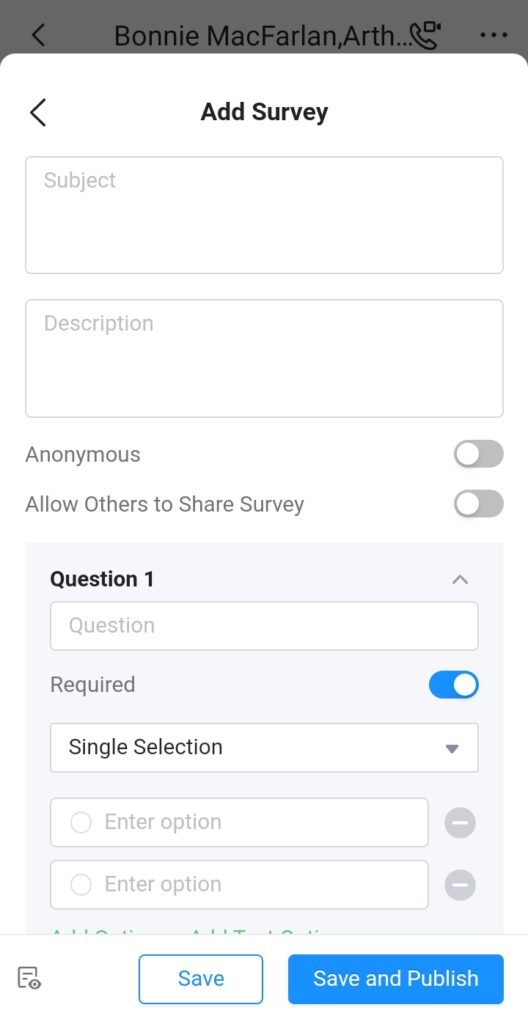
Subject | Enter the subject of the survey. |
Description | Enter a description for the survey. |
Anonymous | Toggle this option to hide the names of the participants of the survey. |
Allow Others to Share The Survey | Toggle this option on to allow the users to share this survey. |
Question | Enter a question |
Answer Type |
|
Add Question | Add more questions to the survey. |
- Stop a Poll/Survey
Step 1: To stop a poll or a survey, please click on your profile picture.
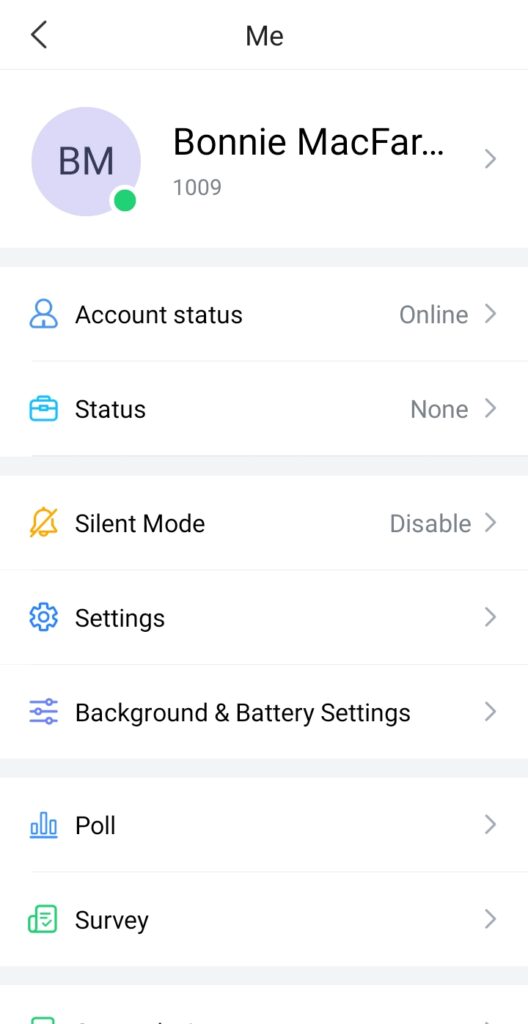
Step 2: Then tap on “Poll” or “Survey”. For the sake of this example, we will choose “Survey”.
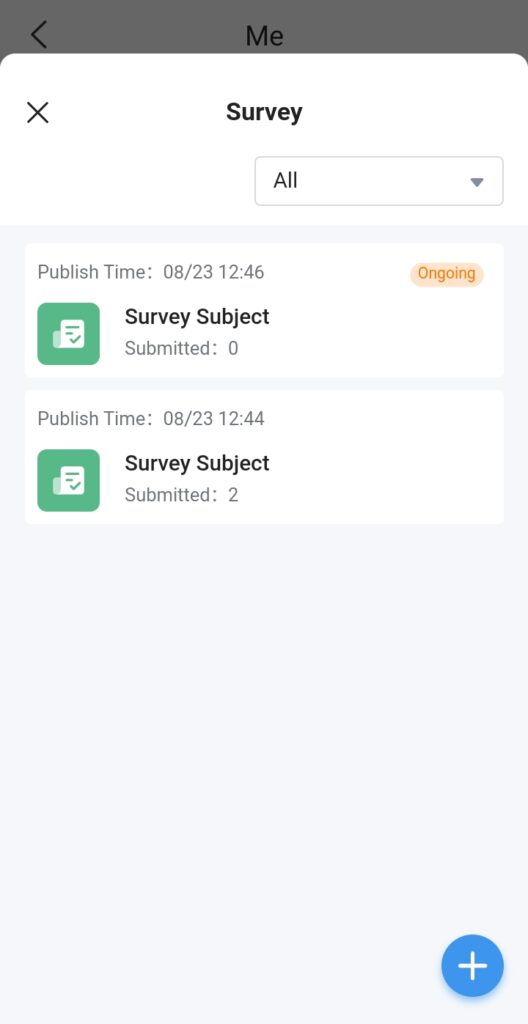
Step 3: Open the survey you wish to stop, then tap 
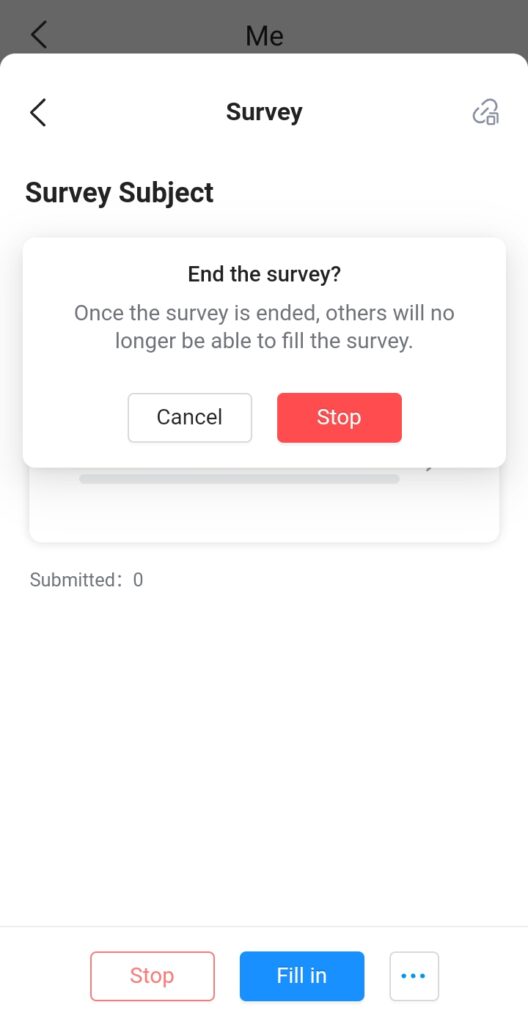
Step 4: Click on “Stop” to end the survey.
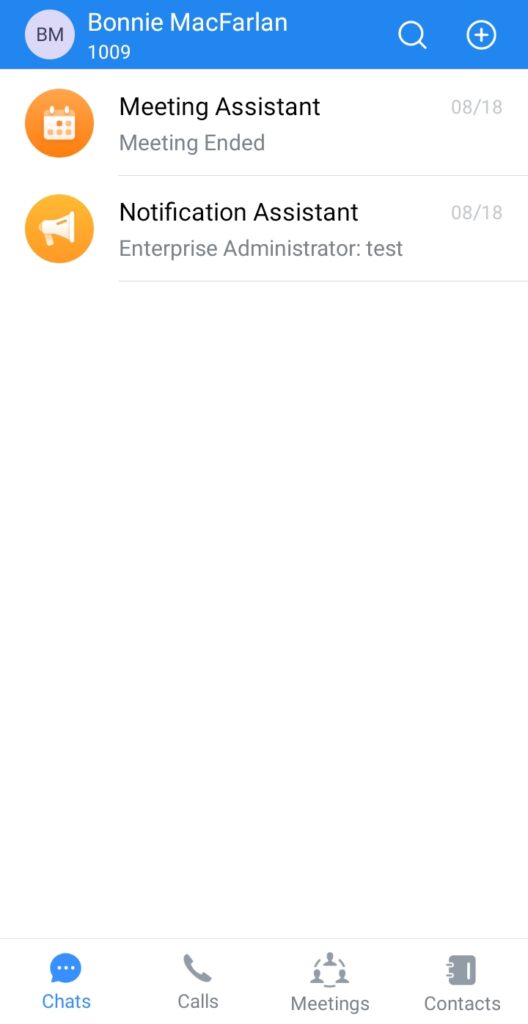
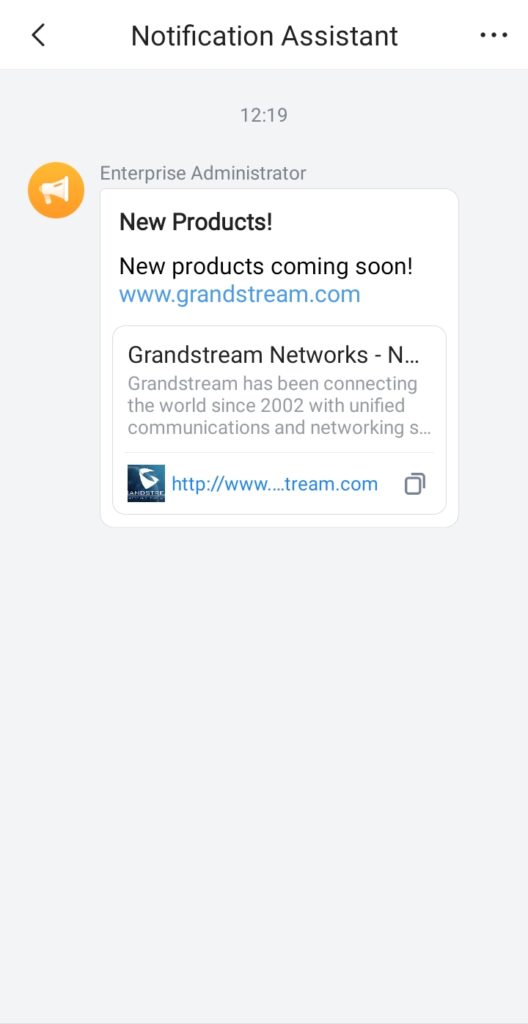
Notification Assistant
The administrator of your UCM can log in the Web UI of the UCM -> Messaging -> Message Broadcast to publish a broadcast message to all extension users, and Wave users can receive this message and display through the Notification Assistant.
Live Chat
When customers initiate Live Chat sessions, the agent can receive the message on Wave mobile client and reply to the customer. The agent can also view the session which have already been processed.
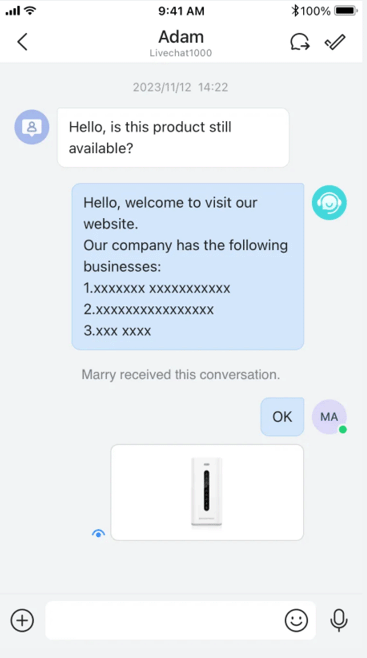
Once the agent has provided the needed support to the customer, the agent can click on ![]() to mark the session as resolved. If the user wishes to transfer the session to a different agent, he/she can click on
to mark the session as resolved. If the user wishes to transfer the session to a different agent, he/she can click on ![]() .
.
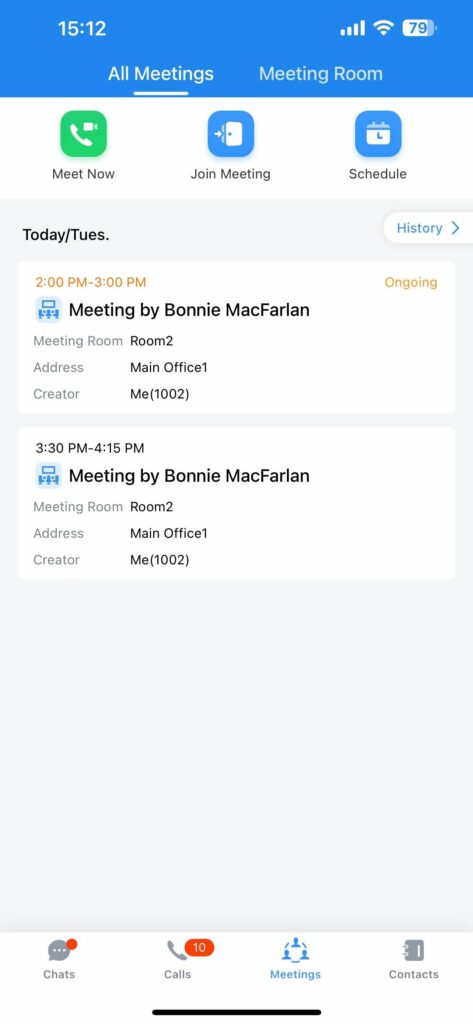
MEETING
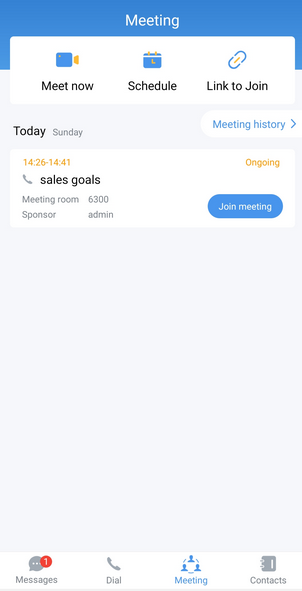
Meet Now
Immediately create a new meeting using one of the UCM’s meeting rooms. Step 1: Tap on “Meet now”. Step 2: Set the meeting subject. Step 3: Select the participants from contacts/group members. Step 4: Click “Meet now” button to create a video conference and join the video conference room.
Note: After creating the instant meeting, the video meeting number is a random meeting number. If the user wants to use the public meeting room, the user can access to the public meeting room list and join the public meeting room.
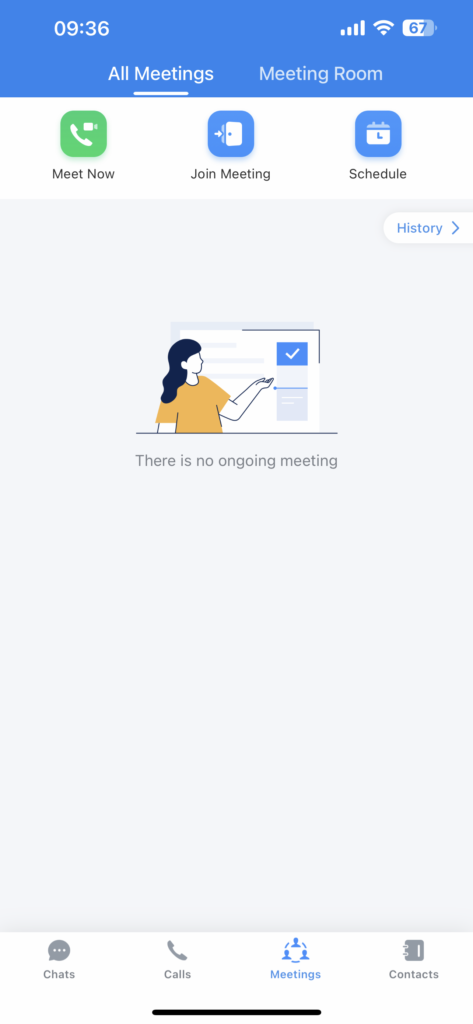

Users can also directly enter a meeting room by dialing its extension from the Dial page.
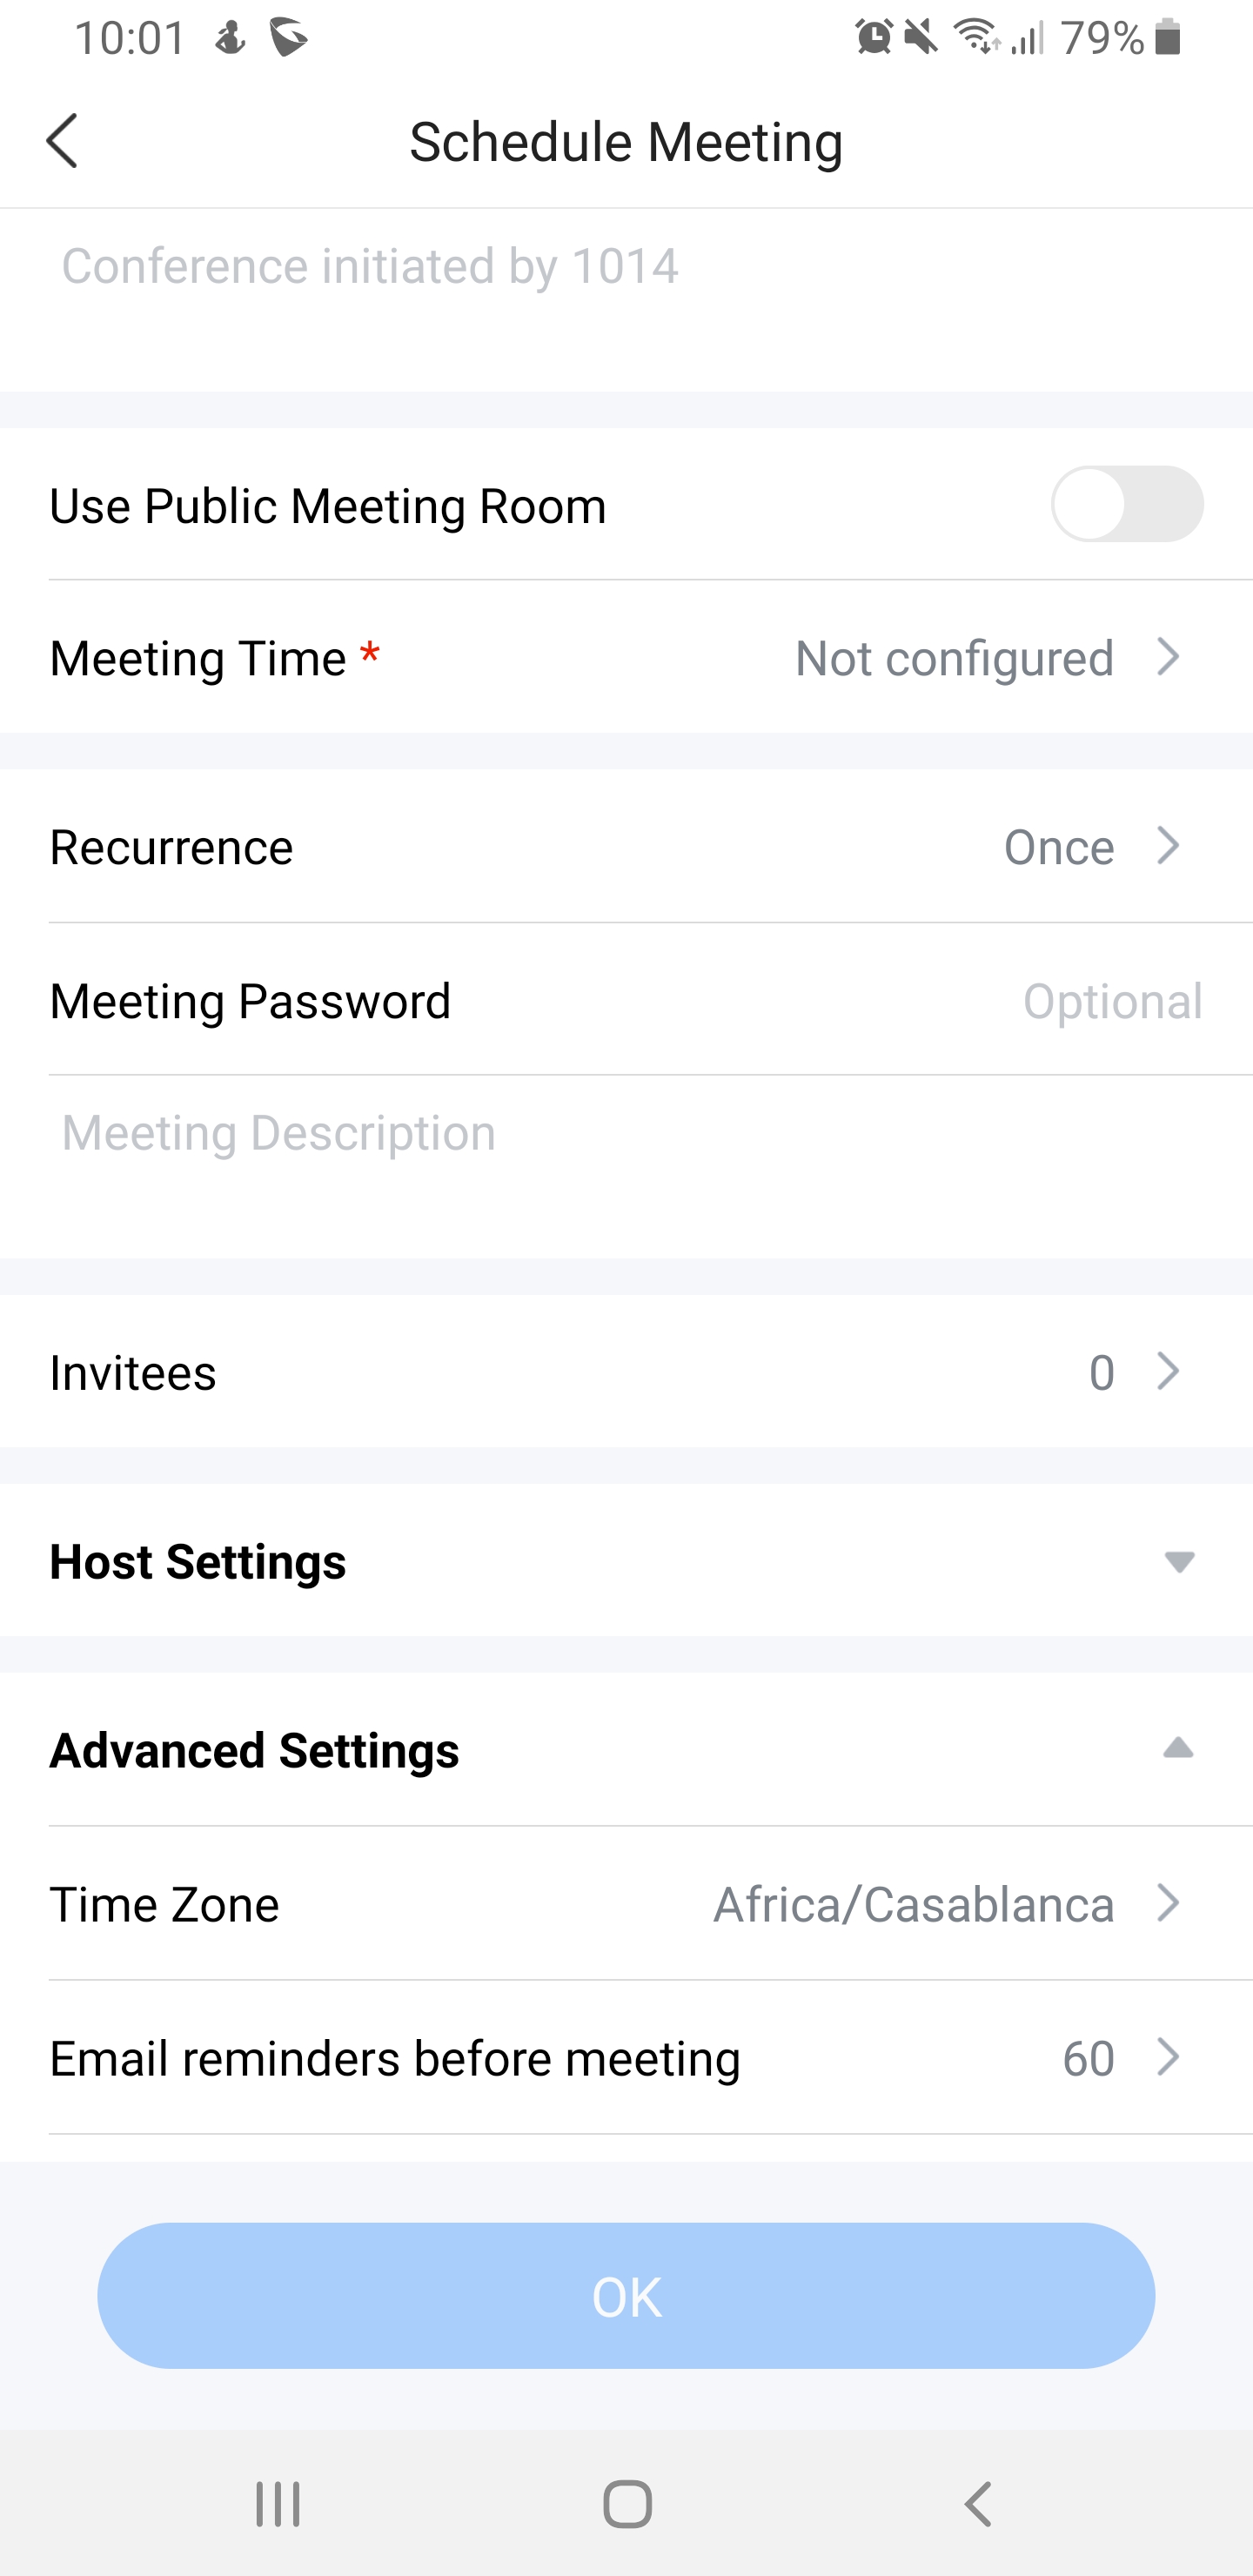
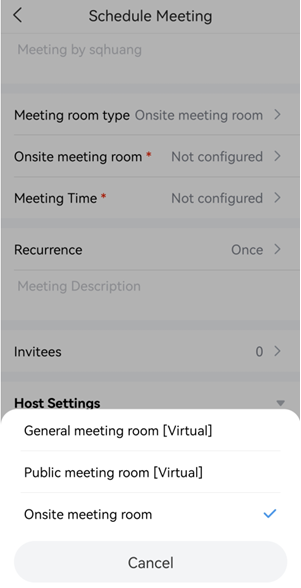
Schedule Meeting
Step 1: Click the “Schedule” button to open the interface as shown on the right.
Step 2: Select whether to use the public meeting room. If the user wants to use the public meeting room, the user needs to select the public meeting room number.
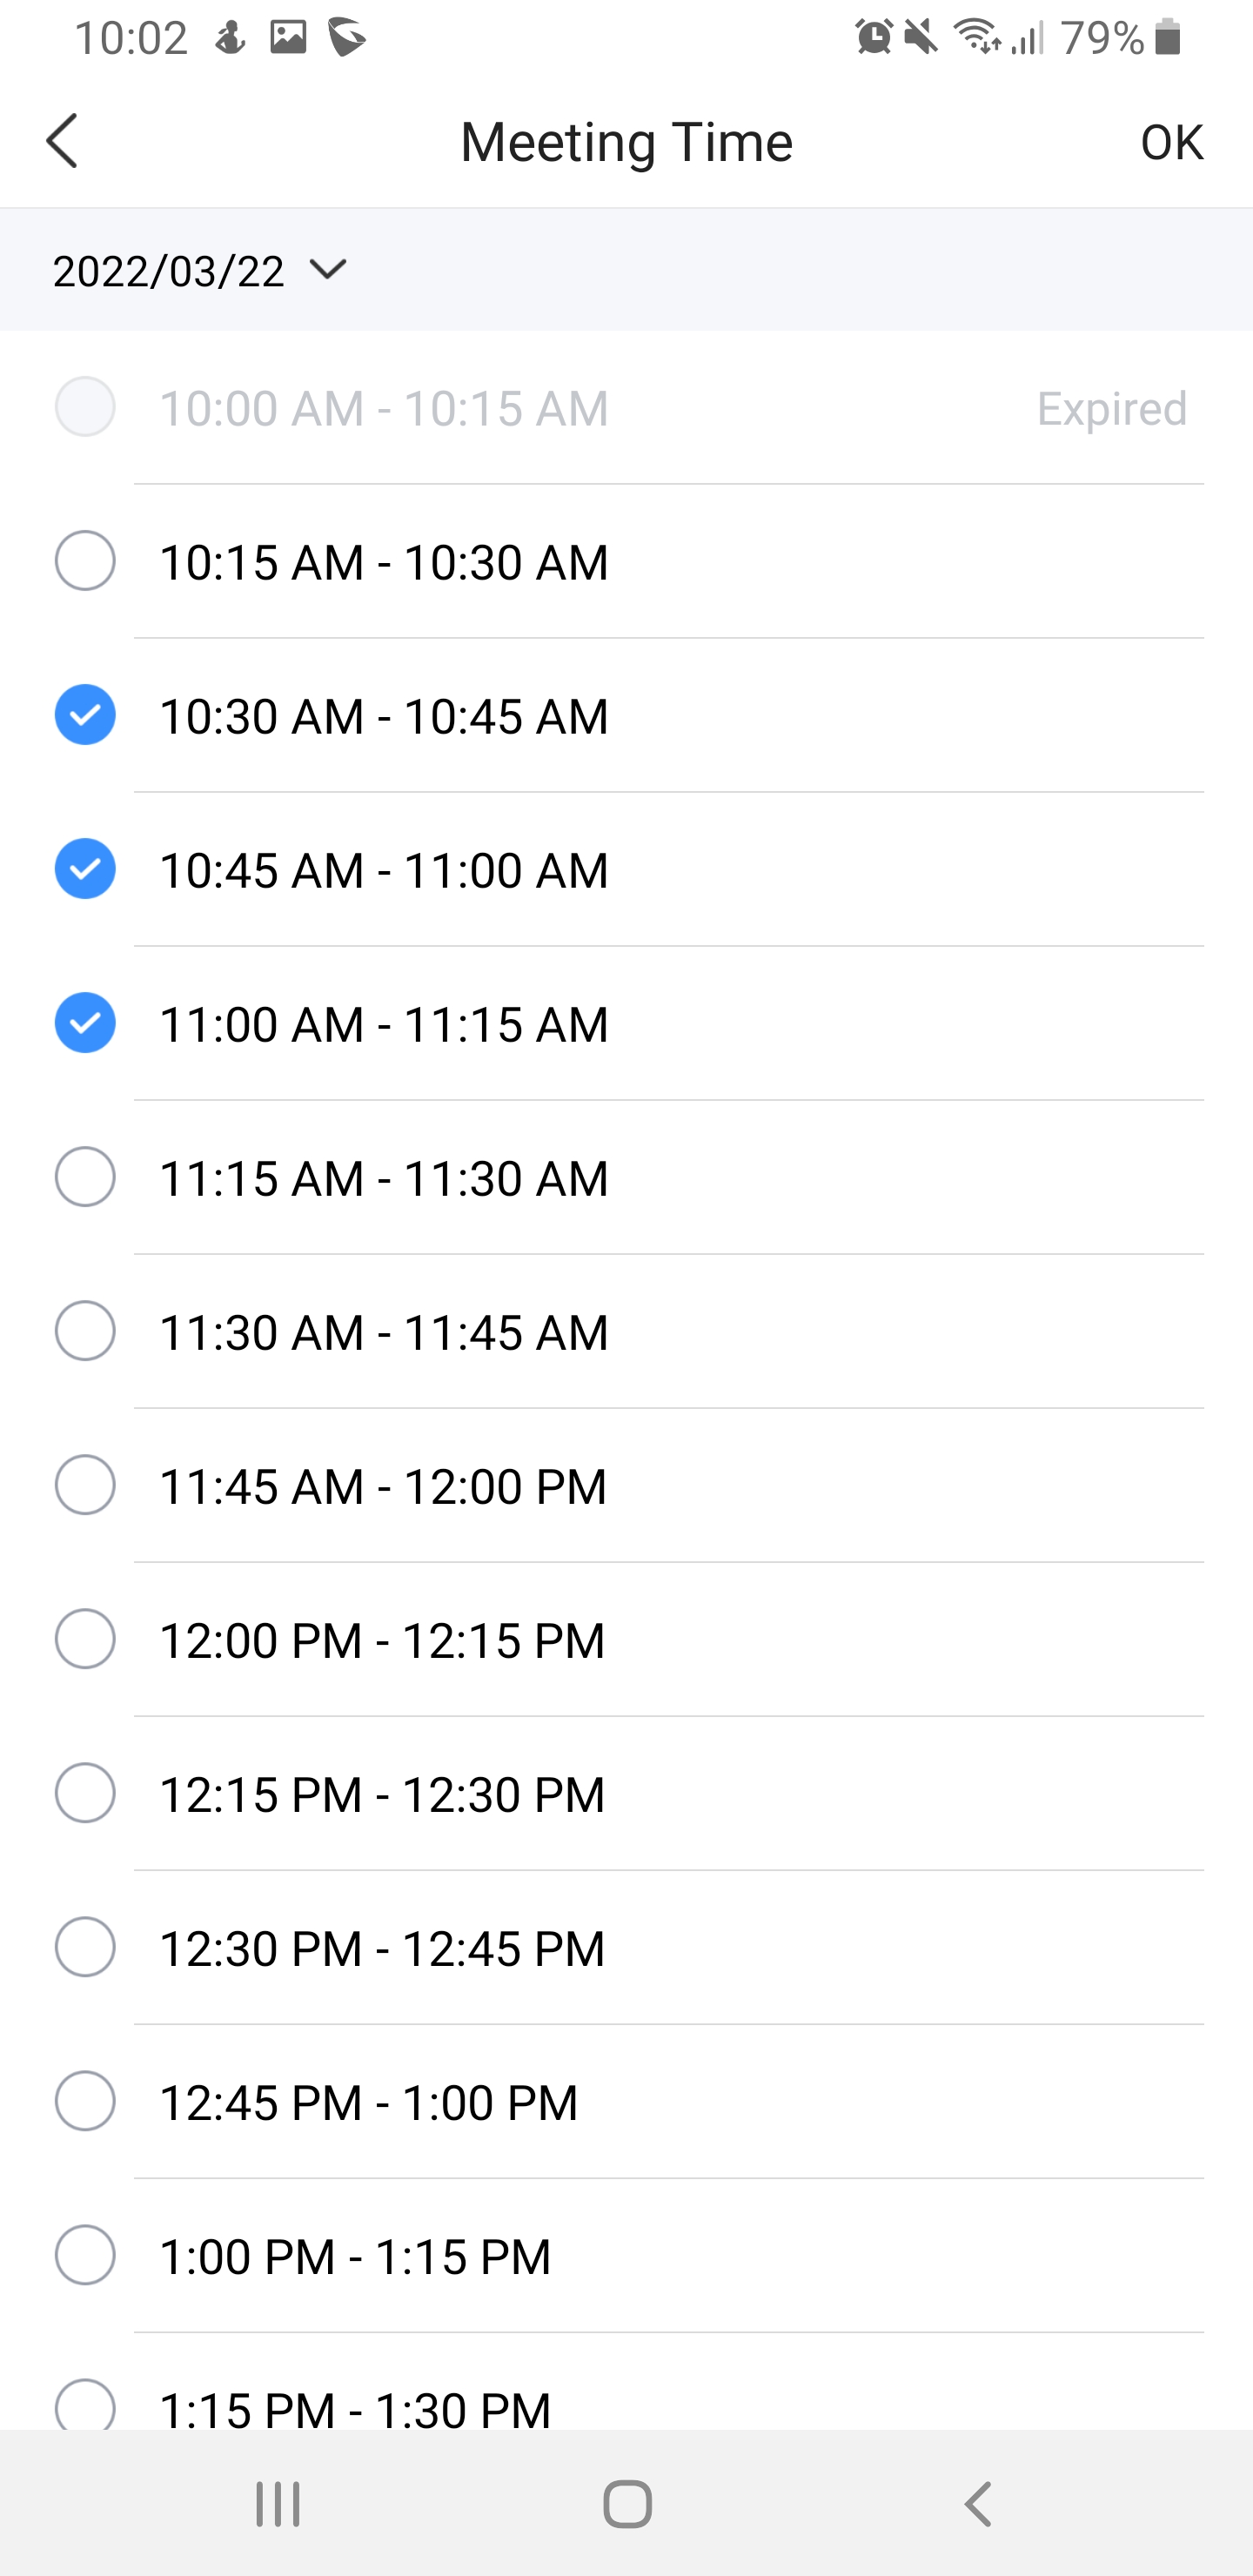
Step 3: Set meeting time and repeat cycle.
Step 4: Set the password for the meeting room.
Step 5: Select meeting participants.
Step 6: Select the meeting host. Set the host code, set the meeting property, etc.
Note: If “Allowed to Override Host Mute” is enabled, the participant can unmute themself after they have been muted by the host of the meeting.
Step 7: Click on “OK” button in the upper right corner to complete the conference room reservation.
When scheduling a meeting, the user can create a group chat by tapping on ![]() . Then, tap on “Create”.
. Then, tap on “Create”.

After the meeting ends, the system will prompt the user to whether to forward the chat history of the meeting to the new meeting group chat.
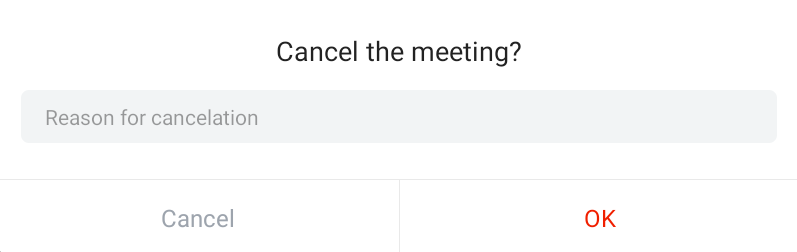
If the user decides to cancel a meeting, he/she can do so by navigating to the list of meetings and tapping on the meeting and then tapping cancel meeting as the figure below indicates.
Then the user will be prompted to enter the reason of the cancellation of the meeting. The reason specific will be relayed by meeting assistant to the extension added in the meeting.
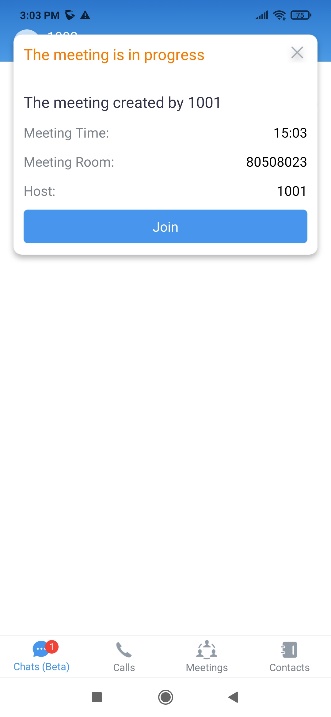
Meeting Invitation
When the user receives the meeting invitation, the user can quickly click to join the meeting through the message reminder in “Meeting Assistant”.
There will be a notification 10 minutes before the meeting starting time or the scheduled meeting is about to begin.

There are two methods to join meeting via link:
- Click on
 to scan the QR code from the meeting invitation email or provided by meeting host to join meeting.
 - Fill in manually the Meeting URL and password. By default, meeting invitation emails also provide a link to join the meeting.
Receive Calls When Receiving an Invitation
If an ongoing meeting sends an invitation to a user, the user will not only receive the message notification, and the user will receive an incoming call notification, so that the user can be notified in time.
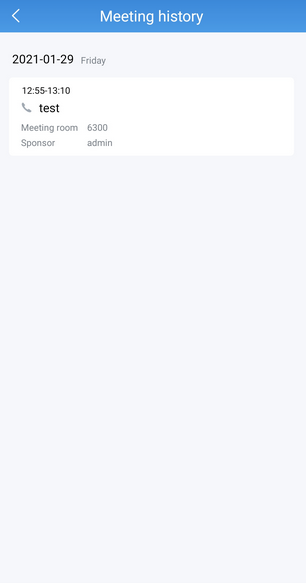
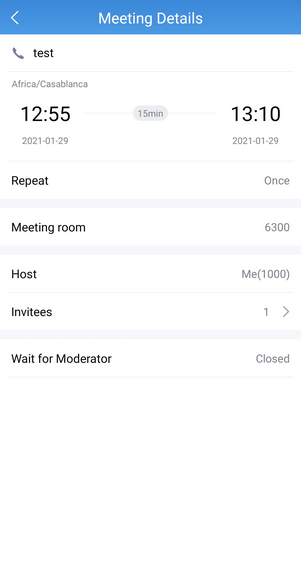
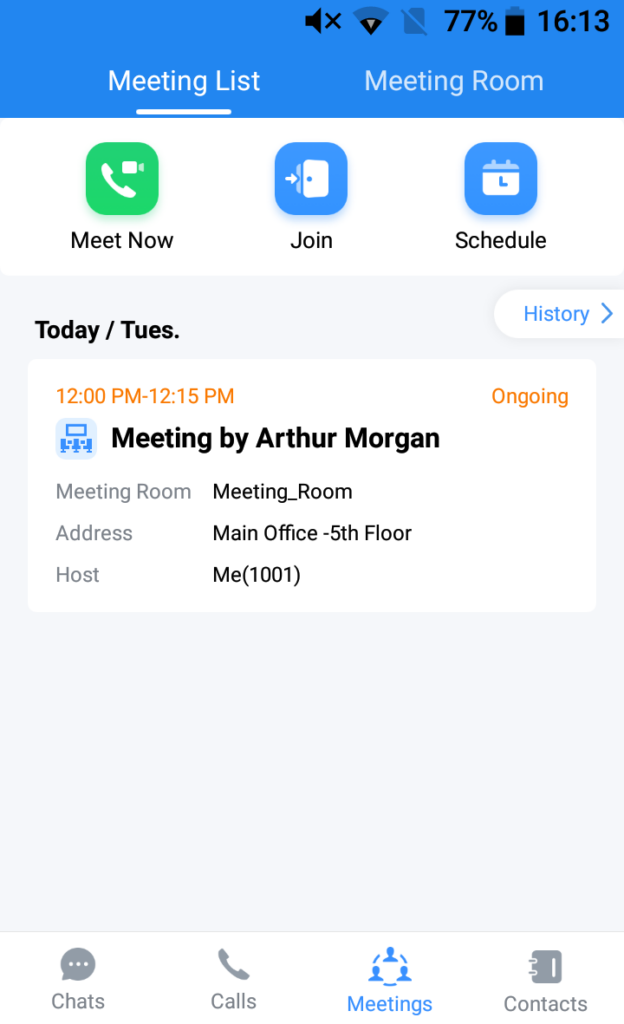
Meeting History
To review the historical meetings, users can always go back to “Meeting history” to display information about old meetings. To do so, please follow the steps below:
Step 1: Click on Meeting history.
Step 2: Select the desired meeting to display more details.
During the Meeting
During a meeting, the participant will be presented with the screen shown below. The participant will be able to perform a number of actions and use features offered by Wave to have a productive meeting.
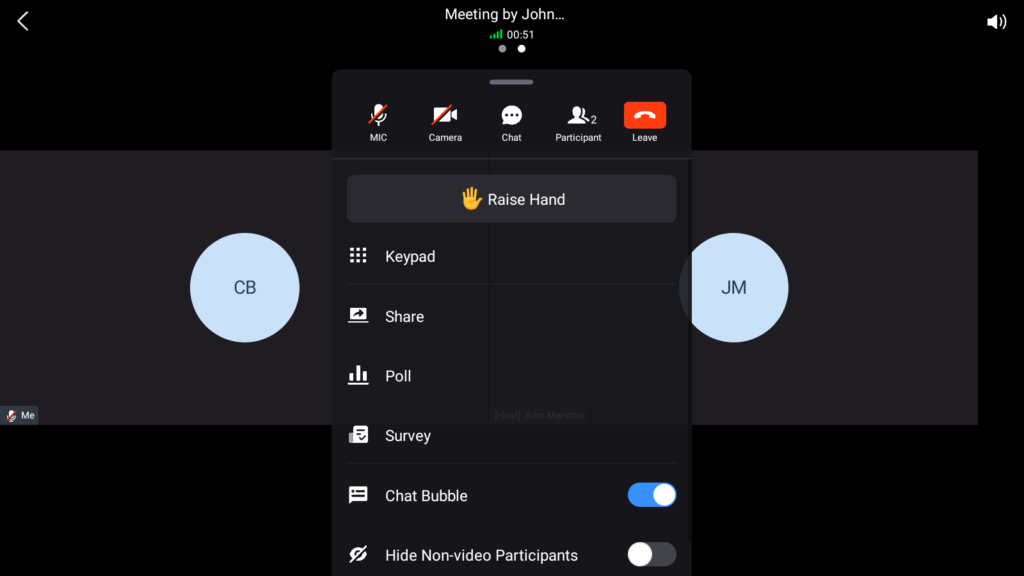
 : Enable or disable the microphone.
 : Enable or disable the camera.
 : Open the chat box.
 : Open the list of participants.
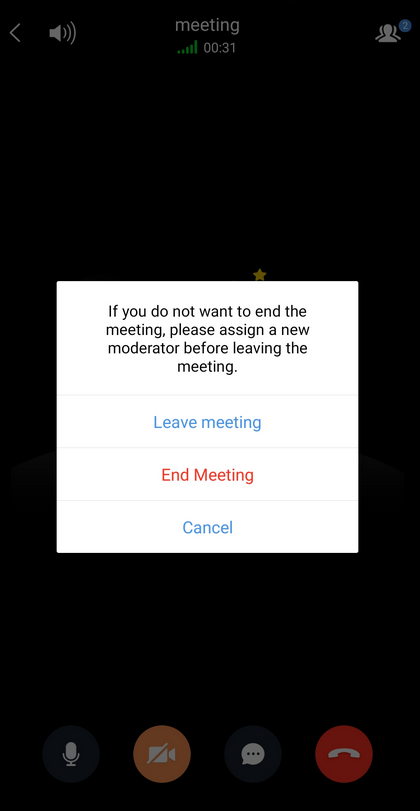
 : Leave the meeting. For the host of the meeting, when he/she clicks on this button, it will prompt two options: “End Meeting” and “Leave Meeting”. End Meeting will finish the meeting and Leave Meeting will result in the host leaving and another member will be assigned as the host, and the meeting will carry on.
 : Raise your hand.
![]() : Open the keypad.
: Open the keypad.![]() : Share your screen with the meeting’s participants.
: Share your screen with the meeting’s participants.![]() : Create a poll.
: Create a poll.![]() : Create a survey.
: Create a survey. : Toggle the Chat Bubble on and off.
 : Toggle to display the current speaker during the meeting.
 : Hide the participants who do not have their camera activated.
 : Change the layout to display the speaker.
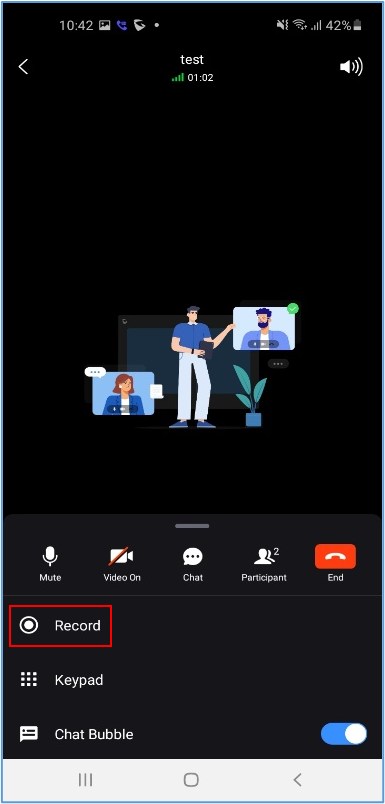
Please follow the instructions showed in the two screenshots below to start recording a meeting.
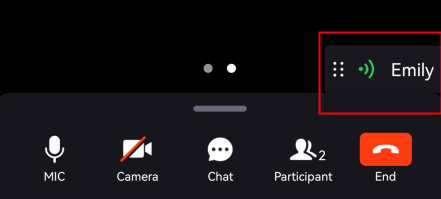
Display Current Speaker
During a meeting, the current speaker will be displayed in real-time. You can configure to display or hide the speaker identity in Settings.
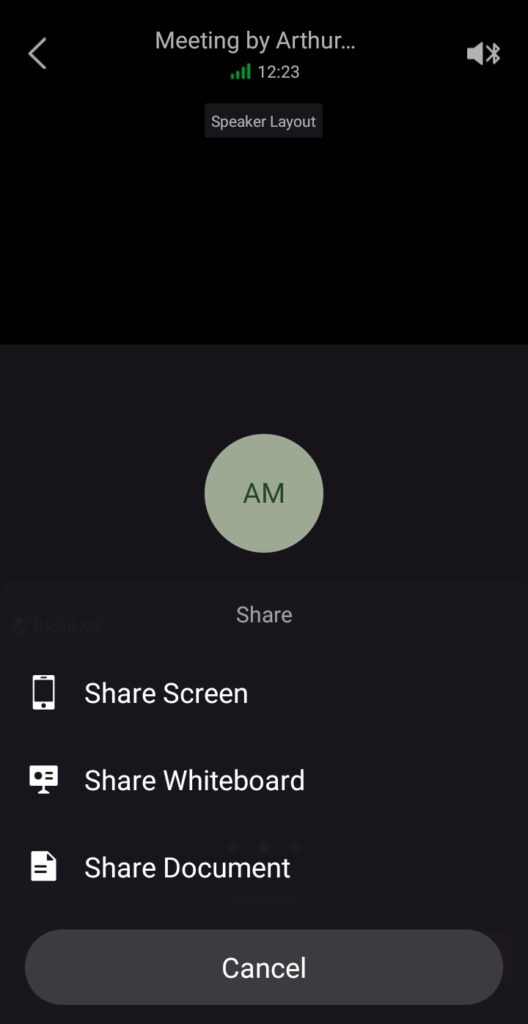
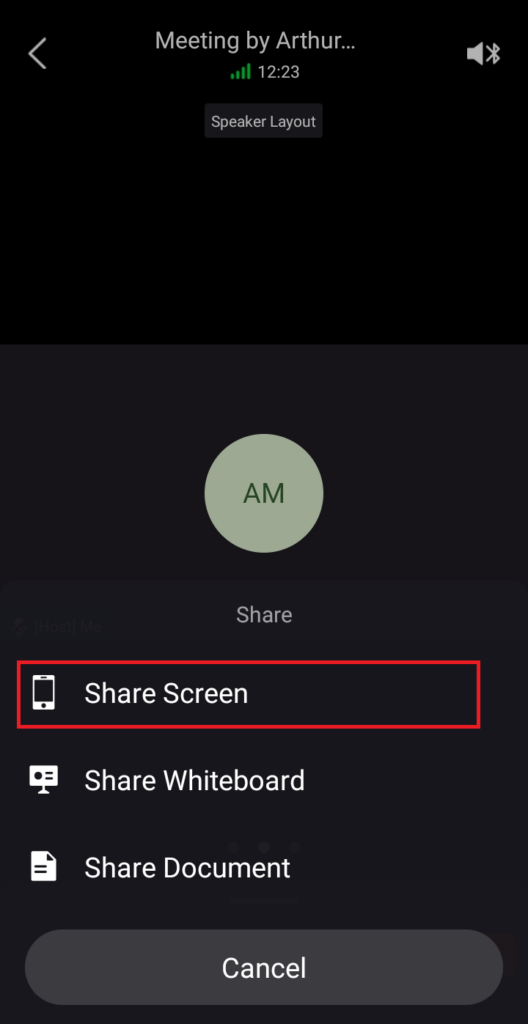
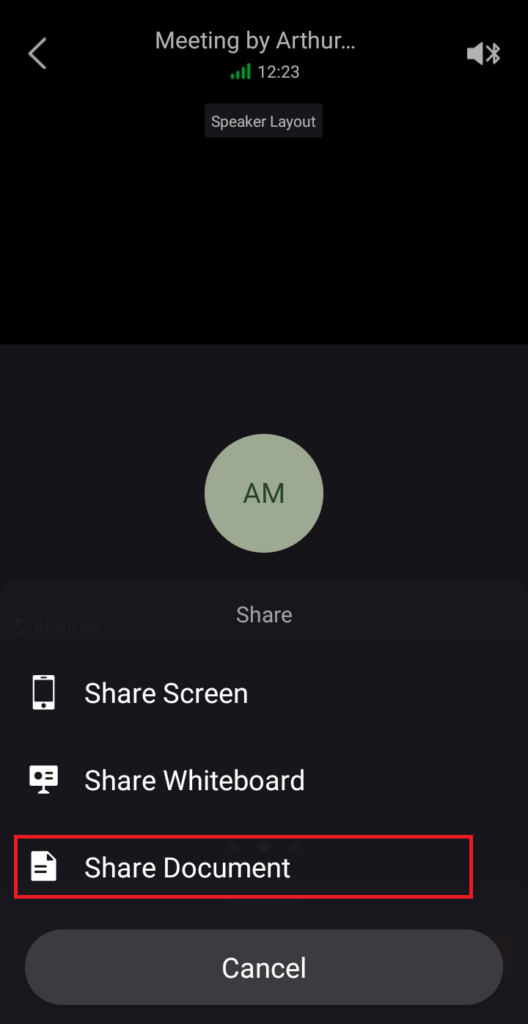
Share
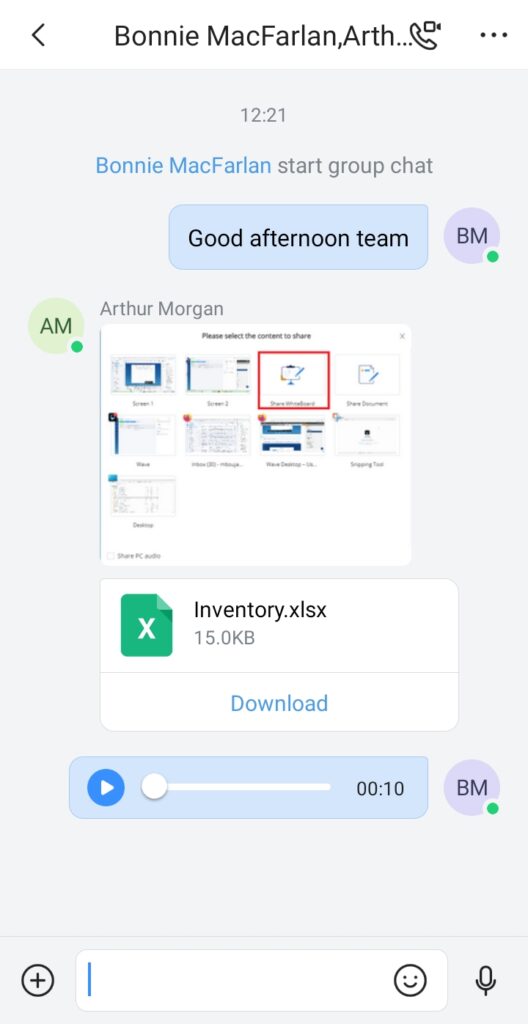
Using Wave mobile, the user can share the screen, share whiteboard or share a document of/from his/her mobile phone for other users in a meeting.
To do that, the user should swipe the contextual menu to reveal more options and select “Share” as shown in the screenshot below:
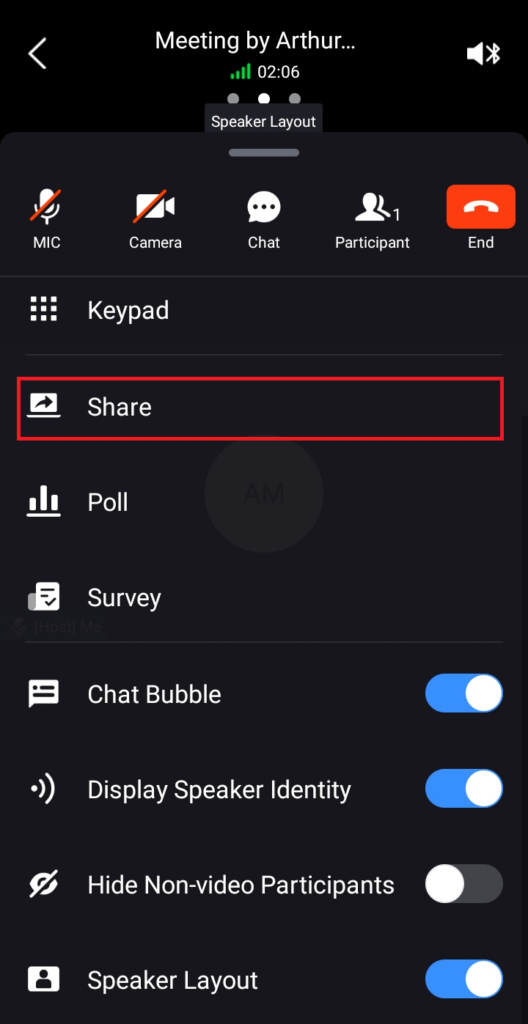
A prompt will appear with the sharing options:
- “Share Screen”: To share the entire screen
- “Share WhiteBoard”: To share the WhiteBoard (Supported in meetings only)
- “Share Document”: To share a PDF file (Supported in meetings only)
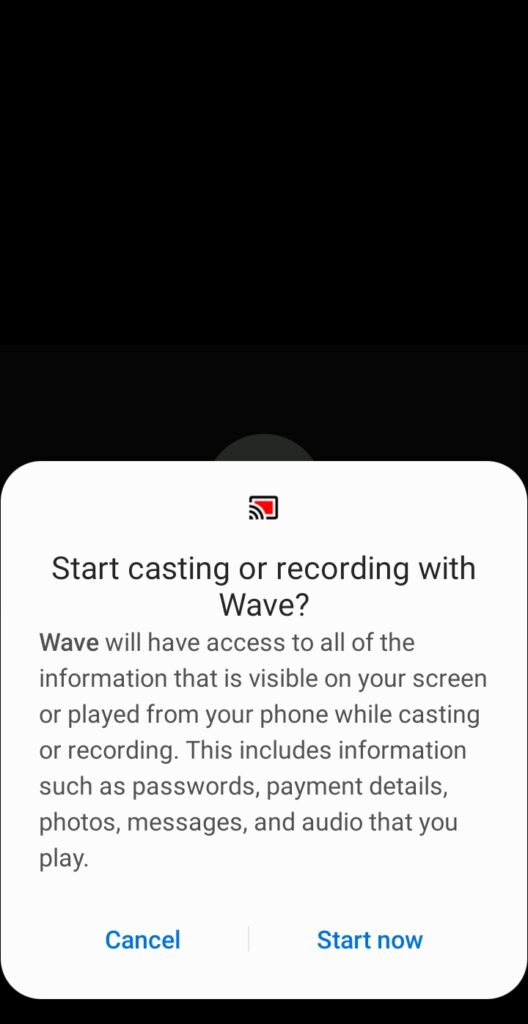
Share Screen
Select “Share Screen”.
A prompt informing you that all your screen content will be shared and viewed by other meeting participants.
Click “OK” to accept.
Click “Start now” to start sharing your screen.
The screen will be shared.

Share WhiteBoard
The user can click on the “Share” icon , and select “Share WhiteBoard”.
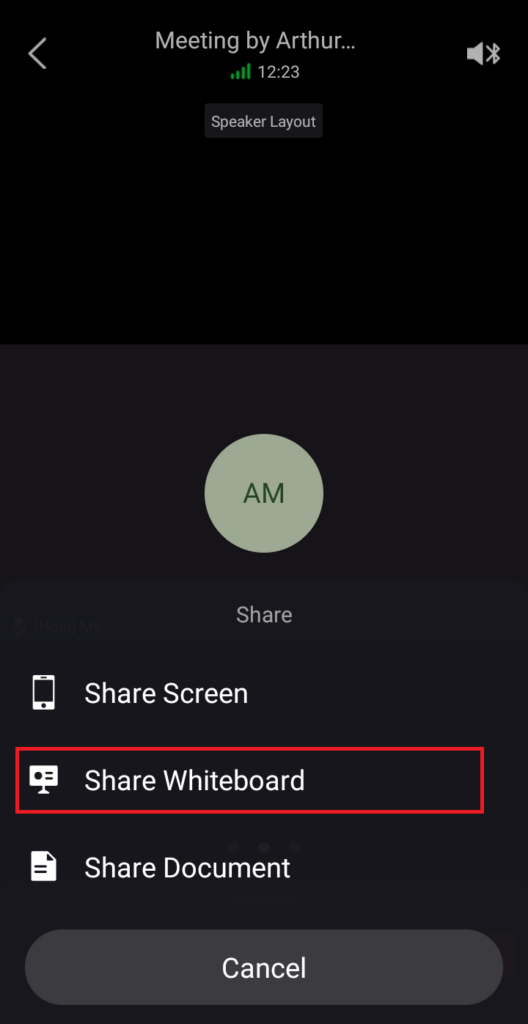
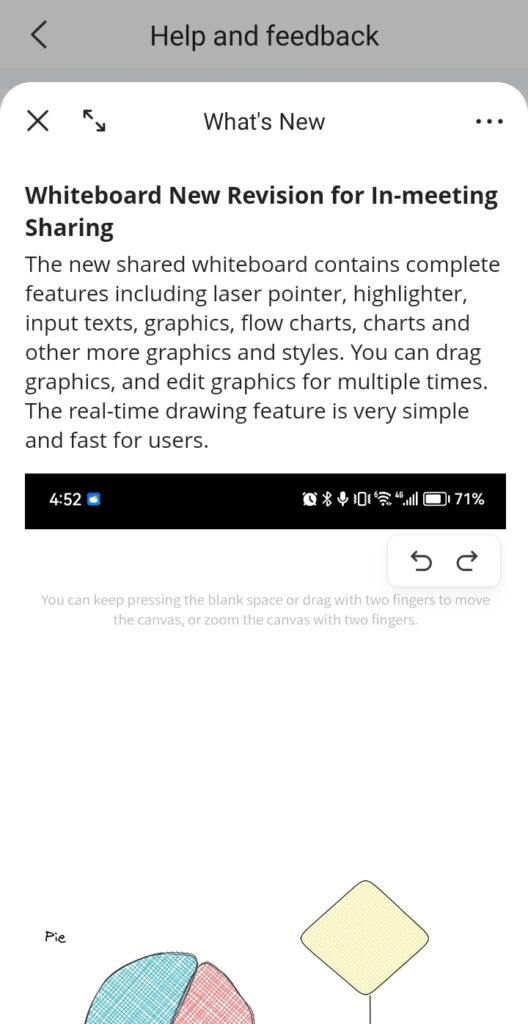
The new shared whiteboard contains complete features including laser pointer, highlighter, input texts, graphics, flow charts, charts and other more graphics and styles. You can drag graphics, and edit graphics for multiple times. The real-time drawing feature is very simple and fast for users.
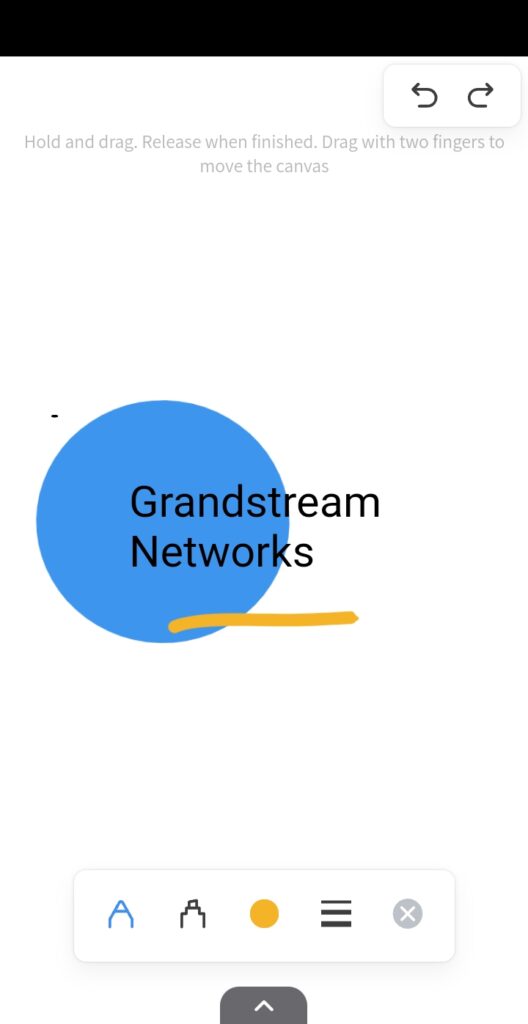
![]() : The drawing toolbar will appear after clicking this icon.
: The drawing toolbar will appear after clicking this icon.
![]() : Click to view more options (only the sharer has the permission) including: Enable/Disable Collaboration function (After enabling this function, other participants can draw at the same time), change the Canvas Color, Empty Canvas, Open File (the whiteboard data picture which was previously saved), Save as Picture, etc.
: Click to view more options (only the sharer has the permission) including: Enable/Disable Collaboration function (After enabling this function, other participants can draw at the same time), change the Canvas Color, Empty Canvas, Open File (the whiteboard data picture which was previously saved), Save as Picture, etc.
![]() : This is the laser pointer option and only the sharer has this option. It displays the drawn track and will disappear in 3 seconds.
: This is the laser pointer option and only the sharer has this option. It displays the drawn track and will disappear in 3 seconds.
![]() : This is the graphics option. It only supports basic graphics. You can double click the graphic to add text.
: This is the graphics option. It only supports basic graphics. You can double click the graphic to add text.
![]() : This is the brush option. There are two types brush “Common Brush” and “Highlighter”.
: This is the brush option. There are two types brush “Common Brush” and “Highlighter”.
![]() : This is the text option.
: This is the text option.
![]() : Pictures can be inserted. After inserting a picture, you can drag the edge to change the size of the picture.
: Pictures can be inserted. After inserting a picture, you can drag the edge to change the size of the picture.
![]() : This is the eraser option.
: This is the eraser option.
![]() : This is the undo option.
: This is the undo option.
![]() : This is the recovery option.
: This is the recovery option.
Share Document
The user can click on the “Share” icon, and select “Share Document”.
The users can click ![]() button to use annotations on the shared document.
button to use annotations on the shared document.

![]() : This option to change the brush thickness and color.
: This option to change the brush thickness and color.
![]() : This is the paint brush option. It supports different modes: Free, Line, Rectangle/square, Circle and Arrow.
: This is the paint brush option. It supports different modes: Free, Line, Rectangle/square, Circle and Arrow.
![]() : This is the eraser option.
: This is the eraser option.
![]() : This is the empty option to clear all the annotations.
: This is the empty option to clear all the annotations.
![]() : This option to other the other participants to draw annotations at the same time.
: This option to other the other participants to draw annotations at the same time.
Stop Sharing
To end the screen-sharing please click on .
Video Meeting Participants
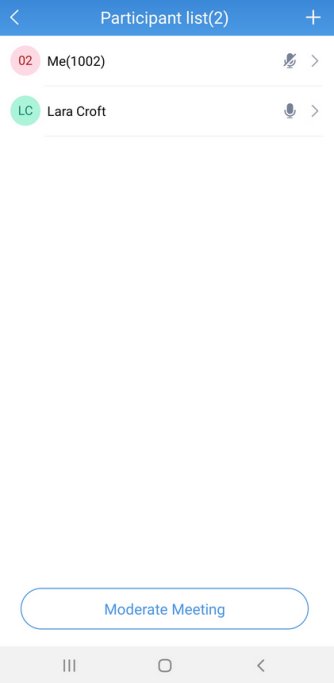
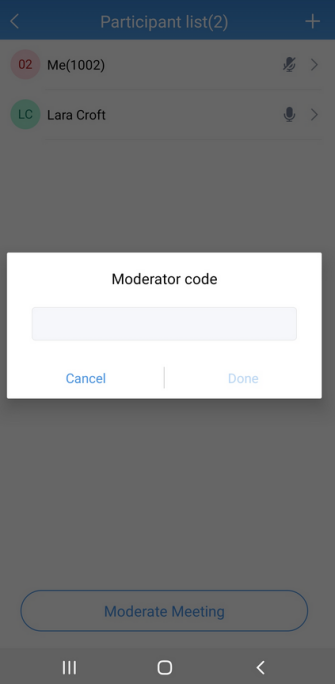
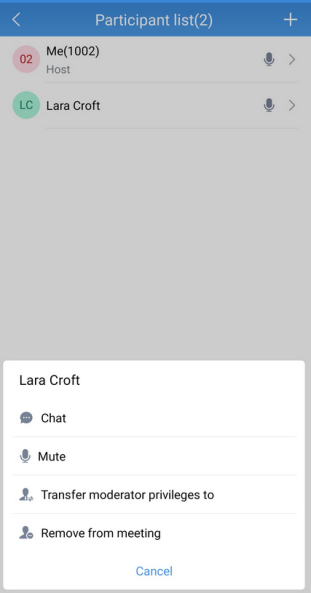
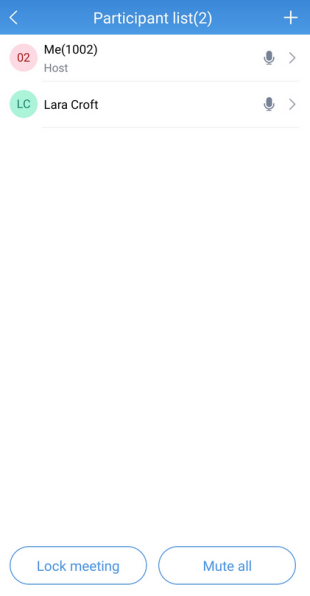
During video meeting, click on button ![]() to view participant list.
to view participant list.
Participants can view meeting participant list, click on “Moderate meeting” on the bottom and enter moderator code to become meeting moderator.
Moderator can tap on a participant name to mute/unmute the participant, transfer moderator privilege to the participant, remove participant from meeting, chat with participants, lock meeting and mute/unmute all participants.
During the meeting, the user can also tap on his/her own name to mute/unmute or edit display name in the meeting.
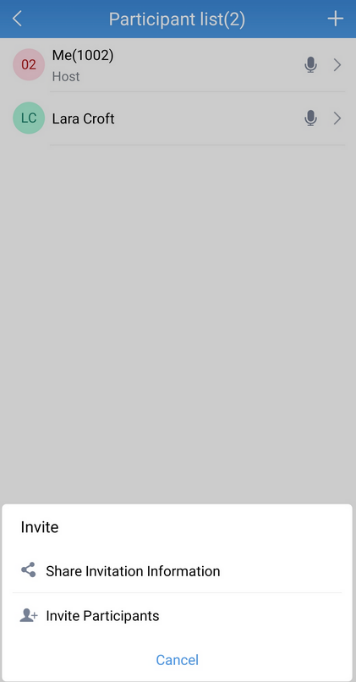
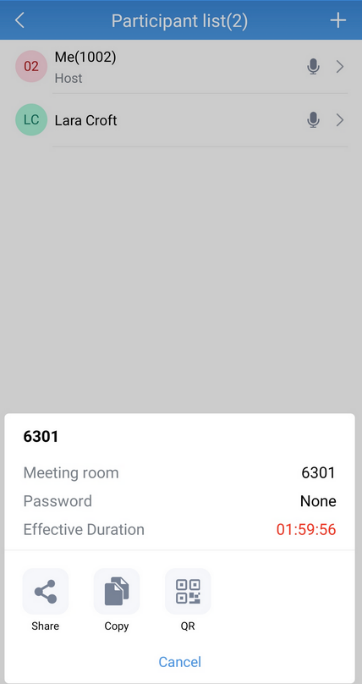
The host can invite members by clicking on the button ![]() in the upper right corner. The video conference supports inviting participants, sharing link invitation, and scanning QR code to join the meeting with Wave app.
in the upper right corner. The video conference supports inviting participants, sharing link invitation, and scanning QR code to join the meeting with Wave app.
Moderator can tap on a participant name to mute/unmute the participant, transfer moderator privilege to the participant, remove participant from meeting, chat with participants, lock meeting and mute/unmute all participants.
During the meeting, the user can also tap on his/her own name to mute/unmute or edit display name in the meeting.
The host can invite members by clicking on the button ![]() in the upper right corner. The video conference supports inviting participants, sharing link invitation, and scanning QR code to join the meeting with Wave app.
in the upper right corner. The video conference supports inviting participants, sharing link invitation, and scanning QR code to join the meeting with Wave app.
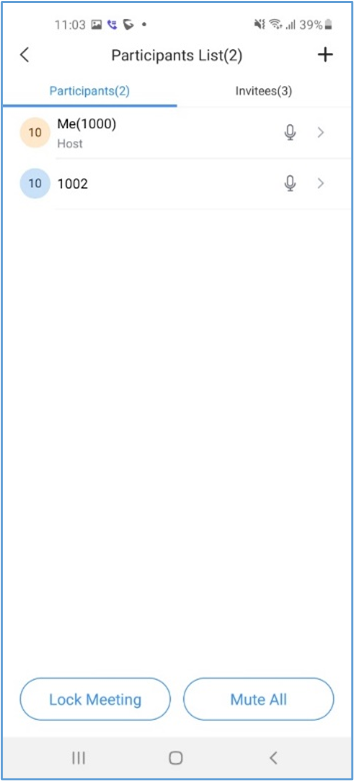
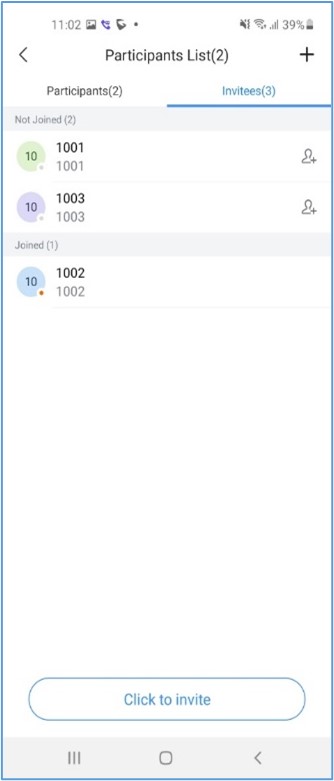
For the Audio/Video Wave meetings, the host can see invitee’s absent list:
- Only meeting host can see invitee’s list and can invite them directly from there. For non-host participants, only participant list is available.
- Applicable to scheduled meeting, instant meeting and group meetings.
- Definition of absent invitees:
- Invitee list contains those invited by email or extension before meeting.
- When meeting room is available which is 10 minutes before meeting schedule, after host joins meeting, host can see invitee list and participant list. Now the status of invitees will be determined.
- The invitee list will display based on attended status and unattended status. An invite button will be available for unattended invitees for host to click to invite directly.
- After the absent invitee joins meeting, this invitee cannot be invited again (the invite button for this invitee will be in grey meaning unavailable).
- On the invitee list, invitee’s status (whether available or busy) needs to be shown.
- If there is no invitee before meeting, invitee list will not show.
- After host transfers host privilege, the new host can see the invitee list and invite as needed.
- The participant list’s status cannot change in real time. The invitee list is based on whether the invitee joins the meeting before, not based on the current participating status. For example, if invitee A joins meeting and exit after he/she is done with meeting while the rest are still in meeting, the invitee list should display he/she as attended invitee.
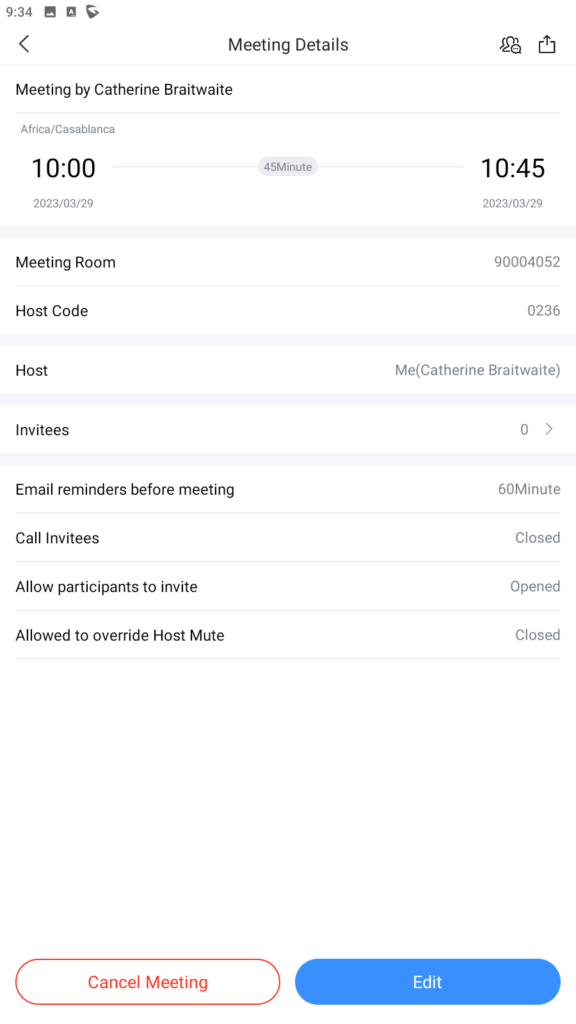
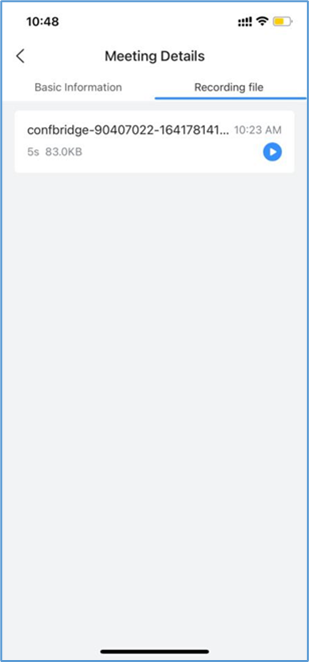
Record an Ongoing Meeting
The meeting host can start recording the meeting after it has started. When the meeting has ended, the meeting host can view the recording files on Meeting Details interface.
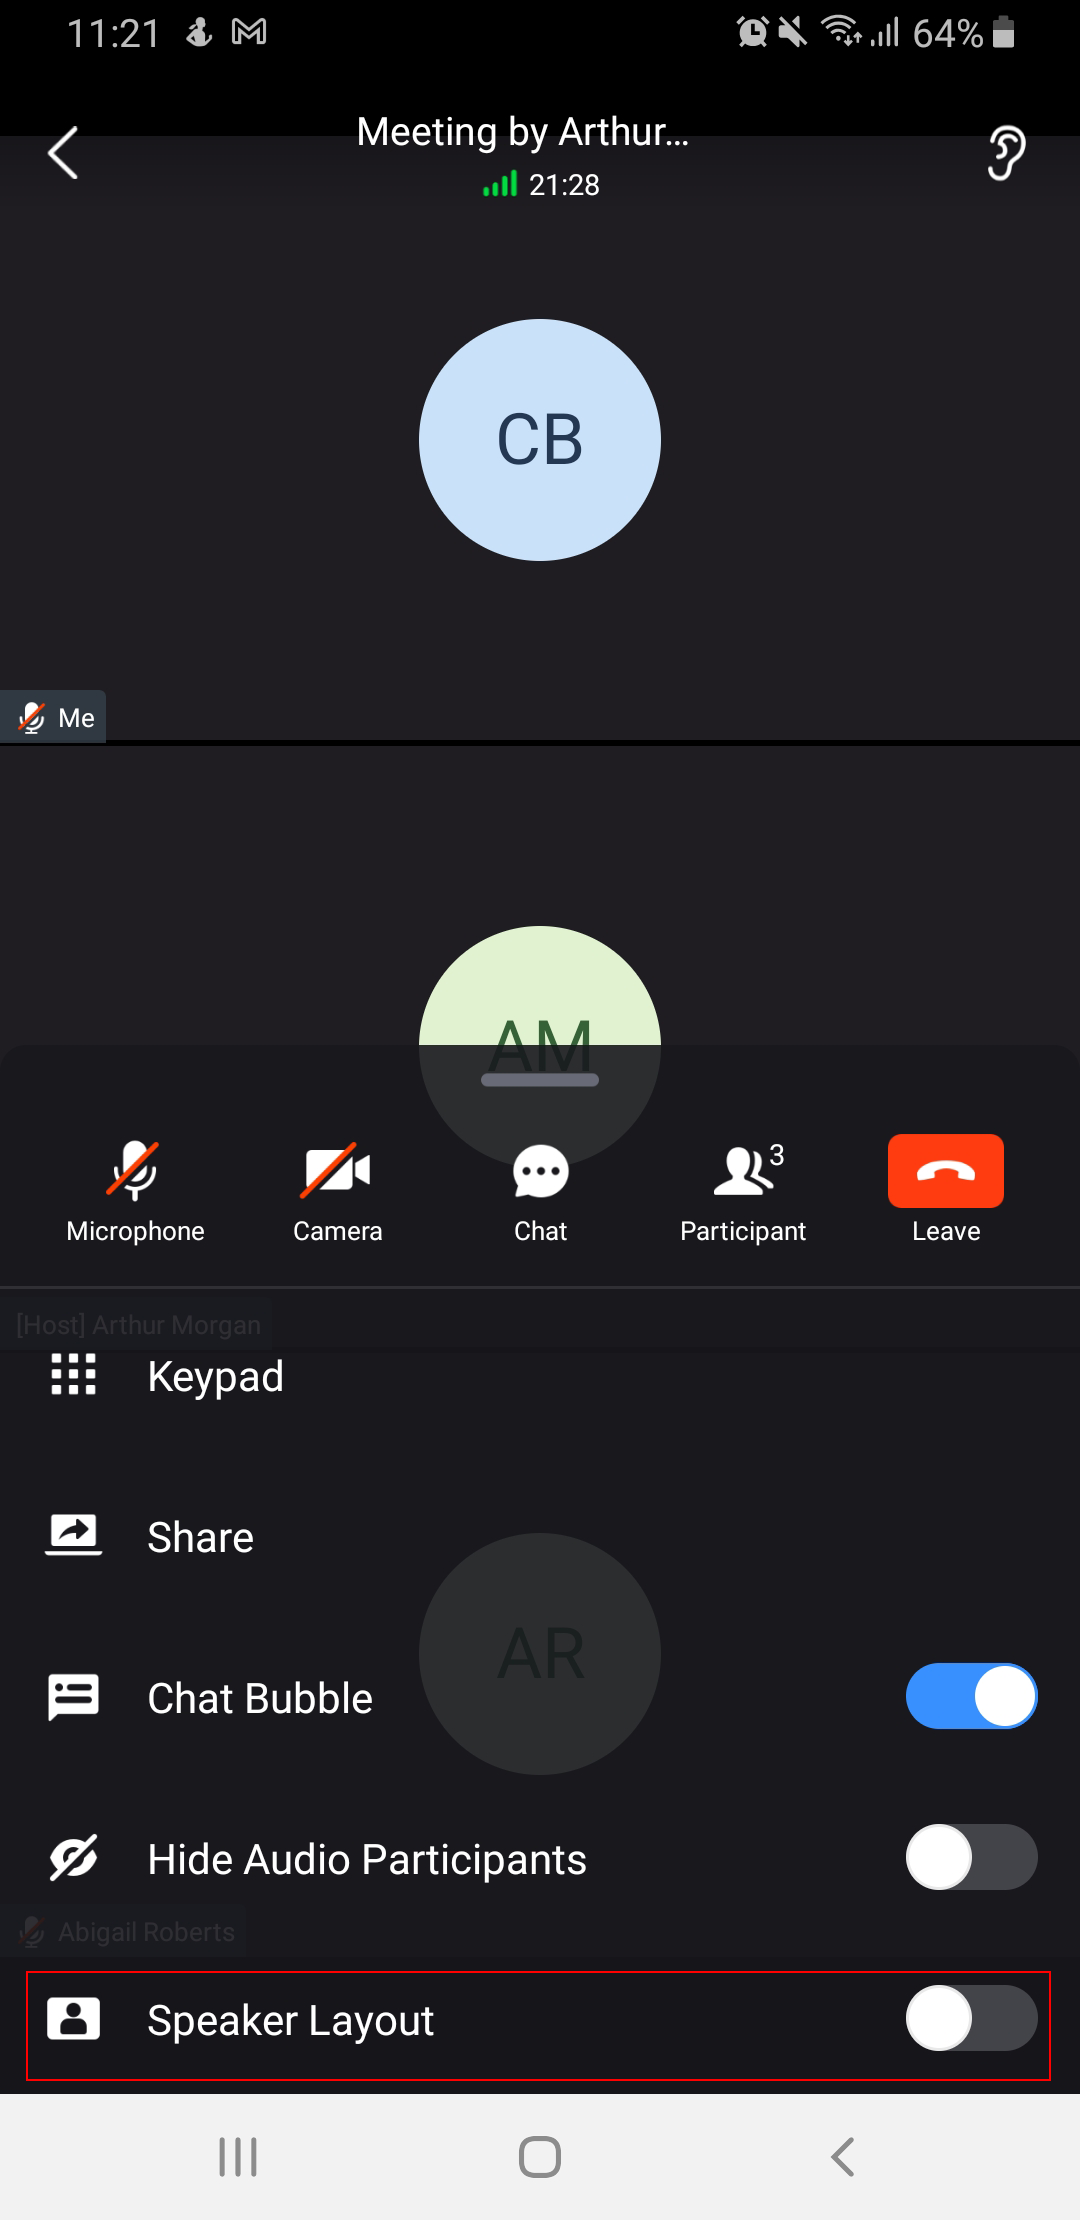
Speaker Layout
Enabling speaker layout will allow only the speaker’s video feed to show on the screen during a meeting. To enable this please see the screenshot below:
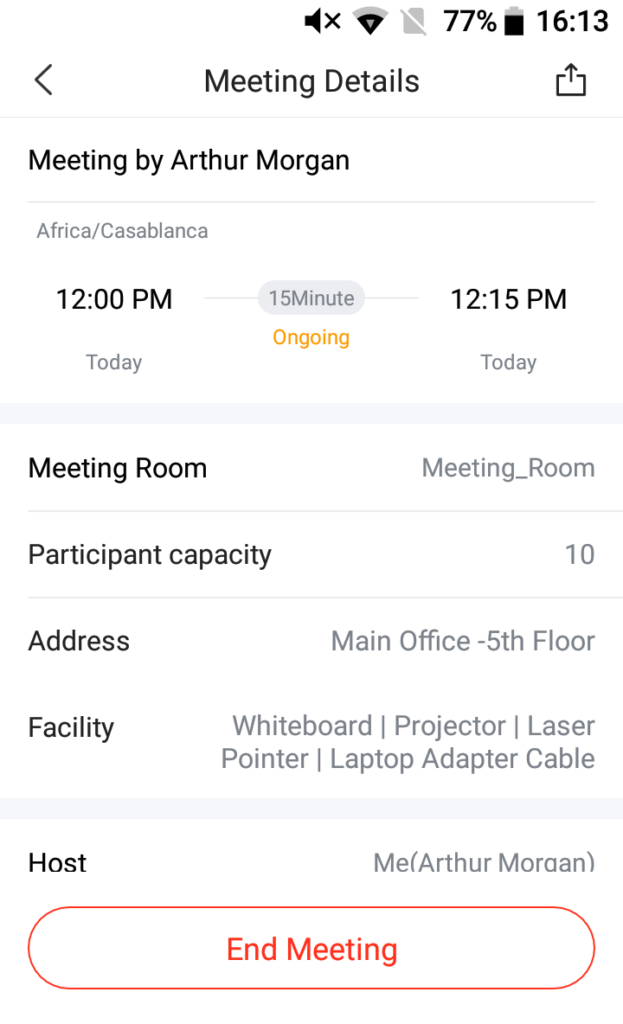
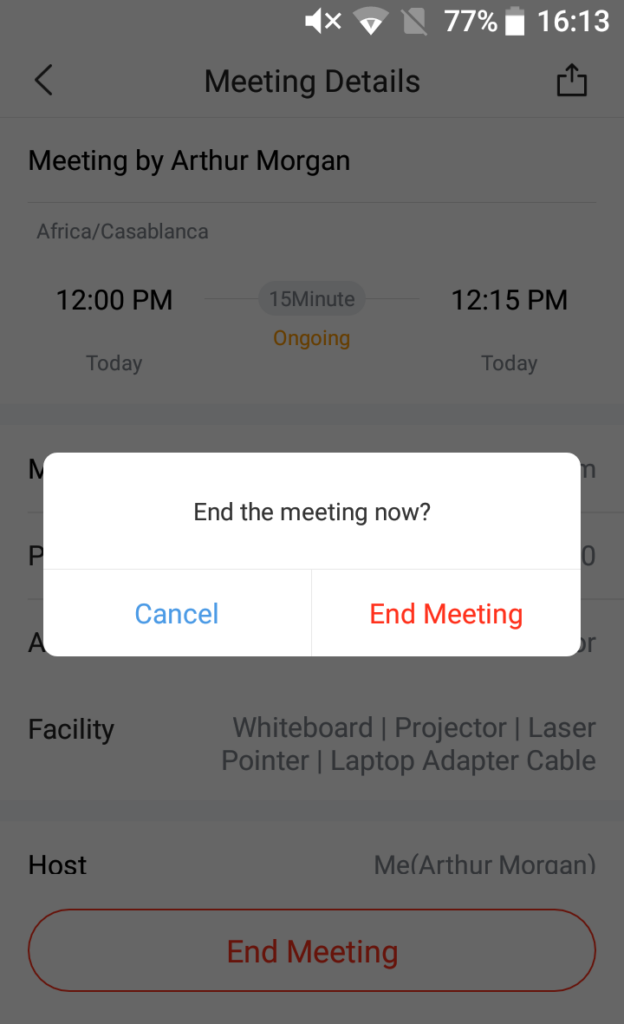
End Meeting
- Virtual Meeting
If moderator clicks  , during the meeting, the moderator will be prompted to select whether to end the meeting or leave the meeting.
- Leave meeting:Leave the meeting without ending it. The other participants will remain in the meeting room.
- End meeting: End the meeting. All participants will be disconnected from the meeting room.
On the meeting list, the meeting creator can click ![]() button to end the meeting which is currently in progress. Then, the meeting will be ended directly.
button to end the meeting which is currently in progress. Then, the meeting will be ended directly.
- Onsite Meeting
To end an onsite meeting, please navigate to “Meetings” tab and select the meeting that you want to end. You can either end an ongoing meeting or a scheduled meeting that has not started yet.
Step 1: Tap on the meeting that you would like to end.
Step 2: Click on “End Meeting”
Step 3: Confirm that you want to end the meeting.

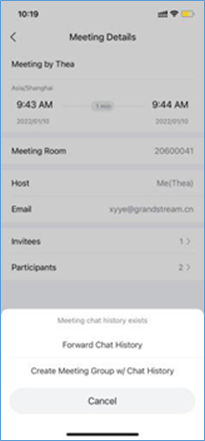
Create a Chat Group After The Meetings
After the meeting has ended, only the meeting organizer can create a chat group from the Meeting Details interface. The chat group will include the members who had participated in the meeting. The meeting’s host can click “More” button to choose to “Forward Chat History” or “Create Chat Group and Forward Chat History”. Please see the screenshot below:
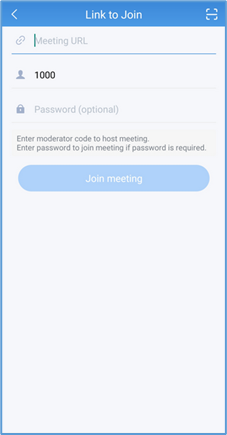
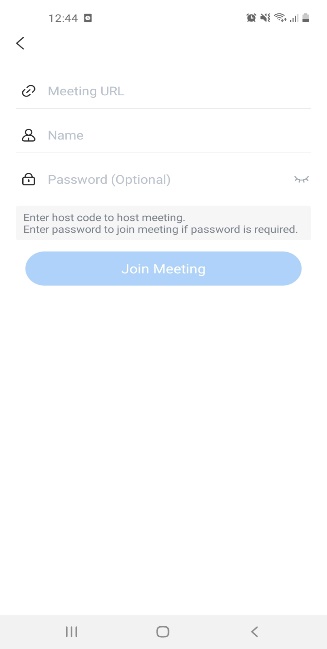
Join Meeting via Link
Users who do not have UCM extensions to log in Wave app can join meeting via link.
There are two methods to join meeting via link:
- Scan the QR code from the meeting invitation email or provided by meeting host to join meeting.
- Tap on the Join meeting button and enter the required information. By default, meeting invitation emails also provide a link to join the meeting. Opening the link with the Wave app will automatically fill in the Meeting URL field.
Schedule Onsite Meeting
Wave users can schedule an onsite meeting. The UCM6300 administrator should add a meeting room first so the Wave users can be able to schedule an onsite meeting.
Parameter | Description |
Meeting Name | Enter the name of the meeting |
Type | Choose the type of meeting.
|
Meeting Room | Select the meeting room in which the physical meeting will take place. |
Meeting Time | Select when the meeting is going to take place. |
Recurrence | Select the recurrence of the meeting.
|
Meeting Description | Enter the description of the meeting. |
Invitees | Select the extensions that you would like to invite.
|
Host Settings | |
Host | Select the extension of the host. |
Select the email of the host. | |
Advanced Settings | |
Time Zone | Select the timezone. |
Email Reminder Before Meeting | Select the interval of time of the reminder. |
Once the meeting has been scheduled, it will appear in the list of pending meetings as shown in the screenshot below:
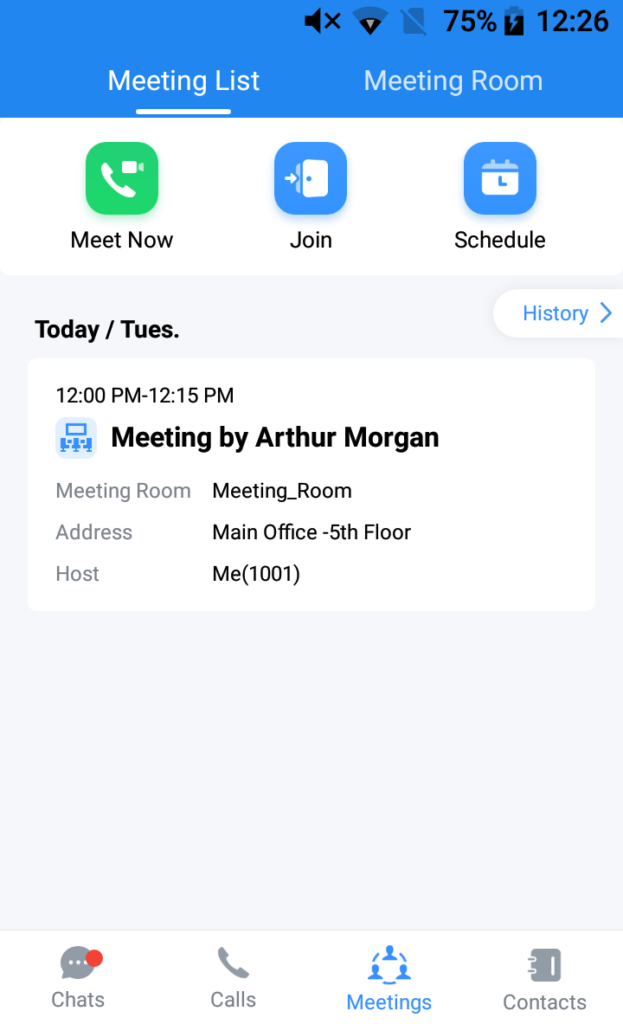
Meeting List
All the meetings that have been created in the UCM can be viewed in the Meeting List (This includes the virtual and onsite meetings).
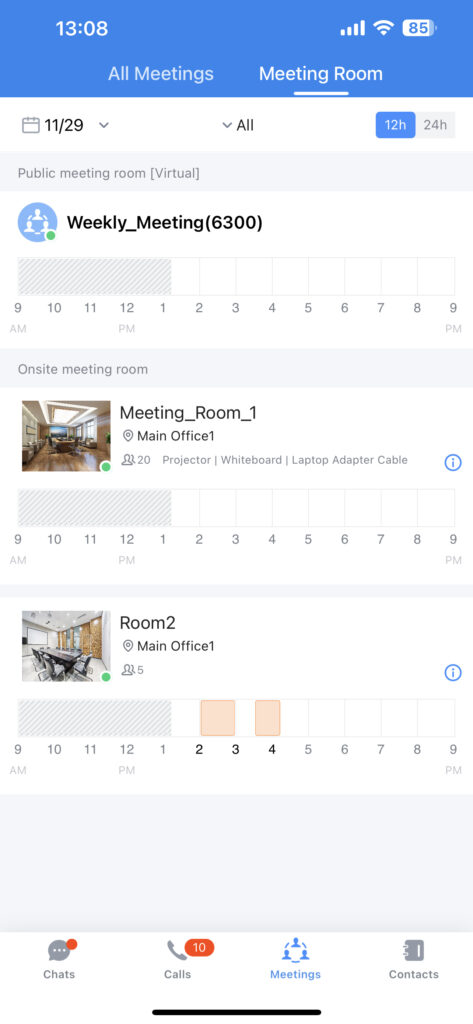
Meeting Room
All the rooms that have been created in the UCM (this includes the virtual and onsite meeting rooms) can be viewed by going to Meeting tab, then tap Meeting Room tab.
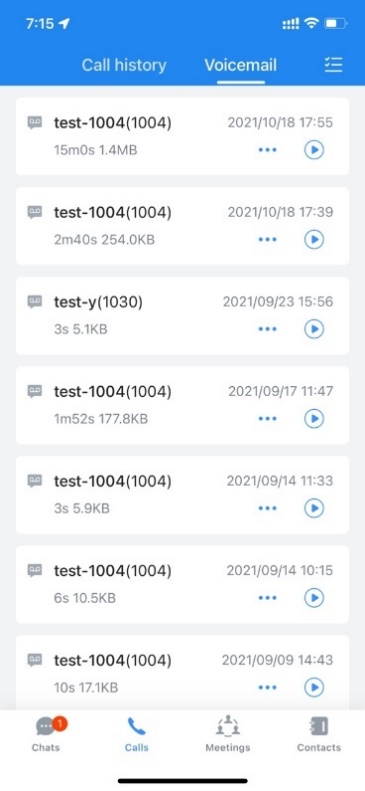
VOICEMAIL
In “Voicemail” module, users can check all voicemail received by the account, including the common voicemail and urgent voicemail.
Users can view and play all voicemail in the Voicemail menu, and users can also batch delete the voicemail messages. As the screenshot shows on the right side:
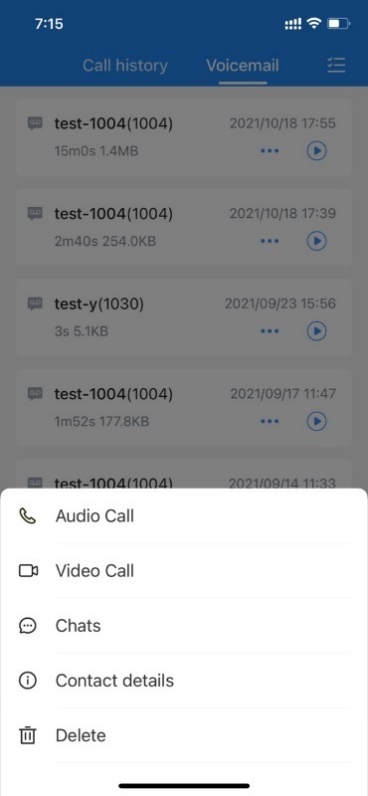
In the Voicemail menu, the user can select 1 voicemail message, and click  button to select to make audio/video call or send chat message to the voicemail sender. As the screenshot shows on the right side:
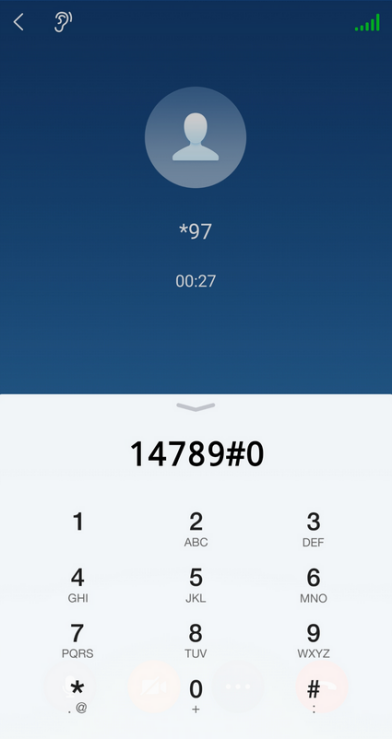
To access the extension’s voicemail: Step 1: Bring up the dial pad to enter the voicemail access feature code for the registered user’s personal voicemail box (*97 by default) or for another extension’s voicemail box (*98 by default). Step 2: Tap on  icon and select “DTMF” option.
Step 3: Enter the DTMF keys to access the voicemail and listen to the messages.
CONTACTS
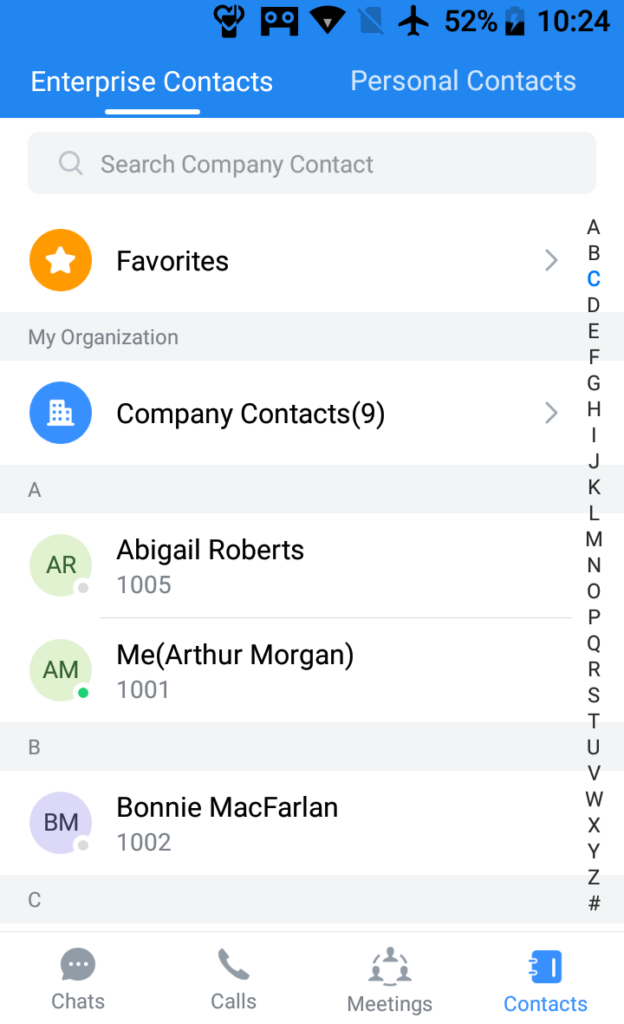
There are two types of contacts that Wave can display.
Enterprise Contacts: These contacts are the extensions which are registered on the UCM.
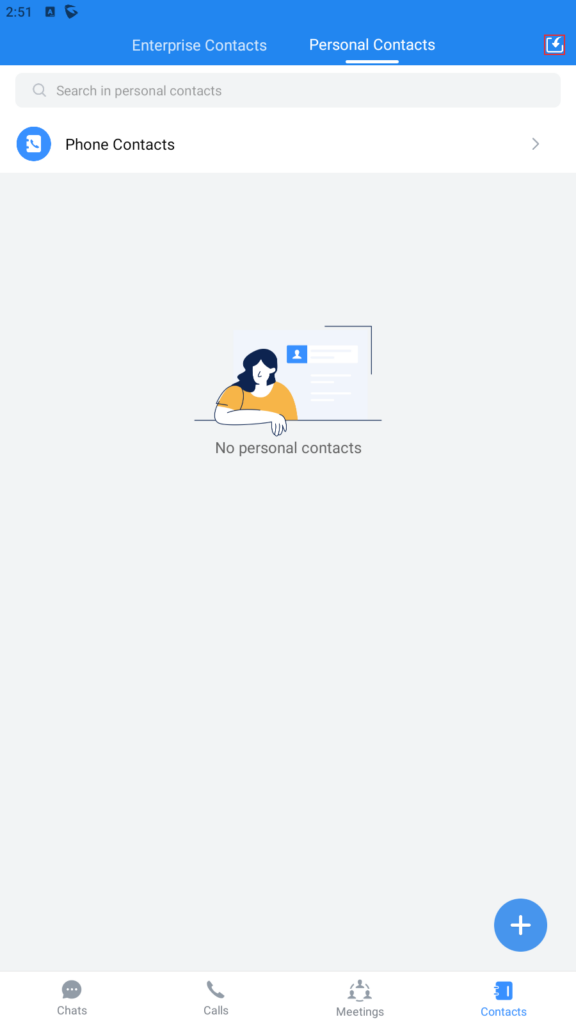
Personal Contacts: These are the contacts which the user has added to Wave.
Phone Contacts: These are the contacts which are registered on the phone.
In Wave app, click on to display contacts as the screenshot shows on the right side: In Wave app, users can click “Contacts” menu to view all contacts, favorites, LDAP contacts, local UCM contacts and CloudIM contacts.
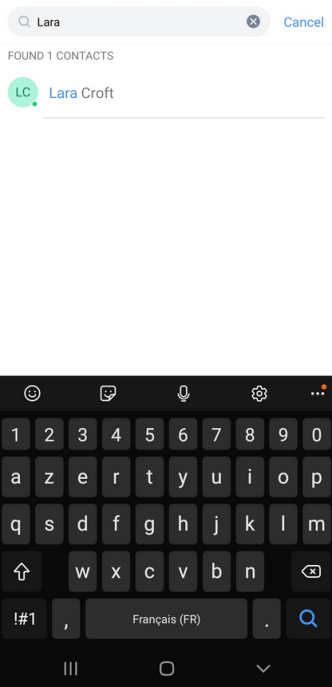
Search Contacts
Users can search for contacts in the Contacts tab. Tap on the search bar near the top of the app and enter keywords to search. Clicking on a result will bring up the contact details.
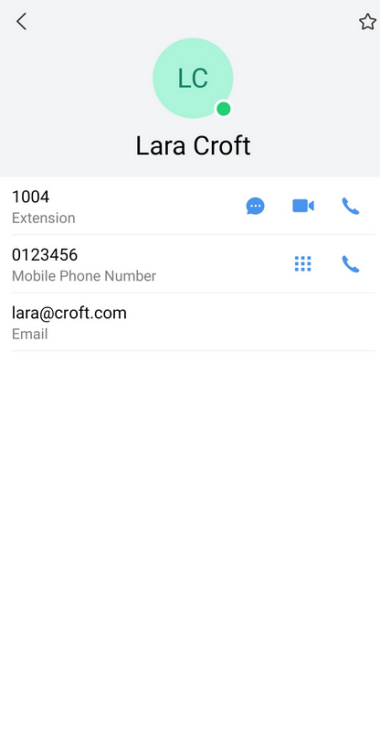
View Contacts
After searching contacts, users can click on the search result to view the details of the selected contact. The following options will be available in the Contact Details page:
 : Initiate audio call
 : Initiate video call
 : Open dial pad to edit the contact’s number before dialing
![]() : Chat with the contact
: Chat with the contact
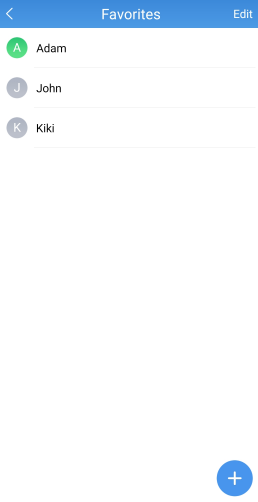
Favorites
Favorite contacts are displayed at the top of the contact list. There are two ways to add a contact as a favorite:
Method 1: Enter the contact details and follow the steps below:
Click on a contact in the contact list as shown on the right.
Click on the button  at the top right of the interface, when the button changes to
  , the contact will be set as a favorite contact.
Click again on the button  to remove the contact from favorites.
Method 2: Enter the favorites list and follow the steps below to add a contact as favorite:
Click on Favorites menu ![]() at the top in the contact list to enter the favorites management interface as shown on the right.
at the top in the contact list to enter the favorites management interface as shown on the right.
Click on the button  at the bottom right corner of the interface to enter the contact selection page.
After checking the contacts that need to be set as favorite contacts, confirm by clicking on OK to complete the setting.
Note: You can set up to 20 Favorite contacts. Favorite contacts can monitor their BLF status.
Call History
In Wave app, users can click “Call” menu to view all call history of the current Wave account. Two tabs are available: Call History and Voicemail.
The following icons will be displayed on the left of each entry.
 Incoming audio call
 Outgoing audio call
 Missed audio/video calls and rejected calls
 Incoming video call
 Outgoing video call
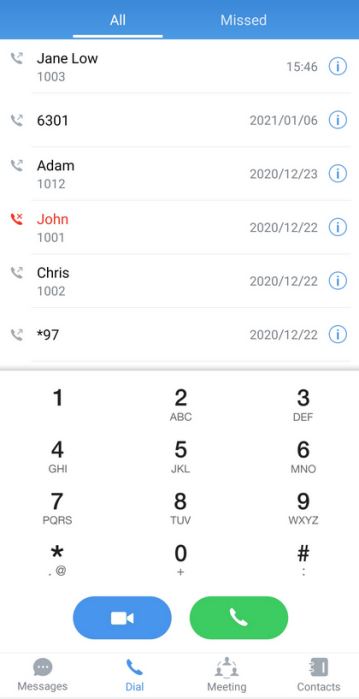
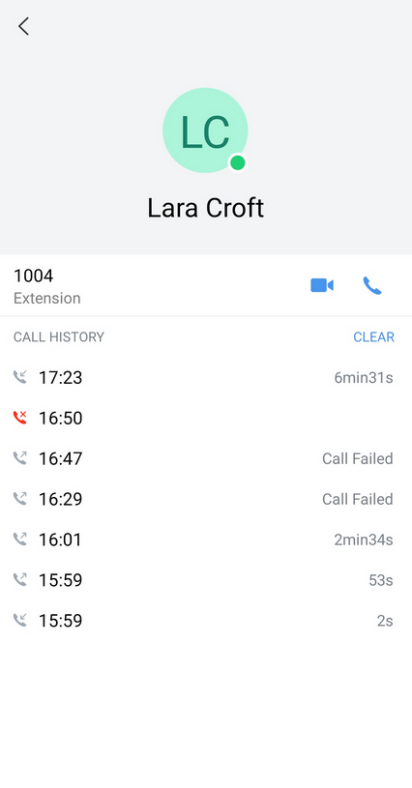
Users can tap on the call history entry to call the number. Users can click any specific call record to view the detailed information of this call, as the screenshot shows on the right side:
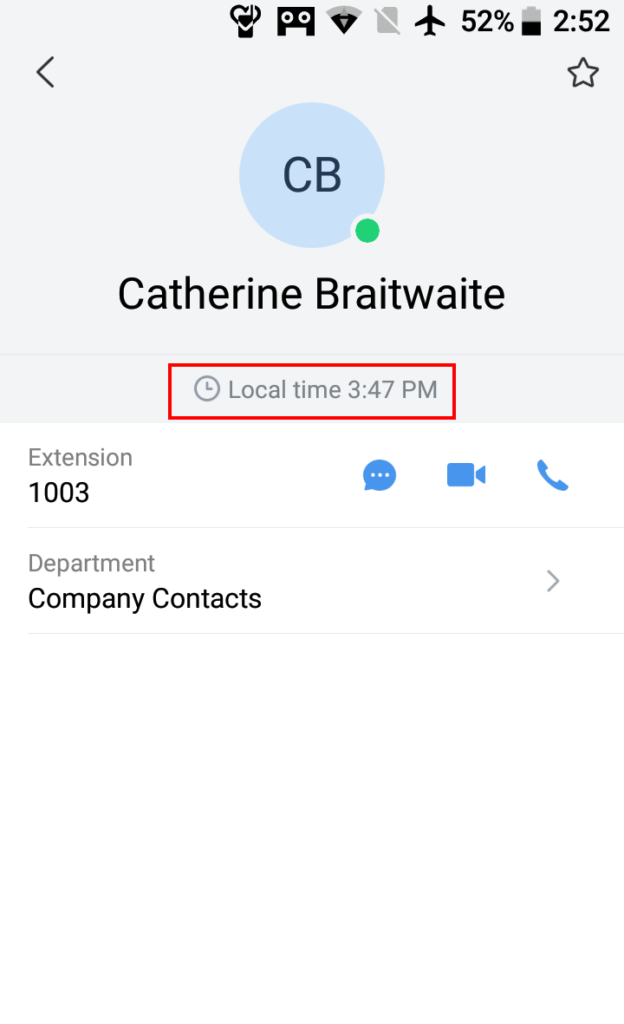
Contact Local Time
When the contact is on a different time zone, Wave mobile application will display the local time of the contact. Wave is able to retrieve the contact’s time settings from the user’s mobile phone in order to show the correct time zone. If no local time is displayed for the user, then that means that yourself and the other user are on the same time zone.
To see the local time for a specific contact, please navigate to Contacts and tap on the contact to open his/her profile, then the local time will be displayed under the contact’s name.
Import Contacts
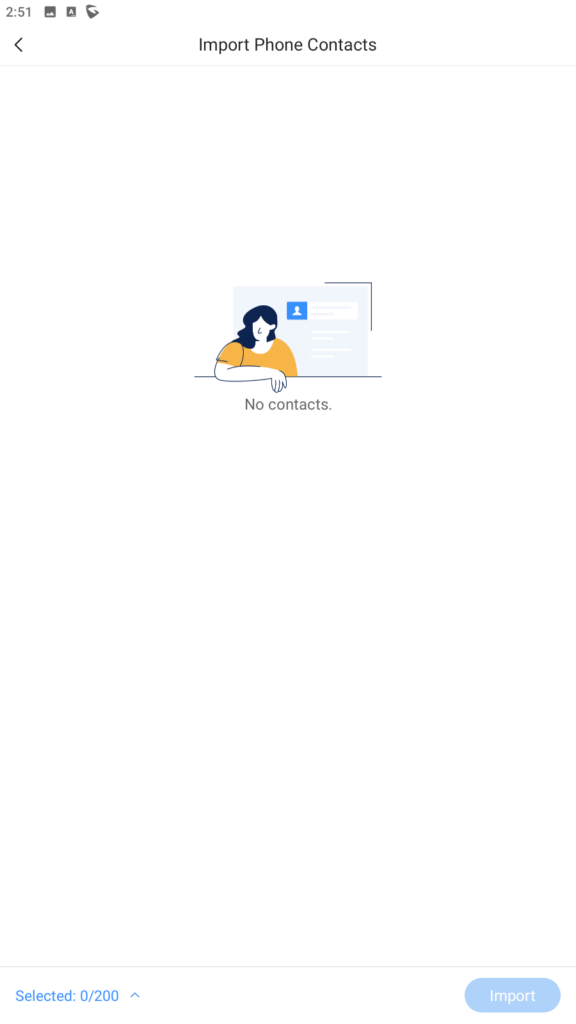
Wave allows importing the mobile phone contacts to Personal Contacts within Wave, this makes it easier for the user to call other parties using Wave instead of the phone’s telephony service itself.
To import your phone’s local contacts to Personal Contacts on Wave, please navigate to Contact tab in Wave and click on import button ![]() .
.
Select the contacts to import then tap “Import” button.
SETTINGS MENU
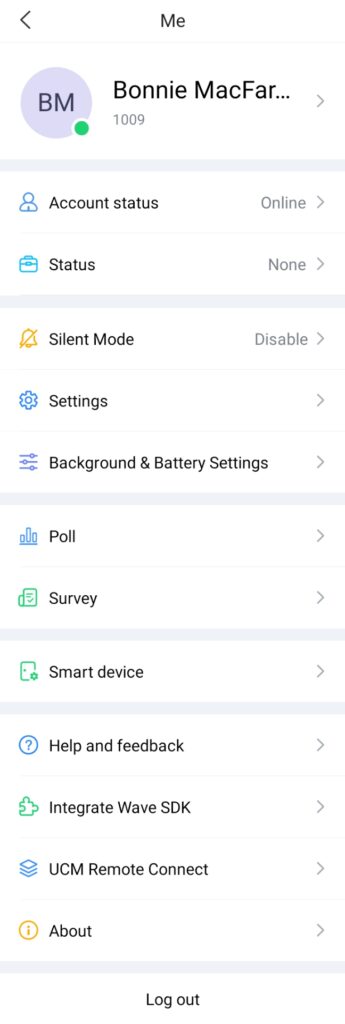
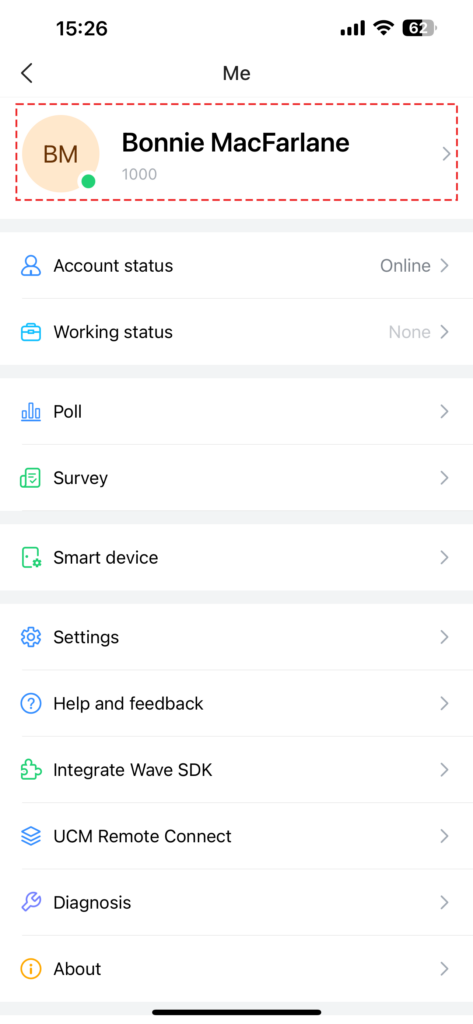
Tapping on the user account under Messages window will bring up:
- Account Information page about the user.
- Account Status and Status pages.
- Silent Mode, Settings, Background & Battery Settings pages.
- Poll & Survey pages.
- Smart Device page (Door System & Monitor).
- Help and Feedback, Integrate Wave SDK, UCM RemoteConnect, and About pages. Tapping on the About option will allow users to bring up details about the Wave app, check for app updates, privacy agreement, help, and export logs for troubleshooting purposes.
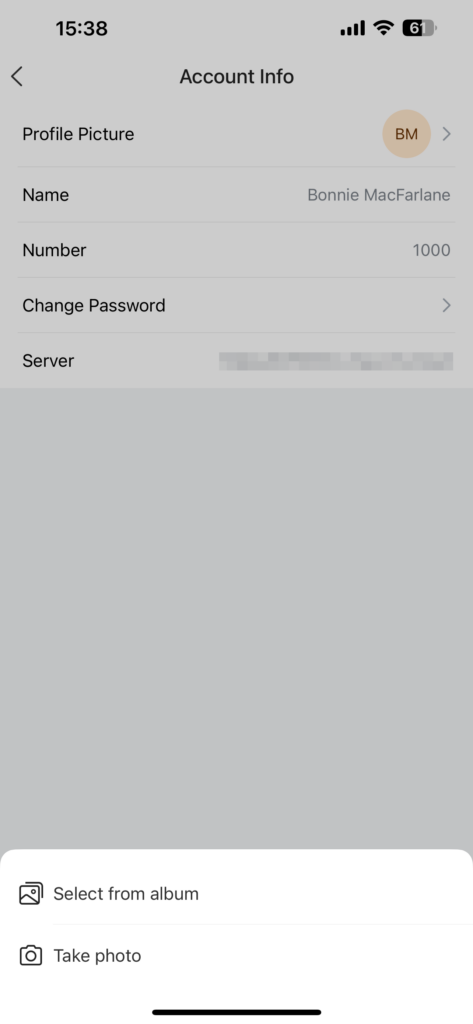
Account Info
Change Avatar
The Account Info page will display custom avatar, the currently registered account’s name/number, and the SIP server the account is registered to.
The user can select to take a photo or upload a photo from album as the custom avatar. For the uploaded custom avatar, the user can select to view the details or restore to the default image, as the screenshot shows on the right side:
Note: Custom avatar uploading only supports PNG, JPG and JPEG files.
Change Password
To change password, please tap on “Change Password” in Account Info page.
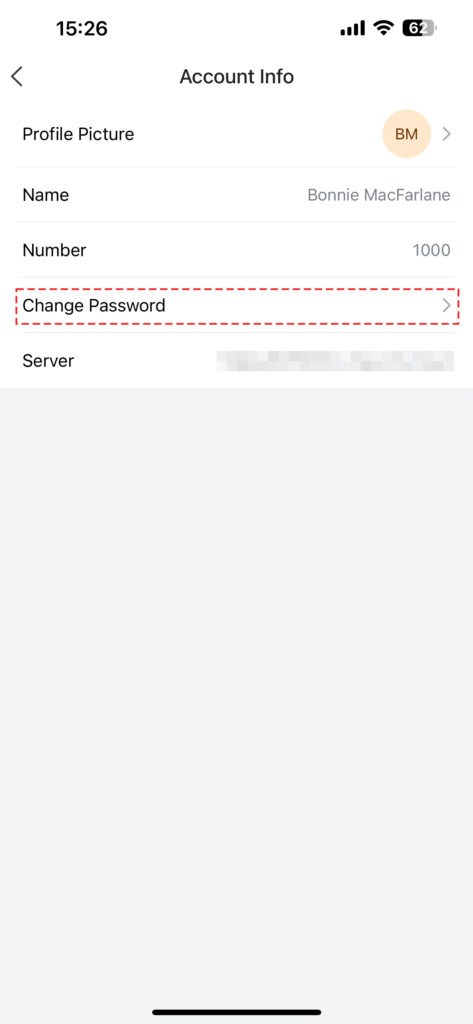
Enter the old password, then enter the new password and confirm by re-entering it again in the third field. Then tap the OK button.

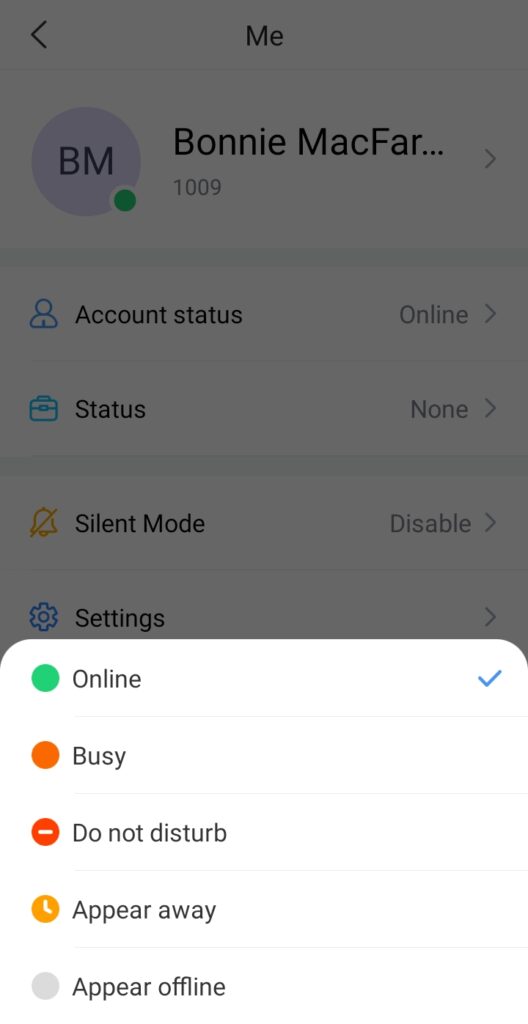
Account Status
It displays the login status of Wave account. When the account status is set, the account status will be displayed in contacts module and chat module.
The Account Status can be set to Online, Busy, Do not disturb, Away, and Offline:
 Online: This is the default account status. The new calls and messages will prompt users.
 Busy: The user is busy now, and the user can send and receive new calls and messages normally.
 Do Not Disturb: The new incoming calls and messages will be prompted without any sounds, and there is no push notification. The new incoming calls will be ignored, and the new missed call history will be generated.
 Offline: The account status will be displayed as offline, but the user still can send/receive calls and messages normally.
 Away: The account status will be displayed as away, but the user still can send/receive calls and messages normally.
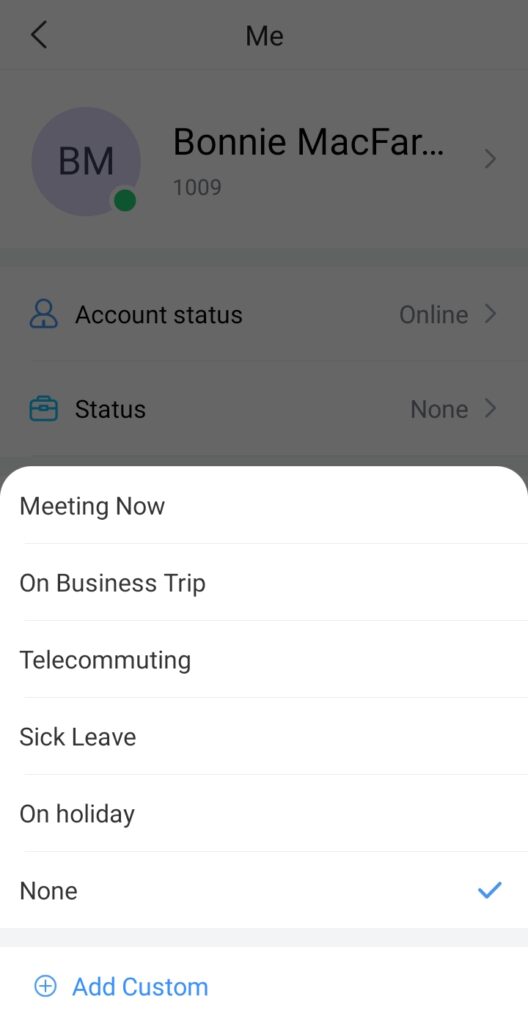
Working Status
It displays the working status of Wave account. When the working status is set, the working status will be displayed in contacts module and chat module.
The working status can be set to:
- Meeting Now
- On Business Trip
- Telecommuting
- Sick Leave
- On holiday
- None
- Add Custom
Note: The custom working status allows users to enter up to 64 characters and the emojis are not allowed.
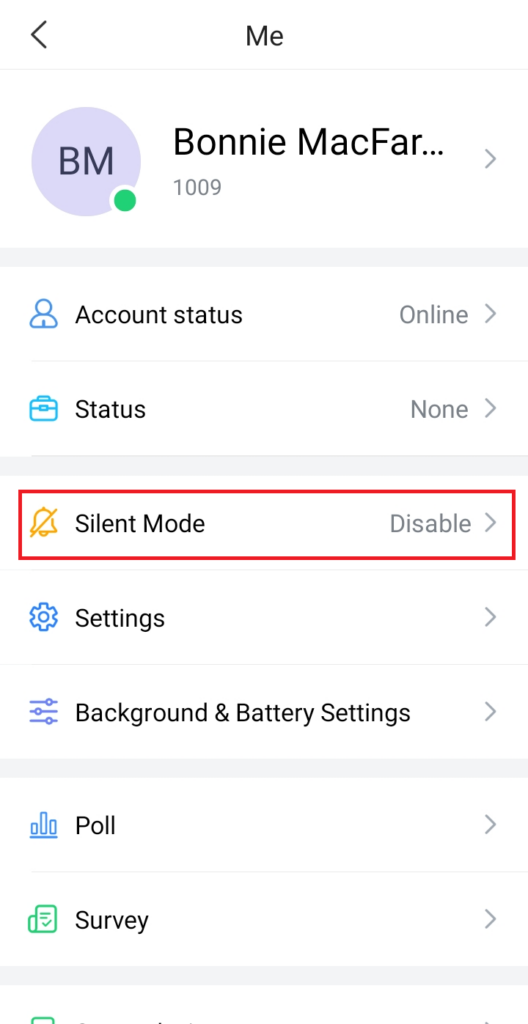
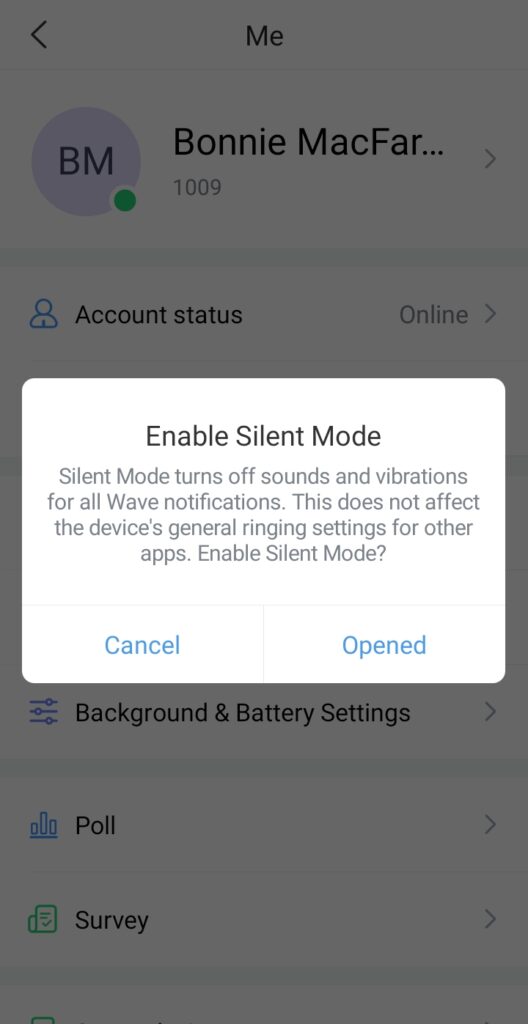
Silent Mode
Silent mode allows silencing all the sounds and vibrations prompted by Wave, this includes the vibrations and sounds produced when a call or a message is received. To enable silent mode, please follow the steps below:
Step 1: Tap on your profile picture on Wave mobile application
Step 2: Tap on “Silent Mode” then click “Opened” to enable Silent Mode.
Settings
Notification and Ringtone
- Enable or disable notifications by using the toggle “Allow Notification“. If you slide the toggle to the left, all the notifications will be suppressed.
- To customize the notifications settings, please tap on Message Notification Settings and then tailor the notification behavior based on your needs, then choose to play a sound or vibrate when a notification is received.
- Tap on Vibration to customize which notifications will trigger vibration.
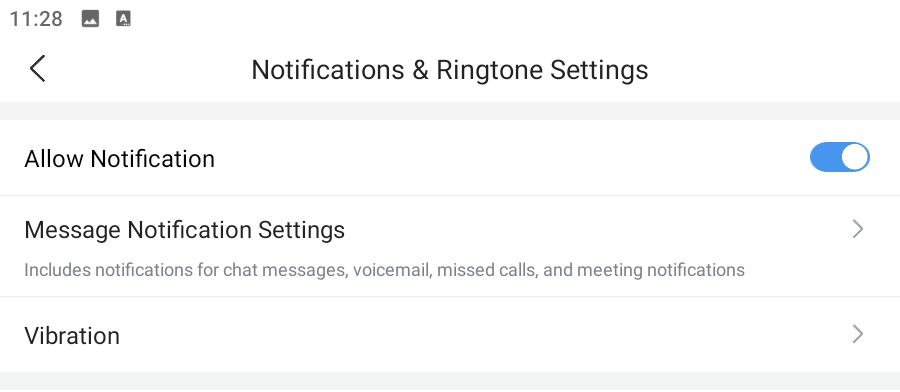
- Wave mobile offers 6 ringtones to choose from when receiving calls. When Wave is running in the background and a call has been received, Wave will use the system’s default ringtone.
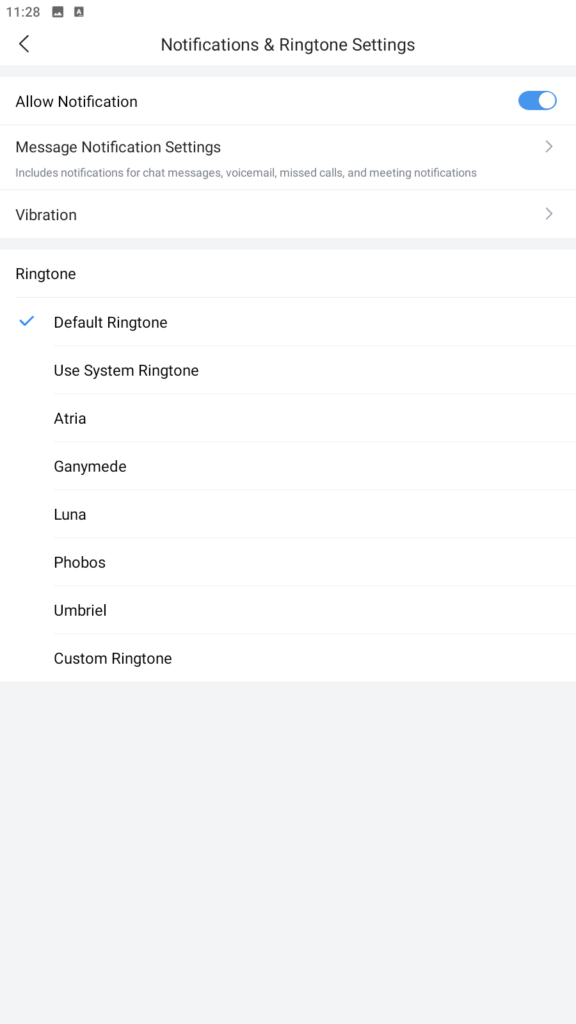
- “Block Notification When Active on Desktop“: If the Wave Desktop device is inactive for more than 5 minutes, push notifications to Wave Mobile will resume. Default is disabled.
Calls and Messages
- Call Waiting: If enabled, new incoming calls can be received during calls. Default is enabled.
- Call Waiting Tone: If enabled, play a tone for call waiting. Default is enabled.
- Echo Cancellation: If enabled, improve the audio quality using echo cancelation. Default is enabled.
- Noise Suppression: If enabled, suppress the noise during calls. Default is disabled.
- Safe Driving Mode: If enabled, camera and microphone will not be turned on automatically during Wave meetings. Users may enable them manually. Default is enabled.
- Car/Bluetooth Support: Answer and end calls with your bluetooth headset or from your car. Not all devices support this feature. If unsupported, or if the current device is in an active call, Wave calls may not be able to be controlled by the bluetooth device. Default is enabled.
- Audio Subsystem API: Using different audio APIs, the sound effects will be different.
- OpenSL (the older and most widely used API)
- AAudio (Widely used API started from Android 8.0+)
Dial Settings
Dial Plan Rules
Wave mobile support dial plan which can be configured and taken into consideration when numbers are dialed through Wave.
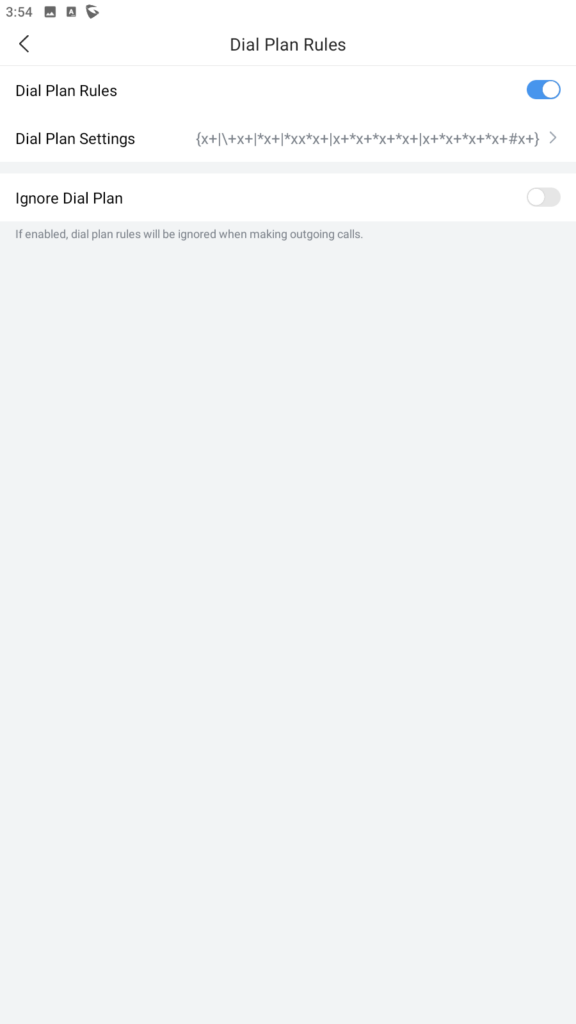
Toggle “Dial Plans Rules” so Wave starts taking the dial plan settings into consideration.
If “Ignore Dial Plan” is toggled on, Wave will ignore the dial plan settings.
Set the dial plan rules grammar for the number dialed. You can either enable the dial plan to have Wave take it into consideration, or to ignore completely when dialing numbers.
Here are the valid values:
1, 2, 3, 4, 5, 6, 7, 8, 9, 0, *, #, T,+, A-Z, a-z
Dial Plan rules:
- xx – Any 2-digit number
- xx+ – At least 2-digit number
- xx. – At least 1-digit number
- xx? – 1-digit or 2-digit number
- ^ – Reject
- T – Delay call after matching
- | – Or
- + – Add + to the number
- [3-5] – Dial the number 3, 4, or 5
- [147] – Dial the number 1, 4, or 7
- <2=011> – When the dial number is 2, it is replaced with 011
- Set \{x+\} – All all digital numbers to make outgoing calls
- “+character” – It indicates a fixed character.
Note: it does not need to be added in front of * and #, and it cannot be added in front of T^,; and | - Set \{X+\} Allow all 0-9, A-Z, a-z inputs with at least one character
Examples:
- Example 1: {[369]11 | 1617xxxxxx} – Allow 311, 611, 911, any 10-digit call that starts with 1617 to make the outgoing calls.
- Example 2: {^1900x+ | <=1617>xxxxxxx} – It will refuse to dial numbers starting with 1900, and adding the prefix 1617 when dialing any 7-digit number
- Example 3: \{ax+\} – It will dial a number starting with a and followed by at least 1-digit
Dial Tone
Choose to enable or disable Dial Tone. Default is enabled.
This will affect the dial pad on the calls page.
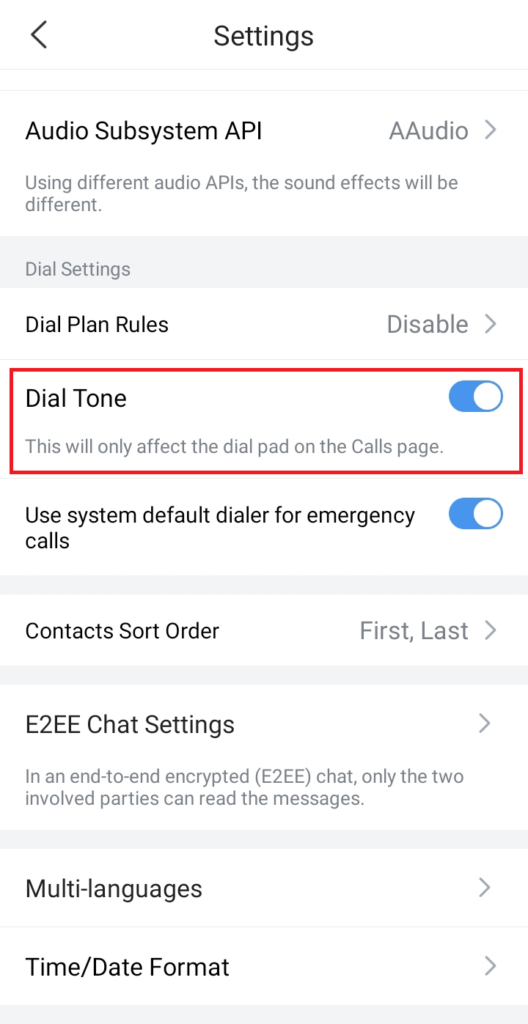
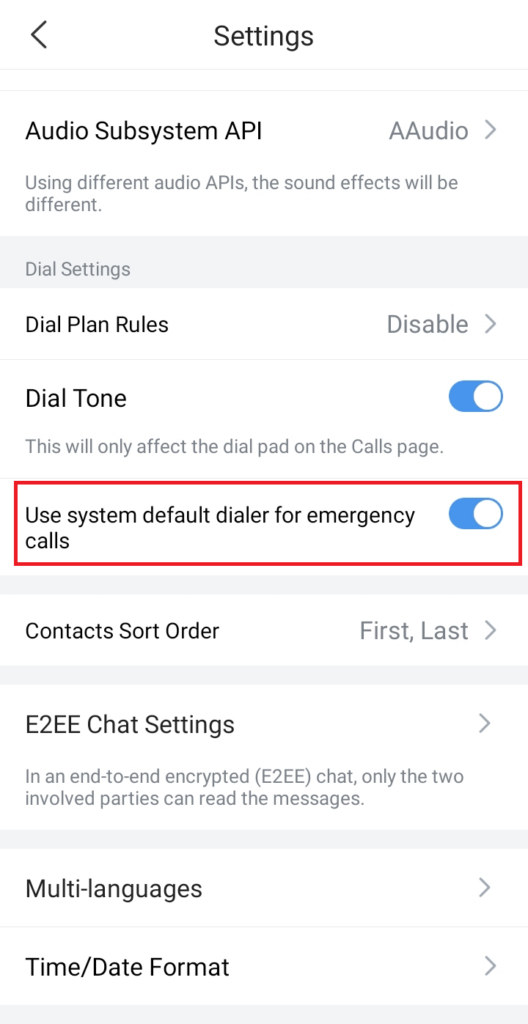
Use System Default Dialler for Emergency Calls
If enabled, emergency calls will use the default dialler to initiate the call even if the number is dialed on Wave. Default is enabled.
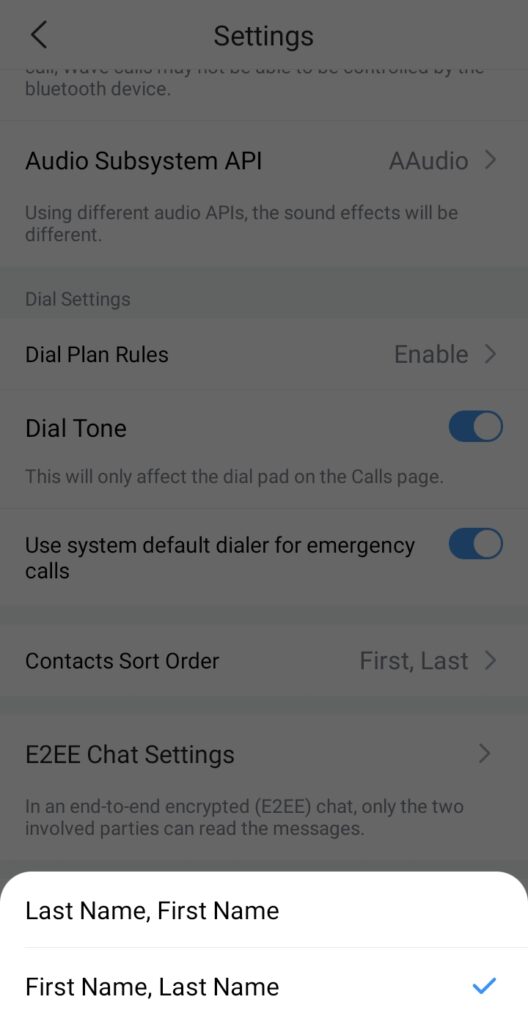
Contacts Sort Order
Select the sorting order for the contacts: “Last Name, First Name” or “First Name, Last Name”
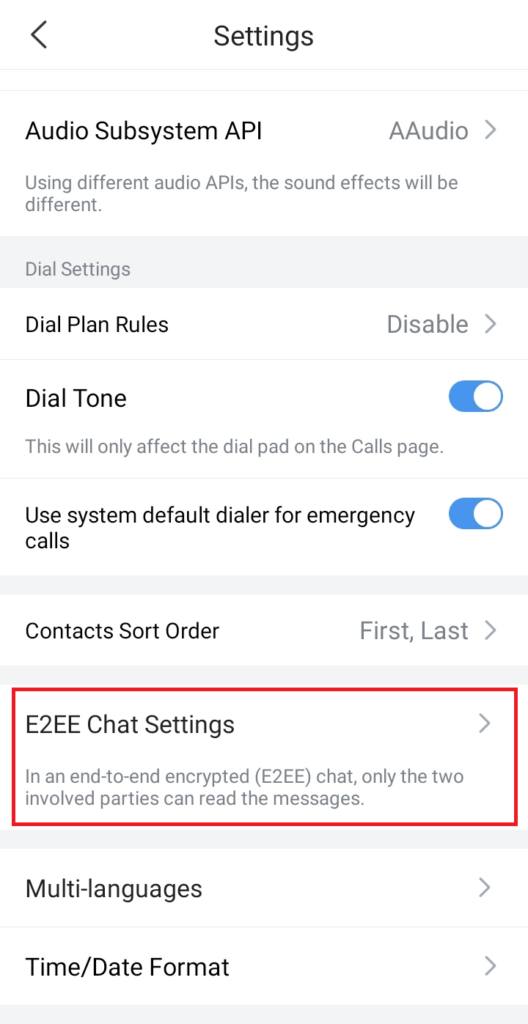
E2EE Chat Settings
In an end-to-end encrypted (E2EE) chat, only the two involved parties can read the messages.
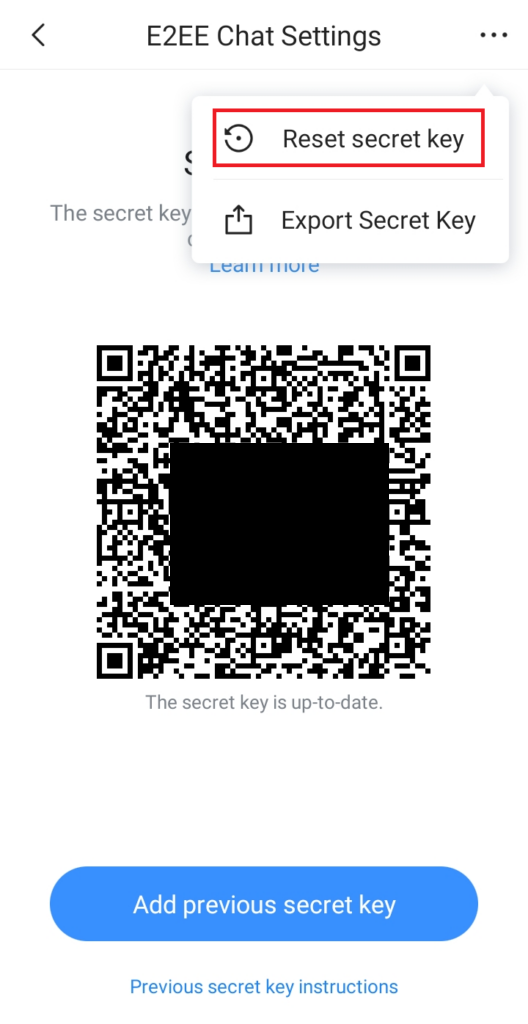
Export a Secret Key
Wave allows exporting the privacy key, to do that go to E2EE Chat Settings under Settings
Then tap on the three dots on the top right corner of the screen, then select Export secret key.
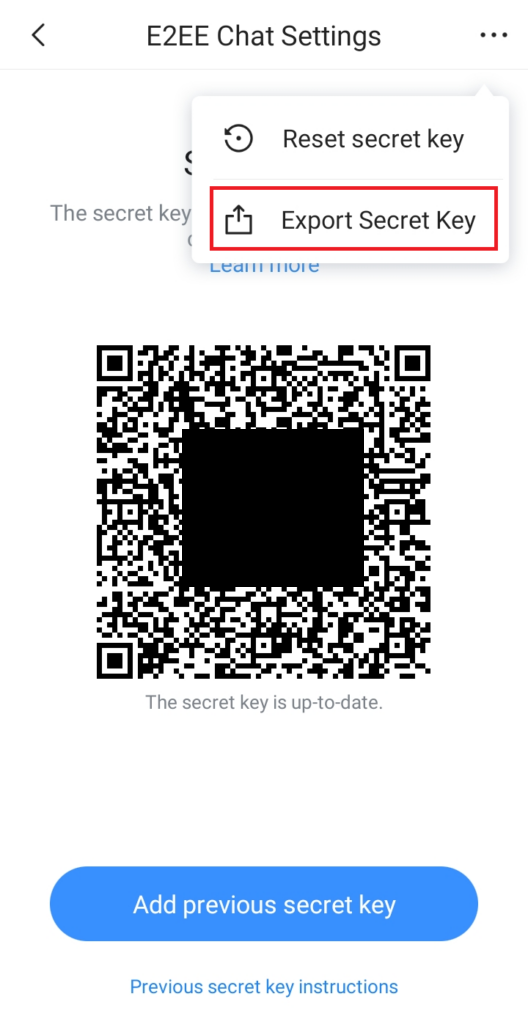
Then you can select to send it to yourself or to another contact on Wave, or to an email address.
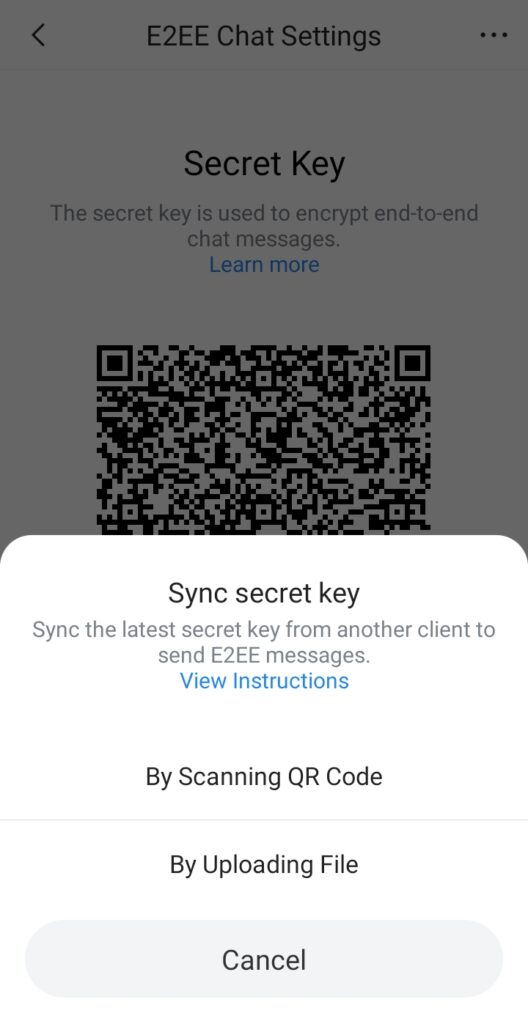
Sync Secret Key
To synchronize a previous end-to-end encryption key, the user can either upload to the application or by scanning the QR code generated by Wave mobile application. To do that please tap on the profile picture of your Wave account, then go Settings, then tap E2EE Chat Settings.
Then tap Sync Secret Key button
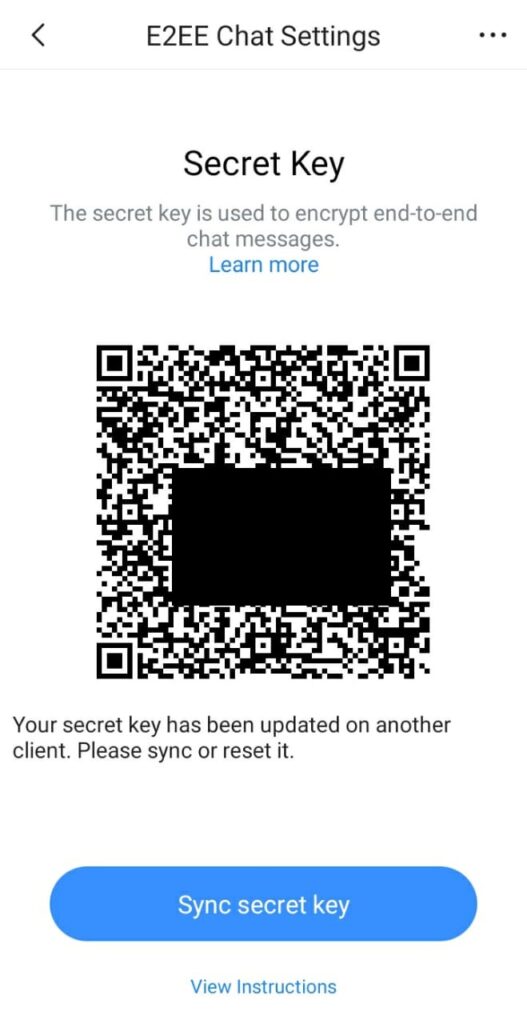
Choose to add the previous key secret either by Scanning QR code, or by Uploading the file.
Reset the Secret Key
The user can choose to reset to a new secret key by choosing Reset secret key from the E2EE settings page
Multi-languages
Select the language to use on Wave Mobile App.
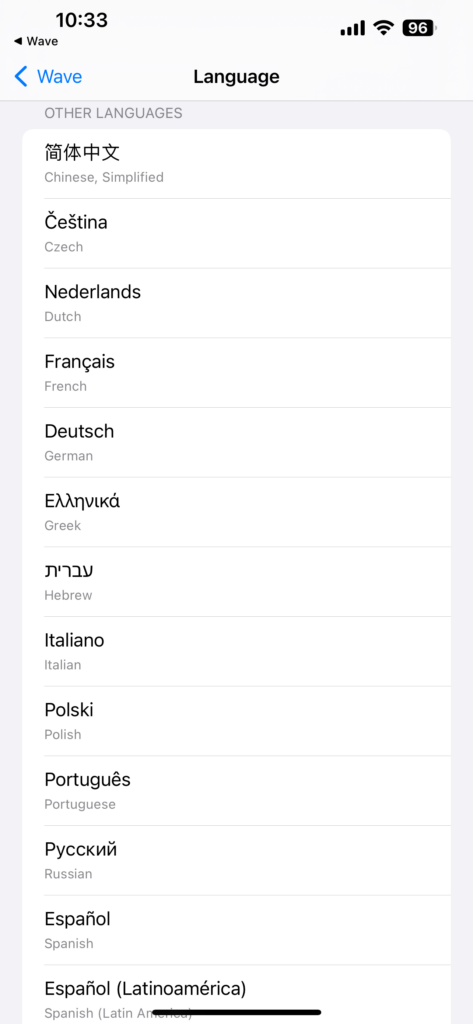
The languages supported are: English, Simplified Chinese, French, Spanish (Latin America), Spanish (Spain), Italian, Greek, Arabic, Russian, German, Polish, Portuguese and Vietnamese, Thai, Czech, Turkish, Hebrew, Dutch, and Slovenian.
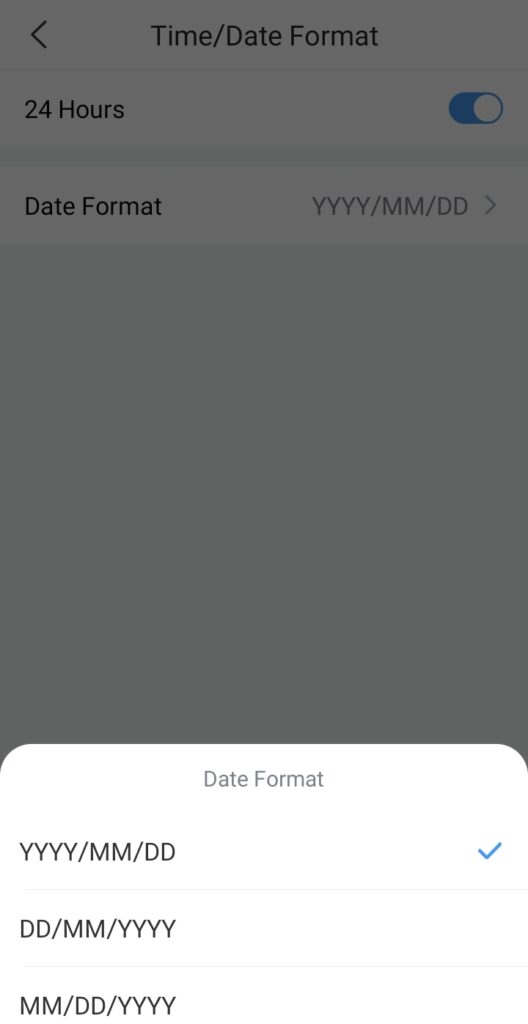
Time and Date Format
The users can select the Time/Date format as shown in the screenshot below:
Background and Battery Settings
Background and Battery Settings allow to control the behavior of Wave application in the background. This affects notifying the user when a call or a new message is received.
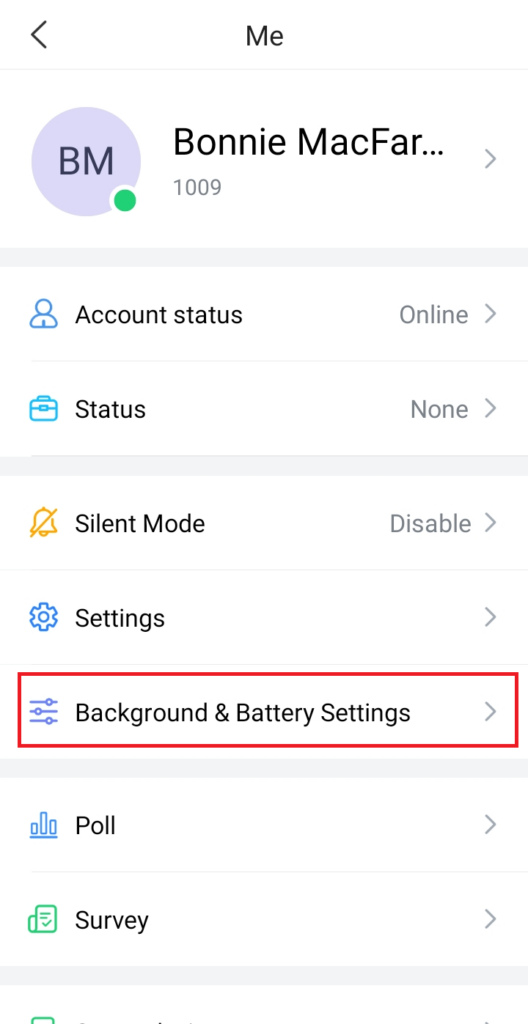

Background Mode | When the background mode is enabled, the user can still receive incoming calls, messages, and notifications when the application is running at background It is recommend to enable this if issues are experienced with message notifications and receiving incoming calls. |
Disable Battery Usage Optimization | This allows Wave to use the battery in the background. If this option is disabled, issues like not receiving notifications and incoming calls might not be received. |
Enable Background Data | Enable this option to allow Wave to use data in the background. Disabling this will prevent any messages or calls to be delivered when Wave is on the background. |
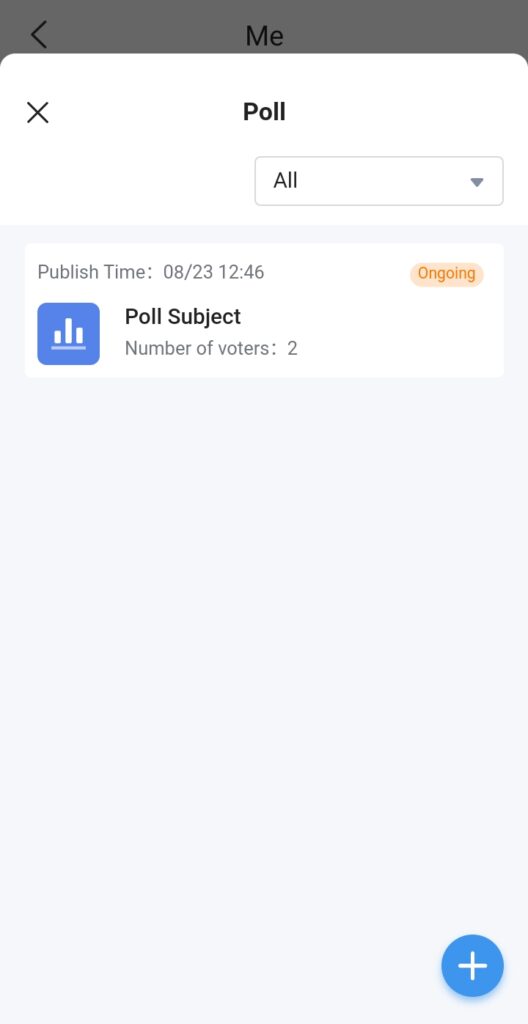
Poll
This page allows to view the ongoing polls, add new poll or stop a poll.
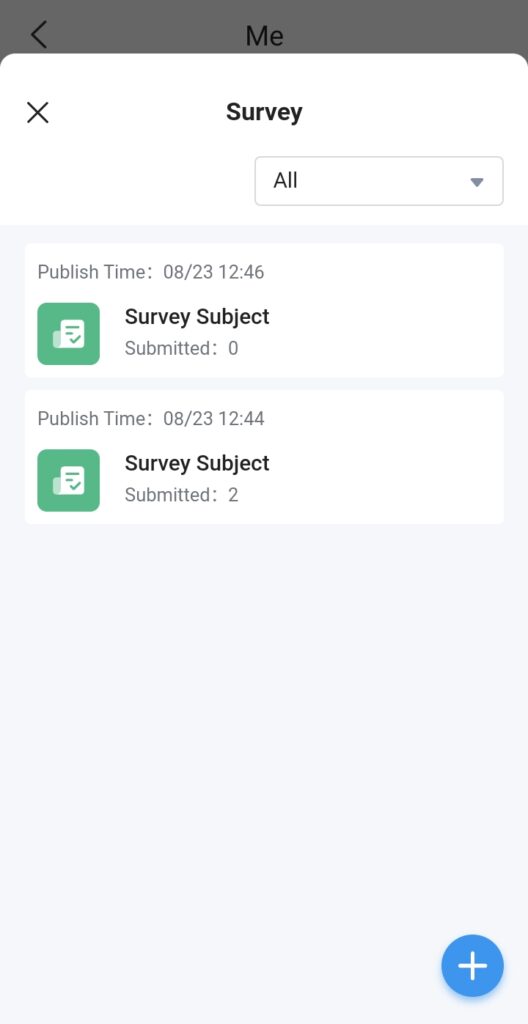
Survey
This page allows to view the ongoing surveys, add new survey or stop a survey.
Smart Device
This page allows to add/view GDS Door Systems and to Monitor Grandstrem Suveillance cameras.

Door System
The user can click “+” button to add door system to the Wave application and configure the relevant parameters, as the screenshot shows on the right side: The user can add multiple door systems in the Wave application. The user can also call the door system and view the door system details.
| When the door system has been configured, the Wave user will receive an incoming call once someone rings the door system, as the screenshot shows on the right side: | 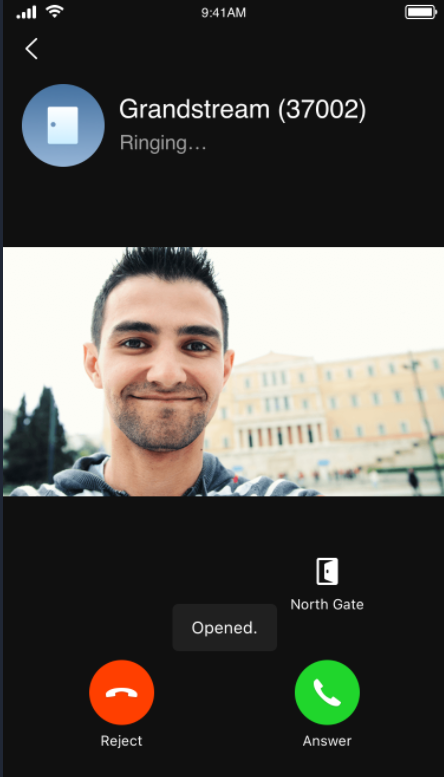 |
Help and Feedback
Users can go to the settings menu and click “Help and Feedback” to display the, What’s New, help, feedback, and exporting logs menu.
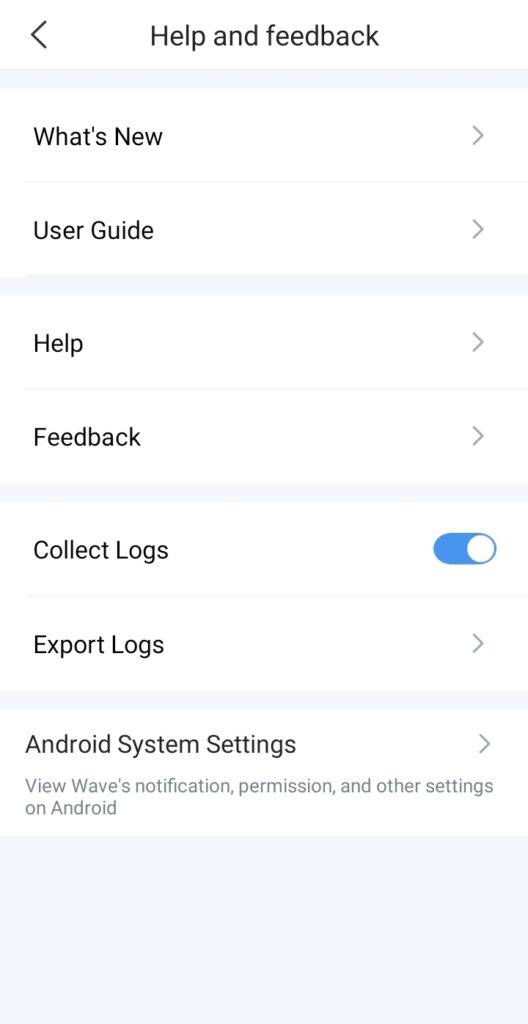
What’s New
A popup window will display the new features introduced in the current version.
User Guide
If the user has any questions while using Wave application, the user can click “User Guide” option to go to the official website of Grandstream and view the user guide of Wave application.
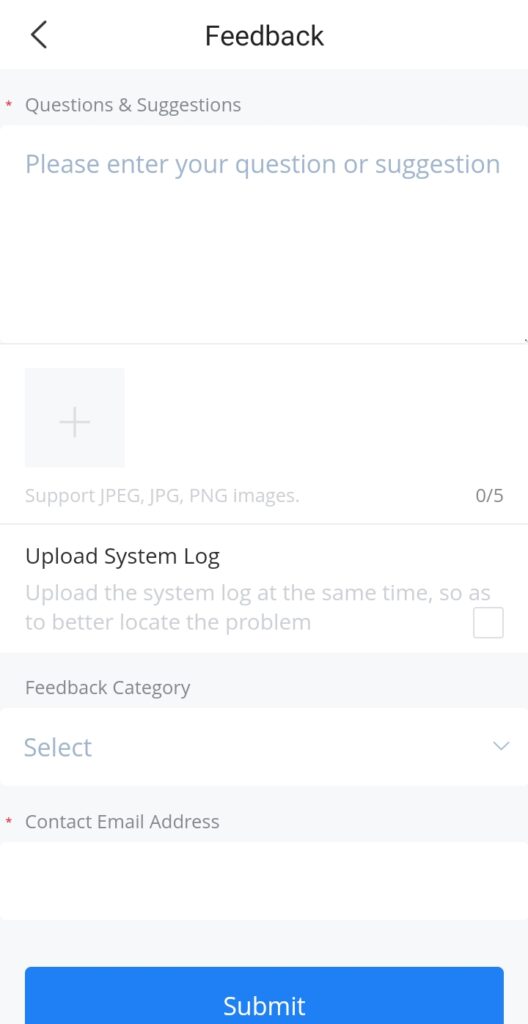
Feedback
If the user encounters any problems with Wave application, or the user wants to share any suggestions about Wave application, the user can click “Feedback” option to connect to the Grandstream Feedback System. It allows users to share feedback and we can collect questions/suggestions from users, so that we can provide better using experiences for users.
Collect and Export Logs
Users can enable “Collect Logs” to attach them when submiting feedback.
Users can go to the settings interface and click “Export Logs” option to export the application logs. If the user encounters any issues about the Wave application, the user can export the logs and save them. The exported logs can help users to troubleshoot the issues so that we can offer users better using experiences.
Diagnosis
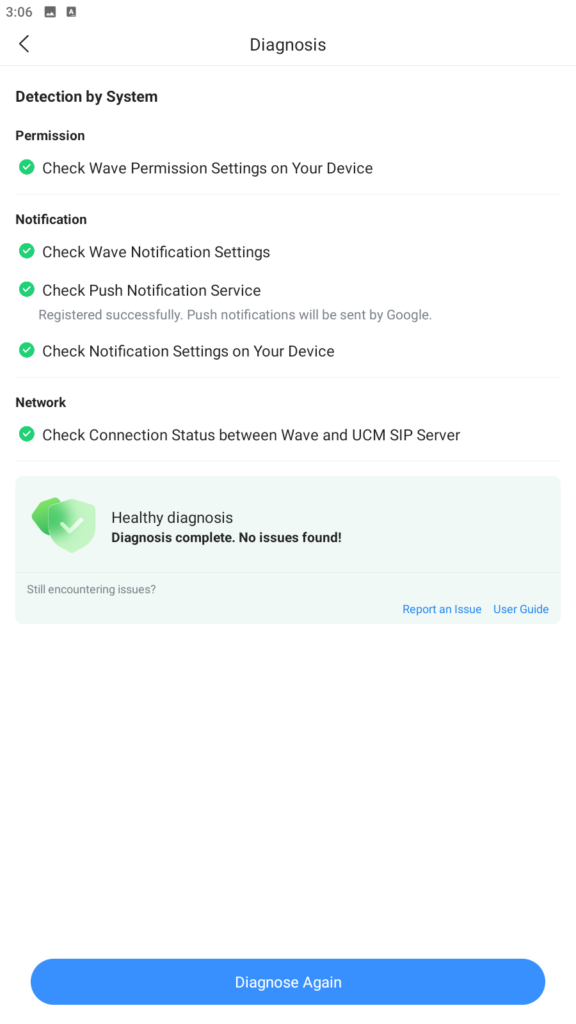
When you encounter an issue using Wave mobile application, it is highly recommended to run the diagnosis tools built into Wave to identify the cause of the issue. The diagnosis tools offered in Wave include permission verification, notification verification, and network test.
- To perform a diagnosis, please tap on your account profile on the top left corner, then select “Diagnosis” from the list.
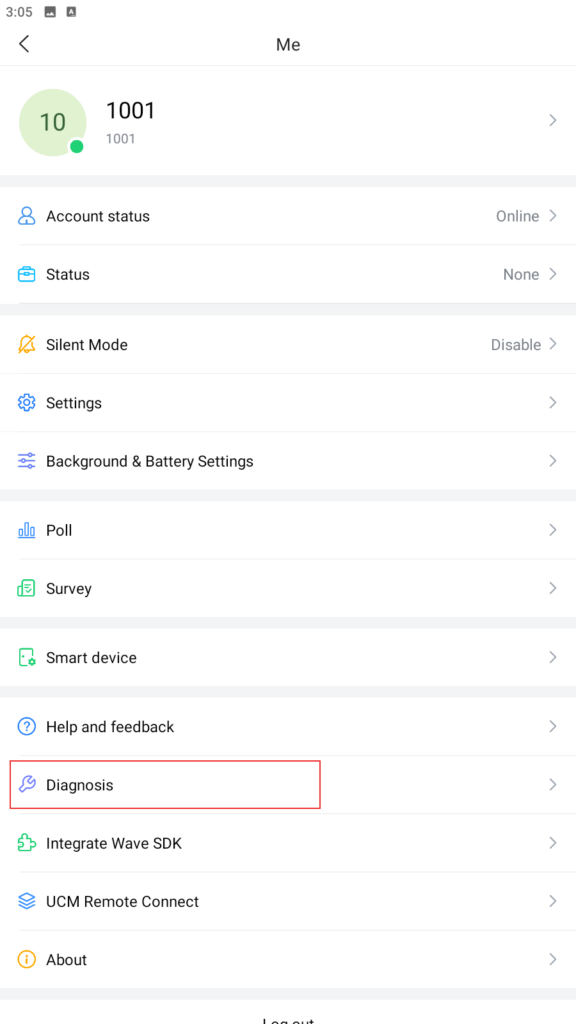
- Then click on “Start Diagnosis“
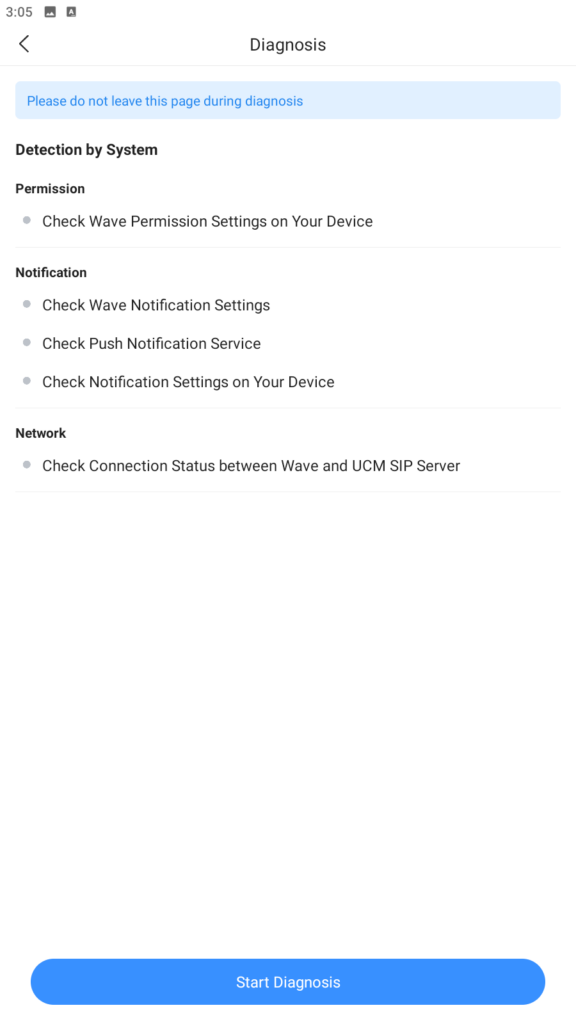
- When the diagnosis ends, the results will be displayed, see the example below.
Integrate Wave
Users can learn about the available Add-in API and SDK for further development to integrate Wave with other platforms. When clicked, the user will be redirected to the corresponding instruction guide.
- Add-in Development Instructions
- SDK Development Instructions
UCM Remote Connection
Users can learn more about UCM RemoteConnect services by accessing this menu.
The users will be redirected to UCMRC website: https://ucmrc.gdms.cloud/home
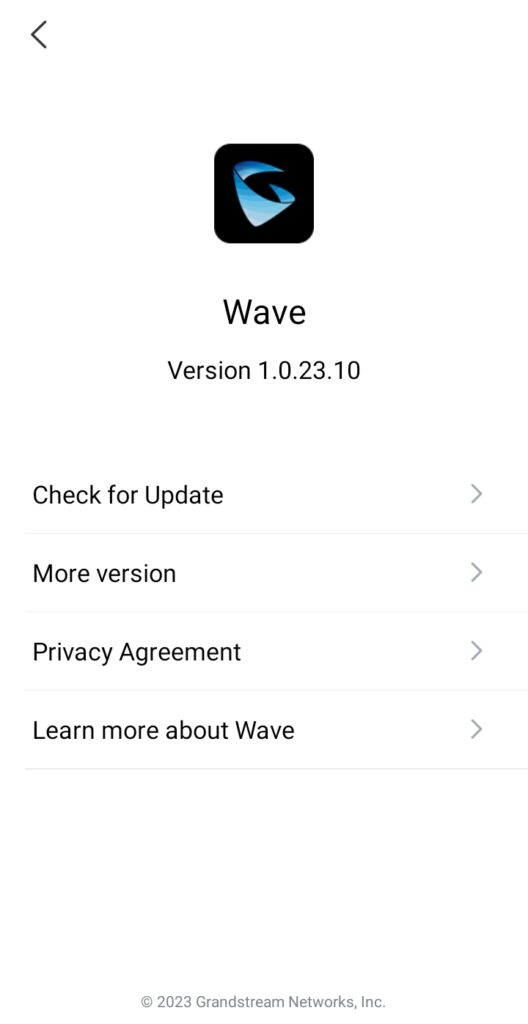
About
- Users can go to the settings interface and click “About” to get more details about the Wave application.
- Display the current version of the Wave application.
- If there is an updated application version, the user can click “Update Version” to upgrade the application.
- The user can click on “Privacy Agreement” to view the privacy terms of Wave application.
- The user can click on “Learn more about Wave” to direct to Grandstream Official website to view the Wave application user manual.
Log out
Users can click “Log out” to jump to the login interface and log in again.
RESET ACCOUNT PASSWORD
Users can reset their Account password in case it is forgotten by clicking on Forgot Password? On the Sign in page like shown in the figure below: | 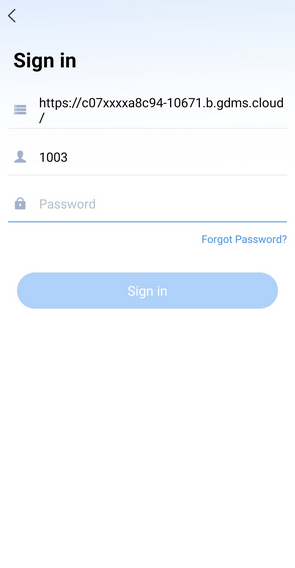 |
Once clicking on Forgot Password, the user will need to click on Send Mail button in order to receive an email to reset the password. | 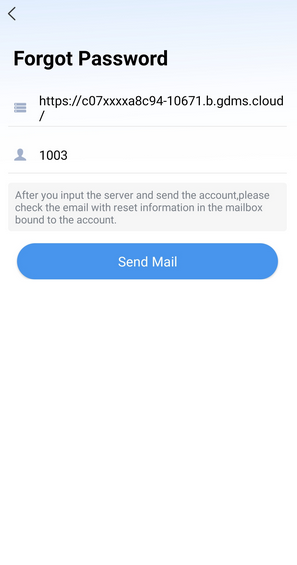 |
After clicking on “Send Mail” button, a verification code will be provided. Note: An email address should be previously configured under the extension on the UCM630x | 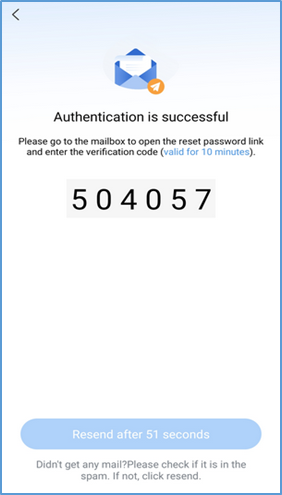 |
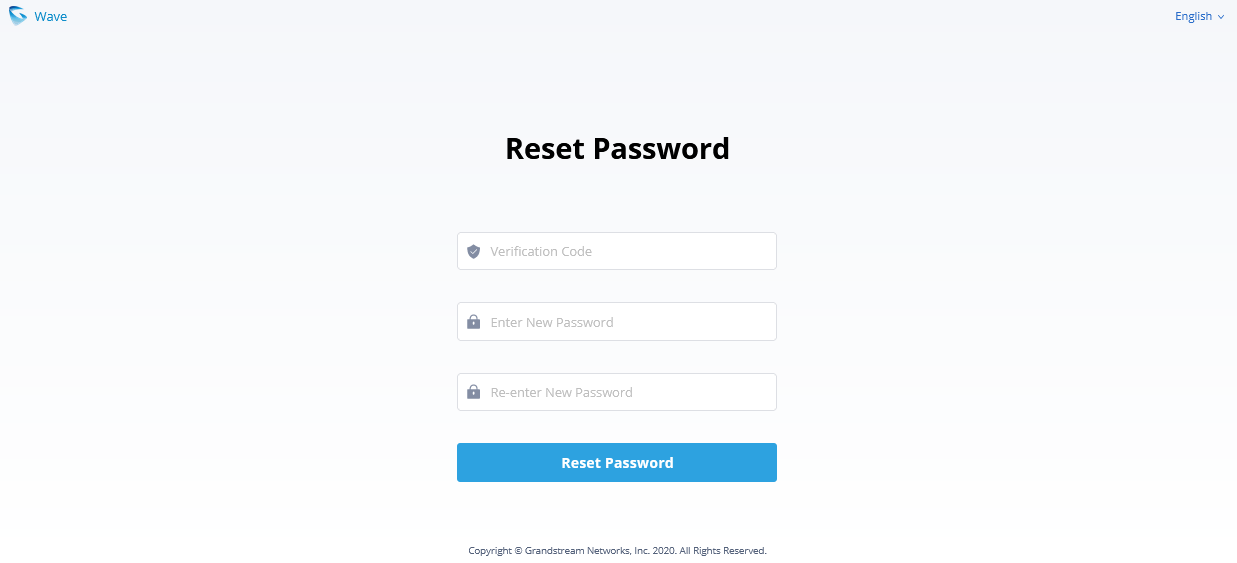
The user will need to go to the mailbox to open the reset password link, enter the provided Verification code and the new desired password.
FREQUENTLY ASKED QUESTIONS
Q: My account is unable to register. What should I do?
A: Please check the following:
- Network connection:
Please check whether the device is connected to Wi-Fi, 2G, 3G, 4G, or 5G network properly.
- Server Address:
Please check whether the server address is entered correctly. Wave uses the web access address, not the SIP server address. The server address should be the web access address, not the SIP server address.
For internal server address using IP address (IPv4 or IPv6), port number is required. For external server address (domain name), please confirm whether port number is required. If the external server address contains port number, port number must be entered. Otherwise, there is no need to enter port number.
- Extension and Password:
Check whether the extension number and User password are correct.
Q: Why do I see contacts from my phone in Wave app?
A: When using Wave for the first time, users will be prompted to allow or deny permission to access contacts. If allowed, the phone’s contacts will be displayed in Wave. To change this, go to your device’s app settings and change the Permissions for the Wave app.
Q: Why does my device not display any notifications from Wave?
A: Please confirm that notifications for the Wave app are enabled on your device. If enabled, the status bar will display account registration status. (This display may vary on different brands or systems of mobile devices.)
CHANGE LOG
This section documents significant changes from previous versions of user manuals for Wave mobile app. Only major new features or major document updates are listed here. Minor updates for corrections or editing are not documented here.
Version 1.25.11 (iOSTM)
- Added Slovenian language.
Version 1.0.25.10 (AndroidTM)/ 1.25.9 (iOSTM)
- Added support for replying to Live Chat calls and messages. [Live Chat]
- Added support for pinning messages and viewing pinned messages in chat groups. [Pin Message]
- Added support for saving messages. [Save Message]
- Added diagnostic tools. [Diagnosis]
- Added support for converting calls from multiple lines into an n-way conference. [N-way Conference]
- Added support for viewing who has seen a message in a group chat. [Group Chat]
- The user can now change the password directly on Wave mobile application. [Change Password]
- Added more emojis.
Version 1.0.23.14 (AndroidTM)/ 1.23.14 (iOSTM)
- Added new language – Traditional Chinese
Version 1.0.23.13 (AndroidTM) / 1.23.13 (iOSTM)
- Added Dutch language.
- Updated Hebrew language display.
Version 1.0.23.10 (AndroidTM) / 1.23.10 (iOSTM)
- Whiteboard new revision for in-meeting sharing. [Share]
- Optimized Audio Call Interface. [Using Wave App]
- Supported Emergency Calls on Mobile Phones [Dial Settings]
- Display Current Speaker in Meetings. [Display Current Speaker]
- Receive Calls when receiving an Invitation. [Receive Calls when receiving an Invitation]
- Notification Assistant [Notification Assistant]
- Preview Links in Messages. [Preview Link]
- Added following new settings: Call Waiting, Call Waiting Tone, Contacts Sort Order (“Last Name, First Name” or “First Name, Last Name”), etc. [Calls and Messages] [Contacts Sort Order]
- Added menu entrances: What’s New, SDK Integration Development Instructions, Add-in Integration Development Document. [What’s New] [Integrate Wave]
- Added “Delete Chat” permission. [Delete Message]
- On the Meeting list, you can search for the recent 6 months meeting history. The period will be counted by natural month. [Meeting History]
Version 1.0.21.18 (AndroidTM) / 1.21.15 (iOSTM)
- No major changes.
Version 1.0.21.14 (AndroidTM) / 1.21.11 (iOSTM)
- Added silent mode feature. [Silent Mode]
- Added custom ringtone for Wave on Android. [Notifications and Ringtones Settings]
- Added related battery settings. [Background and Battery Settings]
Version 1.0.21.8 (AndroidTM) / 1.21.8 (iOSTM)
- Added Raise Hand feature. [During the Meeting]
- Users can now set dial plan rules in Wave mobile. [Dial Plan]
- Users can now customize their ringtone by picking a ringtone from the list of ringtones (Currently supported on iOS Only). [Ringtone]
- T9 contact name matching is now supported. [Search Contacts]
- Users can now delete specific chats, or delete all the chats at once. [Single Chat]
- Meeting hosts can now specify the reason why a scheduled meeting was cancelled. [Schedule Meeting]
- Wave mobile application indicates now when a message has been delivered and read. [Single Chat]
- Added Survey and Poll features. [Create Poll/Survey]
- Added support for importing phone contacts to Personal Contacts on Wave. [Import Contacts]
Version 1.0.19.10 (AndroidTM) / 1.19.10 (iOSTM)
- Safe-driving mode has been added. [Safe Driving Mode]
- Ability to zoom in and out when a screen is shared in a meeting has been added.
- Added support for call/meeting ending indicator tone.
- Added support for scheduling onsite meetings. [Schedule Onsite Meeting]
- Added support for canceling and editing upcoming scheduled meetings, or ending ongoing meetings. [Onsite Meeting]
- Added support for forwarding multiple messages in one message, or separately. [Message Forwarding]
- Added support for displaying the local time in the contact’s messaging window. [Contact Local Time]
- Added support for rotating, forwarding and downloading images exchanged in Wave mobile application. Note: Forwarded images will not retain the rotation. [View an Image]
- Added support for blocking Push notifications on Wave mobile app when the user is logged into Wave desktop. [Notifications]
- Added support for end-to-end encryption [End-to-end encryption]
- Added support for Personal Contacts
- Added an indicating tone once the call is ended or exiting the meeting
Version 1.0.17.6 (AndroidTM) / 1.17.8 (iOSTM)
- Made several UI improvements.
- The last 10 server addresses logged into will now be remembered. These server addresses can be viewed and selected by tapping on the arrow icon in the Server Address field on the login page.
- [Calling]
- Users can now have up to 6 simultaneous calls instead of just 2.
- Improved attended transfer functionality.
- When copy/pasting a number with special characters into the dialpad, the special characters will be automatically filtered out.
- [Chat]
- Added the Change Group Owner option to the group chat settings to transfer ownership of the group to an existing group member.
- Added additional emojis.
- [Meetings]
- Users can now start and stop video recordings during meetings by swiping up the bottom bar and tapping on the Record option. If the meeting does not support video recordings, audio will be recorded instead. Recordings can be viewed and played directly from Wave.
- Users can now change the video feed layout of meetings by swiping up the bottom bar during meetings and toggling the Speaker Layout option. Enabling Speaker Layout will display only the video feed of the designed speaker, and users can swipe left or right to view just the speaker or all video participants respectively. Disabling the option will just display all video participants instead.
- Users can now create a meeting group chat when scheduling a meeting.
- When there is only 1 participant in a meeting, and the meeting duration has reached 30 minutes, a prompt will appear asking whether to extend the meeting. If extended, the meeting will last another 30 minutes. Otherwise, the meeting will automatically end after 5 minutes.
- If the duration of a meeting is about to reach 12 hours, and the meeting host is in the meeting, they can extend the meeting for another 12 hours once. The meeting will automatically end once another 12 hours have passed. If the meeting host is not in the meeting after the initial 12 hours, the meeting will automatically end.
- Users can now invite IP camera devices they have permission to access to meetings. Other meeting participants can view the video feed of invited IP camera devices.
- Added the Allowed to override Host Mute option to the Edit Meeting / Schedule Meeting pages → Advanced Settings page. If enabled, participants muted by the meeting host will be able to unmute themselves.
Version 1.0.15.9 (AndroidTM) / 1.15.8 (iOSTM)
- Added support for creating meeting group chat for a scheduled meeting. [Schedule Meeting]
- The host of a group chat can now allow or prohibit the group members from adding other users. [Group Chat]
- Added support for sending and receiving instant voice messages. [Voice Messages]
- Added support for viewing all images sent in a discussion in a gallery style display. [Instant Messages]
- Added support for searching chat history. [Search in a Chat History]
- Added support to enable or disable dial tone when using the keypad. [Dial Tone]
- Added support for sending files and video through the mobile phone system.
Version 1.0.13.8 (AndroidTM) / 1.13.9 (iOSTM)
- Made several UI adjustments.
- Added ability to change date and time format. [Time/Date Format]
- Added Portuguese and Vietnamese language support. [Wave Technical Specifications]
- Added support to start audio recording during the Wave meetings. [Record an Ongoing Meeting]
- Added support to display absent meeting invitees for the host. [Absent Meeting Invitees]
- Added support for Call Flip Function. [Call Flip Function]
- Added support to start audio recording during a point-to-point call. [Record an Ongoing Call]
- Added support to create a chat group after a meeting with the members of the meeting. [Create Chat Group After Meetings]
- Added support for viewing contacts based on UCM contact privilege settings. [CONTACTS]
- LDAP phonebook contact visibility is now based on the UCM’s LDAP phonebook settings. [CONTACTS]
- Added support for restricting visibility of chat history when inviting contacts to a group chat. [Group Chat]
- Added more emojis. [Instant Message]
- Added support for quick reply with emojis. . [Instant Message]
- Added support to view the files list. [Files list]
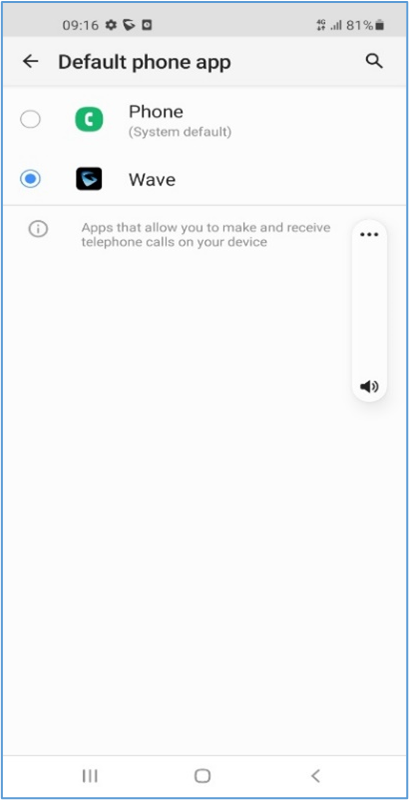
- The Wave app can now be selected as default phone app. [Default phone app]
- Added support for iPad landscape mode.
Version 1.0.11.x (AndroidTM) / 1.11.X (iOSTM)
- Added more functions in Chat module: supported replying with emoji, set the viewable range of chat history for new chat members, supported displaying the other party’s status (XXX is typing…), and supported more emojis. [Instant Message]
- Added multiple hierarchical organizational structure contacts in Contacts module. [Contacts]
- Added Voicemail function in Wave mobile applications. [VOICEMAIL]
- Added custom avatar function in Wave mobile applications. [Account Info]
- Added Help and Feedback module in Wave mobile applications. [Help and Feedback]
- Added to support GDS door system involved functions on the call interface. [Smart Device]
- Added chat bubble function during the meeting. [Conference]
- Added to synchronize call history from multiple clients for a single Wave account. [Call History]
- Merged audio conference and video conference to Conference module. [Conference]
Version 1.0.9.15 (AndroidTM) / 1.9.14 (iOSTM)
- Added support for the DTMF soft keyboard during the call. [During a Call]
- Added the ability to set the account status. [Account Status]
- Added the ability to set the workings status. [Working Status]
- Added support for Background Mode. [Settings]
Version 1.0.7.7 (AndroidTM) 1.7.8 (iOSTM)
- Added New features in chat module: pin chat box, mute message notice, hide chat box, quote to reply message, delete messages, etc. [Group Settings]
- Supported multi-lines calls. [Hold/Unhold and Multiple Lines]
- Supported to transfer an active call to a video conference. [N-Way Conference]
- Added public meeting room list and the list will show the meeting room status in different periods. [MEETING]
- Added to create a meeting with random meeting number. The meeting can be created as instant meeting or scheduled meeting. [Meet Now]
- Added to display the actual meeting duration and actual participants list for the previous meetings. [Meeting History]
- Supported to add participants from contacts/groups when scheduling a meeting. [Schedule Meeting]
- Supported to set meeting subject and add invitees for instant meetings. [Meet Now]
- Added meeting assistant module. When there are new meeting invitations, meeting reminders and meeting cancelation notifications, the meeting assistant will send messages to the host and participants. [Meeting Invitation]
Version 1.0.5.2 (AndroidTM) / 1.5.1 (iOSTM)
- Add chat feature, including single chat, group chat. [Single chat][Group Chat]
- Chat feature is supported in the meeting. [Meeting Chat]
- Support call waiting and switch two calls on Wave Android. [Call Waiting]
- Support N-Way audio conference. [N-Way Conference]
- Add history meeting list. [Meeting History]
- Wave users support using links to join the meeting. [Link to Join]
Version 1.0.1.9 (AndroidTM) / 1.1.9 (iOSTM)
- Added the option Favorites. [Favorites]
- Add the option of scheduled meeting. [Schedule Meeting]
- Added the option of listing participants and inviting members to the meeting. [Video Meeting Participants]
- Added the option of modifying the display name in the meeting. [Edit Name]
- Added the ability to reset account password. [RESET ACCOUNT PASSWORD]
- Added landscape layout support.
Version 1.0.0.17 (AndroidTM) / 1.0.15 (iOSTM)
- This is the initial version.