WELCOME
Thank you for purchasing Grandstream’s GXV3500, a powerful device to convert analog camera to IP network camera (encoder mode) or display real-time stream to big screen TV (decode mode).
GXV3500 is a next-generation Encoder/Decoder. It features cutting-edge H.264 real-time video compression, industry-leading SIP/VoIP for 2-way audio and video streaming to smartphones and videophones, PoE, best-in-class scalability and ease of integration, and advanced security protection. The unique incorporation of TCP/IP protocols creates sophisticated, flexible networking and remote-control abilities.
The GXV3500 features the advanced functionality of embedded analytics (motion detection). The built-in Alarm_In and Alarm_Out interface can be used to a linked analog camera, can also be peered to configured IP camera as external and remote Alarm_Out, saved the direct wiring to the camera via Ethernet network connection.
The GXV3500 can be managed with GSurf Pro (Grandstream’s intuitive FREE video management software that controls up to 72 cameras simultaneously). It also offers an advanced and flexible HTTP API and an SDK for easy integration with other surveillance systems.
Designed for indoor environment application, the GXV3500 is a robust surveillance solution for a broad range of application environments such as banks, hotels, schools, retail stores, small warehouses, offices or building entrances, and other small to median-sized enclosed environments.
CONNECT YOUR GXV3500
Equipment Package Contents
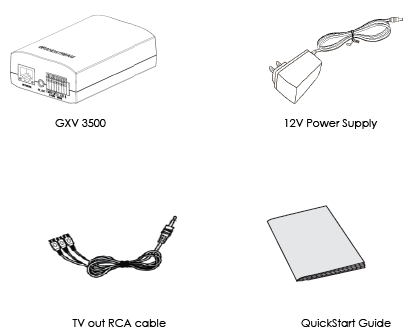
- GXV3500 – 1 Channel digital video encoder/Decode
- 12V DC Universal Power Adaptor
- 3.5mm to RCA audio/video cable
- Quick Installation Guide
Connecting the GXV3500
- Using the Power Adapter as power supply
- Connect the RJ45 Ethernet cable to the NETWORK port of the GXV3500
- Connect the other end of the RJ45 cable to your network (switch, router, or PC)
- Connect the power supply to the DC 12V power clamps on the back of the GXV3500
- Connect the GXV3500 Video into the analog camera Video Out port via BNC cable.
- Connect 3rd party 3.5mm external microphone to “MIC_IN” port of GXV3500 if audio required.
- Using PoE as power supply
- Connect the RJ45 Ethernet cable to the NETWORK port of GXV3500
- Connect the other end of the RJ45 cable to your PoE switch
- PoE injector can be used if PoE switch is not available.
- Connect the GXV3500 “Video In” to the analog camera “Video Out” port via BNC cable.
- Connect 3rd party 3.5mm external microphone to “MIC_IN” port of GXV3500 if audio required.
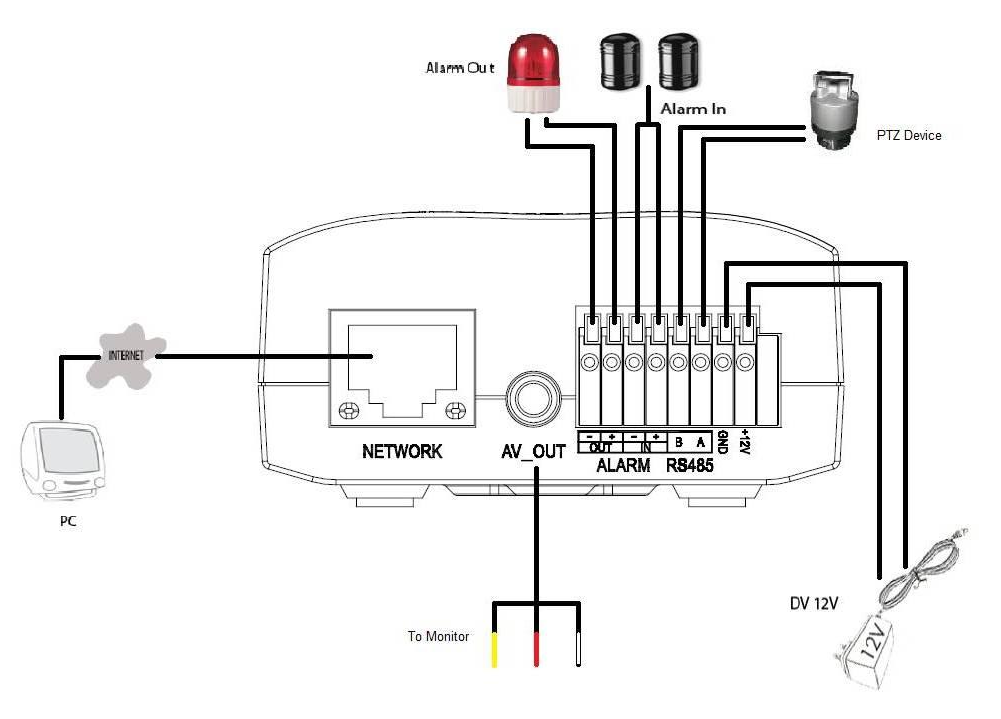
Please refer to following connection diagram to hook up the camera and external 3rd party accessories.
PRODUCT OVERVIEW
GXV3500 Camera
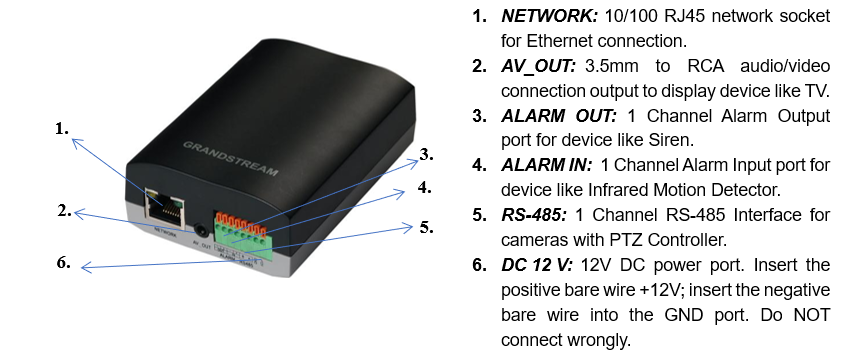
Please see below the diagram and explanation of GXV3500 IP camera:

1: Ground;
2: Video (Yellow);
3: Audio Right (Red);
4: Audio Left (White).
Same as the AV cable used in Apple iBook, etc.

Technical Specifications
The following table resumes all the technical specifications including the protocols / standards supported, voice codecs, telephony features and upgrade/provisioning settings for GXV3500.
Table 1: GXV3500 Technical Specifications
1 | |
Video Compression (Encoder) | H.264, MJPEG, JPEG |
Video Decompression (Decode) | H.264 ONLY |
Max. Video Resolution (Encoding) | Encoding (4CIF): 704×480@30fps (NTSC); 704×576@25fps (PAL) |
Max. Video Resolution (Decoding) | Decoding (4CIF): 720×480@30fps (NTSC); 720×576@25fps (PAL) |
Video Bit Rate | 16 Kbps ~ 2 Mbps |
Video Input (Encoder Mode) | 1, BNC (Voltage: 1.0Vp-p; Resistance: 75Ω) |
Video Output (Decode Mode) | 1, 3.5mm to RCA Line-Out |
Audio Compression | G.711 a/u (PCMA, PCMU) |
Audio Input | 1, 3.5mm Line In (Resistance: 1.5KΩ) |
Audio Output | 1, 3.5mm to RCA Line-Out (600Ω, 0.707 Vrms) |
Alarm Input | 1, PIN, Voltage < 45V, Current (DC) < 50mA, Normal Open (Low) |
Alarm Output | 1, PIN, Voltage < 80V, Current < 50mA, Normal Open (Low) |
PTZ Control | 1, PIN, via RS-485 |
Embedded Analytics | Motion Detection (up to 16 target areas) |
Pre-/Post-Alarm Recording | Yes |
Security | On screen display, HTTPS, Password |
Snapshots | Triggered upon Events, Send via email and/or FTP |
SIP/VoIP Support | Yes, Voice and Video |
Power over Ethernet (PoE) | IEEE 802.3af Class 0; 10M/100M Auto-sensing, 2KV Lightning Surge Protection. |
Network Protocol | TCP/UDP/IP, RTP/RTCP, RTSP, DHCP, DDNS, HTTP, HTTPS, SMTP, FTP, NTP |
Cable Connections |
|
Dimensions | 67mm x 34mm x 96mm |
Weight | 121g or 4.3oz |
Temperature / Humidity | Operating: 0°C ~ +45°C (32°F ~ 113°F), 10 – 90% RH (Non–condensing) Storage: -20°C ~ +60°C (-4°F ~ 140°F) |
Power Adapter | Output: 12VDC/0.5A; Input: 100–240VAC, 50–60Hz |
Compliance | FCC Part 15,Subpart B Class B; EN 55022 Class B, EN 61000-3-2, EN 61000-3-3, EN 55024, EN 60950-1; RCM AS/NZS CISPR 22/24, AS/NZS 60950 |
INSTALLATION GUIDE
Minimum Recommended Computer System Requirement
To install GXV3500, you have to have a computer, PC recommend.
The minimum recommended PC system requirement listed below:
- Windows XP, Windows Vista, Windows 7, and Windows 8
- CPU: Intel Pentium 4 or higher, 2 GHz
- RAM: 2 GB (4 GB recommended for larger systems)
- Support for DirectX 8.0 and above.
Configure the GXV3500 via Web Browser
The GXV3500 has embedded Web server to respond to HTTP GET/POST requests. Embedded HTML pages allow user to configure the IP camera through Microsoft Internet Explorer (7.0 or above), Firefox, Chrome (plug-in from Grandstream required).
Download WebControl Plug-in from Grandstream website:
http://www.grandstream.com/products/tools/surveillance/webcontrl_plugin.zip
Connect the Camera to network with DHCP server (Recommended)
The GXV3500 by default enabled as DHCP client, it will automatically get IP address from the network with DHCP server running.
Windows Platform
There are two ways for Windows user to get access to the IP Camera easily:
A. UPnP
By default, the GXV3500 has the UPnP feature turned ON. For customers using Window network with UPnP turned on (most SOHO router support UPnP), it is very easy to access the IP camera:
-
Find the “Network” icon
 at Windows Desktop.
- Click the icon to get into the “Network” and the IP cameras will list as “Other Devices” shown like below. Refresh the pages if nothing displayed. Otherwise, the UPnP may not be active in the network.

- Click the displayed icon of related IP camera, the default browser (e.g.: Firefox or Chrome) will open and connect directly to the camera’s webpage, prompt message will display asking for plug-in installation.
- Disable security or antivirus software, download the plug-in, close browser, and install the plug-in, open the browser again, the embedded video will be displayed if clicking the icon of the related IP Camera.
B. “GS_Search” Utility Tool
User can know the IP address assigned to the camera from DHCP server log or using the Grandstream GS_Search tool. Following is the instruction for using “GS_Search” utility tool:
- Download the GS_Search tool from Grandstream website: GS_Search
- Run the Grandstream GS_Search tool by double click the unzipped “GS_Search.exe”.
- Click on the
 button to begin device detection
 - The detected devices will appear in the output field like below:
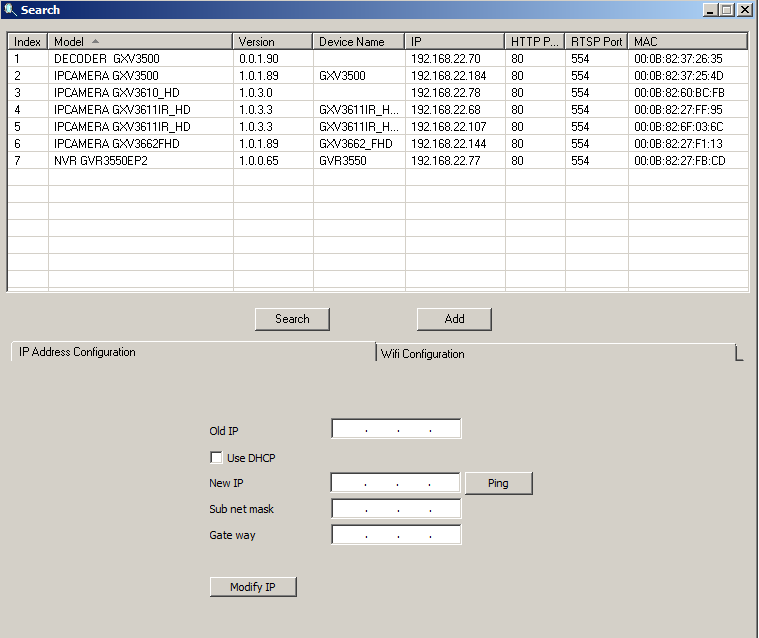
5. Double click the column of the detected camera, the browser will automatically open and link to the device IP and the web configuration page.
6. The browser will ask for plug-in or ActiveX if not installed, otherwise it will get to Home page and start to show the video captured by the camera (by default the camera enabled anonymous access)
7. Click “Configuration” icon, the browser will ask credentials to authorize configuration.
8. Enter the administrator user name and password to access the Web Configuration Interface, the default user name and password are both set to admin.
9. In step 6, browser will indicate that “This website wants to install the following add-on: GSViewerX.cab from Grandstream Networks Inc.” Please allow the installation.
10. The plug-in can be download here:
http://www.grandstream.com/products/tools/surveillance/webcontrl_plugin.zip
Apple Platform
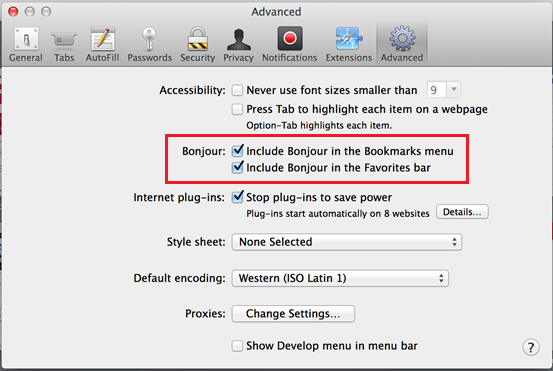
For Apple users, please turn on Bonjour of Safari to find and access the GXV3500.
- Open Safari, select “Advanced” to open the Advanced Setting.
- Click “Include Bonjour in the Bookmarks menu” and “Include Bonjour in the Favorites bar” then close the setting page and back to Safari.
3. Bonjour will now display embedded at Safari. Select “Bonjour” pull-down menu and select “Webpages”, the related IP Camera like GXV3500 will be there.

4. Click the displayed camera to access to the configuration page of the camera.
Connect to the GXV3500 using Static IP
If no DHCP server in the network, or the camera does not get IP from DHCP server, user can connect the camera to a computer directly, using static IP to configure the camera.
The default IP, if no DHCP server; or DHCP offer time out (3 minutes), is 192.168.1.168
- Connect the computer network port via an Ethernet cable directly to the IP camera GXV3500.
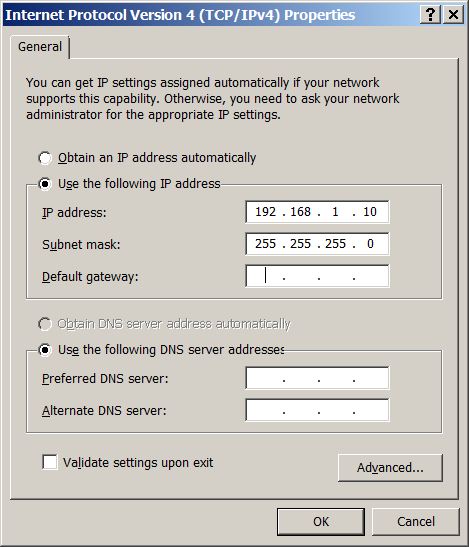
- Configure the computer using Static IP: 192.168.1.XXX (1<XXX<255, but NOT 168) and configure the “Subnet mask” to “255.255.255.0”. Leave the “Default Gateway” to “Blank” like below: (Example of Windows platform, Apple platform is similar)
3. Power on the GXV3500.
4. Start the browser when the network connection is up.
5. Enter 192.168.1.168 in the address bar of the browser.
6. The browser will ask for plug-in or ActiveX if not installed, otherwise it will get to Home page and start to show the video captured by the camera (by default the camera enabled anonymous access)
7. Click “Configuration” icon, the browser will ask credentials to authorize configuration.
8. Enter the administrator user name and password to access the Web Configuration Interface, the default user name and password are both set to admin.
9. In step 6, IE will indicate that “This website wants to install the following add-on: GSViewerX.cab from Grandstream Networks Inc.”, allow the installation.
10. Firefox, Chrome user need to download and install the plug-in to see the video, the plug-in is here: http://www.grandstream.com/products/tools/surveillance/webcontrl_plugin.zip
GXV3500 APPLICATION SCENARIOS
GXV3500 is a very versatile indoor device, it can be used in a lot of scenarios.
Battery Power or No network
For environment like remote warehouse/storage, grocery store, small (take-out) restaurants, the GXV3500 will meet your basic surveillance requirement
This is idea solution to upgrade the traditional standalone CCTV security system, while leave the potential of operating it in IP network when the network is available. All you need is power (could be battery), network wiring is not necessarily required and can leave to future upgrade when it available.
Table 2: GXV3500 Power Specifications

Equipment List:
- GXV3500
- Ethernet cable and PoE injector (Optional)
Depending on the space monitored, one or several GXV3500 may be required.
LAN w/o Internet
For multi-room or a bigger space, multiple GXV3500 might be required. User can establish a local area network using PoE switch.
If remote access required, a router with internet access may add in.
Equipment List:
- Several GXV3500
- Ethernet cables
- Switch (Static IP required to configure to IP Cameras)
- PoE Switch (Optional, better solution)
If remote access to the cameras required to view the LIVE video stream, then broadband Internet is required, and more equipment required:
5. Router (if DHCP configured than static IP is not required although still recommended)
6. Broadband Internet Access (FiOS, Cable or DSL)
7. iPhone or Android phone.
LAN with Internet
For multi-room or a bigger space, with Internet access and local video recording required, following list is recommended:
Equipment List:
- Several GXV3500
- GVR3550/2 NVR
- Ethernet cables
- Switch (PoE Switch recommended)
- Router
- Broadband Internet Access (FiOS, Cable or DSL)
- iPhone or Android phone
- GSurf_Pro Remote Access (Optional)
GXV3500 Application Peripheral Connection
Below is the illustration of GXV3500 peripheral connections for related application.
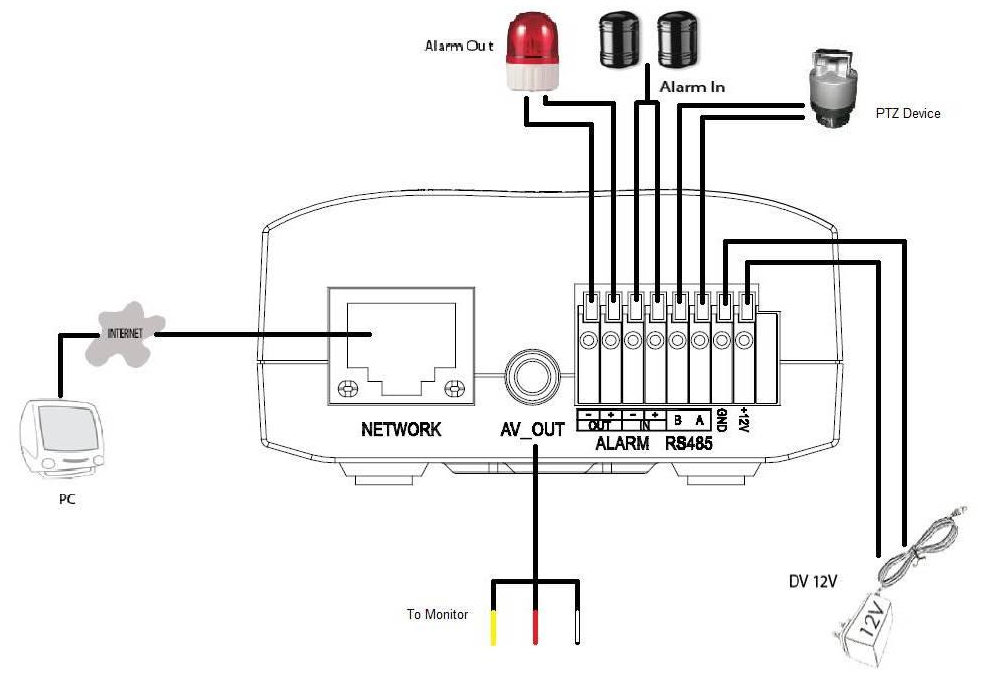
Notes:
- For days of video storage, please use Motion Detection Event Video Recording or GSurf_Pro VMS.
- Alarm_In could use any 3rd party Sensors (like IR Motion Sensor) or Intercom Push Button, etc.
- Alarm_Out device could use 3rd party Siren and Strobe Light, or Electric Door Striker, etc.
- Audio Input (Microphone) and Audio Output (Amplified Speaker) using 3.5mm interface and must match below impedance parameter:
Audio Input |
|
Audio Output |
|
- Grandstream Video Phone can work with GXV3500 via either Peer IP (LAN) or SIP extension (WAN).
- Peer to Peer (or Direct IP) works only at LAN using static IP; SIP extension requires related SIP server/proxy provided and configured.
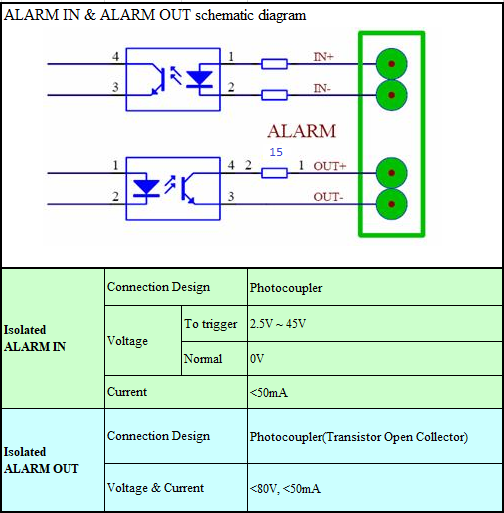
Notes:
- The Alarm_In and Alarm_Out circuit connection has to be similar to above circuit diagram and meet following requirement:
Alarm Input | 1, PIN, Voltage < 45V, Current (DC) < 50mA, Normal Open (Low) |
Alarm Output | 1, PIN, Voltage < 80V, Current < 50mA, Normal Open (Low) |
- The Alarm_In circuit (like above photo coupler), if there is any voltage change smaller than 15V, as specification listed), the GXV3500 Alarm_In port will detect it and trigger the action and event.
- Higher voltage and wrong polarity connection are prohibited because this will damage the devices.
GXV3500 HOME WEB PAGE (ENCODER MODE)
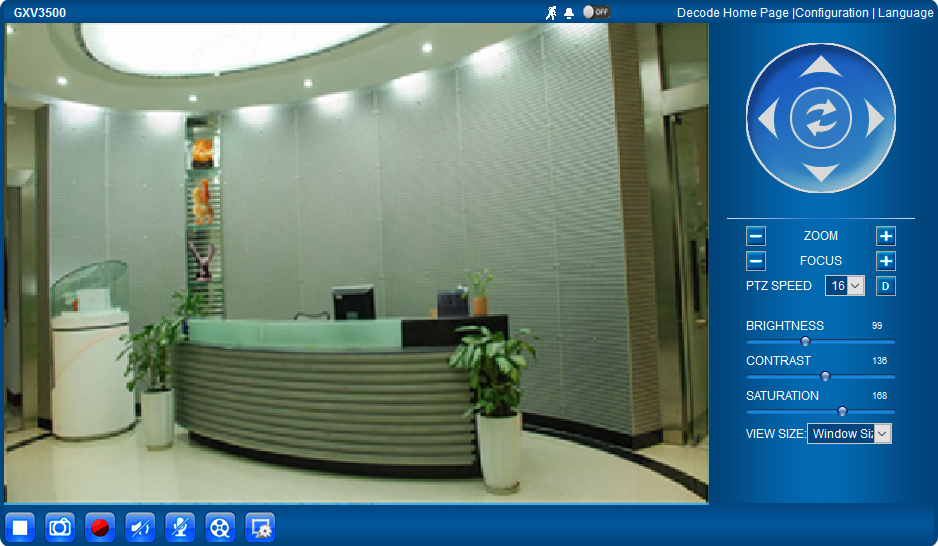
Table 3: Home page options (Encoder Mode)
View Size | Click to switch between real resolution size and embedded window size video. |
ZOOM | Zoom In/Out during PTZ operation (when connected to supported camera) |
BRIGHTNESS bar | Adjust the image or video brightness. |
CONTRAST bar | Adjust the image or video contrast. |
SATURATION bar | Adjust the image or video saturation. |
Language icon | Click to switch webpage language.(Current support: Chinese, English, and Russian) |
Configuration icon | Click to enter “Configuration Page” to configure the parameters of GXV3500 (Administration |
Decode Home Page | Click to switch to Decode Mode (Reboot required to take effect). |
Default Video Parameter icon | Click to reset video parameters (Brightness, Contrast, and Saturation) to default. |
Stop/Play Video icon | Click to Stop and Play the embedded live video. |
Capture (Snapshot) icon | Click to capture and save a snapshot of current displayed video frame. |
Record icon | Click to Start/Stop record of current video stream into a file. Default directory: C:\Record |
Listen On/Off icon | Toggle to listen/stop audio from the camera’s microphone |
Listen On/Off icon | Toggle to listen/stop audio from the camera’s microphone |
Talk On/Off icon | Toggle to talk to camera’s speaker (computer microphone required) |
Playback | Click to playback the recorded video file. |
Local Configuration | Click to configure the file path of snapshot and recorded video files. Also adjust the video |
Motion Detection Alarm | If (configured) motion detection alarm triggered, the indicator will flash in |
DI, Alarm_In icon | Indicator will be on when there is an external Alarm Input. Click the indicator icon to turn off the alarm indication. |
DO, Alarm_Out icon | Click the indicator icon manually switch the Alarm_Out operation. |
GXV3500 Configuration & Language Page
- When click the “Configuration” icon, web page will link to configure page related parameters of the GXV3500.
- There are two big categories of settings: Basic Settings and Advanced Settings. Details will illustrate in the following Chapters.
- When click the “Language” icon, supported languages will display in Figure 2. Click to select the related webpage display language.
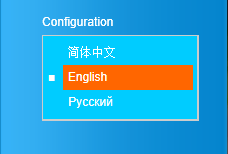
- Currently firmware only support: English (default), Simplified Chinese and Russian.
Basic Settings Explanation
System Settings Page
This page allow user to configure the system settings of GXV3500.
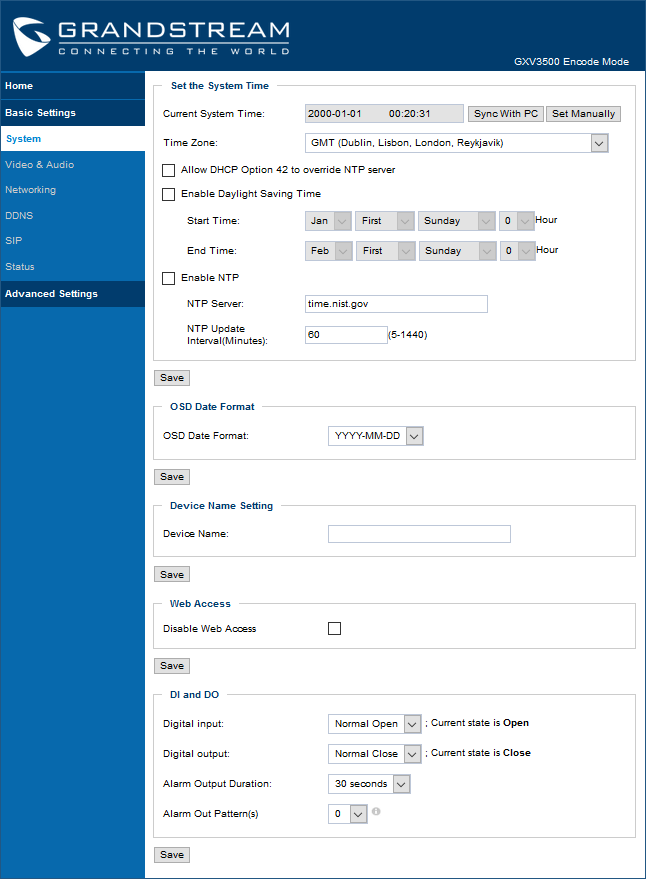
Table 4: System settings page options (Encoder Mode)
Current System Time | Display time current system is running at. |
Sync with PC | Click to synchronize current time with computer. |
Set Manually | Click to manually set the current time and date. |
Time Zone | Select from pull down menu the time zone unit located. |
Allow DHCP Option 42 to override NTP server | Defines whether DHCP Option 42 should override NTP server or not. When enabled, DHCP Option 42 will override the NTP server if it is set up on the LAN. The default setting is “Yes”. |
Enable Day Light Saving Time | Enable and Configure Day Light Saving Start Time and End Time. |
Enable NTP | Enable and configure NTP server and update interval. |
(On Screen Display) OSD Date Format | OSD Date format, choose based on user preference. |
Device Name Setting | Set the name of the camera which will be shown in the result of “Search Tool” of GSurf_Pro VMS program. |
Choose to Enable/Disable HTTP Web Access | |
| Max Times Consecutively Login Error | Specifies the allowed login times error limit, if the unsuccessful login attempts exceed this value, the GXV3500 web GUI will be locked for the time specified in Login Error Lock Time. The default value is 5. The valid range: 3-10 |
| Login Error Lock Time(min) | Specifies how long the GXV3500 is locked before a new login attempt is allowed. The default value is 5 minutes. The valid range is 5-60. |
DI and DO | DI and DO initial status for Alarm In or Out operation. |
Digital Input | State of Digital Input, normal at Open state. |
Digital Output | State of Digital Output, normal at Open state |
DO Output Duration | Select operation of Alarm Output Duration from pull down list. |
Alarm Out Pattern (s) | Configure an ON/OFF cadence during that specific duration of time which the alarm out follows when played. Range is from 0-3. Default is 0. When set to 0, no cadence will be applied and alarm out will be played continuously. |
Video & Audio Setting Page
This page allows user to configure the video and audio related settings.
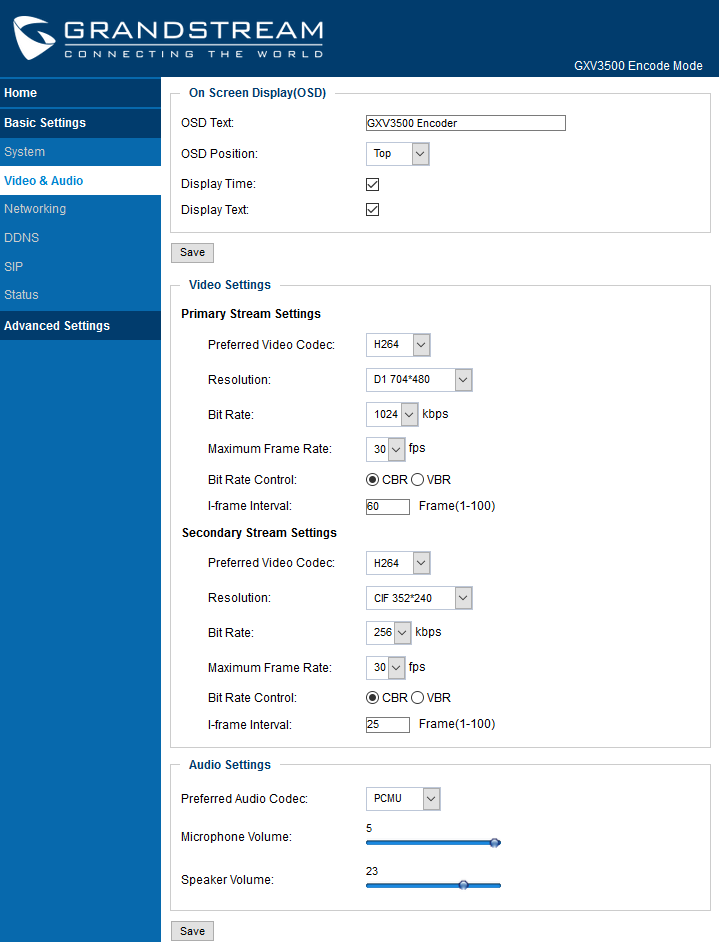
Table 5: Video & Audio settings
On Screen Display (OSD) | Format to display the OSD date. |
OSD Text | Input text (to identify the camera) shown on the screen. |
OSD Position | Show the OSD in either top or bottom position on screen. |
Display Time | When checked, time will be displayed inside the video image. |
Display Text | When checked, inputted text will display on video image. |
Preferred Video Codec | MJPEG and H.264 supported, H.264 recommended. |
Resolution | The resolution in pixels used at video image. |
Bit Rate | Video bit rate or bandwidth used. |
Maximum Frame Rate | Maximum frame rate used (more data if big frame used). |
Bit Rate Control | Constantly bit rate, or variable bit rate. |
Image Quality | Image quality used when Variable Bit Rate used. |
I-frame Interval | I-frame interval (suggested 2~3 times of frame rate). |
Preferred Audio Codec | PCMU, PCMA. Audio also can be disabled. |
Microphone Volume | Slide to adjust microphone gain. |
Speaker Volume | Slide to adjust the speaker volume connected. |
Networking Setting Page
This page allows user to configure network related parameters:
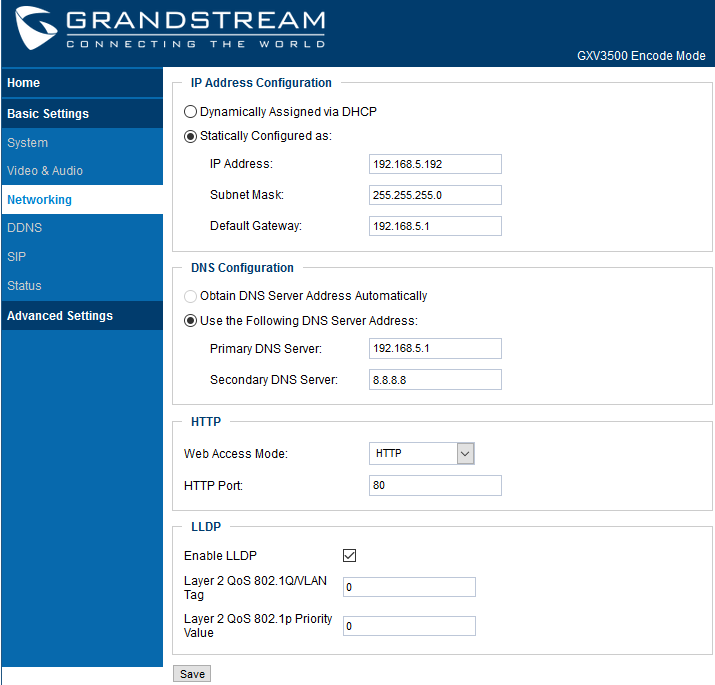
Dynamically Assigned via DHCP | Default setting, DHCP server assign IP to camera. |
Statically Configured as | Static IP address configuration (Preferred for Port FWD). |
DNS Configuration | DNS server IP. Must be configured if using static IP. |
Selects the access mode to the web GUI either HTTP or HTTPS. | |
HTTP Port | Specifies the TCP port for Web Access, Default is 80. |
Enable LLDP | Controls the LLDP (Link Layer Discovery Protocol) service. The default setting is “Enabled”. |
Assigns the VLAN Tag of the Layer 2 QoS packets. Default value is 0. Range is from 0 – 4094. | |
Layer 2 QoS 802.1p Priority Value | Assigns the priority value of the Layer2 QoS packets. Default value is 0. Range is from 0 – 7. |
DDNS Settings Page
This page allows user to configure dynamic DNS related parameters:
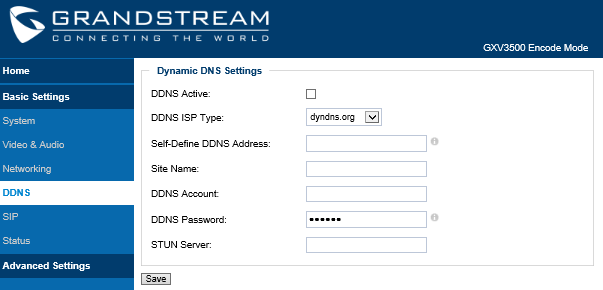
DDNS Active | Enable DDNS by check this field. |
DDNS ISP Type | Select the DDSN service provider from the pull-down menu list. |
Self-Define DDNS Address | Input the self-defined DDNS address. |
Site Name | DDNS site name. |
DDNS Account | DDNS account name. |
DDNS Password | DDNS password. |
STUN Server | Stun server FQDN or IP. If device behind a non-symmetric router, STUN server can help to penetrate & resolve NAT issue. |
SIP Setting Page
GXV3500 can be configured as SIP endpoint to call out when alarm trigged or allow permitted number to call in to check the audio/video if Grandstream IP videophone used.
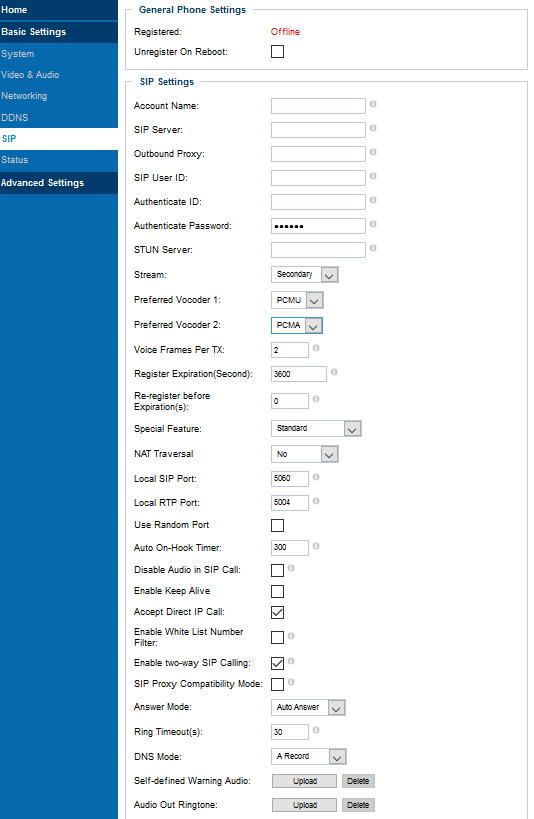
Registered | SIP registration status. Display “Online” in Green, “Offline” in Red. |
Unregistered on Reboot | If checked and SIP server support, reboot camera will unbind all registered end points using this SIP account. |
Account Name | SIP account name used for self-identification. |
SIP Server | FQDN or IP of SIP server from VoIP service provider |
Outbound Proxy | IP or FQDN of Outbound proxy server, helps penetrate NAT/Firewall |
SIP User ID | SIP username, or telephone number from ITSP. |
Authenticate ID | Authenticate ID used by SIP proxy |
Authenticate Password | Authenticate password used by SIP proxy |
STUN Server | STUN server used to resolve NAT if have |
Stream | Which stream used for SIP call. Default 2nd stream, strongly recommended due to bandwidth and data involved at video call. |
Preferred Vocoder 1 | Audio codec used for SIP call, only G.711 A or U supported. |
Preferred Vocoder 2 | Audio codec used for SIP call, only G.711 A or U supported. |
Voice Frame Per TX | Configures the number of voice frames transmitted per packet. When configuring this, it should be noted that the “ptime” value for the SDP will change with different configurations here. This value is related to the codec used and the actual frames transmitted during the in-payload call. For end users, it is recommended to use the default setting, as incorrect settings may influence the audio quality. The default setting is 2. Range is from 1-64. |
Registration Expiration (s) | Registration expiration time, default 3600 seconds. |
Re-Register before Expiration (s) | Specifies the time frequency (in seconds) that the GXV3500 sends re-registration request before the Register Expiration. The default value is 0. Range is from 0-64800 seconds. |
Local SIP Port | Local SIP port, default 5060 |
Local RTP Port | Local RTP port for media, default 5004 |
Forces the GXV3500 to use random ports for both SIP and RTP messages. This is usually necessary when multiple units are behind the same full cone NAT. The default setting is “Disabled”. Note: This parameter must be set to “Disabled” for Direct IP Calling to Work. | |
Auto On-Hook Timer | Timer (in seconds) for automatic disconnecting the SIP call. Default 300. |
Disable Audio in SIP Call | Disable or turn off audio of camera when SIP call established. |
Enable Keep Alive | Checked to help NAT resolution, sending alive packets. |
Accept Direct IP Call | Check to accept peer-to-peer IP call in LAN without SIP server. |
Enable White List Number Filter | Check to allow only white list number to call in, for security. |
Enable two-way SIP Calling | Check to enable two-way audio when call established (Default) |
SIP Proxy Compatibility Mode | Check to enable more proxy compatibility with cost of bandwidth, the SIP call will send both audio and video no matter what. |
User can either select: Auto-Answer: The GXV3500 will answer immediately incoming call. Ring: The GXV3500 will ring until reaching the configured Ring Timeout. Auto-Answer After Ring Timeout: The GXV3500 will ring until reaching the configured Ring Timeout then call will be auto answered. | |
Ring Timeout (s) | Pulldown selection of Ring Timeout timer in seconds. Range: 2-300 seconds. Default is 30 seconds. |
Selects DNS mode to use for the client to look up server.
Default is A Record. | |
Self-Defined Warning Audio | Upload the correct formatted self-defined warning audio. Upload self-defined alarm warning message audio. (Format: G.711A, G711M format, File Size <= 300KB, Linear PCM, 8KHz Sampling Rate, 16bit, Single Channel) |
Audio Out Ringtone | Upload the correct formatted audio out ringtone. |
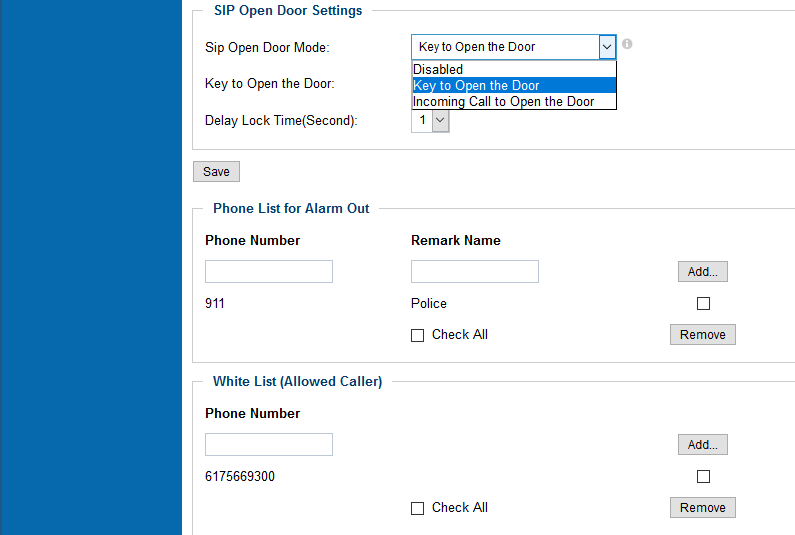
Pulldown selection of three mode: Disabled, Key to Open the Door and Incoming Call to Open the Door
| |
Phone List for Alarm Out | Callee or receiver’s number when alarm call trigged. |
White List (Allowed Caller) | Phone numbers allowed calling into the camera. |
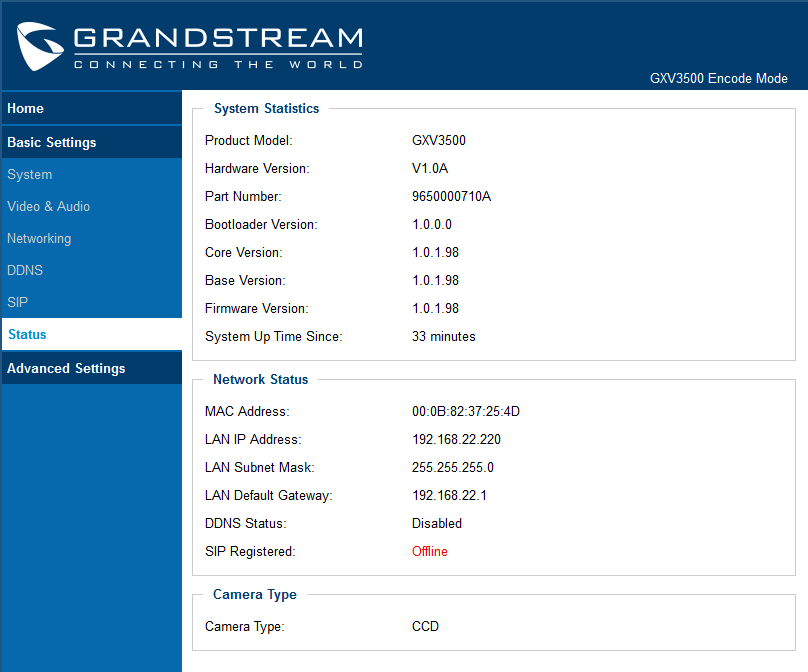
Status Page
This page shows the GXV3500 operation status:
Advanced Settings Explanation
User Management Page
This page allows user to do user management:
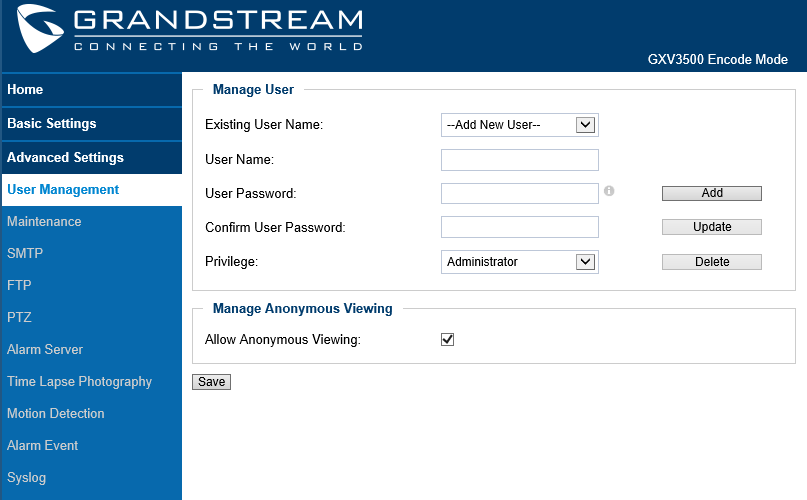
Existing User Name | Allow revise existing user or add new user. |
User Name | The name of users need to be revised. |
User Password | New password if revise password. |
Confirm User Password | Re-enter the new password for verification, must match. |
Privilege | Server path holding the configuration file (auto provisioning). |
Allow Anonymous Viewing | When checked, no security enhanced. Any person can view the camera if knowing the IP or FQDN of the camera, but cannot change anything, just view ONLY. |
Maintenance Page
This page allows user to maintain the camera:
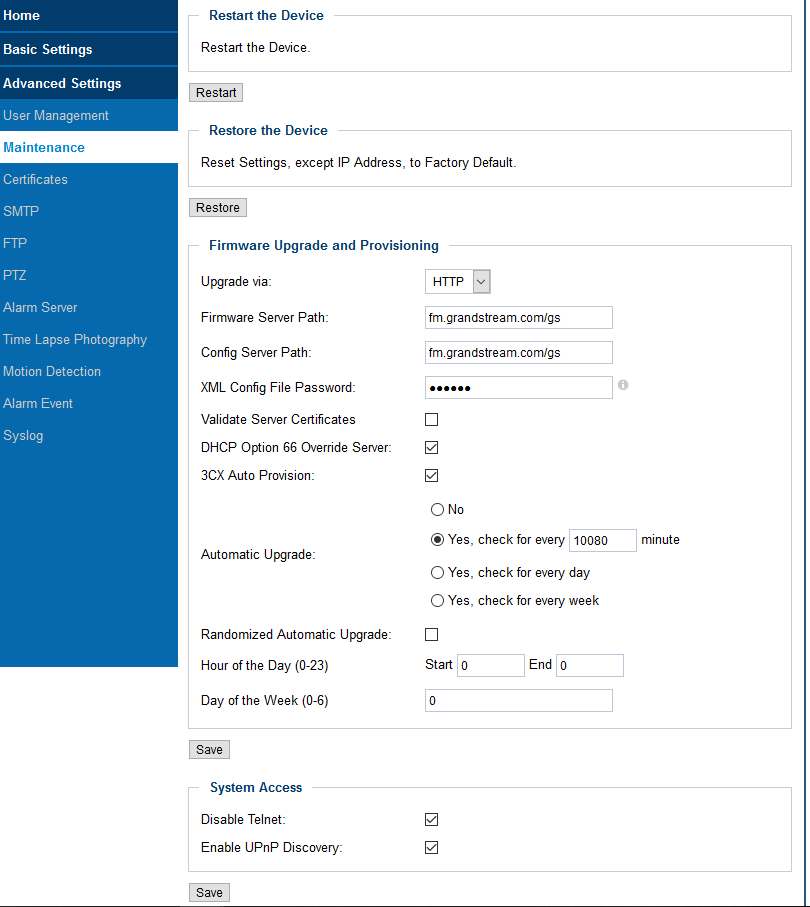
Table 10: User Management page
Restart | When clicked, the GXV3500 will reboot or restart (soft reboot). |
Restore | When clicked, the camera will be reset to factory default, wiping out all the configurations (except IP address). |
Upgrade via | Firmware upgrade via TFTP, HTTP or HTTPS. |
Firmware Server Path | Sets IP address or domain name of firmware server. The URL of the server that hosts the firmware release. Default is “fm.grandstream.com/gs”. Note: Make sure to not prepend address with “http://” or any other protocol |
Config Server Path | Sets IP address or domain name of configuration server. The server hosts a copy of the configuration file to be installed on the GXV3500. Default is “fm.grandstream.com/gs”. Note: Make sure to not prepend address with “http://” or any other protocol. |
XML Config File Password | Password for encrypt the XML based configuration file. |
Validate Server Certificates | Enable this option in order to validate certificate with trusted ones during TLS connection. |
If DHCP option 66 is checked, the GXV3500 will attempt to download firmware file and XML config file from the server URL provided by DHCP overriding configured Firmware Server Path and Provisioning Server Path (even if left blank). | |
3CX Auto Provision | Enable or disable the 3CX PnP Auto Provision. When enabled, the GXV3500 to broadcast the SIP SUBSCRIBE message during booting up to allow itself to be discovered and be configured by the SIP platform. The default setting is “Yes”. |
Automatic Upgrade | Checked to enable automatic firmware upgrade and provisioning. |
Randomized Automatic Upgrade | Randomized Automatic Upgrade within the range of hours of the day or postpone the upgrade every X minute(s) by random 1 to X minute(s). |
Disable Telnet | Check to disable Telnet to enhance security. |
Enable UPnP Discovery | Used for UPnP automatic discovery of the device in related network environment. Default enabled. |
Note:
- Only XML based automatic provisioning is supported by GXV3500.
Certificates Page
This page allows users to upload up to 6 Trusted CA certificate files which will be trusted by the GXV3500 during SSL exchange.
Also users are allowed to configure the device with custom certificate signed by custom CA certificate under the Custom Certificate section.
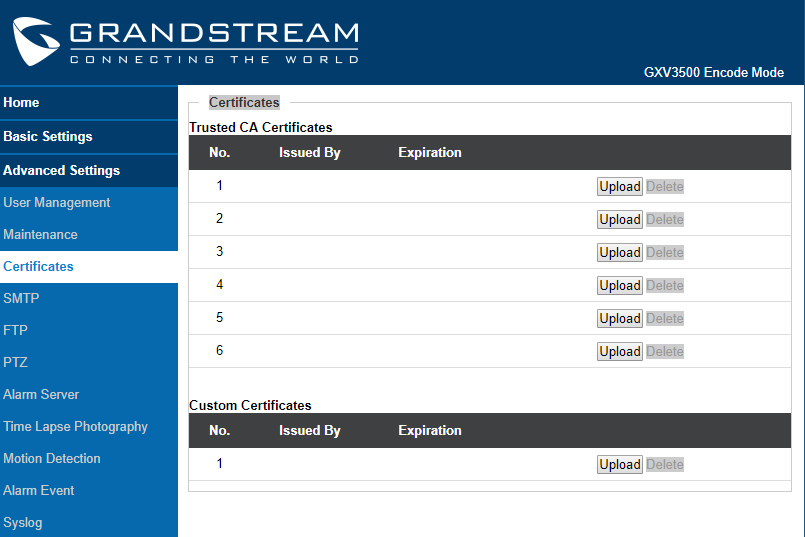
In order to upload your Trusted CA certificate:
Click on
![]() button to upload a file and some related information to the uploaded file will be displayed, such as “Issued by” and “Expiration”.
button to upload a file and some related information to the uploaded file will be displayed, such as “Issued by” and “Expiration”.

User could press
![]() to delete one of the files.
to delete one of the files.
In order to upload your Custom certificate:
Click on
![]() button to upload a file and some related information to the uploaded file will be displayed, such as “Issued by” and “Expiration”.
button to upload a file and some related information to the uploaded file will be displayed, such as “Issued by” and “Expiration”.

User could press
![]() to delete one of the files.
to delete one of the files.
SMTP Setting Page (Email Alarm)
This page allows user to configure email client to send out email when alarm trigged:
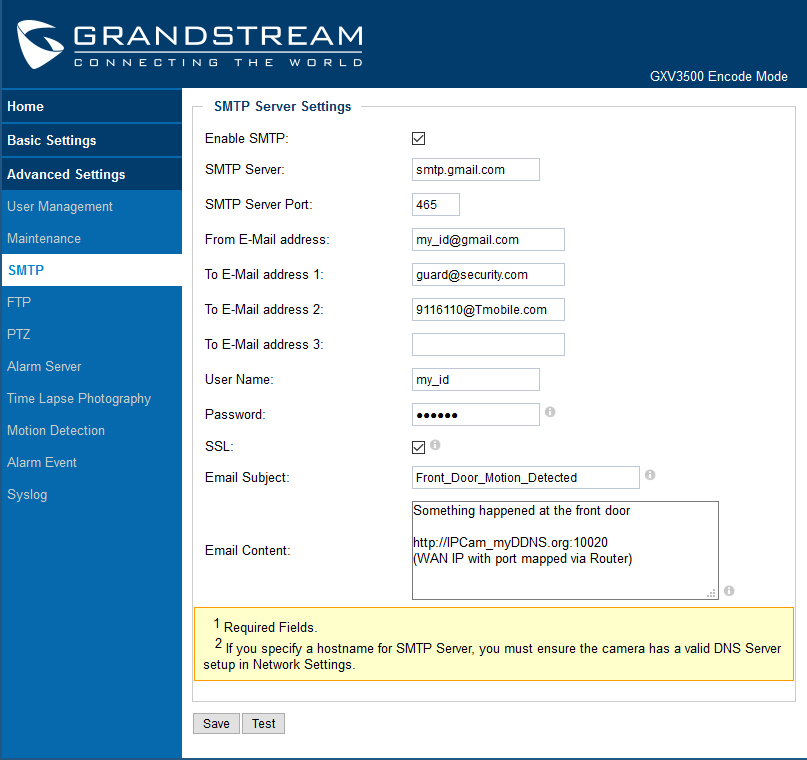
Enable SMTP | When checked will enable email client. |
SMTP Server | SMTP Email Server IP or Domain Name. |
SMTP Server Port | Port number used by server to send email. |
From Email address | The email address of alarm email sending from, usually client email ID. |
To E-Mail address | The email address to receive the alarmed email, total 3 can be configured. |
User Name | Email client User ID. |
Password | Email client password. |
SSL | Check if the SMTP email server requires SSL. |
Email Subject | Customizable email subject for user’s convenience. |
Email Content | Customizable email content for user’s purpose. |
Notes:
- Click “Save” to save the email configuration information.
- Click “Test” after configuration, if setting is correct, a test email will send out and “Test successful!” orange bar will display:

FTP Settings Page (Upload Alarm)
This page allows user to configure FTP parameters to upload the alarm or video recording:
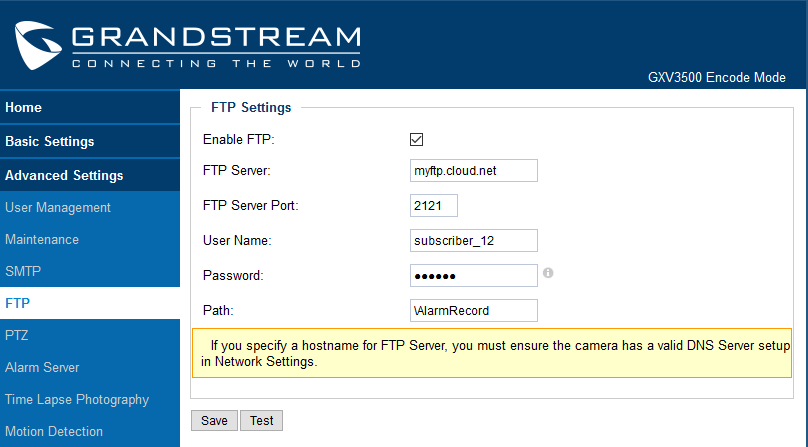
Enable FTP | When checked will enable built-in FTP client. |
FTP Server | IP or Domain name of FTP site or server. |
FTP Server Port | TCP port for FTP server, default port number 21. |
User Name | FTP server User ID. |
Password | FTP server user password. |
Path | Path in the server where upload files are stored or saved. |
PTZ
This page allows user to configure PTZ parameters if the connected analogue camera support Pelco-D or Pelco-P protocol.
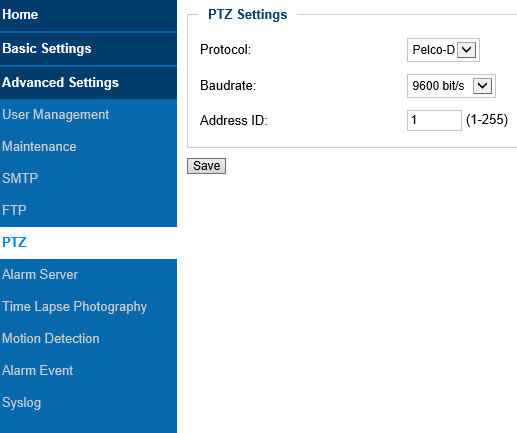
Protocol | Pull-down to select supported PTZ protocol by connected analogue camera. Only Pelco-D or Pelco-P allowed. |
Baudrate | The baudrate used by the analogue camera interface, select from the pull-down menu. |
Address ID | Hardware Pelco-D or Pelco-P address ID used by the analogue camera, please refer to related camera user manual for this ID (or PIN switch in the UM), then fill in related matching address into this field. |
Alarm Server Settings Page
This page allows user to configure alarm HTTP server to upload alarms (Upload Alarms to VMS platform supported or HTTP Server for processing)
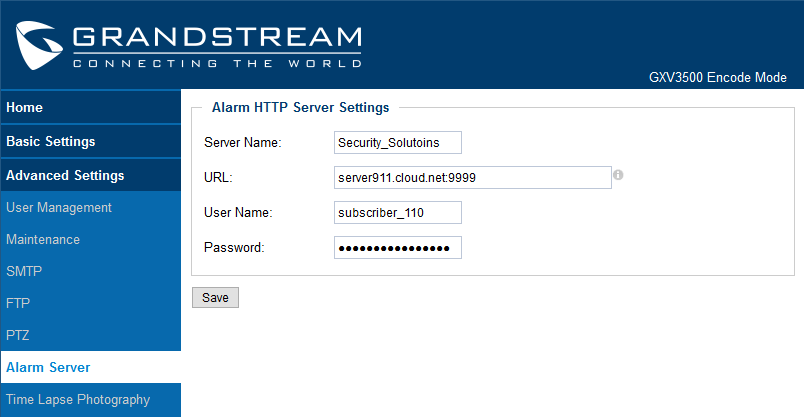
Table 14: Alarm HTTP Server Settings
Server Name | The name of HTTP server or VMS system |
URL | URL of the Server |
User Name | User ID from that Server |
Password | Password for that User ID |
Time Lapse Photography
This page allows user to configure Time Lapse Photography (or period snapshot).
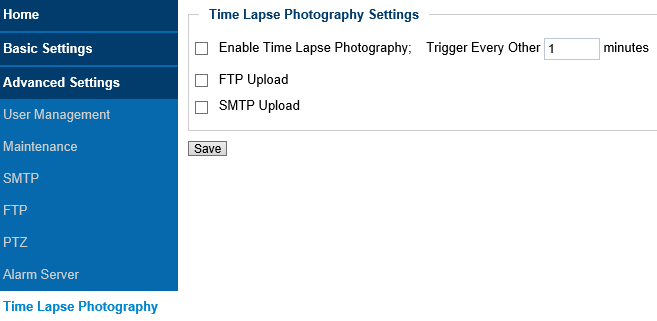
Table 15: Time Lapse Photography Configuration
Enable Time Lapse Photography | Check to enable this feature. User can configure the timer or duration of the triggering moment; minimum value is 1 minute. |
FTP Upload | Enabled will allow device to upload the snapshots to FTP server. The FTP server is configured at “FTP” server page illustrate before. |
SMTP Upload | Enabled will allow device to email the snapshots via email server. The email server is configured at “SMTP” configuration page. |
Click “Save” button to save the changes made and the feature will take effect immediately.
Motion Detection
This page allows user to configure motion detection to trigger alarms:
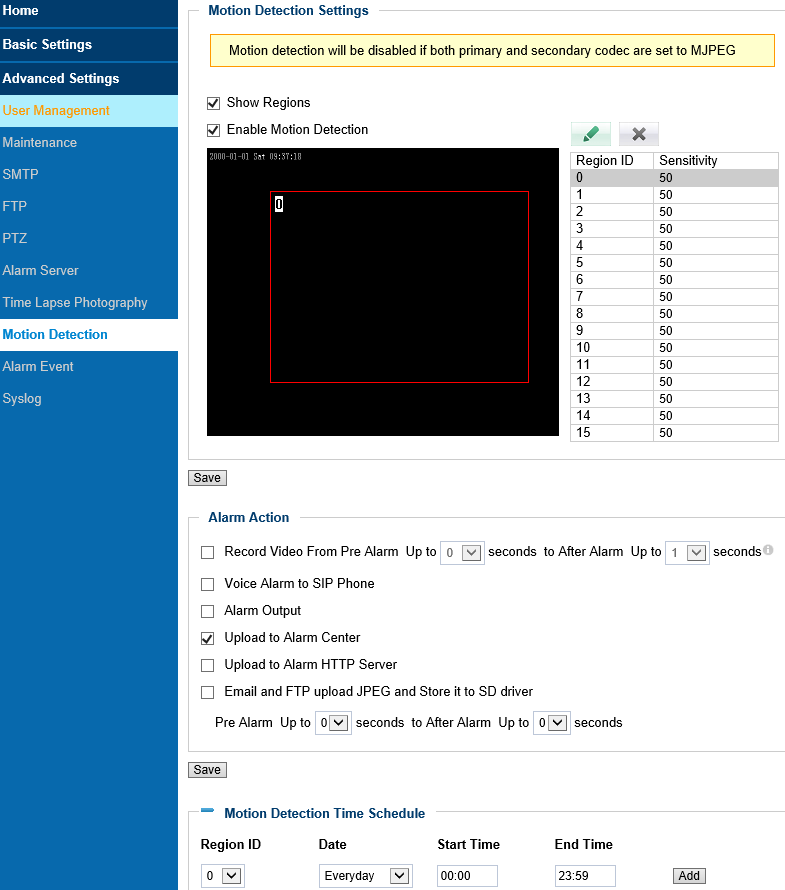
Table 16: Motion Detection Configuration
Show Regions | When checked, Motion Detection region with number will be displayed as a white rectangle in the screen. When “Edit” clicked, the Rectangle will become Red. |
Enable Motion Detection | When checked, Motion Detection is enabled. |
Record Video From Pre Alarm up to XXX seconds to After Alarm Up to XXX seconds | This setting to allow configure pre/post alarm video for applications to utilize. MJPEG is NOT supported for this feature. |
Voice Alarm to SIP Phone | If a SIP server or peer IP device configured, check this will allow MD event to trigger alarm SIP call to pre-configured number. |
Alarm Output | Select will allow MD to send alarm to Alarm Output interface. |
Upload to Alarm Center | When checked, the alarm video will be transferred to Alarm Center, like Grandstream free GSurf _Pro VMS software, or other 3rd party Alarm Center. |
Upload to Alarm HTTP Server | When checked MD alarm will be send to 3rd party HTTP server via programmed Grandstream HTTP API. |
Email and FTP upload JPEG | When checked, snapshots of trigger moment will be emailed to pre-configured email account and also uploaded to FTP server if configured. The pre/post alarm snapshot numbers can be configured based on time (in second) to meet user’s requirement. |
Motion Detection Time Schedule:
Click the “ + ” will expand the following interface to allow user to configure the Time Schedule for related Motion Detection region to take action.

Alarm Event
This page allows user to configure the Alarm_In event and related actions.
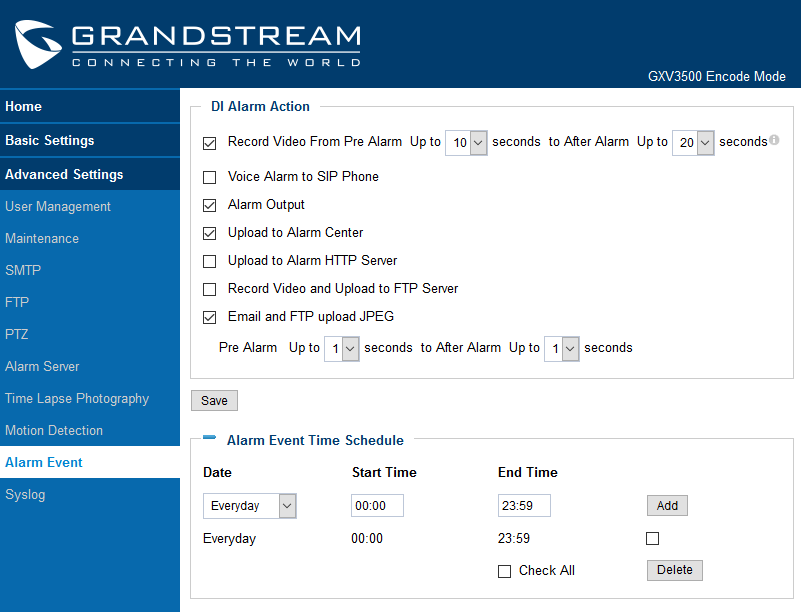
Table 17: Alarm_In Action Configuration
Pre/Post Alarm Recording (Record Video From Pre Alarm Up to XXX to After Up to XXX) | Depending on 1st stream resolution, this allows internal buffer to store the pre/post alarm video for applications to utilize. |
Voice Alarm to SIP Phone | Enabled will allow device to make SIP call after receiving Alarm_In. See below NOTE for example. |
Alarm Output | Enabled will allow Alarm Output after receiving Alarm_In signal. |
Upload to Alarm Center | Upload to alarm center like 3rd party VMS system. |
Upload to Alarm HTTP Server | Upload to 3rd party HTTP server or application using HTTP API. |
Record Video and Upload to FTP Server | Upload video recording to pre-configured FTP server. |
Email and FTP upload JPEG | JPEG snapshot are sent via Email and uploaded through FTP when alarm is triggered. |
- Click “Save” to save the settings. Following bar will display if operation successful.

Alarm Event Time Schedule:
Click the “Alarm Event Time Schedule” will bring up following interface to allow user to configure the Time Schedule for the Alarm_In to take action.

Syslog Settings
This page allows user to enable the Syslog to help troubleshooting problems.
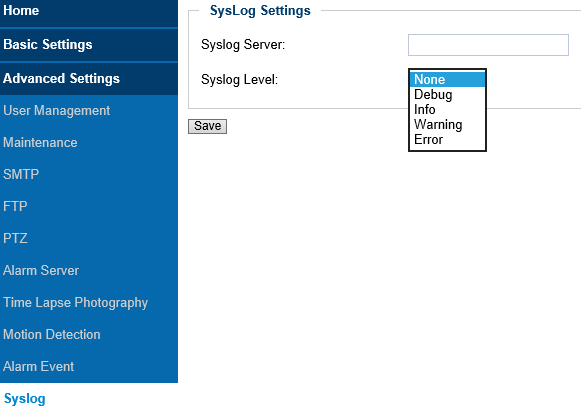
Syslog Server | Syslog server IP or Domain Name |
Syslog Level | Lever of syslog message sent to the syslog server: None, Debug, Info, Warning, Error. |
SOFTWARE UPGRADE
This page allows user to configure firmware upgrade:
Software upgrade can be done via TFTP, HTTP or HTTPS. The corresponding configuration settings are in the ADVANCED SETTINGS configuration page.
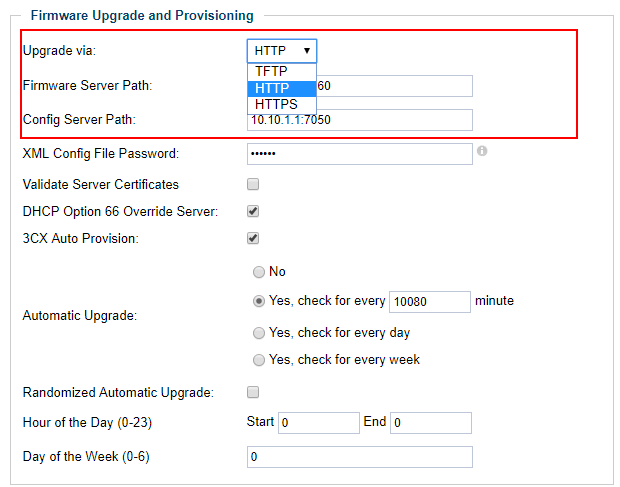
End users can also choose to download the free HTTP server from http://httpd.apache.org/ or use Microsoft IIS web server.
CONFIGURATION FILE DOWNLOAD
Grandstream SIP Device can be configured via Web Interface as well as via Configuration File through TFTP or HTTP/HTTPS. “Config Server Path” is the TFTP or HTTP/HTTPS server path for configuration file. It needs to be set to a valid URL, either in FQDN or IP address format. The “Config Server Path” can be same or different from the “Firmware Server Path”.
A configuration parameter is associated with each particular field in the web configuration page. A parameter consists of a Capital letter P and 1 to 3 (Could be extended to 4 in the future) digit numeric numbers. i.e., P2 is associated with “Admin Password” in the ADVANCED SETTINGS page. For a detailed parameter list, please refer to the corresponding firmware release configuration template.
When Grandstream Device boots up or reboots, it will issue request for configuration file named “cfgxxxxxxxxxxxx.xml”, where “xxxxxxxxxxxx” is the MAC address of the device, i.e., “cfg000b820102ab.xml”. The configuration file name should be in lower cases.
RESTORE FACTORY DEFAULT SETTING
WARNING!
Restoring the Factory Default Setting will DELETE all configuration information of the camera. Please BACKUP or PRINT out all the settings before approach to following steps. Grandstream will not take any responsibility if you lose all the parameters of setting or cannot connect to your VoIP service provider.
Reset from Web Interface (Soft Reset)
This page allows user to configure dynamic network related parameters:

Reset via Button (Hard Reset)
To “hard” factory reset the camera, with the camera powered on, press and hold the “reset” button for 15 seconds until the IP camera reboot.

GXV3500 HOME WEB PAGE (DECODE MODE)
Once click “Decode Home Page” from the Home page of the Encode mode, the device will prompt and reboot to switch itself from Encode Mode to Decode Mode.
Following Home Page of Decode Mode will be displayed once the device boots up:
Home Page (Decode Mode)
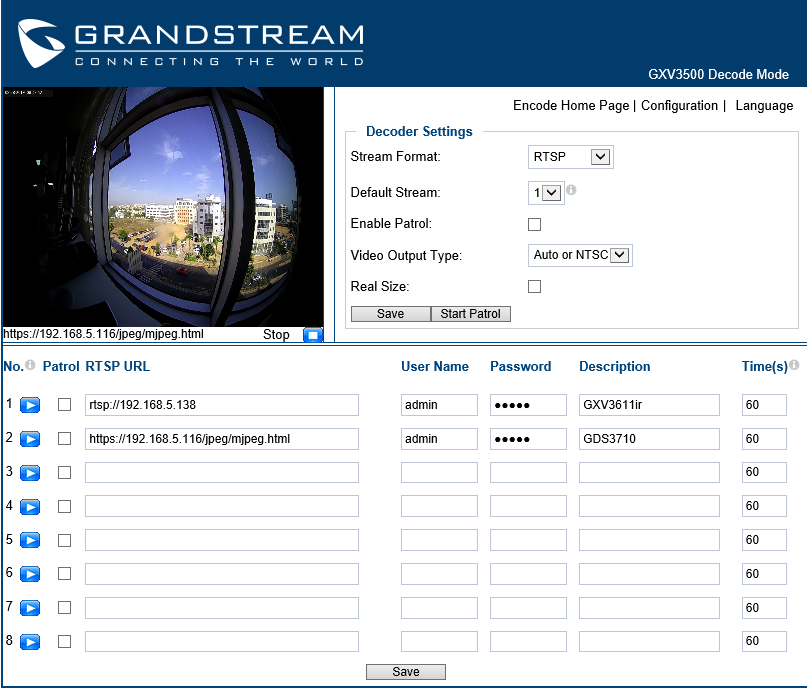
Table 19: Decode Home settings
Stream Format | Format of the data stream to be decoded: RTSP: Decode RTSP data stream format. SIP Phone: Decode SIP Phone call (UDP streaming). HTTP: Decode HTTP data stream. (similar to VLC Player) |
Default Stream | Select stream to be decoded, maximum 8 stream can be selected, but only one stream can be decoded at any given moment. |
Enable Patrol | Click to select whether to run the decoding in Patrol Mode. |
Video Output Type | Analogue Video Output Mode: Auto to NTSC; Auto to PAL; NTST; PAL. |
Real Size | Select to display in Home Page the Real Size of the decoded video. |
Decode Setting Explanation:
- Patrol: Select to enable and add the stream to “Patrol” mode
- RTSP URL: Input the RTSP URL or HTTP URL stream for GXV3500 to decode
- User Name: User Name or ID if required to decode the related stream
- Password: Password if required to decode the related stream
- Description: Name used to describe or identify the stream decoded
- Times: Timer (in second) used in Patrol Mode for this particular stream
Basic Settings Explanation (Decode Mode)
System Setting Page (Decode Mode)
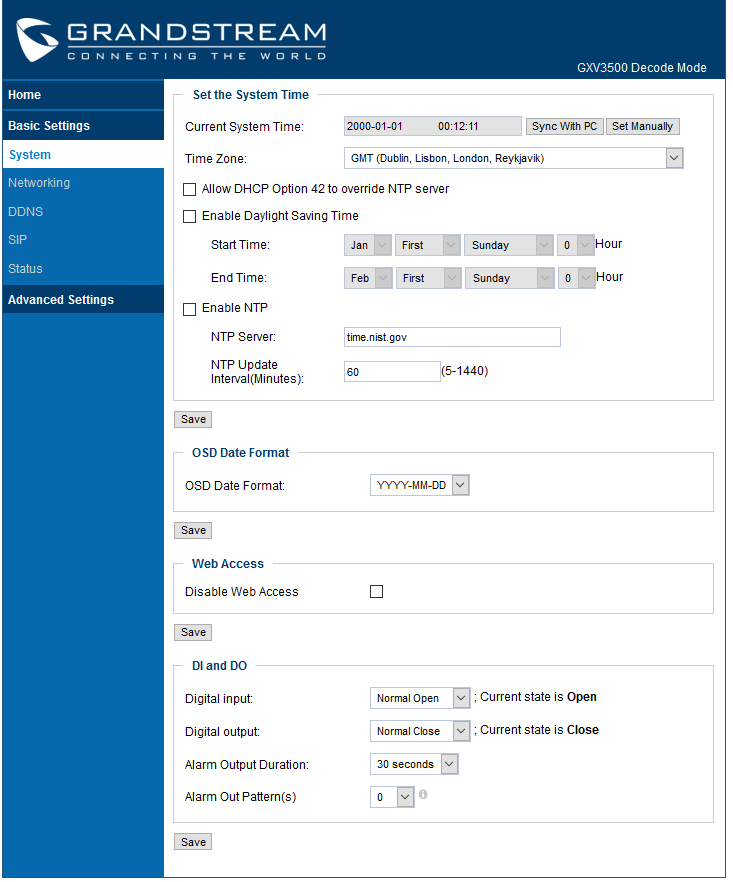
Current System Time | Display time current system is running at. |
Sync with PC | Click to synchronize current time with computer. |
Set Manually | Click to manually set the current time and date. |
Time Zone | Select from pull down menu the time zone unit located. |
Allow DHCP Option 42 to override NTP server | Defines whether DHCP Option 42 should override NTP server or not. When enabled, DHCP Option 42 will override the NTP server if it is set up on the LAN. The default setting is “Yes”. |
Enable Day Light Saving Time | Enable and Configure Day Light Saving Start Time and End Time. |
Enable NTP | Enable and configure NTP server and update interval. |
(On Screen Display) OSD Date Format | OSD Date format, choose based on user preference. |
Device Name Setting | Set the name of the camera which will be shown in the result of “Search Tool” of GSurf_Pro VMS program. |
Disable Web Access | Choose to Enable/Disable HTTP Web Access |
DI and DO | DI and DO initial status for Alarm In or Out operation. |
Digital Input | State of Digital Input, normal at Open state. |
Digital Output | State of Digital Output, normal at Open state |
DO Output Duration | Select operation of Alarm Output Duration from pull down list. |
Alarm Out Pattern (s) | Configure an ON/OFF cadence during that specific duration of time which the alarm out follow when played. Range is from 0-3. Default is 0. When set to 0, no cadence will be applied and alarm out will be played continuously. |
Audio Setting Page (Decode Mode)
This page allows user to configure to adjust the Speaker’s volume:

Networking Setting Page (Decode Mode)
This page allows user to configure network related parameters:
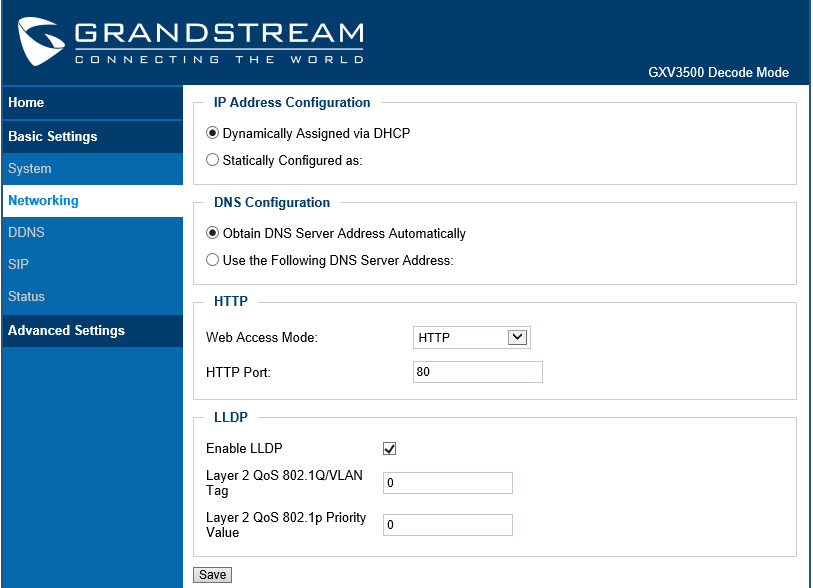
Dynamically Assigned via DHCP | Default setting, DHCP server assign IP to camera. |
Statically Configured as | Static IP address configuration (Preferred for Port FWD). |
DNS Configuration | DNS server IP. Must be configured if using static IP. |
Web Access Mode | Selects the access mode to the web GUI either HTTP or HTTPS. |
HTTP Port | Specifies the TCP port for Web Access, Default is 80. |
Enable LLDP | Controls the LLDP (Link Layer Discovery Protocol) service. The default setting is “Enabled”. |
Layer 2 QoS 802.1Q/VLAN Tag | Assigns the VLAN Tag of the Layer 2 QoS packets. Default value is 0. Range is from 0 – 4094. |
Layer 2 QoS 802.1p Priority Value | Assigns the priority value of the Layer2 QoS packets. Default value is 0. Range is from 0 – 7. |
DDNS Setting Page (Decode Mode)
This page allows user to configure dynamic DNS related parameters:
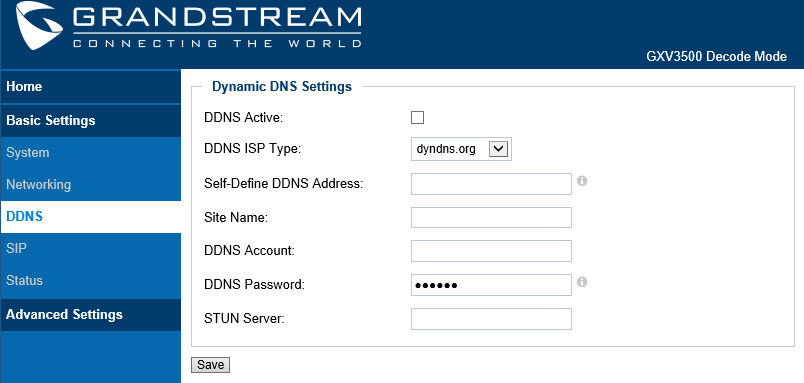
DDNS Active | Enable DDNS by check this field. |
DDNS ISP Type | Select the DDSN service provider from the pull-down menu list. |
Self-Define DDNS Address | Input the self-defined DDNS address. |
Site Name | DDNS site name. |
DDNS Account | DDNS account name |
DDNS Password | DDNS password |
STUN Server | Stun server FQDN or IP. If device behind a non-symmetric router, STUN server can help to penetrate & resolve NAT issue. |
SIP Setting Page (Decode Mode)
GXV3500 Decode can be configured as SIP endpoint to decode the video SIP call, showing remote SIP video phone or IP camera during SIP video call, and displaying to audio and video to the connected big screen TV set.
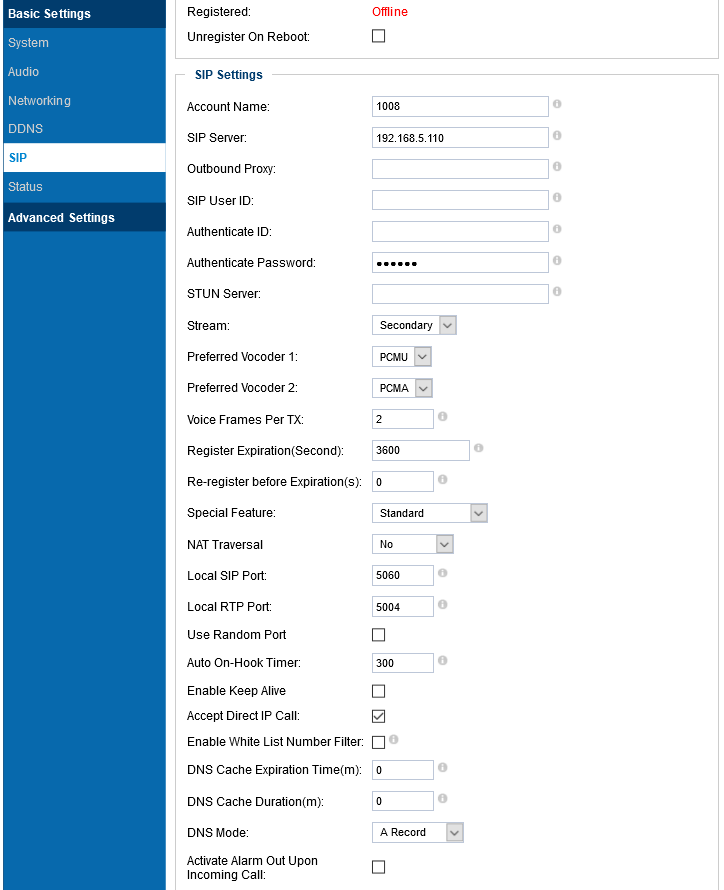
Table 23: SIP Setting Page (Decode)
Registered | SIP registration status. Display “Online” in Green, “Offline” in Red. |
Unregistered on Reboot | If checked and SIP server support, reboot camera will unbind all registered end points using this SIP account. |
Account Name | SIP account name used for self-identification. |
SIP Server | FQDN or IP of SIP server from VoIP service provider. |
Outbound Proxy | IP or FQDN of Outbound proxy server, helps penetrate NAT/Firewall. |
SIP User ID | SIP username, or telephone number from ITSP. |
Authenticate ID | Authenticate ID used by SIP proxy. |
Authenticate Password | Authenticate password used by SIP proxy. |
STUN Server | STUN server used to resolve NAT if have. |
Stream | Which stream used for SIP call. Default 2nd stream and only 2nd. |
Preferred Vocoder 1/2 | Audio codec used for SIP call. It supports G.711A and G.711U. |
Voice Frame Per TX | Configures the number of voice frames transmitted per packet. When configuring this, it should be noted that the “ptime” value for the SDP will change with different configurations here. This value is related to the codec used and the actual frames transmitted during the in-payload call. For end users, it is recommended to use the default setting, as incorrect settings may influence the audio quality. The default setting is 2. |
Registration Expiration | Registration expiration time, default 3600 seconds. |
Re-register before Expiration | Specifies the time frequency (in seconds) that the GXV3500 sends reregistration request before the Register Expiration. The default value is 0. Range is from 0-64800 seconds. |
Special Feature | Users may need select special features to meet some switch requirements. Users can choose from Standard, Broadsoft and Telefonica. Default is Standard. |
NAT Traversal | This parameter configures whether the NAT traversal mechanism is activated. Users could select the mechanism from No (Default), STUN, Keep-alive, UPnP, Auto. If set to “STUN” and STUN server is configured, the phone will route according to the STUN server. If NAT type is Full Cone, Restricted Cone or Port-Restricted Cone, the phone will try to use public IP addresses and port number in all the SIP&SDP messages. The phone will send empty SDP packet to the SIP server periodically to keep the NAT port open if it is configured to be “Keep-alive”. Configure this to be “No” if an outbound proxy is used. “ |
Local SIP Port | Local SIP port, default 5060. |
Local RTP Port | Local RTP port for media, default 5004. |
Use Random Port | Forces the GXV3500 to use random ports for both SIP and RTP messages. This is usually necessary when multiple units are behind the same full cone NAT. The default setting is “Disabled”. Note: This parameter must be set to “Disabled” for Direct IP Calling to Work. |
Local SIP Port | Configure the Local SIP Port used by the GXV3500. Default is 5060. |
Local RTP Port | Configure the Local RTP Port used by the GXV3500. Default is 5004. |
Use Random Port | Forces the GXV3500 to use random ports for both SIP and RTP messages. This is usually necessary when multiple units are behind the same full cone NAT. The default setting is “Disabled”. Note: This parameter must be set to “Disabled” for Direct IP Calling to Work. |
Auto On-Hook Timer | Timer (in seconds) for automatic disconnecting SIP call. Default 300. |
Enable Keep Alive | Checked to help NAT resolution, sending alive packets. |
Accept Direct IP Call | Check to accept peer-to-peer IP call in LAN without SIP server. |
Enable White List Number Filter | White List (Allowed Caller) Phone numbers allowed calling into the camera. |
DNS Cache Expiration Time(m) | The GXV3500 will attempt to renew its DNS cache once this expiration time is reached. |
DNS Cache Duration(m) | This the duration of time that the GXV3500 keeps the save DNS cache in case of the DNS server not responding to the new DNS Lookup requests. |
Selects DNS mode to use for the client to look up server.
Default is A Record. | |
Activate Alarm Out Upon Incoming Call | The Alarm output will triggered if an incoming call is received. |
White List (Allowed Caller) | Phone numbers allowed calling into the camera. |
Status Page (Decode Mode)
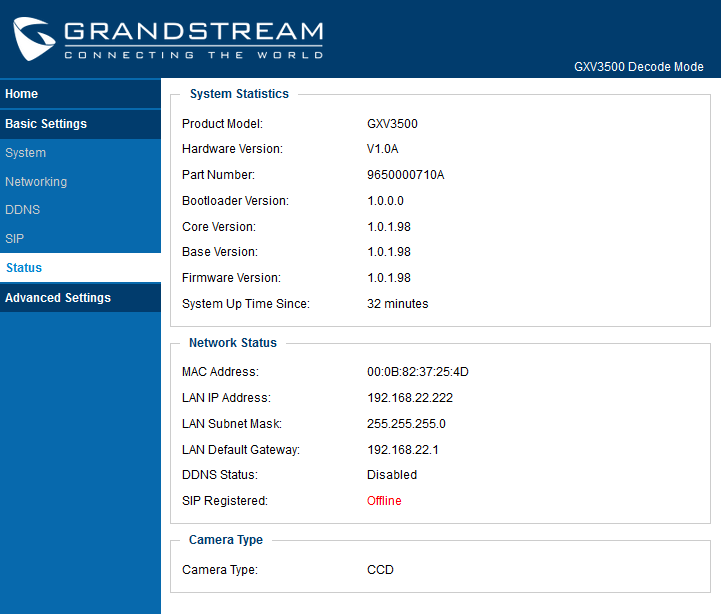
This page shows the GXV3500 Decode Mode operation status:
Advanced Settings Explanation (Decode Mode)
User Management Page (Decode Mode)
This page allows customer to configure the user and related privilege
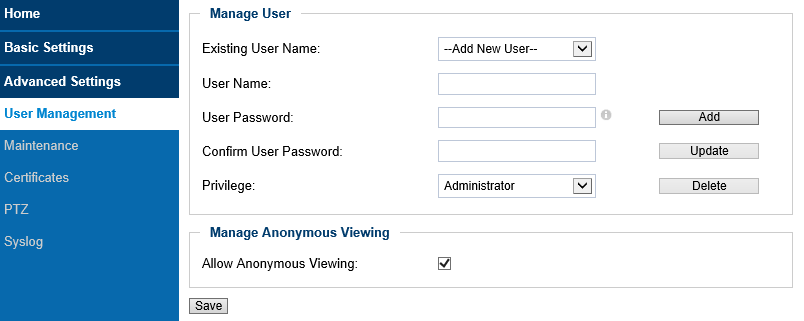
Table 24: User Management (Decode)
Existing User Name | Allow revise existing user or add new user. |
User Name | The name of users need to be revised. |
User Password | New password if revise password. |
Confirm User Password | Re-enter the new password for verification, must match. |
Privilege | Choose user privilege. Two levers: Administrator, Viewer. Viewer cannot change any settings. |
Allow Anonymous Viewing | When checked, no security enhanced. Any person can view the camera if knowing the IP or FQDN of the camera, but cannot change anything, just view ONLY. |
Maintenance Page (Decode Mode)
This page allows user to maintain the GXV3500 in Decode Mode:
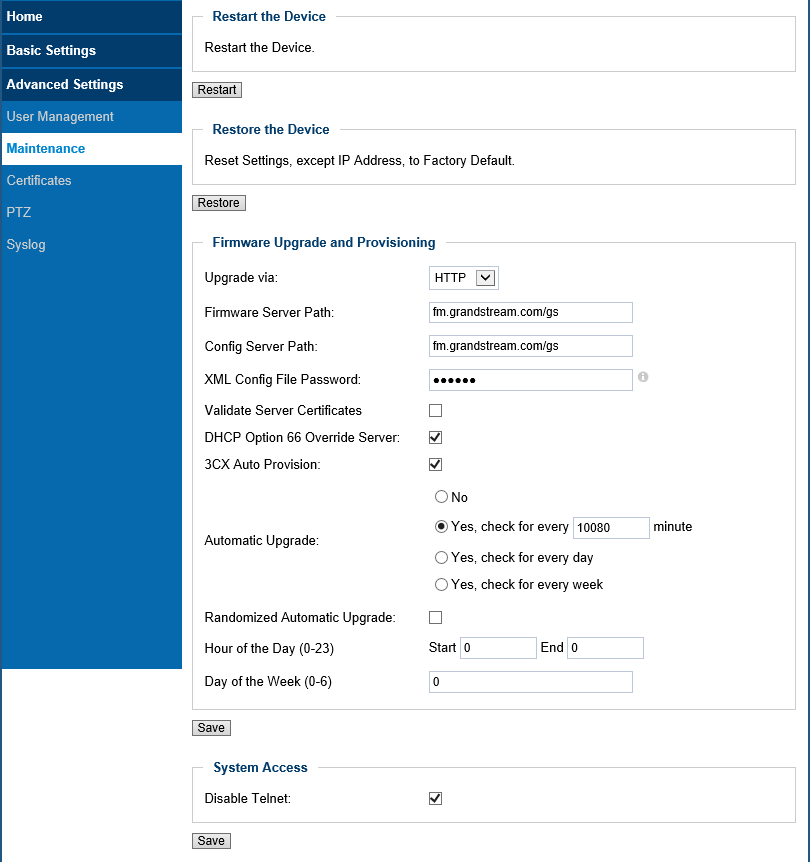
Table 25: User Management page
Restart | When clicked, the GXV3500 will reboot or restart (soft reboot). |
Restore | When clicked, the camera will be reset to factory default, wiping out all the configurations (except IP address). |
Upgrade via | Firmware upgrade via TFTP, HTTP or HTTPS. |
Firmware Server Path | Sets IP address or domain name of firmware server. The URL of the server that hosts the firmware release. Default is “fm.grandstream.com/gs”. Note: Make sure to not prepend address with “http://” or any other protocol |
Config Server Path | Sets IP address or domain name of configuration server. The server hosts a copy of the configuration file to be installed on the GXV3500. Default is “fm.grandstream.com/gs”. Note: Make sure to not prepend address with “http://” or any other protocol. |
XML Config File Password | Password for encrypt the XML based configuration file. |
Validate Server Certificates | Enable this option in order to validate certificate with trusted ones during TLS connection. |
DHCP Option 66 Override Server | If DHCP option 66 is checked, the GXV3500 will attempt to download firmware file and XML config file from the server URL provided by DHCP overriding configured Firmware Server Path and Provisioning Server Path (even if left blank). |
3CX Auto Provision | Enable or disable the 3CX PnP Auto Provision. When enabled, the GXV3500 to broadcast the SIP SUBSCRIBE message during booting up to allow itself to be discovered and be configured by the SIP platform. The default setting is “Yes”. |
Automatic Upgrade | Checked to enable automatic firmware upgrade and provisioning. |
Randomized Automatic Upgrade | Randomized Automatic Upgrade within the range of hours of the day or postpone the upgrade every X minute(s) by random 1 to X minute(s). |
Disable Telnet | Check to disable Telnet to enhance security. |
Certificates Page
This page allows users to upload up to 6 Trusted CA certificate files which will be trusted by the GXV3500 during SSL exchange.
Also users are allowed to configure the device with custom certificate signed by custom CA certificate under the Custom Certificate section.
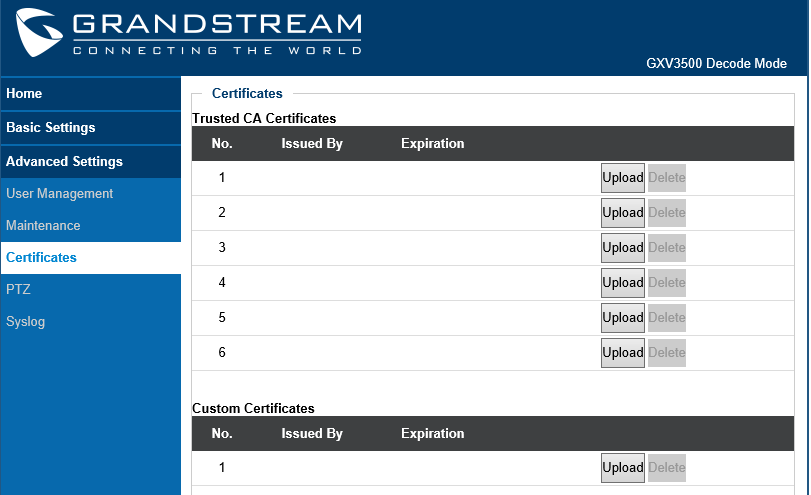
In order to upload your Trusted CA certificate:
Click on
![]() button to upload a file and some related information to the uploaded file will be displayed, such as “Issued by” and “Expiration”.
button to upload a file and some related information to the uploaded file will be displayed, such as “Issued by” and “Expiration”.

User could press
![]() to delete one of the files.
to delete one of the files.
In order to upload your Custom certificate:
Click on
![]() button to upload a file and some related information to the uploaded file will be displayed, such as “Issued by” and “Expiration”.
button to upload a file and some related information to the uploaded file will be displayed, such as “Issued by” and “Expiration”.

User could press
![]() to delete one of the files.
to delete one of the files.
PTZ (Decode Mode)
This page allows user to configure GXV3500 (decode mode) to use its related RS-485 port as output control of 3rd party PTZ compatible device or TEXT output device via RS-485 port.
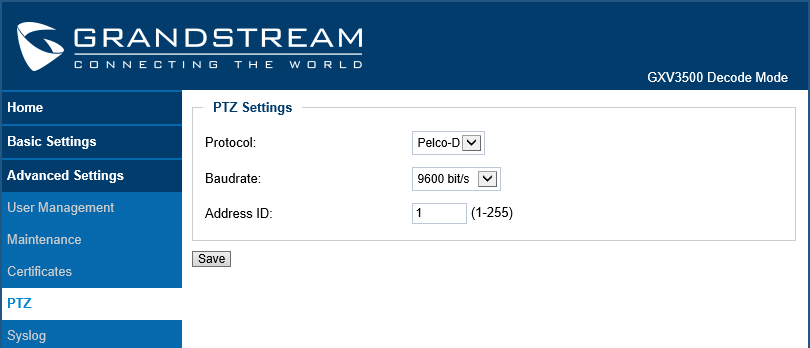
Table 26: Configuration Page (Decode)
Protocol | Pull-down to select supported PTZ protocol by connected analogue camera. Only Pelco-D or Pelco-P allowed. |
Baudrate | The baudrate used by the analogue camera interface, select from the pull-down menu. |
Address ID | Hardware Pelco-D or Pelco-P address ID used by the analogue camera, please refer to related camera user manual for this ID (or PIN switch in the UM), then fill in related matching address into this field. |
Remote Alarm_Out Peering with GXV3500 (Decode Mode) :
The IP66 weather-proof IP cameras GXV3672, GXV3674 and GXV3610 series do not have built-in Alarm_Out interface, but when peering with Grandstream GXV3500 encoder/Decoder, the GXV3500’s built-in Alarm_Out interface (running at Decode mode) can behave as remote Alarm_Out for those IP Cameras.
The benefit of such peering is the Alarm_Out circuit is not physically wired into the IP Camera anymore, with the Ethernet network behaving as wiring, the Alarm_Out circuit can now be located to convenient places where GXV3500 located.
This means IP Camera can be in location A, while the Alarm_Out can be in location B (A and B can be in the same or different places as long as A and B can reach each other via network/internet). This will help a lot of users to monitor site remotely and take appropriate action, because there are situations where location A with cameras, but actions have to be taken from location B. With Grandstream’s solution, traditional A and B limitation by the cable length is now disappear.
The configuration of such remote Alarm_Out is very simple:
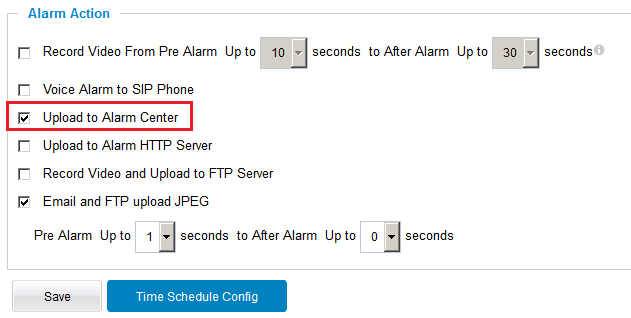
GXV3672/GXV3674/GXV3610 Side:
Same configuration as previous Motion Detection configuration, just make sure “Upload to Alarm Center” checked and selected:
GXV3500 (Decode Mode) Side:
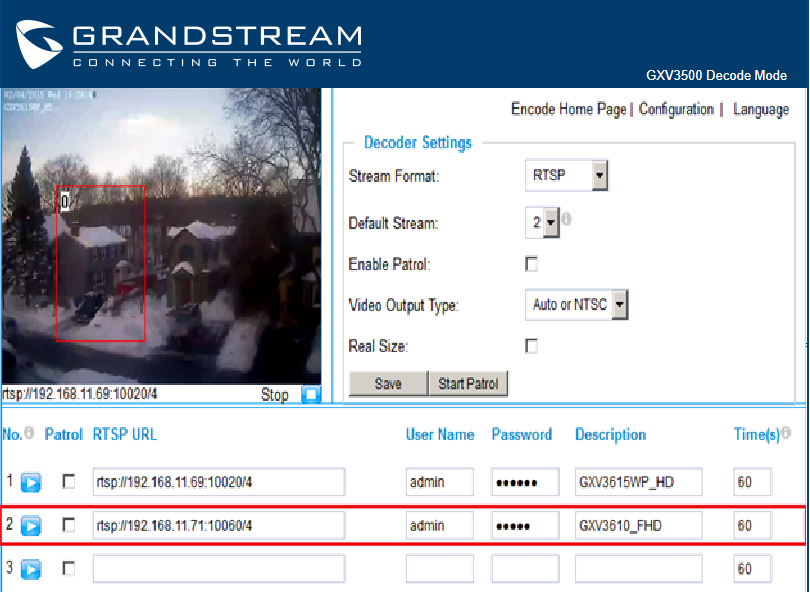
GXV3500 has to be running as Decode Mode when functioning as remote Alarm_Out of the peering IP Camera. The configuration is as below:
- Input the 2nd stream (H.264 Only, MJPEG NOT supported) as the RTSP URL, with correct credentials, as shown below.
- Only ONE stream (currently decoding stream) the Motion Detection can use the GXV3500 built-in Alarm_Out interface if there are multiple RTSP URL configured in the GXV3500.
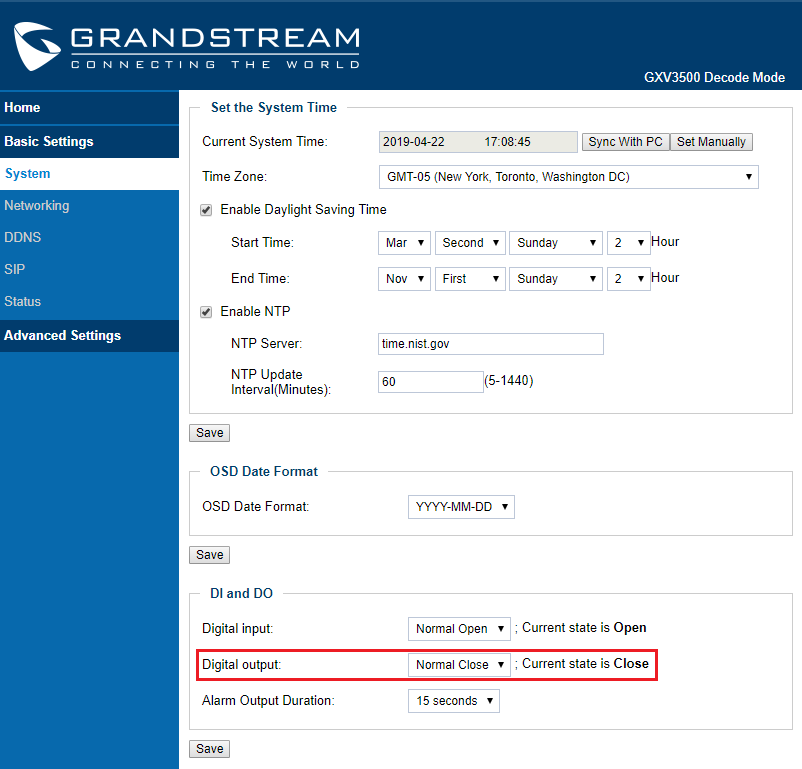
For example, below the “Digital Output Duration” is selected as “15 seconds” so the Alarm_Out will act for 15 seconds before reverting back to previous state. In below case, the default is circuit “Open”, when Motion Detection alarm triggered, the circuit state changed to “Close”, as illustrated below for 15 seconds and then switch back to previous “Open” state.
Unlike the Alarm_Out interface of Grandstream IP Camera (e.g.: GXV3611IR_HD or GXV3662_HF/FHD where the related Alarm_Out interfaces are using relay switch), the GXV3500 Alarm_Out is using photocoupler circuit.
If connecting to a multimeter, you will see the Ohm changed from unlimited to several hundred Ohms depending on GXV3500 HW version.
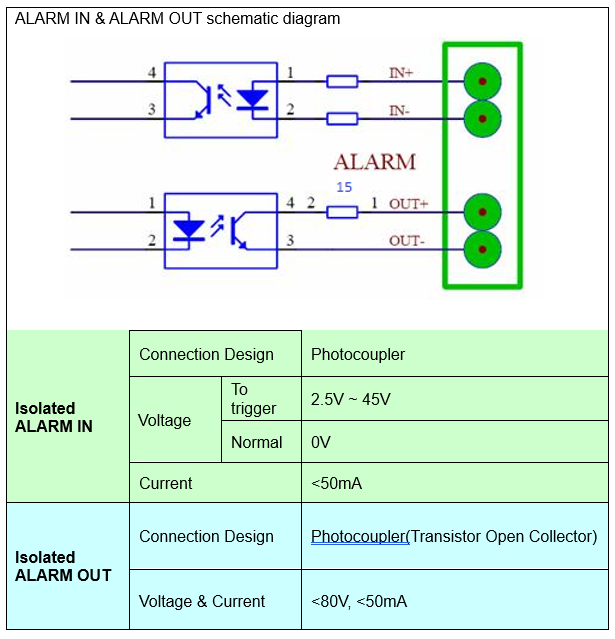
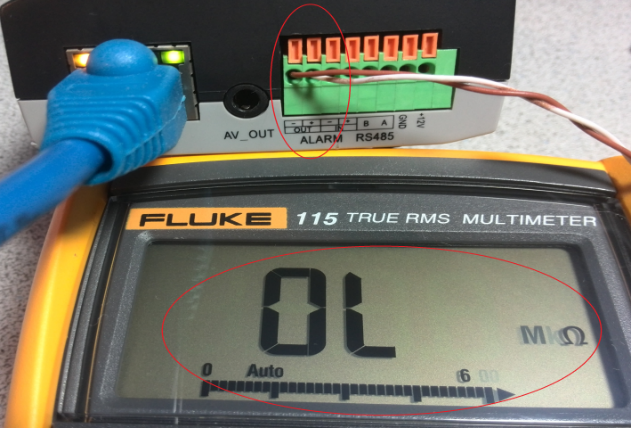
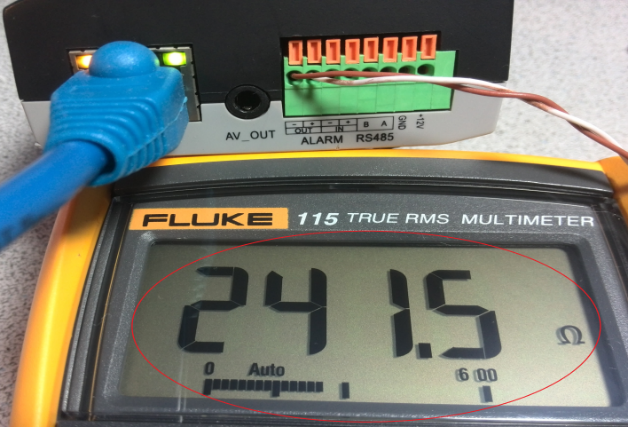
The above method can be used for installers to check the functionality of this feature at lab or on field before the installation. With the help of GXV3500 Decode, customers can now free from the wiring limitation and have the Alarm_Out feature for Grandstream IP66 weather-proof IP cameras.
Syslog Settings (Decode Mode)
This page allows user to enable the Syslog to help troubleshooting problems.
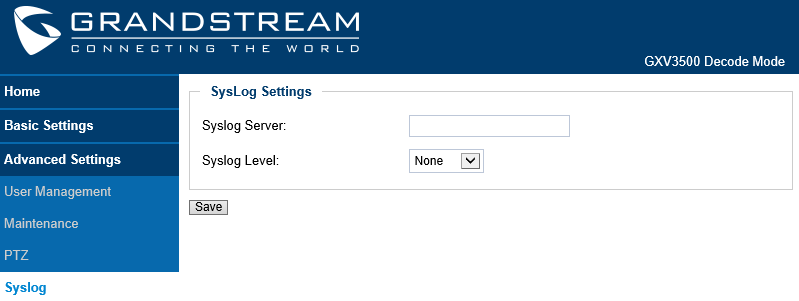
Syslog Server | Syslog server IP or Domain Name. |
Syslog Level | Lever of syslog message sent to the syslog server: None, Debug, Info, Warning, Error. |
IP SURVEILLANCE FAQ
1. What is the default IP address of the GXV3500?
The default IP configuration is DHCP or 192.168.1.168 after booting up 5 minutes.
2. Why can I not view the live video stream in Microsoft Internet Explorer?
Please double check whether the Grandstream Plug-in/Active-X is installed correctly.
Once you log into the GXV3500 web interface, Internet Explorer will indicate that this website wants to install to following add-on: “GSViewer.cab” from Grandstream Networks, Inc. Please install this add-on when prompted by IE.
3. How do you manually uninstall the Grandstream video viewer add-on for IE?
Please follow these steps to uninstall the add-on:
1. Delete the GSViewerX Control from C:\WINDOWS\Downloaded Program Files directory
2. Delete GSNetClient.dll, GS_Replay.exe, GSViewerX.ocx, hi_h264dec_w.dll, lik_VoiceEngine_dll.dll and GSViewerX.inf from C:\WINDOWS\system32
4. Why can’t I access the GXV3500 web configuration interface?
Q 1: Is your internet service down?
A 1: Connect a PC to the internet to test the connection.
Q 2: Are the PC and the device in different subnets?
A 2: Check the subnet mask and default gateway of the device and PC.
Q 3: Is there a conflict with another IP address? A 3: Try to change the IP address of the device.
Q 4: Has the HTTP port been changed?
A 4: Contact the administrator of the device for more information.
5. The GXV3500 web configuration page is not displayed correctly in IE8?
In IE8, Compatibility View might need to be enabled for the GXV3500 web configuration page to load properly. To enable compatibility view, open IE8, click Tools, Compatibility View Setting, and add the GXV3500 web configuration pages to the Compatibility View.
6. Why does IE indicate to install Grandstream Video Viewer add-on after a firmware upgrade? The add-on was properly installed before the firmware upgrade process. New firmware will often upgrade the add-on as well. To watch the live video stream, you must install the newest version of the add-on.
7. How do you watch secondary video stream?
Login to the home page of the GXV3500 web GUI, click Play to watch the video stream. To watch a secondary video stream, right click on the video, and select Secondary Stream on the pop-up menu. Try reinstalling the Grandstream Viewer add-on for IE if you cannot see the video stream.
8. What is DDNS? Is it important for IP surveillance product to have DDNS support?
DDNS is an acronym for Dynamic Domain Name Service. It is important to choose an IP network camera that has DDNS support for dynamic IP addresses. Chances are that the network has a dynamic IP address (which changes with every log on). A DDNS service makes sure that the camera‘s IP address always matches up to the current server address. DDNS also allows a website to be linked to the IP camera that is constantly updated with the correct information and has a reliable feed.
9. Why is Windows Media Player unable to play the recorded video files?
The GXV3500 uses the H.264 video codec. Windows Media Player may lack the proper H.264 Decode to play the recorded video. Please download the Microsoft FFDShow H.264 Decode from https://sourceforge.net/projects/ffdshow-tryout/ and install it.
10. Alarm Triggered Events do not work with GSurf_Pro?
Please double check the Alarm Action on your GXV3500. Login to the web GUI of the GXV3500, go to the Motion Detection or Alarm Events page, and make sure option Upload to Alarm Center is checked.
11. Recommended to save the video files in different directories when using GSurf_Pro?
It is better to save video files in different directory to prevent accidental deletion of the recorded files you need.
12. How to use a cell phone to watch the GXV3500 video stream?
You must set the video resolution to QCIF to watch the GXV3500 video stream from a cell phone. Make sure to set the bit rate to 64kbps to ensure the best video quality.
13. What Smartphone application should I use to view the video?
There are free applications and paid version applications for this, you can find them in Google Play for Android phone and Apple Store for iPhone, like: IP Cam Viewer:
14. Why the IP address of the device NOT reset when clicking the “Restore” button?
The GXV3500 could be installed in areas that are not easy to access. For example, it could be installed on the roof of a building or the ceiling of an office. This makes it difficult to reinstall the device, therefore the “Restore” function will not clear the IP address.
15. Why can’t the live video stream be viewed using a mobile phone or GSurf_Pro after changing the HTTP Port of the device?
Make sure that the RTSP port of the device is set to 2000 plus the HTTP Port number. For example, if the HTTP port is 88, then the RTSP port of the device that you configured on GSurf_Pro or mobile phone should be 2088.
Two ports must be forwarded on your router to watch video from a GXV3500 that is located on a private network from a PC in a public network. The web port (HTTP) and the RTSP port. Please make note that the RTSP port number changes according to the web port. If the web port is 80, then the RTSP port is 554. If the web port is not 80, then the RTSP port equals the web port +2000. For example, if the web port is 88, then the RTSP port will be 2088.
17. What is the “Pin Out” for the 3.5mm AV cable used in GXV3500?
The “Pin Out” layout for the supplied 3.5mm AV cable used in GXV3500 is the 1st one (highlight in Blue) in below table.
Basically: 1: Ground; 2: Video (Yellow); 3: Audio Right (Red); 4: Audio Left (White).
Same as the AV cable used in Apple iBook.

17. Will the GXV3500 Decode/Encoder be compatible with third party cameras?
- Encode Mode: (Analogue Camera)
Generally, most 3rd party analogue cameras will be digitized to IP Camera when connecting to GXV3500 BNC port at Encode Mode. - Decode Mode: (IP Camera)
Whether GXV3500 can decode the data stream from a 3rd party IP camera is dependent on how the stream was encoded. GXV3500 utilizes the RTSP stream and is capable ONLY H.264 formats decoding (so MJPEG is out of luck). General rule of thumb is if the RTSP stream of 3rd party IP Camera can be viewed by VLC Media Player (free open source media player software), the GXV3500 will very likely be able to decode the stream, but no guarantee due to the variety of H.264 encoding implementation by different IP Camera vendors.
CHANGE LOG
This section documents significant changes from previous versions of user manual for GXV3500. Only major new features or major document updates are listed here. Minor updates for corrections or editing are not documented here.
Firmware Version 1.0.3.17
- Added support for “Max. Times Consecutively Login Error”. [System Settings Page]
- Added support for “Login Error Lock Time”. [System Settings Page]
Firmware Version 1.0.3.14
Firmware Version 1.0.3.13
- No major change.
- Added support for “Auto-Answer After Ring Timeout” (Encoder). [Answer Mode]
- No major change.
- No major change.
- Added support for HTTPS web access. [Web Access Mode]
- Added option to Enable/Disable HTTP web access. [Web Access]
- Added schedule for firmware upgrade and provisioning. [Maintenance Page]
- Added ability to enable multiple audio codecs simultaneously and specify priority of codecs. [SIP Setting Page]
- Added support to validate server certificate. [Certificates Page]
- Added support for VLAN. [Networking Setting Page]
- Added support for “Voice Frame per TX” on audio settings. [SIP Setting Page]
- Added ability to upload trusted certificates and to configure device with custom certificate signed by custom CA certificate. [Certificates Page]
- Increased the “Ring Timeout” limit to 5 minutes. [SIP Setting Page]
- Added support for alarm out pattern. [System Settings Page]
- Added support for “Reregister before Expiration” option. [SIP Setting Page]
- Added support HTTPS Web access. [Networking Setting Page]
- Added ability to disable 3CX PnP feature. [Maintenance Page]
- Added support for new Grandstream MAC block: C0:74:AD
- Added support for DHCP Option 66. [DHCP Option 66 Override Server]
- Add support for DNS SRV mode. [DNS Mode]
- Added activating alarm out directly upon receiving SIP call.
- Changed the WEB UI color tone to dark blue and updated the Logo.
- Added displaying black screen to external monitor/TV when network is disconnected.


