
Dial By Name is a feature on the PBX that allows the caller to search a person by first or last name by entering mapped letters from the caller phone keypad.
The administrator can define the Dial By Name directory including desired extensions
and the searching type by “first name” or “last name” as well as how matching results are presented (“By Order” or “By Menu”).
Dial By Name can be an option in IVR/Auto-attendant; after dialing in and selecting Dial By Name option from IVR, the caller will be requested to enter the first 3 letters (mapped to digits from keypad) to find the person in the Dial By Name directory.
UCM6XXX Dial By Name feature is very useful when companies don’t want to reveal internal extensions numbers and want to have a restricted list of employees to be accessible by callers from outside.
Using UCM6xxx Dial By Name feature provides the following benefits:
-
- The administrator can define the Dial By Name directory to only include desired extensions to be reached. This helps block unscreened calls to reach employees who do not want to receive those calls directly.
Dial By Name Configuration
Create New Dial by Name
Administrators can create the dial by name group under web GUI 🡪 Call Features 🡪 Dial By
Name.
-
Click on
 , and the following window will popup.
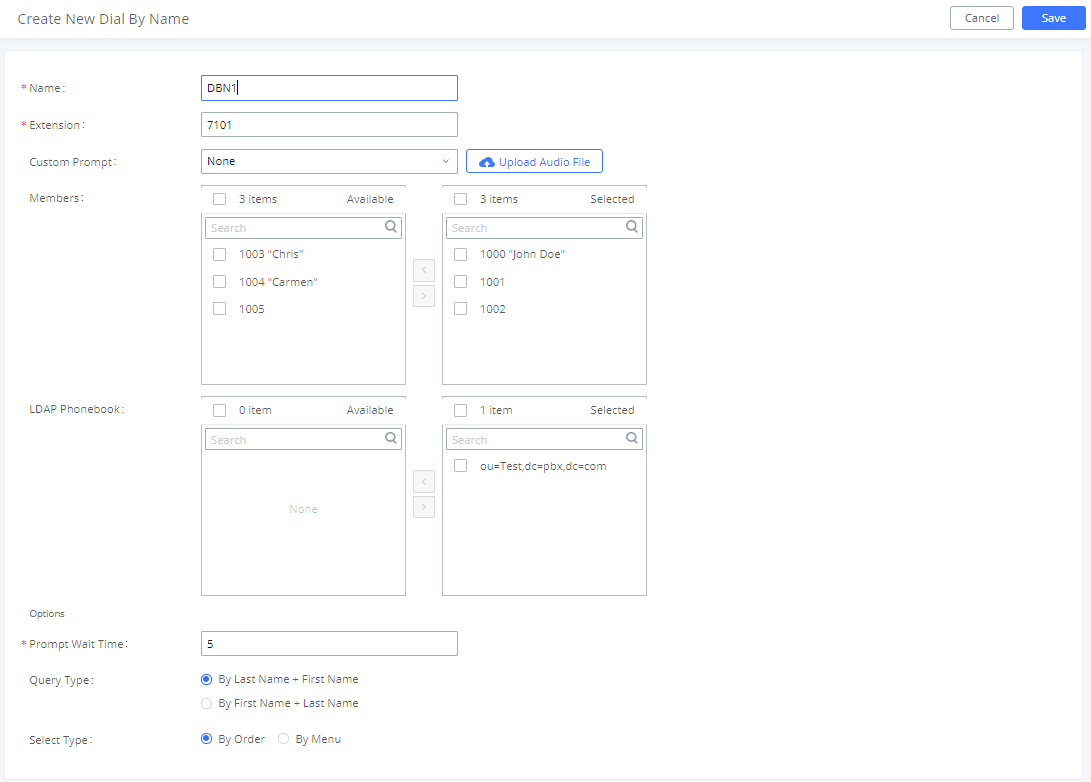
- Enter the Name of the Dial By Name Group.
- Enter the extension Number.
- Set a custom prompt for directory to announce to a caller.
- Add extensions from “Available Extensions” to “Selected Extensions”.
- Add LDAP directory from “Available LDAP” to “Selected LDAP” if available.
- Configure “Prompt Wait Time” for Dial By Name feature. The timeout range is between 3 and 60 seconds.
- Select the Query Type (“By Last Name + First Name” or “By First Name + Last Name”).
- Select the Type (“By Order” or “By Menu”).
- Save and Apply the changes.
Name | The name of the Dial By Name Group. |
Extension | The Extension of the Group, the range allowed on the UCM is 7101🡪7199. |
Custom Prompt | This option sets a custom prompt for the directory to announce to a caller. The file can be uploaded from the page “Custom Prompt”. Click “Upload Audio File” to add additional records. |
Members | Select extension to add to the Dial By Name Directory. |
LDAP Phonebook | Select LDAP directory to add to the Dial By Name Directory. |
Prompt Wait Time | Configure “Prompt Wait Time” for Dial By Name feature. During Dial By Name call, the caller will need to input the first letters of First/Last name before this wait time is reached. Otherwise, the timeout will occur and the call might hang up. The timeout range is between 3 and 60 seconds. |
Query Type | This defines how the caller will need to enter to search the directory. Two options are available:
|
Select Type | Specify the select type on the searching result. The IVR will confirm the name/number for the party the caller would like to reach before dialing out.
|
Record/Customize the voicemail greetings
By default, the Dial By Name feature will spell letter by letter the name of extension matching the search criteria. However, if you want to announce the full name assigned to the dialed extension instead of spelling it letter by letter, you can use the recorded voicemail greetings which contain the extension’s name.
To record these voicemail greetings, please make sure to follow the steps below:
- Make sure to edit the extensions that belong to Dial By Name, then Enable Voicemail option
- Dial *98 to access the voicemail
- Enter the desired extension that belongs to Dial By Name feature then enter its voicemail password
- Press “0” to enter the recordings menu
- Now press “3” to record the extension’s owner First name and Last Name as greeting message
Dial By name feature use case
Access directly the Dial By Name
Once configured, the “Dial By Name” feature will behave by design as follow:
- Caller should dial the Dial By Name extension number (7101 in this example)
- UCM will play an audio prompt asking the caller to enter the first 3 digits of the extension owner’s name (First Name or last name)
- Once the caller enters the 3 digits and the UCM finds the right extension matching the search criteria, The UCM will play the message bellow:
- If the Greeting message is not recorded for the matching extension, the UCM will spell the matching extension’s First Name/ Last Name.
- If the Greeting message is recorded for the matching extension, UCM plays the Greeting message that contains matching extension’s first name or last name
Note: Refer to section Record/Customize the voicemail greetings
- Now the caller should confirm if this extension is matching his expectation by pressing digit “1”
- Once done, the UCM will forward the call to the right extension.
Using Dial By Name in Inbound Route
Once successfully created, users can configure the inbound route destination as “Dial By Name” or IVR key event as “Dial By Name”.
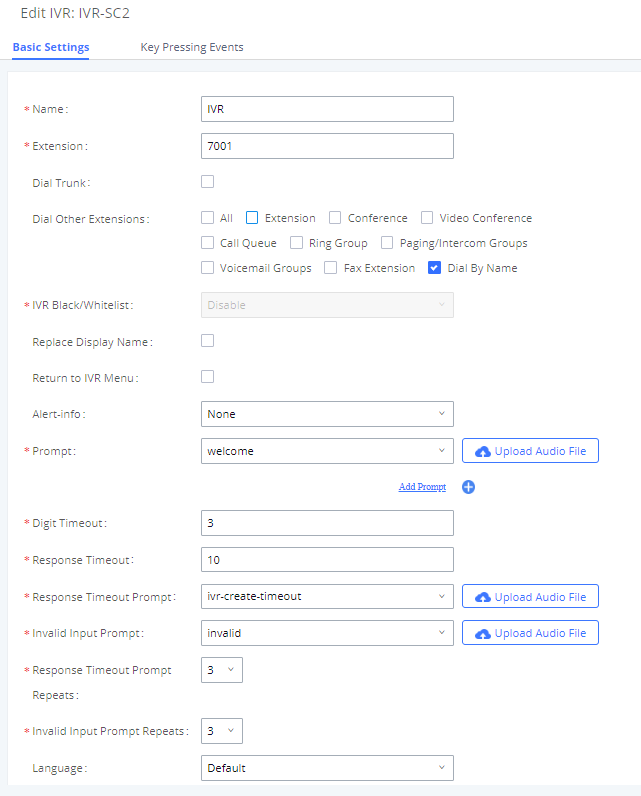
- To configure Dial By Name as IVR Key Pressing Event, go to UCM6XXX WebGUI 🡪 Call Features 🡪 IVR.
- Edit an existing IVR or Create a new one to use in inbound routes.
- Go to Key Pressing Events and choose Dial By Name from drop-down list next to the desired key event.

User needs to set “Dial By Name” on the “Dial other Extensions” field in order to restrict the use of the IVR for incoming calls, to only Dial By Name.
Once set, Go to Extension/Trunk 🡪 Inbound Routes.
Users can set the destination under the inbound routes of a trunk to Dial By Name directly or IVR with a pressing key event configured as Dial By Name.


When calling into that Trunk and selecting Dial By Name, users will be prompted to enter the first three digits of the user’s “first name” or “last name” in order to be redirected to the wanted contact.
Dial By Name Call Flow
The following shows an example of Dial By Name flow where caller reaches Dial By Name feature and try to talk to employee “Jane Doe”:
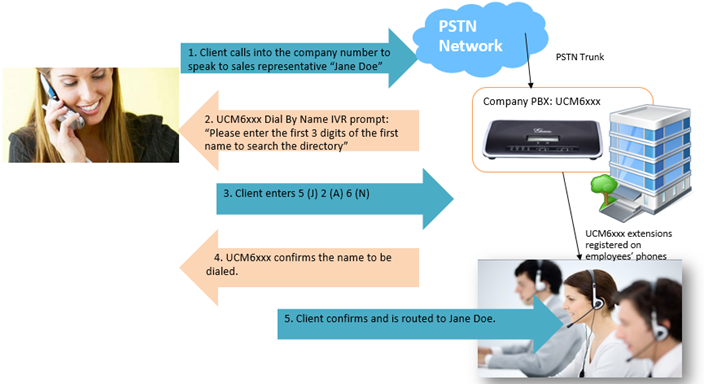
.