INTRODUCTION
The Grandstream GRP261X/GRP262X/GRP263X/GRP265X/GRP267X supports XML Application. This XML API allows users to access service information on a web server, and present the information in LCD as well as customize screen display. It’s a custom application where the XML framework is interactive and dynamic, depending on the configured object. It could be easily developed with all the programming languages for web application development (e.g., PHP, ASP, etc). Typical XML applications could be call center service, surveys, reservations, and much more.
What is XML
XML (eXtensible Markup Language) is a markup language* for documents and applications containing structured information. This information contains both content (text, pictures, input box, etc.) and an indication of what role that content plays (e.g. content in a section header is different from content in a footnote, or content in a figure caption, or content in a database table, etc.). Almost all documents have a certain kind of structure.
Why XML
What benefits does XML provide to SIP endpoints? XML enables our SIP phones to serve as output devices for web services and other online applications. The XML infrastructure allows the phones to interact with external applications in a flexible and programmable manner. Two specific XML API supported by GRP261X/GRP262X/GRP263X/GRP265X/GRP267X are XML Phonebook and XML Application.
XML API Architecture
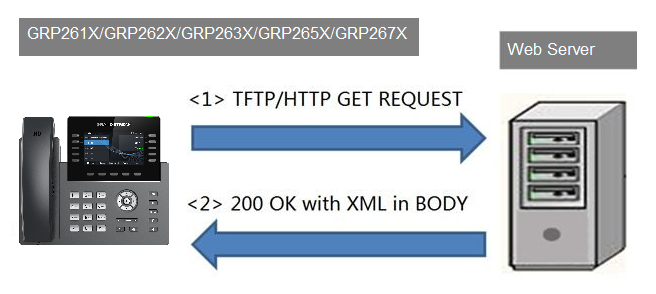
The XML application on GRP261X/GRP262X/GRP263X/GRP265X/GRP267X is using TFTP/HTTP/HTTPS as the transport protocol. The following figure shows how it works. GRP261X/GRP262X/GRP263X/GRP265X/GRP267X initiates the HTTP/HTTPS GET Request to the server and waits for the response. Once the phone receives the response with XML content in BODY, it displays the information.
Two types of XML API architecture are introduced below, depending on if the application is within LAN or accessed via the Internet.
- An application in the LAN area may exchange information in the following manner. GRP261X/GRP262X/GRP263X/GRP265X/GRP267X sends requests and accepts XML contents via TFTP/HTTP/HTTPS, directly communicating with the server. The server will then handle the request and response via any protocols with the other application server to get the expected information for the XML service.
- If the above Web Server accesses the Internet, it could interact with the outside web servers and respond to real-time content to GRP261X/GRP262X/GRP263X/GRP265X/GRP267X.
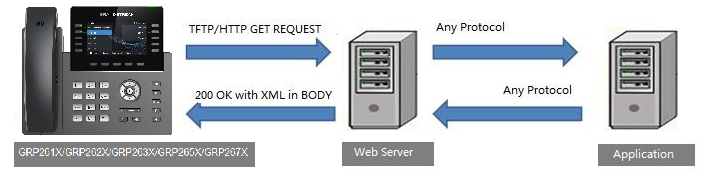
As illustrated above, all of the application logic lies within the server side of the architecture. This allows faster application development and minimal phone-side maintenance.
XML APPLICATION CONFIGURATION
WEB GUI Configuration
To launch the XML application on GRP261X/GRP262X/GRP263X/GRP265X/GRP267X, first set the XML application server path and softkey label in web GUI->Application->XML Application page.
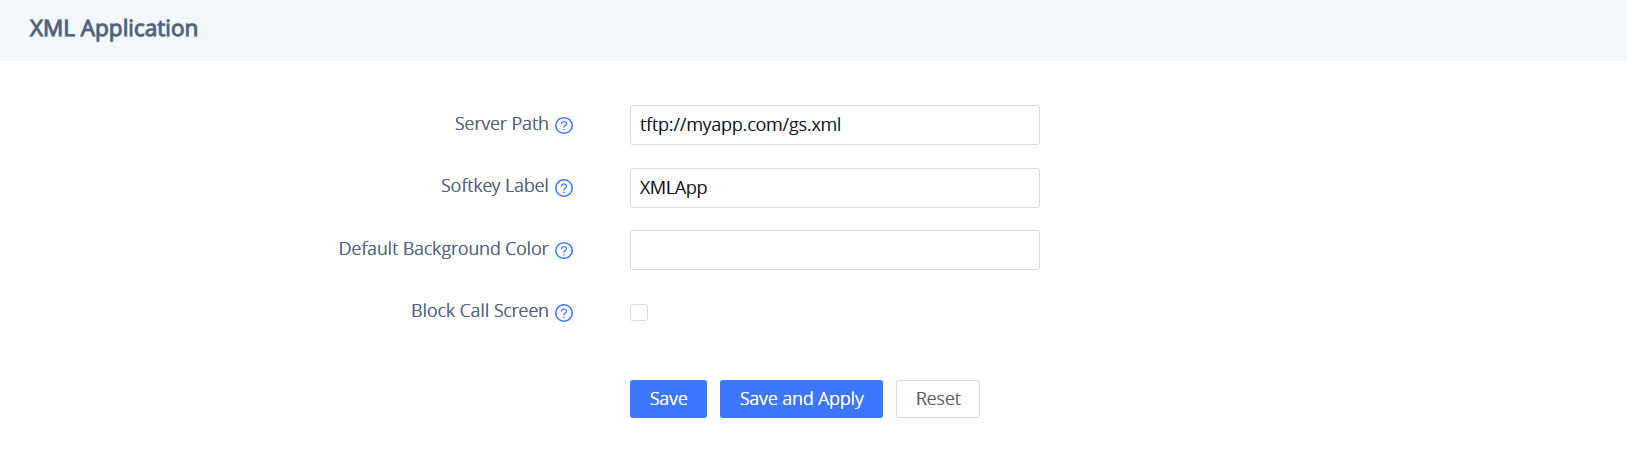
The Server Path must be set to the web server directory where the application is located. Currently, HTTP, HTTPS, and TFTP are supported. The accepted format is as below (content in [ ] is optional).
- For TFTP
tftp://IP_address[:port]/dir/filename
tftp://Hostname[:port]/dir/filename
- For HTTP
http://IP_address[:port]/dir/filename
http://Hostname[:port]/dir/filename
- For HTTPS
- Examples:
tftp://192.168.40.10/XMLapp/welcome.xml
http://192.168.40.10/XMLapp/welcome.xml
tftp://myapp.com:8080/surveyapp.xml
The default value for Softkey Label is “XMLApp”. Users press this softkey to launch the XML application. Please make sure the label string does not exceed the softkey maximum length on each model.
After the server path and label name are filled in, click on “Save and Apply” on the web GUI page to save the configuration. The GRP261X/GRP262X/GRP263X/GRP265X/GRP267X will then display the XML Service softkey on LCD. Press the softkey with the configured label to launch the application.
Users may also use the config file to provision the XML Application Server Path and Softkey Label to the phone. In this case, GRP261X/GRP262X/GRP263X/GRP265X/GRP267X needs to be provisioned and rebooted. The corresponding P values are as below.
- P337: Server Path.
This is a string that should contain the path to the XML application file.
- P352: Softkey Label.
This is a string to display the softkey label on LCD.
Using LCD and Keypad
Without configuration, the default idle screen (use GRP2634 as an example) is like below.

Once the XML Application server path and softkey label are successfully configured, the label will be displayed as the right-most softkey. Press this key to load the application.
As you may know, it is also possible to enter the application server path into PC’s web browser. In this way, you’ll be able to see the exact XML document on your PC that your phone is receiving.
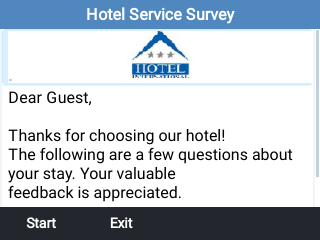
An example application screen will be like below.
Navigation in XML Application
Now the XML application is launched on the phone. To navigate and proceed in the application, use the keypad and softkeys to complete the following different actions.
- Keypad digit input
- Enter the digits on the phone’s keypad if the application requires input.
- To delete an input digit, press the “BackSpace” softkey.
- If there are multiple input fields, press the “UP” or “DOWN” arrow to toggle among the input fields.
- Selection list
- Press the “UP” or “DOWN” arrow to move the selection cursor to the desired list field.
- Press the “LEFT” or “RIGHT” arrow to toggle among different selections defined in the list.
- Checkbox selection
- Press the “UP” or “DOWN” arrow to move the selection cursor to the desired checkbox.
- Press the “LEFT” or “RIGHT” arrow to toggle among different selections defined in the list
- Press the “Check”/”Uncheck” softkey to select/deselect the option.
- Softkey navigation
- Press the corresponding softkeys to navigate. The softkeys are defined in the XML code. Each softkey could contain a label for display, action, and URL to trigger the phone to display another page. In the above example, “Start” will navigate you to the next step of the screening process, and “Exit” will allow you to quit the application.
- In the case where there are more than 3 or 4 softkeys (depending on the GRP261X/GRP262X/GRP263X/GRP265X/GRP267X model) used in the XML application, a “MORE” softkey will automatically show at the rightmost place. Click on it to view more softkeys.
- Quit application.
- If Softkey with the “QuitApp” action is configured, the user may press the Softkey to exit.
- By default, users can quit and return to the normal idle screen by holding the “CONF” button on the phone’s keypad for about 3 seconds.
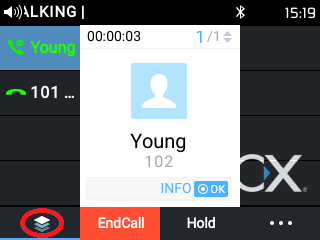
- Make/Answer calls during application.
- When the phone is running the application, users could make or answer calls without exiting.
- Make a call by off-hook the handset, or pressing the speaker button.
- Answer an incoming call by off-hook the handset, pressing the speaker button, or pressing the softkey “AnswerCall”.
- Once the call screen is triggered, the softkey with
 icon will display. Press this key to continue the application.
XML APPLICATION FORMAT
Header
In the first line of the XML document, the following header can be set as an XML declaration. It defines the XML version and encoding. On GRP261X/GRP262X/GRP263X/GRP265X/GRP267X, UTF-8 is used as an encoding method for correct display.
<?xml version="1.0" encoding="UTF-8"?> Special Characters
As followed by the standard XML recommendation, some characters need to be escaped. The following table lists the characters with their escape sequence.
Characters | Name | Escape Sequence |
& | Ampersand | & |
“ | Quote | " |
‘ | Apostrophe | &apos |
< | Left Angle Bracket | < |
> | Right Angle Bracket | > |
Enter Space | 
 |
Special Characters
GRP261X/GRP262X/GRP263X/GRP265X/GRP267X Screen XML Structure
The XML application template could be represented like below. <view> section (mandatory), <Softkeys> section (optional), and <Events> section (optional) are the main customization area for the XML application. Please refer to the template.xml included in the package for more comments.
<xmlapp>

<view>

<section>

<!– ADD DISPLAY AND INPUT ELEMENTS FOR XML APPLICATION CONTENTS–>

</section>

</view>

<Softkeys>

<!– ADD SOFTKEY ELEMENTS FOR XML APPLICATION CONTENTS–>

</Softkeys>

<Events>

<!–ADD EVENT HERE–>

</Events>

</xmlapp>
Example – An easy sample
<?xml version=”1.0″ encoding=”UTF-8″?>

<xmlapp title=”Hotel Service Survey”>

<view>

<section>

<image path=”http://mypath.com/hotel.jpg”></image>

<text label = “1. Overall Room Service Experience:”></text>

</section>

<section>

<select label=”Stay Reason” type=”multiple” name=”:survey_personal_reason”>

<option text=”Business” value=”business” />

<option text=”Travel” value=”travel” />

<option text=”Pleasure/Leisure ” value=”pleasure” />

</select>

<input label=”Your Comments:” name=”:survey_comment”></input>

</section>

</view>

<Softkeys>

<Softkey action=”UseURL” label=”Next” commandArgs=”http://mypath.com/page3.xml”/>

<Softkey action=”QuitApp” label=”Exit”/>

</Softkeys>

<Events>

<Event state=”callStateEnded”>

<Action action=”UseURL” commandArgs=”http://mypath.com/page7.xml”></Action>

</Event>

</Events>

</xmlapp> 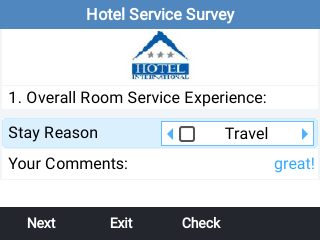
The XML document structure can be presented in the following diagram. This provides users with an overview of the XML element. For the element attribute and text information, please refer to the details in the next section [GRP261X/GRP262X/GRP263X/GRP265X/GRP267X XML ELEMENT].
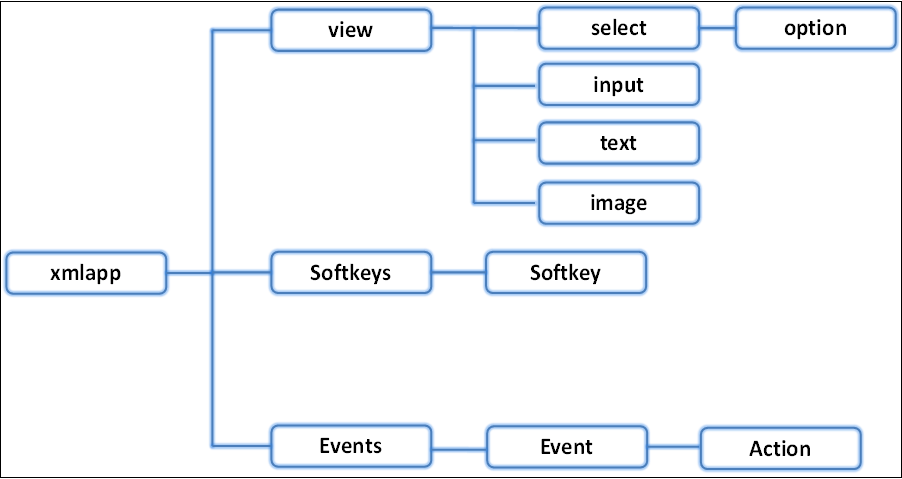
GRP261X/GRP262X/GRP263X/GRP265X/GRP267X XML ELEMENT
This section describes details of the XML element used in GRP261X/GRP262X/GRP263X/GRP265X/GRP267X XML application. Please note that the element name is case-sensitive when being used in XML documents.
Root Element <xmlapp>
<xmlapp> is the root element of the XML document used for GRP261X/GRP262X/GRP263X/GRP265X/GRP267X XML application. This element is mandatory.
<xmlapp title ="XML App display name" >
All the information for screen display is here
</xmlapp>The following table shows child elements and attributes for <xmlapp> element.
Object | Position | Type | Values | Comments |
xmlapp | Root element | Mandatory | – | Root element of the XML document |
title | Attribute | Optional | _ | Defines the title of the XML application |
view | Child element | Mandatory | – | Defines text input and text/image display |
softkeys | Child element | Optional | – | Defines softkey display |
Events | Child element | Optional | – | Used when a certain event is triggered |
Child Elements and Attributes for <xmlapp> Element
<view> Element
This is the main customization section for the XML application.
<xmlapp title ="XML App display name">
All the information for screen display is here
</xmlapp>Object | Position | Type | Values | Comments |
view | Element | Mandatory | – | Defines screen display |
section | Child element | Mandatory | – | Divides the screen into horizontal sections; At least one <section> element should be defined under <view>. |
Child Elements for <view> Element
<section> Element
The <section> element is the container of all displaying widgets.
<section>

Display all widgets here

</section>
Object | Position | Type | Values | Comments |
section | Element | Mandatory | – | Divides the screen into horizontal sections |
select | Child element | Optional | – | Defines selections widget. |
input | Child element | Optional | string | Defines text input widget. |
text | Child element | Optional | string | Display text contents. |
image | Child element | Optional | – | Display image contents. |
Child Elements for <section> Element
<select> Element
This element is to render selection list fields on the screen so that users could choose the answer to submit or proceed. “name=value” will be passed to the query.
<select label="display name" name="filed id" type="single">
     <option text="display text" value="option value"/>
</select>
Object | Position | Type | Values | Comments |
select | Element | Optional | – | |
label | Attribute | Mandatory | string | Defines the display name of the selection field. |
name | Attribute | Mandatory | string | Defines a unique id of the select field. It pairs with the selected value. |
type | Attribute | Optional | single or multiple | Specifies selection list style:
|
shortcut | Attribute | Optional | 0-9 DTMF | Define the shortcut of the selection, if the same number is used for the selections, press that number again will move to the next selection. |
option | Child element | Optional | – | Defines selection list options. |
text | Mandatory | string | Defines the display text of the option. | |
value | Mandatory | string | Defines the value that will be sent to the server when the option is chosen. |
Child Elements and Attributes for <select> Element
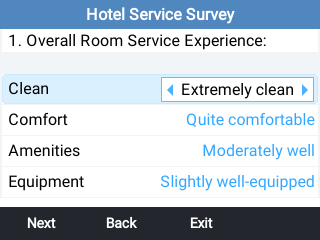
Example 1 – Select type “single” with shortcut select:
The selection list for “Clean” is defined.
<select label="Clean" type="single" name=":survey_clean" shortcut=”0”>
		<option text="Extremely clean" value="5" selected="true"/>
		<option text="Quite clean" value="4"  />
		<option text="Moderately clean" value="3"  />
		<option text="Slightly clean" value="2"  />
		<option text="Not at all clean" value="1"  />
</select>
Example 2 – Select type “multiple”:
Checkbox style is defined for multiple choices.
<select label="Dining experience" type="multiple" name=":survey_dining_experience">
		<option text="Breakfast" value="breakfast" />
		<option text="Dinner" value="dinner"  />
		<option text="Room Service" value="roomService"  />
</select>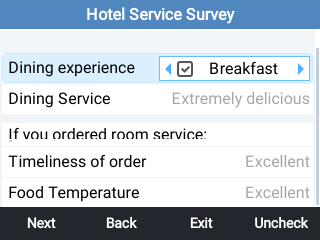
<input> Element
This element is to render input fields on the screen so that users could enter the necessary information to submit or proceed.
<input label="Input Display Name" name="field id" ></input> <input> Element Details
Object | Position | Type | Values | Comments |
input | Element | Optional | – | |
label | Attribute | Mandatory | string | Defines the display name of the input field. |
name | Attribute | Mandatory | string | Defines a unique id for the input field. It pairs with the input text. |
maxLength | Attribute | Optional | string | Defines the maximum length of the input content. |
type | Attribute | Optional | password; password numeric; | If the “password” type is defined, the input field will accept the password; if “password numeric” type is defined, the input field will accept a numeric password; if “number” type is defined, the input field will only accept number input; otherwise, the field will display inputs as clear text, by default. |
Attributes for <input> Element
Example 1 – Input type “text”:
The entered digit entered in “Your Comments” will display as follows, by adding “focused=”1” or “focused=” true” on the element that tends to be focused when the xmlApp page was first loaded, only one such attribute can be used per xmlApp page.
<input label="Your Comments:" name=" :survey_comment " focused="1" />
Example 2 – Input type “password” and “password numeric”:
If the input field type defines as “password”, “*” will be displayed rather than entered password, type “password numeric” could also be used, this will allow the user to have the numeric constraint on the password.
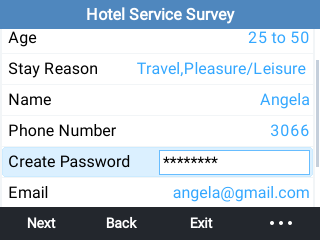
<input label="Create Password" name=":survery_personal_password" type="password"></input>
<input label="Create Password" name=":survery_personal_password" type=" passwordnumeric "></input>
Example 3 – Input type “number”:
The input field requires a maximum 11-digit number. The entered digit will display as it is.
<input label="Phone Number" name=":survery_personal_phone" type="number" maxLength="11"> </input> 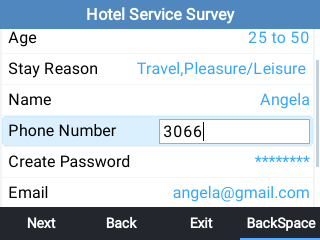
<text> Element
This element is for text display.
<text label="input text for display here"></text> <text> Element Details
Object | Position | Type | Values | Comments |
text | Element | Optional | – |
|
label | Attribute | Mandatory | string | Defines the display text of the field. |
Attributes for <text> Element
Example 1 – text:
Display the content of the label on the screen.
<text label=" *Thank You for Choosing us ! ByeBye !*"></text> 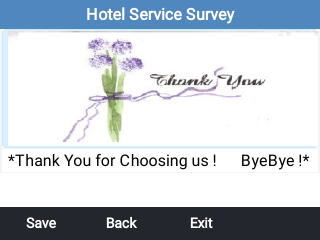
<image> Element
This element is for text display.
<image path="input image URL here"></image> <image> Element Details
<image> element supports common image formats, like png, jpeg, etc.
Object | Position | Type | Values | Comments |
image | Element | Optional | – |
|
path | Attribute | Mandatory | URL | Defines the display image of the field. |
Attributes for <image> Element
Example 1 – Image:
Display the path-linked image on the screen. It will be displayed as an “Input Number Example” Figure.
<image path="http://mypath.com/thankyou.png"></image> <Softkeys> Element
This element is the parent element of <Softkey>. The purpose is to set up the softkey display and action. This element is optional.
<Softkeys>
    <Softkey>
	Softkey information here
    </Softkey>
 </Softkeys>
<Softkeys> Element Details
Object | Position | Type | Values | Comments |
Softkeys | Element | Mandatory | – | |
Softkey | Child element | Mandatory | – | Defines each softkey’s display and action. |
Child Elements for <Softkeys> Element
<Softkey> Element
This element defines each softkey’s label and action. This element is mandatory. If there are more than 3 or 4 softkeys set up here (depending on the softkey number of different models), a “MORE” softkey will be displayed automatically to access all the active softkeys.
<Softkey action="Softkey action" label="Softkey label" commandArgs="Argument" /> <Softkey> Element Details
Object | Position | Type | Values | Comments |
Softkey | Element | Mandatory | – | |
action | Mandatory | string | “Dial”, “UseURL”, “AppendInputURL”, “QuitApp” “provision” | |
label | Mandatory | string | Displays the softkey name | |
commanders | Optional | string | URL information, or number | |
commanded | Optional | int | Only for action=Dial. This specifies the account index to dial out the call from, starting from 0 for account 1 |
Attributes for <Softkey> Element
Example 1 – Dial:
A softkey “Call” will be displayed. When pressing on it, number 622 will be dialed out using account 1.
<Softkey action="Dial" label="Call" commandArgs="622" commandId="0" /> 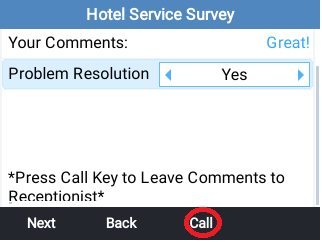
Example 2 – UseURL:
A softkey “Start” will be displayed. When pressing it, the phone will send out an HTTP request to the link specified in commandArgs. The XML document in the link “http://mypath.com/page2.xml ” will be displayed. This could be used for directing to the Next page, or back to the Previous page in the XML application.
<Softkey action="UseURL" label="Start" commandArgs=" http://mypath.com/page2.xml "/> 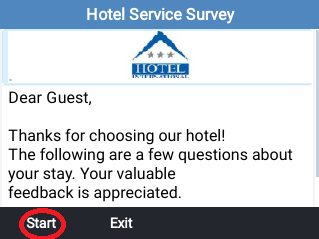
The URL in commandArgs could also have variables directly appended to reflect the user’s response in the XML application. The following “Yes” softkey pressing will trigger a request for the link with answer=yes at the end.
 <Softkey action=”UseURL” label=”Yes”

commandArgs=”http:// mypath.com /question1.php?answer=yes” />
Example 3 – AppendInputURL:
A softkey “Login” will be displayed. When pressing it, the phone will send out an HTTP request to the link with the “name=value” formatted appendix, which is specified in the <input> element field. For example, if the <input> element has an attribute: name=” id”, and the user enters “1234” in this input field, the requested link will be “http://mypath.com/login.php?id=1234”. Finally, the output result could be passed to the next XML application page.
<Softkey action="AppendInputURL" label="Login" commandArgs="http:// mypath.com /start.php" /> If there are many input fields defined on one page, please make sure every input element has a unique name. All of them will be appended to the commanders in sequence. For example, the final URL would be “http://mypath.com/page2.php?id=1234&password=abcd” where two input elements with name=” id” and name=” password” are defined respectively,
Only one value from a specific input field, rather than all of them, could be added as an appendix. For example, the user could refer to an URL “http://mypath.com/page2.php?id=<?php echo $questionID;?>” by retrieving the entered value from the ‘name=”id”’ input field.
<Softkey action=”AppendInputURL” label=”Next”

commandArgs=”http://mypath.com/page2.php?id=<?php echo $questionID;?>” />
<Softkey action=”AppendInputURL” label=”Next”
commandArgs=”http://mypath.com/page2.php?id=<?php echo $questionID;?>” />
Also, HTTPS URLs can be used.
<Softkey action=”AppendInputURL” label=”Login” commandArgs=” http://mypath.com/start.php” /> Example 4 – QuitApp (Optional Provision):
A softkey “Exit” will be displayed. When pressing it, the phone will quit the XML application and go back to the idle screen. If a provision is needed after Exit, add an event with the state as “quitApp” and action as “provision”.
 <Softkey action=”QuitApp” label=”Exit” />

<Event state=”quitApp”>

<Action action=”provision”></Action>

</Event> 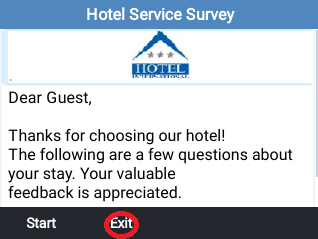
<Events> Element
This element enables the phone to respond to certain pre-defined events.
 <Events>

<Event>

Event

</Event>

</Events>
<Events> Element Details
Object | Position | Type | Values | Comments |
Events | Element | Optional | – |
|
Event | Child element | Mandatory | – | Defines each event |
<Event> Element
In one XML document, multiple <Event> elements could be used. However, the state for each event must be unique for the action to handle.
 <Event state=”Event state“>

<Action action=”Action name” commandArgs=”Action argument“></Action>

</Event>
<Event> Element Details
Object | Position | Type | Values | Comments |
Event | Element | Mandatory | – | |
state | Mandatory | string | Please refer to the “ATTRIBUTE state” section for values and meaning | |
Action | Child element | Mandatory | – |
|
action | Mandatory | string | ||
Command Args | Optional | string |
|
Child Elements and Attributes for <Event> Element
Example:
When the event “callStateEnded” is triggered during the XML application, an HTTP request to the specified <URL> will be sent out while the action defines as” UseURL”. Then the screen will display the XML document in that link.
 <Events>

<Event state=”callStateEnded”>

<Action action=”UseURL” commandArgs=”http://mypath.com/page7.xml“></Action>

</Event>

</Events> 
XML APPLICATION ELEMENT ATTRIBUTE
Attribute State
Attribute state is used for <Event> element. This attribute is mandatory.
Example:
State | Details |
callStateStarted | When the phone is switching to call state (e.g., off-hook to dialing state, or an incoming phone call) from idle |
callStateEnded | When the phone is switching to idle from the call state. |
resumeFromCallConnected | Resume XML application from Call Connected state |
resumeFromCallFailed | Resume XML application from Call Failed state |
resumeFromCallOnhold | Resume XML application from Call On Hold state |
resumeFromCallRinging | Resume XML application from Call Ringing state |
on-hook | When the phone is on hook |
off-hook | When the phone is off-hook |
quit app | When the XMLApp is closed |
Attribute State
When the event ” resumeFromCallOnhold ” is triggered during the XML application, for example, press![]() to resume XML from a call on hold state, Then the screen will display the XML document in that link.
to resume XML from a call on hold state, Then the screen will display the XML document in that link.
 <Events>

<Event state=” resumeFromCallOnhold “>

<Action action=”UseURL” commandArgs=”http://mypath.com/page8.xml“></Action>

</Event>

</Events> 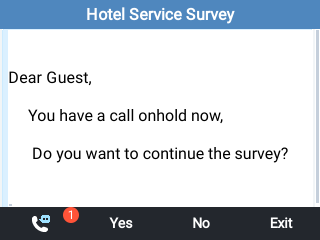
USE LANGUAGE STRING IN XML APP
To use the default language string in XML App, without copying and pasting the whole string into the XML file, the users can simply take advantage of the string ID instead. Inside the language file, each string is paired with a unique index number for identification. The string should be well formatted as {L[string_number]}, in which string_number is the index of the desired string.
Here is what the language string file looks like. Users could find each string text has an index number associated with it at the beginning in the format of {index, length, “text”}.
 …

{14,18, “Status”},

…

{128,18, “Sunday, “},

{129,18, “Monday, “},

{130,18, “Tuesday, “},

{131,18, “Wednesday, “},

{132,18, “Thursday, “},

{133,18, “Friday, “},

{134,18, “Saturday, “}

…
The language string can be used in two elements: the <text> attribute of <option> element and the <label> element.
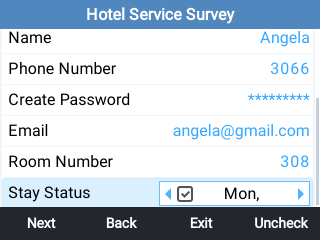
Example: Use language string in <text> element and <label> element.
A selection field requires selecting a language for displaying.
 <?xml version=”1.0″ encoding=”UTF-8″?>

<xmlapp title=”Hotel Service Survey”>

<view>

<section>

<select label=”Stay {L[14]}” name=”:survery_personal_date” type=”multiple”>

<option text=”{L[128]}” value=”7″ />

<option text=”{L[129]}” value=”1″ />

<option text=”{L[130]}” value=”2″ />

<option text=”{L[131]}” value=”3″ />

<option text=”{L[132]}” value=”4″ />

<option text=”{L[133]}” value=”5″ />

<option text=”{L[134]}” value=”6″ />

</select>

</section>

</view>

<Softkeys>

<Softkey action=”UseURL” label=”Next” commandArgs=”http://192.168.40.179/page6.xml”/>

<Softkey action=”UseURL” label=”Back” commandArgs=”http://192.168.40.179/page4.xml”/>

<Softkey action=”QuitApp” label=”Exit”/>

</Softkeys>

Note: A markup language is a mechanism to identify structures in a document. The XML specification defines a standard way to add markup to documents.
<Events>

<Event state=”callStateEnded”>

<Action action=”UseURL” commandArgs=”http://192.168.40.179/page7.xml”></Action>

</Event>

</Events>

</xmlapp>