
Thank you for purchasing Grandstream Small Business IP phone GXP1610/GXP1615/GXP1620/GXP1625/GXP1628/GXP1630. GXP16xx series is a next generation small-to-medium business IP phone: the GXP1620/GXP1625 features 2 lines with 2 SIP accounts, superior HD wideband audio, 132 x 48 backlit graphical LCD; the GXP1610/GXP1615 supports 2 lines with 2 SIP accounts, 132 x 48 graphical LCD; GXP1630 supports 3 lines with 3 SIP accounts, 132×64 backlit graphical LCD. The GXP1610/GXP1615/ GXP1620/GXP1625/GXP1628/GXP1630 delivers rich features of 3 XML programmable context-sensitive softkeys, dual network ports with PoE (GXP1625/GXP1628/GXP1630 only), EHS (Electronic Hook-Switch) with Plantronics headsets, 3-ways conference on GXP1610/GXP1615/GXP1620/GXP1625/GXP1628 and up to 4-ways conference on GXP1630, superb full-duplex hands-free speakerphone with advanced acoustic echo cancellation, advanced security protection for privacy, and compatible with Grandstream UCM Features. It is a perfect choice for small-to-medium businesses looking for a high quality, feature rich IP phone with affordable cost.
PRODUCT OVERVIEW
Feature Highlights (GXP1610/GXP1615/GXP1620/GXP1625/GXP1628)
- 132*48 pixels backlit graphical LCD display (GXP1610/GXP1615 do not support backlit)
- 2 dual-color line keys, 3 XML programmable context-sensitive soft keys, 8 BLF keys (GXP1628 only), 3-way conference, multi-language support
- HD wideband audio (GXP1620/GXP1625/GXP1628 only), superb full-duplex hands-free speakerphone with advanced acoustic echo cancellation and excellent double-talk performance
- Large phonebook (up to 1000 contacts) and call history (up to 200 records)
- Automated personal information service, personalized music ring tone/ring back tone, flexible customizable screen content & format using XML, and advanced Web and enterprise applications.
- Dual switched 10/100 Mbps ports on GXP1610/GXP1615/GXP1620/GXP1625, dual switched auto-sensing 10/100/1000 Mbps Ethernet ports on GXP1628, integrated PoE on GXP1615/GXP1625/GXP1628
- Automated provisioning using TR-069 or encrypted XML configuration file, SRTP and TLS for advanced security protection, 802.1x for media access control
- Perfectly compatible with Grandstream UCM Features
- Innovative UI design (easy and useable multi-language support)
- Use with Grandstream’s UCM6xxx series IP PBX appliance for Zero-Config provisioning, 1-touch call recording and more
Feature Highlights (GXP1630)
- 132*64 pixels backlit graphical LCD display
- 3 dual-color line keys, 3 XML programmable context-sensitive soft keys, 8 BLF keys, 4-way conference, multi-language support
- HD wideband audio, superb full-duplex hands-free speakerphone with advanced acoustic echo cancellation and excellent double-talk performance
- Large phonebook (up to 1000 contacts) and call history (up to 200 records)
- Personalized music ring tone/ring back tone, flexible customizable screen content & format using XML, and advanced Web and enterprise applications
- Dual switched auto-sensing 10/100/1000 Mbps Ethernet ports with integrated PoE
- Automated provisioning using TR-069 or encrypted XML configuration file, SRTP and TLS for advanced security protection, 802.1x for media access control
- Perfectly compatible with Grandstream UCM Features
- Innovative UI design (easy and useable multi-language support)
- Use with UCM6xxx IP PBX appliance for Zero-Config provisioning, 1-touch call recording and more
GXP1610/GXP1615/GXP1620/GXP1625/GXP1628/GXP1630 Technical Specifications
Protocols/Standards | SIP RFC3261, TCP/IP/UDP, RTP/RTCP, RTCP-XR, HTTP/HTTPS, FTP/FTPS, ARP/RARP, ICMP, DNS (A record, SRV, NAPTR), DHCP, PPPoE, SSH, TFTP, NTP, STUN, SIMPLE, LLDP-MED, LDAP, TR-069, 802.1x, TLS, SRTP |
Network Interfaces | Dual switched 10/100 Mbps ports, integrated PoE (GXP1615 only) |
Graphic Display | 132*48 LCD display |
Feature Keys | 2 line keys with dual-color LED and 2 SIP accounts. 3 XML programmable context sensitive soft keys. 5 (navigation, menu) keys. 13 dedicated function keys for PAGE/INTERCOM, PHONEBOOK, MESSAGE, HOME, HOLD, RECORD, MUTE, HEADSET, TRANSFER, CONFERENCE, SEND and REDIAL, SPEAKERPHONE, VOLUME |
Voice Codecs | Support for G.711µ/a, G.722 (wide-band), G.723.1, G.726-32, G.729 A/B, iLBC, in-band and out-of-band DTMF (In audio, RFC2833, SIP INFO) |
Telephony Features | Hold, transfer, forward (unconditional/no-answer/busy), 3-way conference, call park/pickup, downloadable phone book (XML, LDAP, up to 1000 items), call waiting, call history (up to 200 records), off-hook auto dial, auto answer, click-to-dial, flexible dial plan, Hot Desking, personalized music ringtones, server redundancy & fail-over |
Headset Jack | RJ9 headset jack (allowing EHS with Plantronics headsets) |
Base Stand | Yes, allow 2 angle positions available, Wall Mountable |
QoS | Layer 2 QoS (802.1Q, 802.1P) and Layer 3 (ToS, DiffServ, MPLS) QoS |
User and administrator level access control, MD5 and MD5-sess based authentication, 256-bit AES encrypted configuration file, TLS, SRTP, HTTPS, 802.1x media access control | |
Multi-language | LCD Language: Arabic Czech German English Spanish French Croatian Hungarian Italian Japanese Korean Latvian Dutch Polish Portuguese Russian Slovenian Swedish Turkish Traditional Chinese Simplified Chinese Ukrainian Hebrew |
Upgrade/Provisioning | Firmware upgrade via TFTP / HTTP / HTTPS/ FTP/FTPS, mass provisioning using TR-069 or AES encrypted XML configuration file |
Power & Green Energy Efficiency | Universal Power Supply Input 100-240VAC 50-60Hz; Output +5VDC, 600mA |
Temperature and Humidity | Operation: 0°C to 40°C Storage: -10°C to 60°C Humidity: 10% to 90% Non-condensing |
Physical | Dimension: 209mm(L)x 184.5mm(W)x 76.2mm(H) (with handset) Unit Weight: 0.74kg Package Weight: 1.1kg |
Package Content | GXP1610/GXP1615 phone, handset with cord, base stand, universal power supply, network cable, Quick Installation Guide, brochure, GPL license |
Compliance | FCC: Part 15 (CFR 47) Class B CE: EN55022 Class B, EN55024, EN61000-3-2, EN61000-3-3, EN60950-1 RCM: AS/ACIF S004; AS/NZS CISPR22/24; AS/NZS 60950; AS/NZS 60950.1 |
Protocols/Standards | SIP RFC3261, TCP/IP/UDP, RTP/RTCP, RTCP-XR, HTTP/HTTPS, FTP/FTPS, ARP/RARP, ICMP, DNS (A record, SRV, NAPTR), DHCP, PPPoE, SSH, TFTP, NTP, STUN, SIMPLE, LLDP-MED, LDAP, TR-069, 802.1x, TLS, SRTP |
Network Interfaces | Dual switched 10/100/1000 Mbps ports, integrated PoE |
Graphical Display | 132 x 48 backlit graphical LCD display |
Feature Keys | 2 line keys with dual-color LED and 2 SIP accounts. 3 XML programmable context sensitive soft keys. 5 (navigation, menu) keys. 8 BLF keys. 13 dedicated function keys for PAGE/INTERCOM, PHONEBOOK, MESSAGE, HOME, HOLD, RECORD, MUTE, HEADSET, TRANSFER, CONFERENCE, SEND and REDIAL, SPEAKERPHONE, VOLUME |
Voice Codecs | Support for G.711µ/a, G.722 (wide-band), G.723.1, G.726-32, G.729 A/B, iLBC, in-band and out-of-band DTMF (In audio, RFC2833, SIP INFO) |
Telephony Features | Hold, transfer, forward (unconditional/no-answer/busy), call park/pickup, 3-way conference, shared-call-appearance (SCA) / bridged-line-appearance (BLA), downloadable phone book (XML, LDAP, up to 1000 items), call waiting, call history (up to 200 records), off-hook auto dial, auto answer, click-to-dial, flexible dial plan, Hot Desking, personalized music ringtones, server redundancy & fail-over. |
Headset Jack | RJ9 headset jack (allowing EHS with Plantronics headsets) |
HD Audio | Yes, HD handset and speakerphone with support for wideband audio |
Base Stand | Yes, 2 angle positions available, Wall Mountable |
QoS | Layer 2 QoS (802.1Q, 802.1P) and Layer 3 (ToS, DiffServ, MPLS) QoS |
Security | User and administrator level access control, MD5 and MD5-sess based authentication, 256-bit AES encrypted configuration file, TLS, SRTP, HTTPS, 802.1x media access control |
Multi-language |
LCD Language: Arabic Czech German English Spanish French Croatian Hungarian Italian Japanese Korean Latvian Dutch Polish Portuguese Russian Slovenian Swedish Turkish Traditional Chinese Simplified Chinese Ukrainian Hebrew |
Upgrade/Provisioning | Firmware upgrade via TFTP / HTTP / HTTP/ FTP/FTPS, mass provisioning using TR-069 or AES encrypted XML configuration file |
Power & Green Energy Efficiency | Universal Power Supply Input 100-240VAC 50-60Hz; Output +5VDC, 600mA PoE IEEE802.3af Class 2, 3.84W-6.49W |
Temperature and Humidity | Operation: 0°C to 40°C Storage: -10°C to 60°C Humidity: 10% to 90% Non-condensing |
Physical | Dimension: 220.5mm (L) x 192.5mm (W) x 76.0mm (H) (with handset) Unit weight: 0.8kg; Package weight: 1.2kg |
Package Content | GXP1628, handset with cord, base stand, universal power supply, network cable, Quick Installation Guide, brochure, GPL license, BLF label cards |
Compliance | FCC: Part 15 (CFR 47) Class B CE: EN55022 Class B, EN55024, EN61000-3-2, EN61000-3-3, EN60950-1 RCM: AS/ACIF S004; AS/NZS CISPR22/24; AS/NZS 60950; AS/NZS 60950.1 |
Protocols/Standards | SIP RFC3261, TCP/IP/UDP, RTP/RTCP, RTCP-XR, HTTP/HTTPS, FTP/FTPS, ARP/RARP, ICMP, DNS (A record, SRV, NAPTR), DHCP, PPPoE, SSH, TFTP, NTP, STUN, SIMPLE, LLDP-MED, LDAP, TR-069, 802.1x, TLS, SRTP |
Network Interfaces | Dual switched auto-sensing 10/100/1000 Mbps Ethernet ports, integrated PoE |
Graphical Display | 132 x 64 backlit graphical LCD display |
Feature Keys | 3 line keys with dual-color LED and 3 SIP accounts. 3 XML programmable context sensitive soft keys. 5 (navigation, menu) keys. 8 BLF keys. 13 dedicated function keys for PAGE/INTERCOM, PHONEBOOK, MESSAGE, HOME, HOLD, RECORD, MUTE, HEADSET, TRANSFER, CONFERENCE, SEND and REDIAL, SPEAKERPHONE, VOLUME |
Voice Codecs | Support for G.711µ/a, G.722 (wide-band), G.723.1, G.726-32, G.729 A/B, iLBC, in-band and out-of-band DTMF (In audio, RFC2833, SIP INFO) |
Telephony Features | Hold, transfer, forward (unconditional/no-answer/busy), call park/pickup, 4-ways conference, shared-call-appearance (SCA) / bridged-line-appearance (BLA), downloadable phone book (XML, LDAP, up to 1000 items), call waiting, call history (up to 200 records), off-hook auto dial, auto answer, click-to-dial, flexible dial plan, Hot Desking, personalized music ringtones, server redundancy & fail-over. |
Headset Jack | RJ9 headset jack (allowing EHS with Plantronics headsets) |
HD Audio | Yes, HD handset and speakerphone with support for wideband audio |
Base Stand | Yes, 2 angle positions available, Wall Mountable |
QoS | Layer 2 QoS (802.1Q, 802.1P) and Layer 3 (ToS, DiffServ, MPLS) QoS |
Security | User and administrator level access control, MD5 and MD5-sess based authentication, 256-bit AES encrypted configuration file, TLS, SRTP, HTTPS, 802.1x media access control |
Multi-language |
LCD Language: Arabic Czech German English Spanish French Croatian Hungarian Italian Japanese Korean Latvian Dutch Polish Portuguese Russian Slovenian Swedish Turkish Traditional Chinese Simplified Chinese Ukrainian Hebrew |
Upgrade/Provisioning | Firmware upgrade via TFTP / HTTP / HTTPS/ FTP/FTPS, mass provisioning using TR-069 or AES encrypted XML configuration file |
Power & Green Energy Efficiency | Universal Power Supply Input 100-240VAC 50-60Hz; Output +5VDC, 600mA PoE IEEE802.3af Class 2, 3.84W-6.49W |
Temperature and Humidity | Operation: 0°C to 40°C Storage: -10°C to 60°C Humidity: 10% to 90% Non-condensing |
Physical | Dimension: 220.5mm (L) x 192.5mm (W) x 76.0mm (H) (with handset) Unit weight: 0.8kg; Package weight: 1.2kg |
Package Content | GXP1630 phone, handset with cord, base stand, universal power supply, network cable, Quick Installation Guide, brochure, GPL license, BLF label cards |
Compliance | FCC : Part 15 (CFR 47) Class B CE : EN55022 Class B, EN55024, EN61000-3-2, EN61000-3-3, EN60950-1 RCM: AS/ACIF S004; AS/NZS CISPR22/24; AS/NZS 60950; AS/NZS 60950.1 |
CONFIGURATION GUIDE
The GXP1610/GXP1615/GXP1620/GXP1625/GXP1628/GXP1630 can be configured via two ways:
- LCD Configuration Menu using the phone’s keypad.
- Web GUI embedded on the phone using PC’s web browser.
Configuration via Keypad
To configure the LCD menu using phone’s keypad, follow the instructions below:
- Enter MENU options. When the phone is in idle, press the round MENU button to enter the configuration menu.
- Navigate in the menu options. Press the UP/DOWN/LEFT/RIGHT arrow keys to navigate in the menu options.
- Enter/Confirm selection. Press the round MENU button to enter the selected option.
- Exit. Press LEFT arrow key to exit to the previous menu.
- The phone automatically exits MENU mode with an incoming call, when the phone is off hook or the MENU mode if left idle for more than 60 seconds.
- When the phone is in idle, pressing the navigation keys UP/DOWN/RIGHT can access the call history entries:
UP – Missed Calls
DOWN – Dialed Calls
RIGHT – Answered Calls
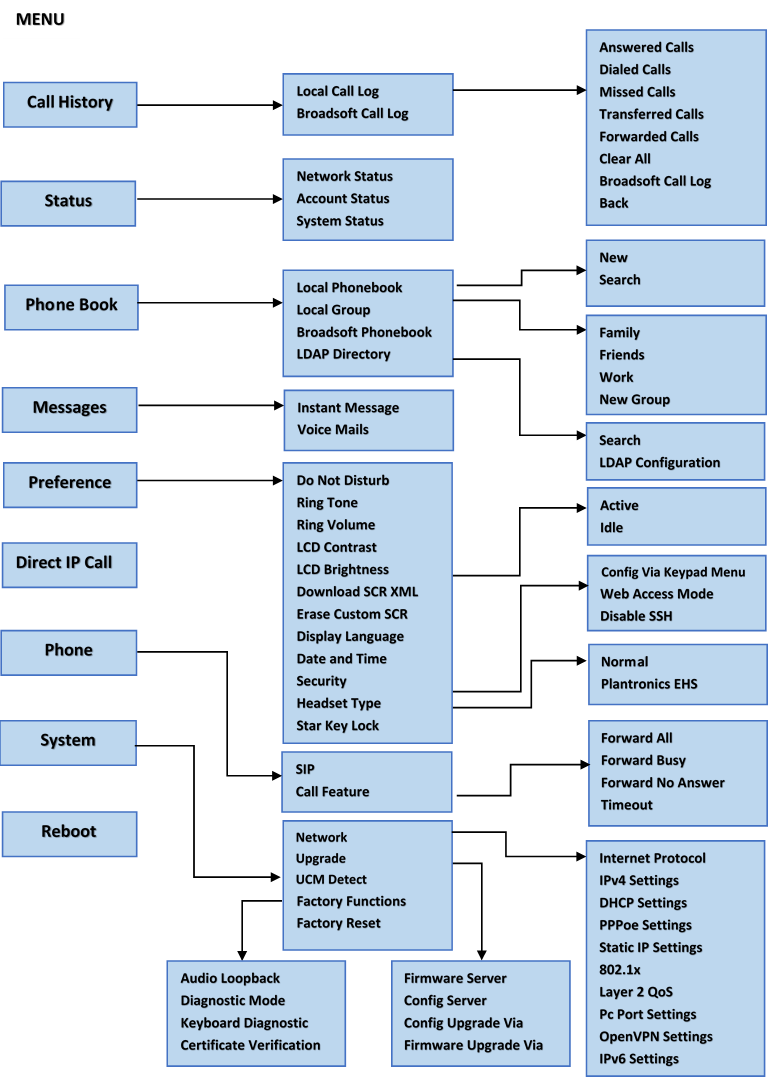
The MENU options are listed in the following table.
Call History | Call History sub menu includes the following options:
Displays answered calls, dialed calls, missed calls, transferred calls, forwarded calls.
Displays Broadsoft call log. |
Status | Status sub menu includes the following options:
Press to enter the sub menu for IP setting information (DHCP/Static IP/PPPoE), IPv4 address, IPv6 address, Subnet Mask, Gateway,DNS server and NTP server.
Shows account registration status.
|
Contacts sub menu includes the following options:
Displays phonebook and users could add, edit, search, and delete contacts, or download phonebook XML to the phone. When doing phonebook search, user can only search ASCII characters.
Displays phonebook group. Note: Besides 3 embedded groups: Family, Friends and Work, user can create, edit, and delete your own new groups. GXP phone allows at most 7 customized groups.
Configures LDAP directory options, displays LDAP directory by searching. LDAP search does not support entering Non-ASCII characters. Note: Starting firmware 1.0.7.49, the “all” softkey now displays all LDAP contacts on the LCD menu. | |
Messages |
Displays received instant messages.
Displays voice mail messages. |
Preference | Preference sub menu includes the following options:
Enables/disables Do Not Disturb on the phone.
Configures different ring tones for incoming call.
Adjusts ring volume by pressing left/right arrow key.
Adjusts LCD contrast by pressing left/right arrow key.
Adjusts LCD brightness of idle state and active state by pressing left/right arrow key.
Triggers the phone to download the XML idle screen file immediately. The XML idle screen server path and downloading method need to be set up correctly from Web GUI first.
Erases custom XML idle screen previously loaded on the phone. After erasing it, the phone will show default idle screen.
Selects the language to be displayed on the phone’s LCD. Users could select Automatic for local language based on IP location if available.
Configures time zone and NTP server on the phone.
Configures the access control for the users to configure from keypad Menu, select the web access mode, and enable / disable the SSH access.
Select Normal or Plantronics EHS headset type.
Turns on/off keypad lock feature and configures keypad lock password. |
Direct IP Call | Makes direct IP call. |
Phone | Phone sub menu includes the following options:
Configures SIP Proxy, Outbound Proxy, SIP User ID, SIP Auth ID, SIP Password, SIP Transport and Audio information to register SIP account on the phone.
Configures call forward features for Forward All, Forward Busy, Forward No Answer and No Answer Timeout. |
System | System sub menu includes the following options:
Displays connected UCM server List and specifies Protocol, IP, and Port of the target UCM server.
Factory Functions sub menu includes the following options:
Speak to the phone using speaker/handset/headset. If you can hear your voice, your audio is working fine. Press Menu button to exit audio loopback mode.
All LEDs will light up. Press any key (except MENU key) on the keypad to display the button name in the LCD. Lift and put back the handset or press Menu button to exit diagnostic mode.
Press all the available keys on the phone. The LCD will display the name for the keys to be pressed to finish the keyboard diagnostic mode.
Verify the certificate loaded on the phone.
|
Reboot | Reboots the phone |
The following picture shows the keypad MENU configuration flow.
Configuration via Web Browser
The GXP1610/GXP1615/GXP1620/GXP1625/GXP1628/GXP1630 embedded Web server responds to HTTP/HTTPS GET/POST requests. Embedded HTML pages allow a user to configure the IP phone through a Web browser such as Microsoft’s IE, Mozilla Firefox, and Google Chrome.
To access the GXP1610/GXP1615/GXP1620/GXP1625/GXP1628/GXP1630 Web GUI:
- Connect the computer to the same network as the phone.
- Make sure the phone is turned on and shows its IP address. You may check the IP address on LCD.
- Open a Web browser on your computer.
- Enter the phone’s IP address in the address bar of the browser.
- Enter the administrator’s login and password to access the Web Configuration Menu.
Notes:
- The computer should be connected to the same sub-network as the phone. This can be easily done by connecting the computer to the same hub or switch as the phone connected to. In absence of a hub/switch (or free ports on the hub/switch), please connect the computer directly to the PC port on the back of the phone.
- If the phone is properly connected to a working Internet connection, the IP address of the phone will display in MENU🡪Status🡪Network Status. This address has the format: xxx.xxx.xxx.xxx, where xxx stands for a number from 0-255. Users will need this number to access the Web GUI. For example, if the phone has IP address 192.168.40.154, please enter “http://192.168.40.154”in the address bar of the browser.
- There are two access levels for the login page:
User Level | User | Password | Web Pages Allowed |
End User Level | user | Set by admin | Only Status page, Basic Settings in Advanced Settings page, and some settings in maintenance page. |
Administrator Level | admin | admin | Browse all pages |
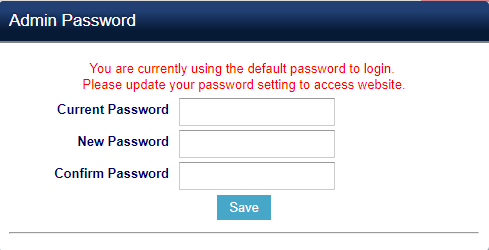
- When accessing the GXP16xx for the first time or after factory reset, users will be asked to change the default administrator password before accessing GXP16xx Web interface.
- The new password field is case sensitive with a maximum length of 25 characters. Using strong password including letters, digits and special characters is recommended for better security.
- Since end user level access is disabled by default, administrators will have to enable user web access under Maintenance 🡪 Web Access, and set a new user password on the same page to enable users to access the Web UI.
- When changing any settings, always SUBMIT them by pressing the SAVE button on the bottom of the page. After submitting the changes in all the Web GUI pages, reboot the phone to have the changes take effect if necessary. All the options under Basic Setting and Account Setting, and most of the options under Advanced Settings do not require reboot after submitting the changes. Under Advanced Setting, the parameters on network configuration require reboot after update.
Definitions
This section describes the options in the GXP1610/GXP1615/GXP1620/GXP1625/GXP1628/GXP1630 Web GUI. As mentioned, you can log in as an administrator or an end user.
- Status: Displays the Account status, Network status, and System Info of the phone.
- Account: To configure the SIP account.
- Advanced Settings: To configure Call features, Time settings, Web services, Programmable keys and etc.
- Maintenance: To configure Network settings, Web/SSH Access, Upgrading and provisioning, Language, Contacts and etc.
Status Page Definitions
Status 🡪 Account Status | |
Account x | Account index. |
SIP User ID | Displays the configured SIP User ID. |
SIP Server | Displays the configured SIP Server address. |
SIP Registration | Displays SIP registration status YES/NO. |
Status 🡪 Network Status | |
MAC Address | Global unique ID of device, in HEX format. The MAC address will be used for provisioning and can be found on the label coming with original box and on the label located on the back of the device. |
IP Setting | DHCP, Static IP or PPPoE. |
IPv4 Address | The IPv4 address obtained on the phone. |
IPv6 Address | The IPv6 address obtained on the phone. |
OpenVPN IP | The IP address of the phone obtained from the OpenVPN server |
Subnet Mask | The subnet mask obtained on the phone. |
Gateway | The gateway address obtained on the phone. |
DNS Server 1 | The DNS server address 1. |
DNS Server 2 | The DNS server address 2. |
PPPoE Link Up | PPPoE connection status. |
NAT Type | NAT Type |
NAT Traversal | Display the NAT traversal status of Account 1 and Account 2. |
Status 🡪 System Info | |
Product Model | Product model of the phone. |
Part Number | Product part number. |
Software Version | Boot Version: boot version number. Core Version: core version number. Base Version: base version number. Program Version.This is the main firmware release number, which is always used for identifying the software system of the phone. Locale Version. This is the version of localization language package. Recovery Version. |
IP Geographic Information | City: Displays the city name. Language:Displays current language been used. Time Zone:Displays current time zone. |
Special Feature | OpenVPN Support:Display the status of the OpenVPN feature. |
System Time | System up time: Displays system up time since the last reboot. System time:Displays current system time on the phone system. |
Service Status | GUI and Phone service status. |
System Information | Download System Information. |
Core Dump | Core dump file that could be downloaded for troubleshooting purpose. |
Status 🡪 GNU GPL License
| |
GNU GPL License | Shows the GNU GPL License information. |
Table 7: Status page Definitions
Account Page Definitions
The GXP1610/GXP1615 support two SIP accounts, GXP1620/GXP1625/GXP1628 support two SIP accounts, and GXP1630 supports three SIP accounts that can be configured to accommodate independent SIP accounts. Every SIP account has an individual configuration page.
Account x 🡪 General Settings | |
Account Active | This field indicates whether the account is active. The default setting is “Yes”. |
Account Name | The name associated with each account to be displayed on the LCD. |
SIP Server | The URL or IP address, and port of the SIP server. This is provided by your VoIP service provider (ITSP). |
Secondary SIP Server | The URL or IP address, and port of the SIP server. This will be used when the primary SIP server fails. |
Outbound Proxy | IP address or Domain name of the Primary Outbound Proxy, Media Gateway, or Session Border Controller. It is used by the phone for Firewall or NAT penetration in different network environments. If a symmetric NAT is detected, STUN will not work and ONLY an Outbound Proxy can provide a solution. |
Backup Outbound Proxy | Secondary outbound proxy which will be used when the primary proxy cannot be connected. |
BLF Server | The URL or IP address, and port of the BLF Server. When “BLF Server” is configured, the SUBSCRIBE request will be sent to this address for BLF. |
SIP User ID | User account information provided by your VoIP service provider (ITSP). It is usually in the form of digits similar to phone number or actually a phone number.
Users can also register an account with a SIP user ID that carries “@”. For example, you can put “111@test.com” in your SIP User ID field. When registering, the phone will register your account as “111@test.com” instead of 111.
Note: The server domain will not be included in the SIP from header. |
Authentication ID | SIP service subscriber’s Authenticate ID used for authentication. It can be identical to or different from the SIP User ID. This field supports up to 8192 characters. |
Authentication Password | The account password required for the phone to authenticate with the ITSP (SIP) server before the account can be registered. After it is saved, this will appear as hidden for security purpose. |
Name | The SIP server subscriber’s name (optional) that will be used for Caller ID display. |
Voice Mail Access Number | This parameter allows you to access voice messages by pressing the MESSAGE button on the phone.
This ID is usually the VM portal access number. For example, in Asterisk server, 8500 could be used. |
Account Display | This option allows you to configure how your SIP account label will be displayed on the phone’s screen. If set to “Username”, LCD account label will display the Account Name configured for this SIP account. If set to “User ID”, it will then display the SIP User ID configured for this SIP account. |
Account x 🡪 Network Settings |
|
DNS Mode | This parameter controls how the Search Appliance looks up IP addresses for hostnames. There are four modes: A Record, SRV, NATPTR/SRV, and Use Configured IP. The default setting is “A Record”. If the user wishes to locate the server by DNS SRV, the user may select “SRV” or “NATPTR/SRV”. If “Use Configured IP” is selected, please fill in the three fields below:
Primary IP: Primary IP address where the phone sends DNS query to; Backup IP 1; Backup IP 2.
If SIP server is configured as domain name, phone will not send DNS query, but use “Primary IP” or “Backup IP x” to send SIP message if at least one of them are not empty. Phone will try to use “Primary IP” first. After 3 tries without any response, it will switch to “Backup IP x”, and then it will switch back to “Primary IP” after 3 re-tries. If SIP server is already an IP address, phone will use it directly even “User Configured IP” is selected. |
NAT Traversal | This parameter configures whether the NAT traversal mechanism is activated. Users could select the mechanism from No, STUN, Keep-Alive, UPnP, Auto or VPN. If set to “STUN” and STUN server is configured, the phone will route according to the STUN server. If NAT type is Full Cone, Restricted Cone or Port-Restricted Cone, the phone will try to use public IP addresses and port number in all the SIP&SDP messages. The phone will send empty SDP packet to the SIP server periodically to keep the NAT port open if it is configured to be “Keep-Alive”. Configure this to be “No” if an outbound proxy is used. “STUN” cannot be used if the detected NAT is symmetric NAT. |
Support Rport (RFC 3581) | This option enables the utilization of symmetric response routing. When enabled, the "rport" field gets appended to the Via header in the SIP Request. The necessary data is then extracted from the SIP 200OK Response during a SIP Register operation, allowing the rewriting of SIP Contact information and its application in subsequent SIP Requests. |
Proxy-Require | A SIP Extension to notify the SIP server that the phone is behind a NAT/Firewall. Do not configure this parameter unless this feature is supported on the SIP server. |
Use SBC | Indicate whether an SBC server is used. |
Account x 🡪 SIP Settings 🡪 Basic Settings |
|
TEL URI | If the phone has an assigned PSTN telephone number, this field should be set to “User=Phone”. Then a “User=Phone” parameter will be attached to the Request-Line and “TO” header in the SIP request to indicate the E.164 number. If set to “Enable”, “Tel:” will be used instead of “SIP:” in the SIP request. The default setting is “Disable”. |
SIP Registration | Selects whether the phone will send SIP Register messages to the proxy/server. The default setting is “Yes”. |
Unregister On Reboot | Allows the SIP user’s registration information to be cleared when the phone reboots. The SIP REGISTER message will contain “Expires: 0” to unbind the connection. Three options are available:
If set to “All“, the SIP user’s registration information will be cleared when the phone reboots. The SIP Contact header will contain “*” to notify the server to unbind the connection. If set to “Instance“, the SIP user will be unregistered on current phone only. If set to “No”, the phone will not unregister the SIP account when rebooting.
The default setting is “No”. |
Register Expiration | Specifies the frequency (in minutes) in which the phone refreshes its registration with the specified registrar. The default value is 60 minutes. The maximum value is 64800 minutes (about 45 days). |
Subscribe Expiration | Specifies the frequency (in minutes) in which the phone refreshes its subscription with the specified registrar. The default is 60, and maximum value is 64800 (about 45 days). |
Reregister Before Expiration | Specifies the time frequency (in seconds) that the phone sends re-registration request before the Register Expiration. The default value is 0. |
Enable OPTIONS Keep Alive | Select whether the phone will keep sending a message to check the connection with the server. |
OPTIONS Keep Alive Interval | Specifies the frequency (in second) in which the phone will send the Keep Alive message to the server. |
OPTIONS Keep Alive Max Lost | Specifies the maximum number of allowed lost packet before the phone will refresh its registration. |
Local SIP Port | Defines the local SIP port used to listen and transmit. The default value is 5060 for Account 1, 5062 for Account 2, and 5064 for Account 3. |
SIP Registration Failure Retry Wait Time | Specifies the interval to retry registration if the process is failed. The default value is 20 seconds. |
SIP T1 Timeout | SIP T1 Timeout is an estimate of the round-trip time of transactions between a client and server. If no response is received the timeout is increased and request re-transmit retries would continue until a maximum amount of time define by T2. The default setting is 0.5 seconds. |
SIP T2 Timeout | SIP T2 Timeout is the maximum retransmit time of any SIP request messages (excluding the INVITE message). The re-transmitting and doubling of T1 continues until it reaches the T2 value. The default setting is 4 seconds. |
SIP Transport | Determines the network protocol used for the SIP transport. Users can choose from TCP, UDP and TLS. |
SIP URI Scheme when using TLS | Specifies if “sip:” or “sips:” will be used when TLS/TCP is selected for SIP Transport. The default setting is “sips:”. |
Use Actual Ephemeral Port in Contact with TCP/TLS | This option is used to control the port information in the Via header and Contact header. If set to No, these port numbers will use the permanent listening port on the phone. Otherwise, they will use the ephemeral port for the connection. |
Outbound Proxy Mode | Configures the outbound proxy mode, to place in route header in sending SIP messages, or always sent to outbound proxy. Default setting is “in route” |
Support SIP Instance ID | Defines whether SIP Instance ID is supported or not.
Default setting is “Yes”. |
SUBSCRIBE for MWI | When set to “Yes”, a SUBSCRIBE for Message Waiting Indication will be sent periodically. The phone supports synchronized and non-synchronized MWI.
The default setting is “No”. |
SUBSCRIBE for Registration | When set to “Yes”, a SUBSCRIBE for Registration will be sent out periodically. The default setting is “No”. |
Enable 100rel | The use of the PRACK (Provisional Acknowledgment) method enables reliability to SIP provisional responses (1xx series). This is very important in order to support PSTN internetworking. To invoke a reliable provisional response, the 100rel tag is appended to the value of the required header of the initial signaling messages. |
Callee ID Display | The phone supports Callee ID display as follows:
When set to “Auto” (Default), the phone will update the callee ID in the order of P-Asserted Identity Header, Remote-Party-ID Header and To Header in the 180 Ringing. When set to “Disabled“, callee id will be displayed as “Unavailable”. When set to “To Header“, caller id will not be updated and displayed as To Header.
|
Caller ID Display | The phone supports Caller ID display as follows:
When set to “Auto” (Default), the phone will look for the caller ID in the order of P-Asserted Identity Header, Remote-Party-ID Header and From Header in the incoming SIP INVITE. When set to “Disabled”, all incoming calls are displayed with “Unavailable”. When set to “From Header”, the phone will display the caller ID based on the From Header in the incoming SIP INVITE.
Note: During call, if the phone receives NOTIFY message with type header:”application/cid-info+xml” and event header:”cid-info-update”, the phone will take the message and update CID information and CID image. |
Ignore Alert-Info Header | This option is used to configure default ringtone. If set to “Yes”, configured default ringtone will be played even if Alert-info header is present.
The default setting is “No”. |
Add Auth Header On Initial REGISTER | When enabled, Device will send Authentication Header on the first Register instead of second Register.
Default is No. |
Account x 🡪 SIP Settings 🡪 Custom SIP Headers |
|
Use Privacy Header | Controls whether the Privacy header will present in the SIP INVITE message or not, whether the header contains the caller info. When set to “Default”. If set to “Yes”, the Privacy Header will always show in INVITE. If set to “No”, the Privacy Header will not show in INVITE. Default setting is “Default”. |
Use P-Preferred-Identity Header | Controls whether the P-Preferred-Identity Header will present in the SIP INVITE message or not. The default setting is “default”. If set to “Yes”, the P-Preferred-Identity Header will always show in INVITE. If set to “No”, the P-Preferred-Identity Header will not show in INVITE. |
Use P-Access Network-Info Header | Enables/disables the use of P-Access-Network-Info header in SIP request. When disabled, the SIP message sent from the phone will not include the selected header. Default setting is “No”. |
Use P-Emergency-Info Header | Enables/disables the use of P-Emergency-Info header in SIP request. When disabled, the SIP message sent from the phone will not include the selected header. Default setting is “No”. |
Use MAC Header | If Yes except REGISTER, the sip message for register or unregister will contains MAC address in the header, and all the outgoing SIP messages except REGISTER message will attach the MAC address to the User-Agent header; If Yes to ALL, the sip message for register or unregister will contains MAC address in the header, and all the outgoing SIP message including REGISTER will attach the MAC address to the User-Agent header; If No, neither will the MAC header be included in the register or unregister message nor the MAC address be attached to the User-Agent header for any outgoing SIP message. |
Account x 🡪 SIP Settings 🡪 Advanced Features |
|
Line-seize Timeout | For Shared Call Appearance, phone must send a SUBSCRIBE-request for the line-seize event package whenever a user attempts to take the shared line off hook. “Line Seize Timeout” is the line-seize event expiration timer. The default value is 15 seconds. The valid range is from 15 to 60. |
Eventlist BLF URI | Configures the Eventlist BLF URI on the phone to monitor the extensions in the list with Multi-Purpose Key. If the server supports this feature, users need to configure an Eventlist BLF URI on the service side first (i.e., BLF1006@myserver.com) with a list of extensions included. On the phone, in this “Eventlist BLF URI” field, fill in the URI without the domain (i.e., BLF1006). To monitor the extensions in the list, under Web GUI 🡪Settings🡪Programmable Keys page, please select “Eventlist BLF” in the key mode, choose account, enter the value of each extension in the list. (Supported only on GXP1628/GXP1630) |
Auto Provision Eventlist BLFs | When enabled, empty multi-purpose keys will be automatically provisioned to the monitored extensions in the Eventlist BLF. Default setting is “Disabled”. (Supported only on GXP1628/GXP1630) |
Conference URI | Configures the conference URI when using Broadsoft N-way calling feature. |
Music On Hold URI | Music On Hold URI to call when a call is on hold if server supports it. |
BLF Call-pickup Prefix | Configures the prefix prepended to the BLF extension when the phone picks up a call with BLF key. (Supported only on GXP1628/GXP1630) |
Call Pickup Barge-in Code | Set feature code of call pickup barge-in feature.
(Supported only on GXP1628/GXP1630) |
PUBLISH for Presence | Enables Presence feature on the phone.
(Supported only on GXP1628/GXP1630) |
Enable User Presence Subscription | If the user presence subscription is enabled, the phone will subscribe and notify about user presence to the sip server.
Note: To enable this feature, register Genesys account on your phone’s SIP account first. The SIP server should support this feature. |
Hide Login Soft Key On Auto User Presence Subscription | This option allows you to hide the soft key to login or logout on idle screen if auto user ID and password are configured. |
Auto User Presence ID | With this ID, the phone will subscribe user presence automatically once the account is registered. |
Auto User Presence password | With this password, the phone will subscribe user presence automatically once the account is registered. |
Special Feature | Different soft switch vendors have special requirements. Therefore, users may need select special features to meet these requirements. Users can choose from Standard, Nortel MCS, Broadsoft, CBCOM, RNK, Sylantro, PhonePower and iPageOn depending on the server type. Default is “Standard”. |
Broadsoft |
|
Broadsoft Call Center | Default setting is “Disabled”. When set to “Enabled”, a soft key “BSCCenter” is displayed on LCD. User can access different Broadsoft Call Center agent features via this softkey. Please note that “Feature Key Synchronization” will be enabled regardless of this setting. |
Hoteling Event | With “Hoteling Event” enabled, user can access the Hoteling feature option by pressing the “BSCCenter” softkey. Default setting is “No”. |
Call Center Status | When set to “Yes”, the phone will send SUBSCRIBE to the server to obtain call center status. The default setting is “No”. |
Feature Key Synchronization | This feature is used for Broadsoft call feature synchronization. When it is enabled, DND, Call Forward features and Call Center Agent status can be synchronized between Broadsoft server and phone. Default is “Disabled”. |
Broadsoft Call Park | When enabled, phone will send the SUBSCRIBE to Broadsoft server to obtain Broadsoft Call Park notification.
Notes: The phone shows parked call notification on its LCD.
If parked member is a monitored extension on BLF MPK key, the MPK will be flashing red. |
Account x 🡪 SIP Settings 🡪 Session Timer |
|
Enable Session Timer | This option is used to enable or disable session timer on the phone side when server side can provide both session timer UPDATE or session audit UPDATE. The default setting is “Yes”. |
Session Expiration | The SIP Session Timer extension (in seconds) that enables SIP sessions to be periodically “refreshed” via a SIP request (UPDATE, or re-INVITE).
If there is no refresh via an UPDATE or re-INVITE message, the session will be terminated once the session interval expires.
Session Expiration is the time (in seconds) where the session is considered timed out, provided no successful session refresh transaction occurs beforehand. The default setting is 180. The valid range is from 90 to 64800. |
Min-SE | The minimum session expiration (in seconds). The default value is 90 seconds.
The valid range is from 90 to 64800. |
Caller Request Timer | If set to “Yes” and the remote party supports session timers, the phone will use a session timer when it makes outbound calls. |
Callee Request Timer | If set to “Yes” and the remote party supports session timers, the phone will use a session timer when it receives inbound calls. |
Force Timer | If Force Timer is set to “Yes”, the phone will use the session timer even if the remote party does not support this feature.
If Force Timer is set to “No”, the phone will enable the session timer only when the remote party supports this feature. To turn off the session timer, select “No”. |
UAC Specify Refresher | As a Caller, select UAC to use the phone as the refresher; or select UAS to use the Callee or proxy server as the refresher. |
UAS Specify Refresher | As a Callee, select UAC to use caller or proxy server as the refresher; or select UAS to use the phone as the refresher. |
Force INVITE | The Session Timer can be refreshed using the INVITE method or the UPDATE method. Select “Yes” to use the INVITE method to refresh the session timer. The default setting is “No”. |
Account x 🡪 SIP Settings 🡪 Security Settings 🡪 Security |
|
Check Domain Certificates | Choose whether the domain certificates will be checked or not when TLS/TCP is used for SIP Transport. The default setting is “No”. |
Validate Certification Chain | Choose whether certification chain will be validated when TLS/TCP mode is used. |
Validate Incoming Messages | Choose whether the incoming messages will be validated or not. The default setting is “No”. |
Check SIP User ID for incoming INVITE | If set to “Yes”, SIP User ID will be checked in the Request URI of the incoming INVITE. If it does not match the phone’s SIP User ID, the call will be rejected. The default setting is “No”. |
Accept Incoming SIP from Proxy Only | When set to “Yes”, the SIP address of the Request URL in the incoming SIP message will be checked. If it does not match the SIP server address of the account, the call will be rejected. The default setting is “No”. |
Authenticate Incoming INVITE | If set to “Yes”, the phone will challenge the incoming INVITE for authentication with SIP 401 Unauthorized response. Default setting is “No”. |
Account x 🡪 Audio Settings |
|
Send DTMF | This parameter specifies the mechanism to transmit DTMF digits.
There are 3 supported modes:
In audio, which means DTMF is combined in the audio signal (not very reliable with low-bit-rate codecs). RFC2833, which means to specify DTMF with RTP packet. Users could know the packet is DTMF in the RTP header as well as the type of DTMF. SIP INFO, which use SIP info to carry DTMF. The defect of this mode is that it is easily to cause desynchronized of DTMF and media packet for the reason the SIP and RTP are transmitted respectively. Default setting is “RFC2833”
|
DTMF Payload Type | Configures the payload type for DTMF using RFC2833. Default value is 101. |
Preferred Vocoder | 7 different vocoder types are supported on the phone, including G.711 U-law (PCMU), G.711 A-law (PCMA), G.723.1, G.729A/B, G.722 (wide band), iLBC, and G726-32. Users can configure vocoders in a preference list that is included with the same preference order in SDP message. |
Use First Matching Vocoder in 200OK SDP | When set to “Yes”, the device will use the first matching vocoder in the received 200OK SDP as the codec.
The default setting is “No”. |
Codec Negotiation Priority | This option allows user to choose which Codec sequence to use.
If set to “Caller”, the phone will negotiate the codecs based on the SDP from the received SIP INVITE. If set to “Callee”, the phone will negotiate the audio codecs based on the codec priority on the phone. |
Disable Multiple m line in SDP | If enabled, the phone always responses 1 m line in SDP regardless multiple m lines are offered. |
SRTP Mode | Enables the SRTP mode based on your selection.
Default setting is “Disabled”. |
Symmetric RTP | Defines whether symmetric RTP is supported or not.
Default setting is “No”. |
Silence Suppression | Controls the silence suppression/VAD feature of the audio codecs except for
G.723 (pending) and G.729. If set to “Yes”, a small quantity of RTP packets containing comfort noise will be sent during the periods of silence. If set to “No”, this feature is disabled. Default setting is “No” |
Voice Frames Per TX | Configures the number of voice frames transmitted per packet.
When configuring this, it should be noted that the “ptime” value for the SDP will change with different configurations here. This value is related to the codec used and the actual frames transmitted in payload during the call. For end users, it is recommended to use the default setting, as incorrect settings may influence the audio quality. The default setting is 2. |
G723 Rate | This option determines the encoding rate for G723 codec. Users can choose from 6.3kbps encoding rate and 5.3kbps encoding rate. The default setting is “5.3kbps encoding rate”. |
G.726-32 Packing Mode | Selects “ITU” or “IETF” for G.726-32 packing mode.
The default setting is “IETF”. |
iLBC Frame Size | This option determines the iLBC packet frame size. Users can choose from 20ms and 30ms. The default setting is “30ms”. |
iLBC payload Type | This option is used to specify iLBC payload type. Valid type is 96-127. |
Jitter Buffer Type | Selects either Fixed or Adaptive based on network conditions. The default setting is “Adaptive”. |
Jitter Buffer Length | Defines jitter buffer length based on network conditions. |
Hide Vocoder | Hides vocoder information on call screen if set to “yes”. Default settings is “No”. |
Account x 🡪 Call Settings |
|
Early Dial | Selects whether to enable early dial. If it is set to “Yes”, the SIP proxy must support 484 responses. The default setting is “No”. |
Dial Plan Prefix | Sets the prefix added to each dialed number. |
Dial Plan | A dial plan establishes the expected number and pattern of digits for a telephone number. This parameter configures the allowed dial plan for the phone.
Dial Plan Rules:
1. Accepted Digits: 1,2,3,4,5,6,7,8,9,0, *, #, A,a,B,b,C,c,D,d; 2. Grammar: x – any digit from 0-9; 3. Grammar: X – any character from 0-9, a-z, A-Z. 4. xx+ – at least 2-digit numbers 5. xx – only 2-digit numbers 6. XX – two characters ( AA, Ab, 1C, f5, 68,…) 7. test : only string “test” will pass the dial plan check 8. ^ – exclude 9. [3-5] – any digit of 3, 4, or 5 10. [147] – any digit of 1, 4, or 7 11. <2=011> – replace digit 2 with 011 when dialing 12. | – the OR operand
Example 1: {[369]11 | 1617xxxxxxx}
Allow 311, 611, and 911 or any 11-digit numbers with leading digits 1617;
Example 2: {^1900x+ | <=1617>xxxxxxx}
Block any number of leading digits 1900 or add prefix 1617 for any dialed 7-digit numbers;
Example 3: {1xxx[2-9]xxxxxx | <2=011>x+}
Allows any number with leading digit 1 followed by a 3-digit number, followed by any number between 2 and 9, followed by any 7-digit number OR Allows any length of numbers with leading digit 2, replacing the 2 with 011 when dialed.
Example of a simple dial plan used in a Home/Office in the US:
{ ^1900x. | <=1617>[2-9]xxxxxx | 1[2-9]xx[2-9]xxxxxx | 011[2-9]x. | [3469]11 }
Explanation of example rule (reading from left to right):
^1900x. – prevents dialing any number started with 1900; <=1617>[2-9]xxxxxx – allows dialing to local area code (617) numbers by dialing7 numbers and 1617 area code will be added automatically; 1[2-9]xx[2-9]xxxxxx |- allows dialing to any US/Canada Number with 11 digits length; 011[2-9]x – allows international calls starting with 011; [3469]11 – allows dialing special and emergency numbers 311, 411, 611 and 911.
Note: In some cases, where the user wishes to dial strings such as *123 to activate voice mail or other applications provided by their service provider, the * should be predefined inside the dial plan feature. An example dial plan will be: { *x+ } which allows the user to dial * followed by any length of numbers.
Max length of dial plan is up to 1024 characters. |
Bypass Dial Plan | Bypass the dial plan when dialing from one of the available items:
Contacts ; Call History Incoming Call ; Call History Outgoing Call ; Dialing Page ; MPK ; API
The default settings bypass the dial plan for the MPK only. |
Call Log | Configures Call Log setting on the phone. You can log all calls, only log incoming/outgoing calls or disable call log. The default setting is “Log All Calls”. |
Send Anonymous | If set to “Yes”, the “From” header in outgoing INVITE messages will be set to anonymous, blocking the Caller ID to be displayed. |
Anonymous Call Rejection | If set to “Yes”, anonymous calls will be rejected. The default setting is “No”. |
Auto Answer | If set to “Yes”, the phone will automatically turn on the speaker phone to answer incoming calls after a short reminding beep. |
Auto Answer Numbers | The function allows users to have the phone configured with a pre-defined list of numbers that will perform auto answer.
For “Auto Answer Numbers”, it accepts:
Digits :1,2,3,4,5,6,7,8,9; x – any digit from 0-9; xx – any two digits from 0-9;
[1-5] – any digit from 1 to 5; +: it matches the previous character as many times as needed like regular expression.
Auto Answer Numbers can be split with “;”, for example: 1x;2xxx;3x+ |
Refer-To Use Target Contact | If set to “Yes”, the “Refer-To” header uses the transferred target’s Contact header information for attended transfer. The default setting is “No”. |
Transfer on Conference Hangup | Defines whether the call is transferred to the other party if the initiator of the conference hangs up.
The default setting is “No”. |
Disable Recovery on Blind Transfer | Defines whether to enable/disable recovery to the call to the transferee on failing blind transfer to the target. |
Blind Transfer Wait Timeout | Defines the timeout (in seconds) for waiting SIP frag response in blind transfer. Valid range is 30 to 300. |
No Key Entry Timeout | Defines the timeout (in seconds) for no key entry.
If no key is pressed after the timeout, the digits will be sent out. The default value is 4 seconds. |
Key As Send | Allows users to configure the “#” key as the “Send” key. If set to “Yes”, the “#” key will immediately dial out the input digits.
In this case, this key is equivalent to the “Send” key. If set to “No”, the “#” key is included as part of the dialing string. |
On Hold Reminder Tone | If enabled, the user will hear 3 beeps as hold reminder, the first on hold reminder occurs at 1 min and the subsequent on hold reminder occurs every 30 sec. Default is “Disabled”. |
Call Recording On | Configures the DTMF sequence sent when pressing the Record key during a call on this account. |
Call Recording Off | Configures the DTMF sequence sent when pressing the Record key during a call on this account when turning recording off. |
Hide Dialing Password | Allows user to hide the password when the dialing number matches the configured prefix. |
Remote Info Display | Choose which caller information to display once receiving a call:
Name and Number: Display the caller ID name and number. Number: Display only the caller number.
Name: Display only the caller ID name. |
Hide Remote User ID | Settings to allow user to hide and display name of remote user ID that has a length more than specific in the incoming and/or outgoing calls |
Ring Tone |
|
Account Ring Tone | Configures ring tone for the account. |
Match Incoming Caller ID | Specifies matching rules with number, pattern or Alert Info text. (Up to 10 rules). When the incoming caller ID or Alert Info matches the rule, the phone will ring with selected distinctive ringtone. Matching rules:
Specific caller ID number. For example, 8321123; A defined pattern with certain length using x and + to specify, where x could be any digit from 0 to 9. Samples:
xx+ : at least 2-digit number;
xx : only 2-digit number;
[345]xx: 3-digit number with the leading digit of 3, 4 or 5; [6-9]xx: 3-digit number with the leading digit from 6 to 9. Alert Info text Users could configure the matching rule as certain text (e.g., priority) and select the custom ring tone mapped to it. The custom ring tone will be used if the phone receives SIP INVITE with Alert-Info header in the following format: Alert-Info: Selects the distinctive ring tone for the matching rule. When the incoming caller ID or Alert Info matches the rule, the phone will ring with the selected ring. |
Ring Timeout | Defines the timeout (in seconds) for the rings on no answer.
Default is 60. |
Ringback Tone at No Early Media | Plays ringback tone when there is no receiving early media RTP packets when P-Early-Media Header support is enabled. |
Account x 🡪 Intercom Settings | |
Allow Auto Answer by Call-Info/Alert-Info | If set to “Yes”, the phone will automatically turn on the speaker phone to answer incoming calls after a short reminding beep, based on the SIP Call-Info/Alert-Info header sent from the server/proxy. |
Mute on answer Intercom call | When enabled, phone will mute the incoming intercom call by Call-Info/Alert-Info |
Play warning tone for Auto Answer Intercom | When enabled, phone will play warning tone when auto answer Intercom |
Custom Alert-Info for Auto Answer | Used exclusively to match the contents of the Alert-Info header for auto answer.
The default auto answer headers will not be matched if this is defined. |
Account x 🡪 Feature Codes |
|
Enable Local Call Features | When enabled, Do Not Disturb, Call Forwarding and other call features can be used via the local feature codes on the phone. Otherwise, the provisioned feature codes from the server will be used. User configured feature codes will be used only if server provisioned feature codes are not provided. |
Do Not Disturb (DND)—On | Configures DND feature code to turn on DND. |
Do Not Disturb (DND)—Off | Configures DND feature code to turn off DND.
|
Call Forward Unconditionally(All)—On | Configures Call Forward All feature code to activate unconditional call forwarding. |
Call Forward Unconditionally(All)—Off | Configures Call Forward All feature code to deactivate unconditional call |
Forwarding. | |
Target | Configures the extension that the call will be forwarded to. |
Call Forward Busy— ON | Configures Call Forward Busy feature code to activate busy call forwarding. |
Call Forward Busy— Off | Configures Call Forward Busy feature code to deactivate busy call forwarding. |
Target | Configures the extension that the call will be forwarded to. |
Call Forward Delayed (No Answer)—On | Configures Call Forward Delayed feature code to activate no answer call forwarding.
|
Call Forward Delayed (No Answer)—Off | Configures Call Forward Delayed feature code to deactivate no answer call forwarding.
|
Target | Configures the extension that the call will be forwarded to. |
Delayed Call Forward Wait Time | Defines the timeout (in seconds) before the call is forwarded on no answer.
Valid range is 1 to 120. Default is 20 |
Settings Page Definitions
Settings 🡪 General Settings | |
Local RTP Port | Defines the local RTP port used to listen and transmit. It is the base RTP port for channel 0. When configured, channel 0 will use this port _value for RTP; channel 1 will use port_value+2 for RTP. Local RTP port ranges from 1024 to 65400 and must be even. The default value is 5004. |
Local RTP Port Range | This parameter defines the range of local RTP port from 48 to 10000. |
Use Random Port | When set to “Yes”, this parameter will force random generation of both the local SIP and RTP ports. This is usually necessary when multiple phones are behind the same full cone NAT. The default setting is “Yes” Note: This parameter must be set to “No” for Direct IP Calling to work |
Keep-alive Interval | Specifies how often the phone sends a blank UDP packet to the SIP server to keep the “ping hole” on the NAT router to open. The default setting is 20 seconds. |
Use NAT IP | The NAT IP address used in SIP/SDP messages. This field is blank at the default settings. It should ONLY be used if it is required by your ITSP. |
STUN Server | The IP address or Domain name of the STUN server. STUN resolution results are displayed in the STATUS page of the Web GUI. Only non-symmetric NAT routers work with STUN. |
Public Mode | Configures to turn on/off public mode for hot Desking feature on the phone. If set to “Yes”, users would need fill in the SIP Server address for account 1 as well. Then reboot the phone. When the phone boots up, users will require entering SIP User ID and Password on the LCD to login and use the phone. Note: When the phone is in public mode login screen, press CONF button will have the IP address of the phone displayed. |
Enable Fix For RTP Timestamp Jump | Make RTP timestamps be continuous if there is audio loss caused by timestamp jump. |
Test Password Strength | Only Allow password with some constraints to ensure better security. |
DNS Cache Refresh Time | The phone will send out DNS queries based on the configured DNS Cache Refresh Time after responding response to refresh IP addresses for SIP. Valid Range is [5 -1440] minutes. Default is 30. |
Settings 🡪 Call Features | |
Onhook Dial Barging | When the option is set to “Disabled”, onhook dialing will not be interrupted by an incoming call. |
Off-hook Auto Dial | Configures a User ID/extension to dial automatically when the phone is Offhook. The phone will use the first account to dial out. The default setting is “No”. |
Off-hook Auto Dial Delay | Defines the timeout (in seconds) for off-hook auto dial. Valid range is 0-30. If set to 0, it will be dialed out immediately; If set to other values, it will be dialed out after the delay. |
Off-hook Timeout | If configured, when the phone is Onhook, it will go Offhook after the timeout (in seconds). The default value is 30 seconds. |
Enable Live DialPad | If the Live DialPad is enabled, after dialing the numbers, the phone will wait for the time set in the expire time (in seconds) and dial out automatically after using handsfree mode. |
Live DialPad Expire Time | Sets the Live DialPad expire time, interval is between 2s and 15s. The default value is 5s. |
Busy Tone Expiration | Busy Tone Expiration (in seconds). The default value is 30 seconds. |
Enable Automatic Redial | When the phone dials a number and no answer, if automatic redial is enabled, the phone will automatically redial this number. |
Automatic Redial Times | The total times that need to be redial if Automatic Redial is enabled (in seconds). The default value is 10 seconds. |
Automatic Redial Interval | The interval between each time redial if Automatic Redial is enabled (in seconds). The default value is 20 seconds. |
Intercom Key Mode | Controls the behavior of the intercom hard key. Default setting is “Intercom”. |
Intercom User ID | Configures the intercom extension number for account 1 to dial out. This User ID is mapped to the INTERCOM button on the phone. |
Intercom Multicast Paging Address | Defines the multicast address that will be broadcasted to when the key is set to multicast paging. |
Intercom Multicast Paging Label | Determines the optional name to be displayed during the page. |
Bypass Dial Plan through Call History and Directories | Enable/disable dial plan check while dialing through the call history and any phonebook directories. |
Disable Call Waiting | Disables the call waiting feature. The default setting is “No”. |
Disable Call Waiting Tone | Disables the call waiting tone when call waiting is on. The default setting is “No”. |
Ring For Call Waiting | This option allows you to configure whether the speaker phone will ring when there is a new incoming call during an active call. If set to No, the user will hear call waiting tone. If set to Yes, the phone will ring using the speakerphone. |
Disable Busy Tone on Remote Disconnect | Disable the busy tone heard in the handset when the call is disconnected remotely. The default setting is No. |
Disable Direct IP Call | Disables Direct IP Call. The default setting is “No”. |
Use Quick IP Call mode | When set to “Yes”, users can dial an IP address under the same LAN/VPN segment by entering the last octet in the IP address. To dial quick IP call, Offhook the phone and dial #XXX (X is 0-9 and XXX <=255), phone will make direct IP call to aaa.bbb.ccc.XXX where aaa.bbb.ccc comes from the local IP address REGARDLESS of subnet mask. #XX or #X are also valid so leading 0 is not required (but OK). No SIP server is required to make quick IP call. The default setting is “No”. |
Disable Conference | Disables the Conference function. The default setting is “No”. |
Disable in-call DTMF Display | When it is set to “Yes”, the DTMF digits entered during the call will not display. The default setting is “No”. |
Enable Sending DTMF via specific MPKs | Allows certain MPKs to send DTMF in-call. This option does not affect Dial DTMF. |
Mute Key Functions While Idle | When set to “DND”, the DND will be enabled for future incoming call if pressing MUTE key in idle state; If this feature is set to “Idle Mute”, MUTE key will take effect in idle state and future incoming call will be answered with mute; Otherwise, MUTE key will not take effect in idle state. |
Disable Transfer | Disables the Transfer function. The default setting is “No”. |
In-call Dial Number on Pressing Transfer Key | Configures the number for the phone to dial as DTMF during the call using TRAN button. |
Attended Transfer Mode | When “Attended Transfer Mode” is set to “Static”, only “Blind Transfer” softkey is available on the call screen. If set to “Dynamic”, both “Blind Transfer” and “Attended Transfer” softkeys are available. |
Do Not Escape # as %23 in SIP URI | Specifies whether to replace # by %23 or not for some special situations. The default setting is “No”. |
Use Pound (#) For Redial | If set to “Yes”, the “#” key will immediately redial out the previous number. Default is Yes. |
Click-To-Dial Feature | Enables Click-To-Dial feature. The default setting is “Disabled”. |
Call History Flash Writing: Write Timeout | Defines the interval (in seconds) to save the call history to phone’s flash. The default value is 300 seconds. |
Max Unsaved Log | Defines the number of unsaved logs before written to phone’s flash. The default value is 200 entries. |
User-Agent Prefix | Add a prefix in the User Agent field on the SIP header. |
Predictive Dialing Feature | Allows the phone to use your dialed number and search the compatible numbers from history and contacts and will “Predict” the number you are going to dial when this feature is enabled. This saves time for the user, so they will not need to dial the entire number every time they wanted to call the number. Default settings is Enabled. |
Disable Hook Switch | User can Enable/Disable the Hook Switch as follows: When set to “Yes“, disable hook switch completely; When set to “For Answer Call“, hook switch cannot be used for answering call. Default is No |
Show SIP Error Response | Allows users to enable or disable SIP error response to be displayed on LCD. Default setting is Yes. |
Auto Answer Delay | Configures the delay for the incoming call automatic answer. This option takes effect only if [Auto Answer] is enabled on the phone. Valid range is 0 to 10 (in seconds). Default is 0. |
Enable Enhanced Acoustic Echo Canceller | Allows user to choose to enable or disable the echo canceller on the phone in speaker mode. Default is Yes. |
Show on Hold Duration | Show the duration of holding a call on the LCD. Default is No. |
Hide/Disable reject key | When “Hide/Disable REJECT Key” is set to “Yes”, the device will not display REJECT softkey upon incoming call. Default is No. |
Enable Diversion Information Display | When set to “Yes” (Default), Diversion info will be displayed if the device receives INVITE with Diversion header. |
Settings 🡪 Multicast paging | |
Paging Barge | During active call if incoming multicast page’s priority is higher than this value, the call will be held, and multicast page will be played. |
Paging Priority Active | If enabled, during a multicast page if another multicast is received with higher priority, that one will be played instead. |
Multicast Paging Codec | The codec for sending multicast pages, there are 7 codecs could be used: PCMU, PCMA, G.723.1, G.726-32, G.729A/B, G.722(wide band), and iLBC. The default setting is “PCMU”. |
Multicast Channel Number | Multicast Channel Number (0-50). 0 for normal RTP packets, 1-50 for Polycom multicast format packets. |
Multicast Sender ID | Outgoing caller ID that displays to your page group recipients (for multicast channel 1 – 50). |
Multicast Listening | Defines multicast listening addresses and labels. GXP16xx phone can listen to at most 10 multicasts addresses with different priorities. |
Settings 🡪 Preferences 🡪 Audio Control | |
Headset Key Mode | When headset is connected to the phone, users could use the HEADSET button in “Default Mode” or “Toggle Headset/Speaker”. Default Mode:
Toggle Headset/Speaker:
|
Headset Type | Selects whether the connected headset is normal RJ11 headset, Plantronics EHS headset. |
Always Ring Speaker | Configures to enable or disable the speaker to ring when headset is used on “Toggle Headset/Speaker” mode. If set to “Yes”, when the phone is in Headset “Toggle Headset/Speaker” mode, both headset and speaker will ring on incoming call. The default setting is “No”. |
Enable Group Listening | Allow handset to be able to listen when picked up during a call with headset |
Group Listening with Speaker | If enabled, during a call, the phone will display softkey to enable speaker listening along with handset or headset. |
Headset TX gain | Configures the transmission gain of the headset. The default value is 0dB. |
Headset RX gain | Configures the receiving gain of the headset. The default value is 0dB. |
Handset TX gain | Configures the transmission gain of the handset. The default value is 0dB. |
Settings 🡪 Preferences 🡪 Date and Time | |
NTP Server | Defines the URL or IP address of the NTP server. The phone may obtain the date and time from the server. |
Allow DHCP Option 42 Override NTP Server | Defines whether DHCP Option 42 should override NTP server or not. When enabled, DHCP Option 42 will override the NTP server if it is set up on the LAN. The default setting is “Yes”. |
Time Zone | Configures date/time used on the phone according to the specified time zone. |
Self-Defined Time Zone | This parameter allows the users to define their own time zone. The syntax is: std offset dst [offset], start [/time], end [/time] Default is set to: MTZ+6MDT+5,M4.1.0,M11.1.0 MTZ+6MDT+5 This indicates a time zone with 6 hours offset with 1 hour ahead which is U.S central time. If it is positive (+) if the local time zone is west of the Prime Meridian (A.K.A: International or Greenwich Meridian) and negative (-) if it is east. M4.1.0,M11.1.0 The 1st number indicates Month: 1,2,3,…,12 (for Jan, Feb, .., Dec) The 2nd number indicates the nth iteration of the weekday: (1st Sunday, 3rdTuesday…) The 3rd number indicates weekday: 0,1,2,..,6( for Sun, Mon, Tues,… ,Sat) Therefore, this example is the DST, which starts from the First Sunday of April to the 1st Sunday of November. |
Date Display Format | Configures the date display format on the LCD. The following formats are supported:
|
Time Display Format | Configures the time display in 12-hour or 24-hour format on the LCD. The default setting is in 12-hour format. |
Settings 🡪 Preferences 🡪 LCD Display | |
Backlight Brightness: Active | Configures the LCD backlight brightness level (from 0 to 8) for phone’s active status. The default value is 6. Note: This option is not applicable to GXP1610/GXP1615. |
Backlight Brightness: Idle | Configures the LCD backlight brightness level (from 0 to 8) for phone’s idle status. The default value is 2. Note: This option is not applicable to GXP1610/GXP1615. |
Active Backlight Timeout | Configure the minute of active backlight timeout. The valid range is 0 to 90. When Active Backlight Timeout is set to 0, the backlight will be constantly on. |
LCD Contrast | Configures the LCD contrast level (from 1 to 5). The default value is 3. |
Disable Missed Call Backlight | When it is set to “Yes”, the LCD backlight will not be turned on when there is a new missed call. The default setting is “No”. Note: This option is not applicable to GXP1610/GXP1615. |
Wide Idle Screen View | Allows to remove the date and moves the notification icons to the right for a longer account name display when enabled. The default setting is “No”. Note: This feature needs a reboot to take effect. |
Caller ID Display Mode | Users can configure “Caller ID Display Mode” to control the caller ID display preference:
|
Settings 🡪 Preferences 🡪 LED Control | |
Enable / Disable VM/MSG Power Light Flash | This option controls the LED behavior upon new/unread Voicemail and Message. If set to “No”, the LED light will be flashing when there is unread Voicemail and Message. Otherwise, it will be off. |
Settings 🡪 Preferences 🡪 Ring Tone | |
Call Progresses Tones:
| Configures ring or tone frequencies based on parameters from local telecom. The default value is North American standard. Frequencies should be configured with known values to avoid uncomfortable high pitch sounds. Syntax: f1=val,f2=val[,c=on1/off1[-on2/off2[-on3/off3]]]; ON is the period of ringing (“On time” in ‘ms’) while OFF is the period of silence. To set a continuous ring, OFF should be zero. Otherwise it will ring ON ms and a pause of OFF ms and then repeat the pattern. Up to three cadences are supported. |
Call Waiting Tone Gain | Configures the call waiting tone gain to adjust call waiting tone volume. The default is “Low“. |
Speaker Ring Volume | Configures speaker ring volume. The valid range is 0 to 7. |
Notification tone volume | This option allows you to adjust the volume for paging, intercom, auto answer call and call hold reminder beep. The valid range is 0 to 7. Default settings is “No”. |
Lock Speaker Volume | Locks the volume of the phone’s ring tone. When set to “Yes”, the volume buttons on the phone will be disabled during ringing. Default settings is “No”. |
Default Ringtone | Allows to set the Default Ringtone to be used globally. Up to 10 custom ringtones are supported. Default settings is “No”. |
Default Ringtone | Allows to set the Default Ringtone to be used globally. Up to 10 custom ringtones are supported. Note: The ring tone set in individual accounts has a higher priority than this setting. If the user wants the default ring tone to be used globally, he needs to set the ring tone of each account to Default Ring Tone; Otherwise, the one specified for each account will be used instead. |
Total Number of Custom Ringtone Update | Configures the total number of custom ringtone update that can be downloaded during provisioning process. Valid range 0-10. Default value is 3. |
Settings 🡪 Web Service | |
Use Auto Location Service | To enable or disable auto location services on the phone (Reboot required). Default settings is Yes. |
Settings 🡪 XML Applications | |
Idle Screen | |
Idle Screen XML Download | Configures to enable idle screen XML download. Users could select HTTP/HTTPS/TFTP to download the XML idle screen file. Default setting is No. |
Download Screen XML At Boot-up | If set to “Yes”, the idle screen XML file will be downloaded when the phone boots up. The default setting is “No”. |
Use Custom Filename | Specifies the custom file for the idle screen XML file to be downloaded. |
Idle Screen XML Server Path | Configures the server path to download the idle screen XML file. This field could be IP address or URL, with up to 256 characters. |
XML Application | |
Server Path | Configures the server path to download the idle screen XML file. This field could be IP address or URL, with up to 256 characters. |
Softkey Label | Specifies the Softkey name displayed on the idle screen for the users to enter XML application. The default Softkey Label is “XML Service”. |
Settings 🡪 Programmable Keys 🡪 Multi-Purpose Keys Settings | |
Transfer Mode via MPK | Perform blind transfer, attended transfer, or a new call with the specific in the Value field when a user presses “Transfer” multiple-purpose key. |
Enable Transfer via non-Transfer MPK | MPK with type BLF, Speed dial, etc, will perform similar to “transfer MPK” under active call. |
Settings 🡪 Programmable Keys 🡪 Programmable Keys | |
Line Key X | Assigns a function to the corresponding line key. The key mode options are:
Notes: The device needs to have GDS open door setting configured under device web UI→ Settings →External Service
|
Softkeys | Assigns a function to the corresponding Softkey. The key mode options are:
For example, if the phone is off hook and account 2 is active, it will call the configured Speed Dial number using account 2.
The Value field should be left blank.
LDAP search does not support entering Non-ASCII characters Note : On firmware 1.0.7.49, You can send HTTP commands (GET, POST, PUT, PATCH, DELETE...) by setting a programmable key as a softkey. |
Multi-Purpose Keys (GXP1628/GXP1630 only) | Assigns a function to the corresponding Multi-Purpose Key. The key mode options are:
|
Settings 🡪 Programmable Keys 🡪 Softkeys Settings | |
Softkey Layout | Custom Softkey Layout Enables/ Disables the custom Softkey layout. Default is Disabled |
Idle Screen Softkey Layout | Hide System Softkey on Idle Page Users can choose a system generated softkey to hide on idle page. Forward is checked by default. |
Custom Call Screen Softkey Layout |
Available softkeys: EndCall, Redial, Backspace, Dial, Clear.
Available softkeys: Answer, Reject, Forward, Dial, Backspace, Cancel.
Available softkeys: Answer, Reject, Forward.
Available softkeys: Answer, Reject, Forward, EndCall.
Available softkeys: Record On/Off(UCM), CallPark (UCM), ParkedCalls, Answer, Answer, Reject, Forward, EndCall, PrivateHold.
Available softkeys: Record On/Off(UCM), ParkedCalls, Answer, Reject, EndCall.
Available softkeys: ParkedCalls, ReConf.
Available softkeys: EndCalls, ReConf
Available softkeys: Cancel, Backspace, BlindTrnf, AttTrnf
Available softkeys: Cancel, Backspace. |
Settings 🡪 Broadsoft XSI | |
XSI | XSI
Login Credentials
Note: The users can enter login credentials through LCD for Broadsoft Directories. SIP Credentials
Sort Phonebook by: Allows users to sort the Broadsoft Phone search based on the selection of first name or last name. Default setting is “Last Name”. |
Network Directories | Enable/Disable Broadsoft Network directories and defines the directory name. The directory types are:
|
Settings 🡪 External Service | |
Grandstream Door System | Connect to a GDS37XX and send OpenDoor request.
Notes:
|
E911 Service | |
Enable E911 | Enables Enhanced 911 call. |
HELD Protocol | Configure HELD transfer protocol |
HELD Synchronization Interval | HELD Synchronization Interval |
Location Server | Configure the primary Location Information Server (LIS) address |
Location Server Username | Configure the user name of the primary Location Information Server (LIS) |
Location Server Password | Configure the password of the primary Location Information Server (LIS) |
Secondary Location Server | Configure the seconary Location Information Server (LIS) address |
Secondary Location Server Username | Configure the user name of the secondary Location Information Server (LIS) |
Secondary Location Server Password | Configure the password of the secondary Location Information Server (LIS) |
HELD Location Types | Configure "locationType" element in the location request |
HELD Use LLDP Information | If "Yes", the information from LLDP-suport switch is used to generate ChassisID and PortID; otherwaise, the mac address of gateway and phone is used as default. |
HELD NAI | If "Yes", Network Access Identifier (NAI) is included as a device identity in the location request sent to the Location Information Server (LIS) |
E911 Emergency Numbers | A user can configure multiple emergency numbers separated with the delimiter symbol ";". |
Geolocation-Routing Header | If "Yes", E.911 INVITE message includes the "Geolocation-Routing" header with the value "Yes" |
Priority Header | If "Yes", E.911 INVITEE message includes the "Priority" header with the value "emergency" |
Network Page Definitions
Network 🡪 Basic Settings | |
Internet Protocol | Selects one of the following IP protocol modes: IPv4 Only: Enforce IPv4 protocol only. IPv6 Only: Enforce IPv6 protocol only. Both, Prefer IPv4: Enable both IPv4 and IPv6 and prefer IPv4. Both, prefer IPv6: Enable both IPv4 and IPv6 and prefer IPv6. Note: Make sure to reboot the phone for the changes to take effect. |
IPv4 Address | Allows users to configure the appropriate network settings on the phone to obtain IPv4 address. Users could select “DHCP”, “Static IP” or “PPPoE”. By default, it is set to “DHCP”. |
Host name (Option 12) | Specifies the name of the client, added for the DHCP INFORM using Option 12. This field is optional but may be required by some Internet Service Providers. |
Vendor Class ID (Option 60) | Used by clients and servers to exchange vendor class ID. |
PPPoE Account ID | Enter the PPPoE account ID. |
PPPoE Password | Enter the PPPoE Password. |
PPPoE Service Name | Enter the PPPoE Service Name. |
IPv4 Address | Enter the IP address when static IP is used. |
Subnet Mask | Enter the Subnet Mask when static IP is used for IPv4. |
Gateway | Enter the Default Gateway when static IP is used for IPv4. |
DNS Server 1 | Enter the DNS Server 1 when static IP is used for IPv4. |
DNS Server 2 | Enter the DNS Server 2 when static IP is used for IPv4. |
Preferred DNS Server | Enter the Preferred DNS Server for IPv4. |
IPv6 Address | Allows users to configure the appropriate network settings on the phone to obtain IPv6 address. Users could select “Auto-configured” or “Statically configured” for the IPv6 address type. |
Static IPv6 Address | Enter the static IPv6 address when Full Static is used in “Statically configured” IPv6 address type. |
IPv6 Prefix Length | Enter the IPv6 prefix length when Full Static is used in “Statically configured” IPv6 address type. |
IPv6 Prefix (64 bits) | Enter the IPv6 Prefix (64 bits) when Prefix Static is used in “Statically configured” IPv6 address type. |
DNS Server 1 | Enter the DNS Server 1 for IPv6. |
DNS Server 2 | Enter the DNS Server 2 for IPv6. |
Preferred DNS server | Enter the Preferred DNS Server for IPv6. |
Network 🡪 Advanced Settings | |
802.1X mode | Allows the user to enable/disable 802.1X mode on the phone. The default value is disabled. It can be set to EAP-MD5, EAP-TLS or EAP-PEAPv0/MSCHAPv2.
Note: GXP16xx has the ability to send an EAPOL-Logoff message when a connected PC is disconnected from the network. EAPOL-Logoff stands for “Extensible Authentication Protocol over LAN Logoff.” It’s a network protocol message used to signal the termination or logoff of a device from a network that uses the Extensible Authentication Protocol (EAP) for authentication and security purposes. |
802.1X Identity | Enter the Identity for the 802.1X mode. |
MD5 Password | Enter the MD5 Password for the 802.1X mode.
Note: the use of special characters is supported. |
802.1X CA Certificate | Upload 802.1X CA certificate to the phone; or delete existed 802.1X CA certificate from the phone. |
802.1X Client Certificate | Upload 802.1X Client certificate to the phone; or delete existed 802.1X Client certificate from the phone. |
HTTP Proxy | Specifies the HTTP proxy URL for the phone to send packets to. The proxy server will act as an intermediary to route the packets to the destination. |
HTTPS Proxy | Specifies the HTTPS proxy URL for the phone to send packets to. The proxy server will act as an intermediary to route the packets to the destination. |
Layer 3 QoS for SIP | Defines the Layer 3 QoS parameter for SIP. This value is used for IP Precedence, Diff-Serv or MPLS. The default value is 26. |
Layer 3 QoS for RTP | Defines the Layer 3 QoS parameter for RTP. This value is used for IP Precedence, Diff-Serv or MPLS. The default value is 46. |
Enable DHCP VLAN | Enables VLAN settings auto-configuration using DHCP options 132 & 133 tunneled through DHCP Option 43. |
Layer 2 QoS 802.1Q/VLAN Tag | Assigns the VLAN Tag of the Layer 2 QoS packets. The default value is 0. |
Layer 2 QoS 802.1p Priority Value | Assigns the priority value of the Layer2 QoS packets. The default value is 0. |
PC Port Mode | Configures the PC port mode. When set to “Mirrored”, the traffic in the LAN port will go through PC port as well and packets can be captured by connecting a PC to the PC port. The default setting is “Enable”. |
PC Port VLAN Tag | Assigns the VLAN Tag of the PC port. |
PC Port Priority Value | Assigns the priority value of the PC port. |
Enable CDP | Allows users to enable/disable CDP feature which will allow the phone to receive CDP packets from the uplink. Default is Enabled.
Note: When CDP feature is enabled, make sure VLAN is also configured accordingly. It will need reboot to take effect for both enabling/disabling. |
Enable LLDP | Users can Enable/Disable the LLDP (Link Layer Discovery Protocol) service to advertise information about the phone to other devices on the network. Default is Enabled. |
Maximum Transmission Unit (MTU) | Defines the Maximum Transmission Unit value (MTU) in bytes.
Default is 1500. |
Network 🡪 Remote Control | |
CSTA Control | Indicates whether CSTA Control feature is enabled. Change of this configuration will need the system reboot to make it take effect. |
Network 🡪 Open VPN® Settings | |
OpenVPN® Enable | Enables/Disables the OpenVPN® feature. Default settings is No. |
OpenVPN® Server Address | Configures the address of the OpenVPN® server. |
OpenVPN® Port | Defines the port of the OpenVPN® server. Default is 1194. |
OpenVPN® Transport | Determines network protocol UDP or TCP used for OpenVPN®. Default is UDP. |
OpenVPN® CA | Uploads the OpenVPN® CA. |
OpenVPN® Certificate | Uploads the OpenVPN® Certificate. |
OpenVPN® Client Key | Uploads the OpenVPN® Client Key. |
OpenVPN® Client Key Password | Sets the password for the client.key file. |
OpenVPN® TLS Auth Key | The OpenVPN® TLS Auth Key is used to add an additional layer of security to the connection by requiring a shared secret between the client and the server. This key is used during the TLS handshake phase to authenticate the parties involved and establish a secure communication channel. you can upload the tls-auth.key file by clicking "upload". |
OpenVPN® Cipher Method | Must be the same cipher method used by the OpenVPN® server |
OpenVPN® Username | OpenVPN® authentication username (optional) |
OpenVPN® Password | OpenVPN® authentication password (optional) |
Network 🡪 SNMP Settings | |
Enable SNMP | Enable/Disable SNMP service. Default is No. |
Version | Choose between (Version 1, Version 2, or Version 3). |
Port | Listening Port of SNMP daemon (Default 161). |
SNMP Trap IP | IP address of trap destination. |
SNMP Trap port | Port of Trap destination (Default 162) |
SNMP Trap Interval | Time interval between traps (Default is 5). |
SNMP Trap Version | Choose between (Version 1, Version 2). |
Community | Name of SNMPv1/v2c community. |
SNMP Trap Community | Name of SNMPv1/v2c trap community. |
SNMP Username | Username for SNMPv3. |
Security Level | noAuthUser: Users with security level noAuthnoPriv and context name as noAuth.
AuthUser: Users with security level authNoPriv and context name as auth.
privUser : Users with security level authPriv and context name as priv. |
Authentication Protocol | Select the Authentication Protocol: “None” or “MD5” or “SHA.” |
Privacy Protocol | Select the Privacy Protocol: “None” or “AES/AES128” or “DES”. |
Authentication Key | Enter the Authentication Key. |
Privacy Key | Enter the Privacy Key. |
SNMP Trap Username | Username for SNMPv3 Trap. |
Trap Security Level | noAuthUser: Users with security level noAuthnoPriv and context name as noAuth. authUser: Users with security level authNoPriv and context name as auth. privUser: Users with security level authPriv and context name as priv. |
Trap Authentication Protocol | Select the Authentication Protocol: “None” or “MD5” or “SHA”. |
Trap Privacy Protocol | Select the Privacy Protocol: “None” or “AES/AES128” or “DES”. |
Trap Authentication Key | Enter the Trap Authentication Key. |
Trap Privacy Key | Enter the Trap Privacy Key. |
Network Page Definitions
Maintenance Page Definitions
Maintenance 🡪 Web Access | |
Enable User Web Access | Administrator can disable or enable user web access. This option is disabled by default. |
New Password | Allows the administrator to set the password for user-level web GUI access. This field is case sensitive with a maximum length of 30 characters. |
Confirm Password | Confirms the end user password field to be the same as above. |
Current Password | Determines the current password which is required to set a new admin password. |
New Password | Allows users to change the admin password. The password field is purposely hidden for security purpose. This field is case sensitive with a maximum length of 30 characters. |
Confirm Password | Confirms the admin password field to be the same as above. |
Maintenance 🡪 Upgrade and Provisioning | |
Firmware Upgrade and Provisioning | Specifies how firmware upgrading and provisioning request to be sent: Always Check for New Firmware, Check New Firmware only when F/W pre/suffix changes, Always Skip the Firmware Check. |
Always Authenticate Before Challenge | Only applies to HTTP/HTTPS. If enabled, the phone will send credentials before being challenged by the server. |
Validate Hostname in Certificate | To validate the hostname in the SSL certificate. |
Allow DHCP Option 43 and Option 66 to Override Server | Default setting is “Yes”. DHCP option 66 originally was only designed for TFTP server. And then was extended to support an HTTP URL. GXP phones support both TFTP and HTTP server via option 66. Users can also use DHCP option 43 vendor specific option to do this. DHCP option 43 approach has priorities.
Note:
Users should include http:// on the IP address or the URL of DHCP option 66 on the server if they want to use an http server. If the URL/IP is without a scheme (protocol) the phone adds tftp:// by default. If the URL/IP includes tftp://, the phone will not add tftp:// and use the URL/IP as it is. |
Additional Override DHCP option | Additional DHCP Option that will be used as a firmware server instead of the setting one or name server from option 43 and 66. However, this option will be effective only when option ‘Allow DHCP Option 43 and Option 66 to Override Server’ is enabled, the options are 150 and 160. |
Allow DHCP Option 120 to override SIP Server | Enables DHCP Option 120 from local server to override the SIP Server on the phone. The default setting is “No”. |
3CX Auto Provision | Enables automatic provisioning using PnP. If enabled, the phone will start sending a SIP SUBSCRIBE message to a multicast IP address 224.0.1.75 at boot up.
The phone should receive response message 200 or 500 from the server, followed by a SIP NOTIFY including URL from where to download configuration file to get provisioned. The default setting is “Yes” (Enabled). |
Automatic Upgrade | Enables automatic upgrade and provisioning.
The default setting is “No”. |
Hour of the Day (0-23) | Defines the hour of the day to check the HTTP/TFTP server for firmware upgrades or configuration files changes. The default value is 1. |
Day of the Week (0-6) | Defines the day of the week to check HTTP/TFTP server for firmware upgrades or configuration files changes. The default value is 1. |
Disable SIP NOTIFY Authentication | Device will not challenge NOTIFY with 401 when set to Yes. |
Firmware Upgrade Confirmation | Allow users to automatically upgrade to the version that the server has provided without need to confirm the upgrade to avoid end users manually select no when doing mass upgrade. When set to “Yes”, the phone will ask the user to upgrade. Default setting is “Yes”. |
Provision | Click Start to trigger the Provision request. |
Config Upgrade Via | Selects firmware upgrade/provisioning method: TFTP, HTTP, HTTPS, FTP, or FTPS. Default is HTTPS. |
Config Server Path | Defines the server path for provisioning. It could be different from the firmware server for upgrading.
Support added to configure variables in the provisioning server URL. Currently, the following variables are supported in the provisioning server URL: • $PN: it is used to identify the directory name of the provisioning server directory where the corresponding boot files and configuration files are located.
• $MAC: it is used to identify the MAC address of the IP phone.
Variables $PN and $MAC can be embedded in server URL setting in Web UI and also in DHCP Option 66. Example (Web UI): /192.168.0.2/$PN_$MAC Example (DHCP Option 66): tftp://192.168.0.2/$PN_$MAC $PN will be replaced with phone model, e.g., GXP1625 $MAC will be replaced with phone’s MAC address, e.g., 000b829a8ffe |
Config HTTP/HTTPS Username | The username for the HTTP/HTTPS server (configuration file). |
Config HTTP/HTTPS Password | The password for the HTTP/HTTPS server (configuration file). |
Config File Prefix | This field enables user to store different configuration files in one single directory on the configuration server. If configured, only the configuration file with the matching prefix will be downloaded. |
Config File Postfix | This field enables user to store different configuration files in one single directory on the configuration server. If configured, only the configuration file with the matching postfix will be downloaded. |
XML Config File Password | The password for encrypt/decrypt the XML configuration file using OpenSSL. |
Authentication Conf File | Sets the phone system to authenticate configuration file before applying it. When set to “Yes”, the configuration file must include value P1 with phone system’s administration password. If it is missed or does not match the password, the phone system will not apply it. Default setting is “No”. |
Download Device Configuration | User can press the “Download” button to export the device’s configuration file. The configuration file is named as “config.txt”. |
Upload Device Configuration | User can press the “Upload” button to upload configuration files to the phone. |
Firmware Upgrade Via | Allows users to choose the firmware upgrade method: TFTP, HTTP, FTP/FTPS or HTTPS for firmware file download. |
Firmware Server Path | Defines the server path for the firmware server. It could be different from the configuration server for provisioning.
Support added to configure variables in the provisioning server URL. Currently, the following variables are supported in the provisioning server URL:
• $PN: it is used to identify the directory name of the provisioning server directory where the corresponding boot files and configuration files are located.
• $MAC: it is used to identify the MAC address of the IP phone.
Variables $PN and $MAC can be embedded in server URL setting in Web UI and also in DHCP Option 66. Example (Web UI): /192.168.0.2/$PN_$MAC Example (DHCP Option 66): tftp://192.168.0.2/$PN_$MAC $PN will be replaced with phone model, e.g., GXP1625 $MAC will be replaced with phone’s MAC address, e.g., 000b829a8ffe |
Firmware HTTP/HTTPS Username | The username for the HTTP/HTTPS server (Firmware file). |
Firmware HTTP/HTTPS Password | The password for the HTTP/HTTPS server (Firmware file). |
Firmware File Prefix | This field enables user to store different firmware files in one single directory on the firmware server. If configured, only the firmware file with the matching prefix will be downloaded. |
Firmware File Postfix | This field enables user to store different firmware files in one single directory on the firmware server. If configured, only the firmware file with the matching postfix will be downloaded. |
Maintenance 🡪 Syslog | |
Syslog Protocol | Choose whether to send syslog messages over UDP or secured SSL/TLS connection. Default is UDP.
Notes:
|
Syslog Server | The URL or IP address of the syslog server for the phone to send syslog to. Note: By adding port number to the Syslog server field (i.e 172.18.1.1:1000), the phone will send syslog to the corresponding port of that IP. |
Syslog Level | Selects the level of logging for syslog. The default setting is “None”.
There are 4 levels: DEBUG, INFO, WARNING and ERROR. Syslog messages are sent based on the following events:
Note: Syslog messages also includes MAC address and firmware version. |
Syslog Keyword Filtering | Configures syslog message to be filtered based on keywords provided. If multiple keywords are filled, it should be separated by “,”. Note: No spaces allowed. |
Send SIP Log | Configures whether the SIP log will be included in the syslog messages or not. The default setting is “No”. |
Maintenance 🡪 Language | |
Display Language | Selects display language on the phone. |
Language File Postfix | Specifies the language file postfix for downloaded language. |
Maintenance 🡪 Action URL | |
Setup Completed | Specifies action URL for signal to be sending out when phone finished setting up processes. |
Registered | Specifies action URL for signal to be sending out when phone successfully registered. |
Unregistered | Specifies action URL for signal to be sending out when phone successfully unregistered SIP account. |
Register Failed | Specifies action URL for signal to be sending out when the IP phone fails to register a SIP account. |
Off Hook | Specifies action URL for signal to be sending out when phone is in off-hook state. |
On Hook | Specifies action URL for signal to be sending out when phone is in on-hook state. |
Incoming Call | Specifies action URL for signal to be sending out when phone received the incoming call. |
Outgoing Call | Specifies action URL for signal to be sending out when phone make an outbound call. |
Missed Call | Specifies action URL for signal to be sending out when phone missed a call. |
Answered Call | Specifies action URL for signal to be sending out when phone answered a call. |
Rejected Call | Specifies action URL for signal to be sending out when phone rejected a call. |
Forwarded Call | Specifies action URL for signal to be sending out when phone forwarded a call. |
Established Call | Specifies action URL for signal to be sending out when phone established a call. |
Terminated Call | Specifies action URL for signal to be sending out when phone terminated a call. |
Idle to Busy | Specifies action URL for signal to be sending out when phone changes from idle to busy. |
Busy to Idle | Specifies action URL for signal to be sending out when phone changes from busy to idle. |
Open DND | Specifies action URL for signal to be sending out when Do Not Disturb mode is enabled. |
Close DND | Specifies action URL for signal to be sending out when Do Not Disturb mode is disabled. |
Open Forward | Specifies action URL for signal to be sending out when forwarding is enabled. |
Close Forward | Specifies action URL for signal to be sending out when forwarding is disabled. |
Open Unconditional Forward | Specifies action URL for signal to be sending out when phone disables call unconditional forward option. |
Close Unconditional Forward | Specifies action URL for signal to be sending out when phone enables call unconditional forward option. |
Open Busy Forward | Specifies action URL for signal to be sending out when phone enables call busy forward option. |
Close Busy Forward | Specifies action URL for signal to be sending out when phone disables call busy forward option. |
Open No Answer Forward | Specifies action URL for signal to be sending out when phone enables call no answer forward option. |
Close No Answer Forward | Specifies action URL for signal to be sending out when phone disables call no answer forward option. |
Blind Transfer | Specifies action URL for signal to be sending out when phone performed a blind transfer. |
Attended Transfer | Specifies action URL for signal to be sending out when phone performed an attended transfer. |
Transfer Finished | Specifies action URL for signal to be sending out when phone successfully transferred a call. |
Transfer Failed | Specifies action URL for signal to be sending out when phone fails to transfer a call. |
Hold Call | Specifies action URL for signal to be sending out when phone placed a call on hold. |
UnHold call | Specifies action URL for signal to be sending out when phone placed retrieved a held call. |
Mute call | Specifies action URL for signal to be sending out when mutes a call. |
UnMute call | Specifies action URL for signal to be sending out when un-mutes a call. |
Open Syslog | Specifies action URL for signal to be sending out when syslog is enabled on the phone. |
Close Syslog | Specifies action URL for signal to be sending out when syslog is disabled on the phone. |
IP Change | Specifies action URL for signal to be sending out when IP address change. |
Auto-Provisioning Finish | Specifies action URL for signal to be sending out when phone completed auto provisioning. |
Maintenance 🡪 TR-069 | |
ACS URL | URL for TR-069 Auto Configuration Servers (ACS). |
TR-069 Username | ACS username for TR-069. |
TR-069 Password | ACS password for TR-069. |
Periodic Inform Enable | Enables periodic inform. If set to “Yes”, device will send inform packets to the ACS. The default setting is “No”. |
Periodic Inform Interval | Sets up the periodic inform interval to send the inform packets to the ACS. |
Connection Request Username | The username for the ACS to connect to the phone. |
Connection Request Password | The password for the ACS to connect to the phone. |
Connection Request Port | The port for the ACS to connect to the phone. |
CPE SSL Certificate | The Cert File for the phone to connect to the ACS via SSL. |
CPE SSL Private Key | The Cert Key for the phone to connect to the ACS via SSL. |
Randomized TR069 Startup | When enabled, the phone will send out first TR-069 INFORM message to server on randomized timing between 1 to 3600 seconds after phone boots up. |
Maintenance 🡪 Security Settings 🡪 Security | |
Configuration via Keypad Menu | Configures the access control for the users to configure from keypad Menu.
Warning: If the admin password is lost while constraint mode is enabled, your device may become permanently unusable. Remember to be careful when using constraint mode to avoid irreversible damage.
|
Enable STAR key Keypad locking | If set to “Yes”, the keypad can be locked by pressing and holding the STAR * key for about 4 seconds. A lock icon will show indicating the keypad is locked. The default setting is “Yes”. Note: When the keypad is locked, users would need press and hold the STAR * key for about 4 seconds and then enter the password to unlock it. If the Star Key Lock is enabled without specifying password, user can press and hold the STAR * key for 4 seconds and press OK to unlock the phone. |
Keypad Lock Type | Users can set Keypad Functional Lock to their phone instead of completely locking the phone.
|
Password to lock/unlock | Configures the password to lock/unlock the keypad. The password field allows number with up to 32 characters. |
Emergency numbers | Emergency numbers, separated by comma (,). |
Keypad Lock Timer | Defines the timeout (in seconds) of idle screen for locking keypad. Valid range is 0 to 3600. |
Validate Server Certificates | Validate server certificates with our trusted list for TLS connections. If set to “No”, device will bypass certificate validation (not recommended). |
SIP TLS Certificate | SSL Certificate used for SIP TLS Transport. Managed through “Upload” and “Delete” buttons. |
SIP TLS Private Key | SSL Private key used for SIP TLS Transport. Managed through “Upload” and “Delete” buttons. |
SIP TLS Private Key Password | SSL Private key password used for SIP TLS Transport. |
Custom Certificate | This feature allows users to update to the device their own certificate signed by custom CA certificate to manage client authentication. |
Web Access Mode | Allows users to enable web access for the phone by specifying which protocol (HTTP/HTTPS) will be used for web interface access or disable the web access by selecting “Disabled”. Default setting is HTTP. |
HTTP Web Port | Configures the HTTP port under the HTTP web access mode. |
HTTPS Web Port | Configures the HTTPS port under the HTTPS web access mode. |
Disable SSH | Disable SSH access. SSH is enabled by default. |
SSH Public Key | Allows to use authentication keys for SSH access. The public key should be loaded to phone’s web UI while the private key should be used in the SSH tool side. Note: This will allow upcoming SSH access without password. |
Web/Keypad/Restrict mode Lockout Duration | Specifies the time in minutes that the web or LCD login interface will be locked out to user after five login failures. This logout time is used for web login, STAR keypad unlock, and LCD restrict mode admin login. Range is 0-60 minutes. |
Web Session Timeout | Configures how long the WEB GUI can remain idle before logout, the accepted range of values is 2-60 minutes. The default setting is 10. |
Web Access Attempt Limit | Configures the number of logins attempts before lockout. The accepted range is 1-10. The default value is 5 |
Minimum TLS Version | The function allows users to choose minimum TLS version for HTTPS provisioning and SIP transport. This setting requires reboot to take effect on HTTPS web access. Provisioning and sip transport do not need reboot. |
Maximum TLS Version | The function allows users to choose maximum TLS version for HTTPS provisioning and SIP transport. This setting requires reboot to take effect on HTTPS web access. Provisioning and sip transport do not need reboot. |
Enable/Disable Weak Ciphers | Allows users to enable Weak TLS Ciphers Suite or disable weak ciphers DES/3DES and RC4, Symmetric Encryption SEED, Symmetric Authentication MD5, Protocol Version SSLv2/SSLv3 or Disable All of The Above Weak TLS Ciphers Suites. This feature could force the TLS version/Cipher suites for HTTPS provisioning and the TLS version for sip transport (TLS/TCP) and HTTPS web access. |
Maintenance 🡪 Security Settings 🡪 Trusted CA certificates | |
Trusted CA certificates | Users could upload up to 6 CA certificates files to be trusted by the phone and establish secure connections over SSL/TLS severs. The certificates can either be uploaded directly via Web GUI or provisioned using Pvalues [8433 – 8438]. |
Load CA Certificates | The phone will verify the server certificate based on the built-in, custom or both trusted certificates list. Users can specify which CA certificates to trust :
All Certificates: The phone will verify the server certificate based on the trusted certificates list including build-in and custom trusted certificates. |
Maintenance 🡪 Packet Capture | |
Packet Capture | Now if users want to capture their phone’s traffic, they can use the packet capture function on the phone.
Press Download to save the captured trace locally. |
Maintenance Page Definitions
Contacts Page Definitions
NAT Settings
If the devices are kept within a private network behind a firewall, we recommend using STUN Server. The following settings are useful in the STUN Server scenario:
- STUN Server
Under Settings🡪General Settings, enter a STUN Server IP (or FQDN) that you may have, or look up a free public STUN Server on the internet and enter it on this field. If using Public IP, keep this field blank.
- Use Random Ports
It is under Settings🡪General Settings. This setting depends on your network settings. When set to “Yes”, it will force random generation of both the local SIP and RTP ports. This is usually necessary when multiple GXPs are behind the same NAT. If using a Public IP address, set this parameter to “No”.
- NAT Traversal
It is under Accounts X🡪Network Settings. Default setting is “No”. Enable the device to use NAT traversal when it is behind firewall on a private network. Select Keep-Alive, Auto, STUN (with STUN server path configured too) or other option according to the network setting.
Public Mode
The GXP1610/GXP1615/GXP1620/GXP1625/GXP1628/GXP1630 supports Hot Desking using public mode. Under public mode, users could login the phone with the SIP account User ID and password. Please follow the steps below to configure the phone for public mode:
- Fill up the SIP server address for account 1 first.
- Under Web GUI🡪Settings🡪General Settings, set “Public Mode” option to “Yes”. Click “Save” and reboot the phone.
- When the phone boots up, SIP User ID and Password to register to the configured SIP server in account 1 will be required. Enter the correct account information to log in to the phone. When entering the account information, press softkey “123/abc” to toggle input method.
- In login page, pressing CONF button on the phone will show phone’s IP address.
- After using the phone, go to LCD MENU🡪Log Out to log off the public mode.
Lock Settings on the Phone
The GXP1610/GXP1615/GXP1620/GXP1625/GXP1628/GXP1630 support the “Locked Mode”, when this feature is selected from Web GUI🡪Maintenance🡪Security🡪Configuration Via Keypad Menu, it will restrict user access to any settings on the LCD: menu is disabled, only allow making and receiving phone calls and basic functionality provided by the feature keys (transfer / conference /hold / mute / volume / send / speaker).
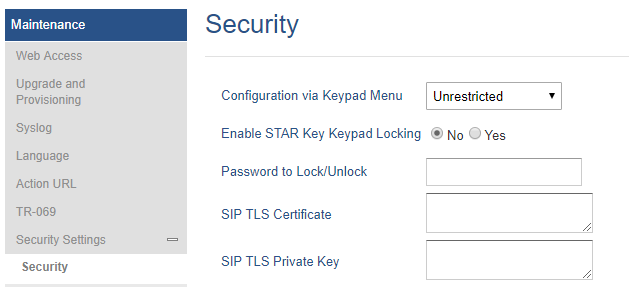
DHCP VLAN
This option can be enabled from web UI🡪Network🡪Advanced Settings, it adds support for DHCP option 132 & 133 tunneled through DHCP Option 43 on the phone to deploy is on the network. By enabling this option, the phone will try to read VLAN setting from DHCP option 132 and 133. If both of values in these two options are empty, phone will then read from option 43.
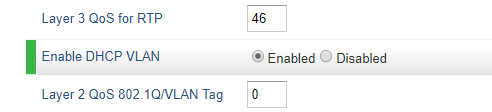
After user enables this feature, the phone will disable LLDP VLAN setting and try to read VLAN setting from DHCP to override manual setting. Firstly, the phone will send discover package and receive offer package for option 132 (VLAN ID) and option 133 (VLAN priority) via DHCP server.
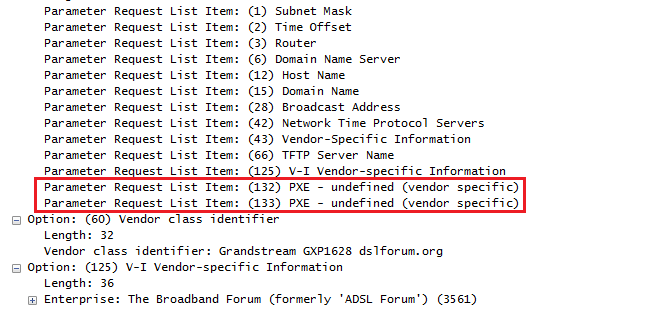
If one of Option 132 or Option 133 is not empty, the phone will read values in these two options. However, if Option 132 and Option 133 are both empty, the phone will retrieve the value of Option 43 for VLAN ID and priority. If VLAN ID and priority are both valid, VLAN setting will take effect after phone rebooting; if one of the values is invalid, DHCP VLAN setting will not override manual setting.
Ability to Configure Record Button
This option can be found under web UI🡪Account🡪Call Settings, it allows users to configure the DTMF that will be sent once record button is pressed during the call.
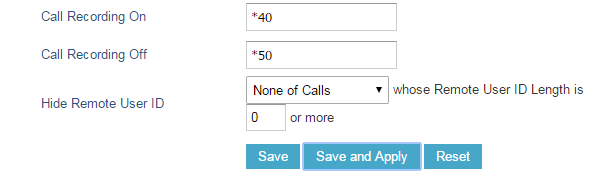
Editing Contacts and Click-To-Dial
From GXP1610/GXP1615/GXP1620/GXP1625/GXP1628/GXP1630 Web GUI, users could view contacts, edit contacts, or dial out with Click-to-Dial feature
![]() on the top of the Web GUI. In the following figure, the Contact page shows all the added contacts (manually or downloaded via XML phonebook). Here users could add new contact, edit selected contact, or dial the contact/number.
on the top of the Web GUI. In the following figure, the Contact page shows all the added contacts (manually or downloaded via XML phonebook). Here users could add new contact, edit selected contact, or dial the contact/number.
Before using the Click-To-Dial feature, make sure the option “Click-To-Dial Feature” under web GUI🡪Settings🡪Call Features is turned on.
By default, it is disabled and the dialing icon in web GUI is in grey
![]() .
.
When clicking on the
![]() icon on the top menu of the Web GUI, a new dialing window will show for you to enter the number. Once Dial is clicked, the phone will go off hook and dial out the number from selected account. Please see Figure 4 and Figure 5 in the following pages for more details.
icon on the top menu of the Web GUI, a new dialing window will show for you to enter the number. Once Dial is clicked, the phone will go off hook and dial out the number from selected account. Please see Figure 4 and Figure 5 in the following pages for more details.
Additionally, users could directly send the command for the phone to dial out by specifying the following URL in PC’s web browser, or in the field as required in other call modules.
http://ip_address/cgi-bin/api-make_call?phonenumber=1234&account=0&login=admin&password=admin
In the above link, replace the fields with
- ip_address:
The IP address of the phone.
- phonenumber=1234:
The number for the phone to dial out
- account=0:
The account index for the phone to make call. The index is 0 for account 1 and 1 for account 2.
- password=admin/123:
The admin or user login passwords of phone’s Web GUI.
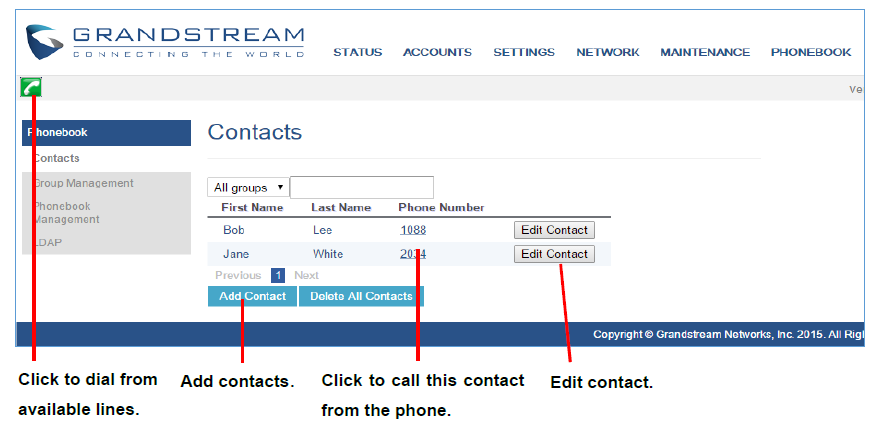
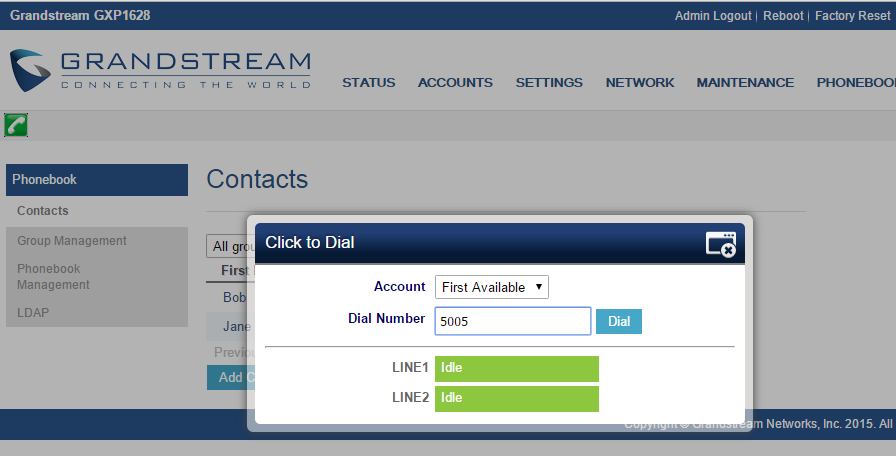
Saving the Configuration Changes
After users makes changes to the configuration, press the “Save” button will save but not apply the changes until the “Apply” button on the top of web GUI page is clicked. Or users could directly press “Save and Apply” button. We recommend rebooting or powering cycle the phone after applying all the changes.
Action URL
Action URL options can be found under device web UI🡪Maintenance🡪Action URL.
To use Action URL, users need to know the supported events and the dynamic variables for the supported events. The dynamic variables for the supported events will be replaced by the actual values on the phone to notify the event to SIP server.
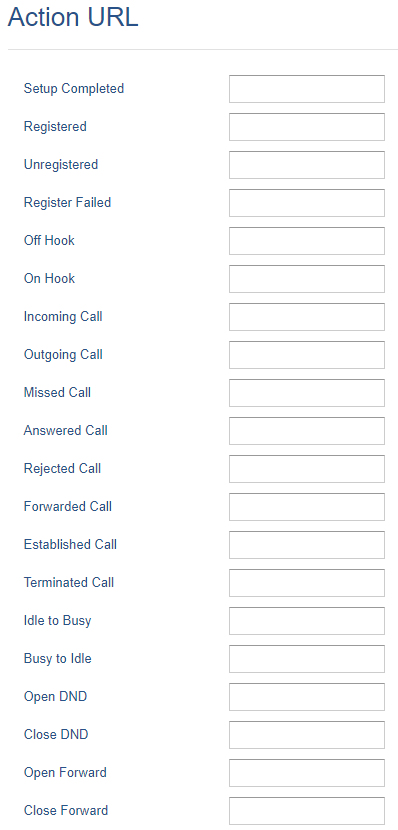
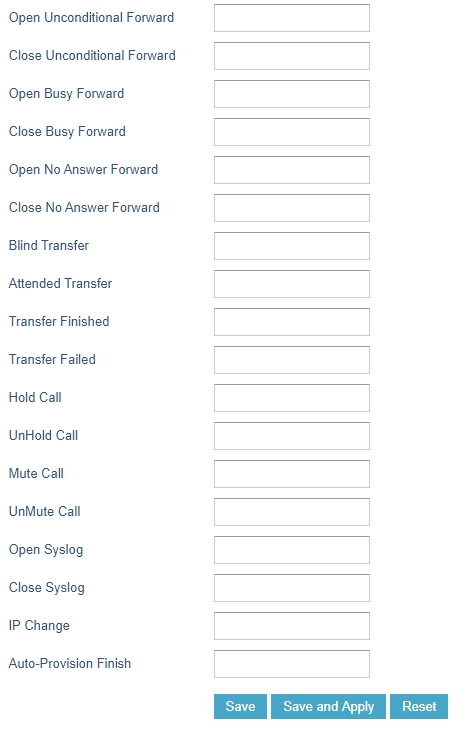
Supported Events | ||
Setup Completed | Terminated Call | Blind Transfer |
Registered | Idle to Busy | Attended Transfer |
Unregistered | Busy to Idle | Transfer Failed |
Register Failed | Open DND | Hold Call |
Off Hook | Close DND | UnHold Call |
On Hook | Open Forward | Mute Call |
Incoming Call | Close Forward | UnMute Call |
Outgoing Call | Open Unconditional Forward | Open Syslog |
Missed Call | Close Unconditional Forward | Close Syslog |
Answered Call | Open Busy Forward | IP Change |
Rejected Call | Close Busy Forward | Auto-Provision Finish |
Forwarded Call | Open No Answer Forward | |
Established Call | Close No Answer Forward |
Supported Dynamic Variables | |
Dynamic Variable | Description |
$phone_ip | The IP address of the phone |
$mac | The MAC address of the phone |
$product | The product name of the phone |
$program_version | The software version of the phone |
$hardware_version | The hardware version of the phone |
$language | The display language of the phone |
$local | The called number on the phone |
$display_local | The display name of the called number on the phone |
$remote | The call number on the remote phone |
$display_remote | The display name of the call number on the remote phone |
$active_user | The account number during a call on the phone |
After the user finishes setting Action URL on phone’s web UI, when the specific phone event occurs on the phone, phone will send the Action URL to the specified SIP server. The dynamic variables in the Action URL will be replaced by the actual values.
Here is an example:
Configure the following Action URL on the phone’s web UI🡪Settings🡪Outbound Notification🡪Action URL:
Incoming Call: 172.18.24.103/mac=$mac&local=$local
Outgoing Call: 172.18.24.103/remote=$remote&phone_ip=$phone_ip
On hold: 172.18.24.103/program_version=$program_version
During incoming call, outgoing call, and call hold, capture the trace on the phone and exam the packets. We can see the phone send Action URL with actual values to SIP server to notify phone events. In the following screenshot, from top to bottom, the phone events for each HTTP message are: Outgoing Call, Incoming Call and On Hold in the format of the defined action URL with the parameters replaced with actual values.
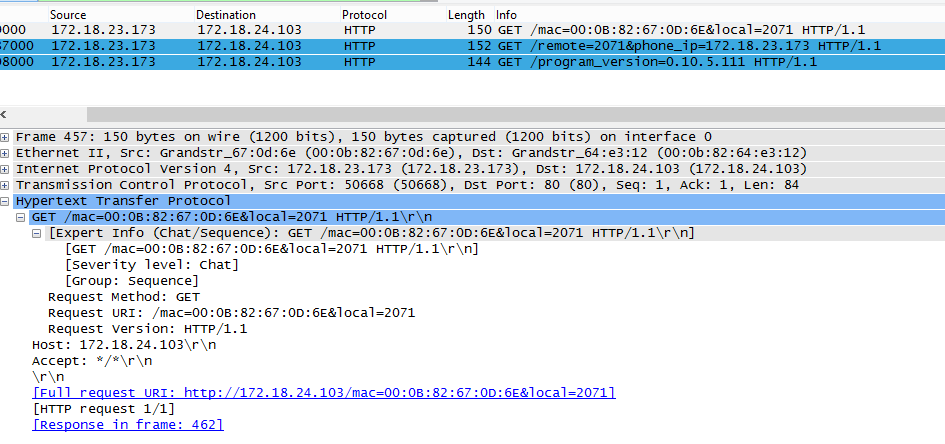
The P values listed in below table are for the Action URL options.
| P-Value | Web UI Option | Value Format |
|---|---|---|
P8304 | Setup Completed | String |
P8305 | Registered | |
P8306 | Unregistered | |
P8307 | Register Failed | |
P8308 | Off Hook | |
P8309 | On Hook | |
P8310 | Incoming Call | |
P8311 | Outgoing Call | |
P8312 | Missed Call | |
P22171 | Answered Call | |
P8315 | Rejected Call | |
P22172 | Forwarded Call | |
P8313 | Established Call | |
P8314 | Terminated Call | |
P8328 | Idle to Busy | |
P8329 | Busy to Idle | |
P8316 | Open DND | |
P8317 | Close DND | |
P8318 | Open Forward | |
P8319 | Close Forward | |
P22164 | Open Unconditional Forward | |
P22165 | Close Unconditional Forward | |
P22166 | Open Busy Forward | |
P22167 | Close Busy Forward | |
P22168 | Open No Answer Forward | |
P22169 | Close No Answer Forward | |
P8320 | Blind Transfer | |
P8321 | Attended Transfer | |
P8322 | Transfer Failed | |
P8324 | Hold Call | |
P8325 | UnHold Call | |
P8326 | Mute Call | |
P8327 | UnMute Call | |
P8330 | Open Syslog | |
P8331 | Close Syslog | |
P22170 | IP Change | |
P8332 | Auto-Provision Finish |
Rebooting from Remote Locations
Press the “Reboot” button on the top right corner of the web GUI page to reboot the phone remotely. The web browser will then display a reboot message. Wait for about 1 minute to log in again.

UPGRADING AND PROVISIONING
The GXP1610/GXP1615/GXP1620/GXP1625/GXP1628/GXP1630 can be upgraded via TFTP, HTTP/HTTPS, FTP or FTPS by configuring the URL/IP Address for the TFTP/HTTP/HTTPS/FTP/FTPS server and selecting a download method. Configure a valid URL for TFTP or HTTP/HTTPS or FTP/FTPS; the server name can be FQDN or IP address.
Examples of valid URLs:
firmware.grandstream.com/BETA
fw.mycompany.com
There are two ways to setup a software upgrade server: The LCD Keypad Menu or the Web Configuration Interface.
Upgrade via Keypad Menu
Follow the steps below to configure the upgrade server path via phone’s keypad menu:
- Press MENU button and navigate using Up/Down arrow to select Config.
- In the Config options, select Upgrade.
- Enter the firmware server path and select upgrade method. The server path could be in IP address format or FQDN format.
- Press the “OK” softkey. A reboot message window will be prompt.
- Reboot the phone to have the change take effect.
When upgrading starts, the screen will show upgrading progress. When done you will see the phone restarts again. Please do not interrupt or power cycle the phone when the upgrading process is on.
Upgrade via Web GUI
Open a web browser on PC and enter the IP address of the phone. Then, login with the administrator username and password. Go to Maintenance🡪Upgrade and Provisioning page, enter the IP address or the FQDN for the upgrade server in “Firmware Server Path” field and choose to upgrade via TFTP or HTTP/HTTPS/FTP/FTPS. Update the change by clicking the “Save and Apply” button. Then “Reboot” or power cycle the phone to update the new firmware. When upgrading starts, the screen will show upgrading progress. When done, you will see the phone restart again. Please do not interrupt or power cycle the phone when the upgrading process is on.
Firmware upgrading takes around 3 minutes in a controlled LAN or 5-10 minutes over the Internet. We recommend completing firmware upgrades in a controlled LAN environment whenever possible.
No Local TFTP/HTTP Servers
Service providers should maintain their own firmware upgrade servers. For users who do not have a TFTP/HTTP/HTTPS/FTP/FTPS server, some free Windows version TFTP servers are available for download from:
http://tftpd32.jounin.net/tftpd32_download.html.
Please check our web site at https://www.grandstream.com/support/firmware for latest firmware.
Instructions for local firmware upgrade via TFTP:
- Unzip the firmware files and put all of them in the root directory of the TFTP server;
- Connect the PC running the TFTP server and the phone to the same LAN segment;
- Launch the TFTP server and go to the File menu🡪Configure🡪Security to change the TFTP server’s default setting from “Receive Only” to “Transmit Only” for the firmware upgrade;
- Start the TFTP server and configure the TFTP server in the phone’s web configuration interface;
- Configure the Firmware Server Path to the IP address of the PC;
- Update the changes and reboot the phone.
End users can also choose to download a free HTTP server from http://httpd.apache.org/ or use Microsoft IIS web server.
Configuration File Download
Grandstream SIP Devices can be configured via the Web Interface as well as via a Configuration File (binary or XML) through TFTP or HTTP/HTTPS or FTP/FTPS. The “Config Server Path” is the TFTP or HTTP/HTTPS or FTP/FTPS server path for the configuration file. It needs to be set to a valid URL, either in FQDN or IP address format. The “Config Server Path” can be the same or different from the “Firmware Server Path”.
A configuration parameter is associated with each field in the web configuration page. A parameter consists of a Capital letter P and 2 to 5-digit numeric numbers. i.e., P2 is associated with the “Admin Password” in the Web GUI🡪Maintenance🡪Web/Telnet Access page. For a detailed parameter list, please refer to the corresponding firmware release configuration template.
When GXP1610/GXP1615/GXP1620/GXP1625/GXP1628/GXP1630 boots up, it will send TFTP or HTTP/HTTPS or FTP/FTPS requests to download configuration files, “cfg000b82xxxxxx” and “cfg000b82xxxxxx.xml”, where “000b82xxxxxx” is the MAC address of the phone. If the download of “cfgxxxxxxxxxxxx.xml” is not successful, phone will issue request for a generic configuration file “cfg.xml”. Configuration file name should be in lower case letters.
Note: (Attempt to download Config File again)
When doing provision on the phone, if your first config file contains p-values listed below, phone will try to download the potential second cfg.xml file and apply the second file without rebooting. Maximum 3 extra attempts.
Those P-values are:
*212 — Config upgrade via
*234 — Config prefix
*235 — Config postfix
*237 — Config upgrade Server
*240 – Authenticate Config File
*1359 – XML Config File Password
*8463 – Validate Server Certificate
*8467 – Download and process ALL Available Config Files
*20713 – Always authenticate before challenge
*22011 – Bypass Proxy For
*22030 – Enable SSL host verification for provision
Note: (P-values that trigger Auto-Provision)
If the p-values listed below are changed while managing configuration on web UI or LCD, the provision process will be triggered: * 192 — Firmware upgrade server
* 232 — Firmware prefix
* 233 — Firmware postfix
* 6767 — Firmware Upgrade Via
* 6768 — Firmware HTTP/HTTPS Username
* 6769 — Firmware HTTP/HTTPS Password
* 237 — Config upgrade Server
* 212 — Config upgrade via
* 234 — Config prefix
* 235 — Config postfix
* 1360 — Config HTTP/HTTPS username
* 1361 — Config HTTP/HTTPS password
Note: (P-values that trigger reboot)
The Pvalue 22421 (or alias “provision.config.forceReboot”) if set to 1 in config file, the phone will need to reboot if any change is applied by downloading the config file. Specifically following the process below:
On first time download:
The phone will downloaded a config file (in any supported format) with P22421 set to 1 included, If the phone find there is change(s) comparing with current setting on the phone it will update to new setting, however it will not save P22421 itself, and will go into normal reboot process.
On second time download:
After reboot, in some cases the phone may download the same config file again (if the config file path did not change),the phone then check the config file and if there is no Pvalue needed to be updated, it will not reboot again.
Certificates and Keys Provisioning
Users can configure the phone to get all the needed certificates during boot up. Instead of putting the certificate/key content in text directly from the Web interface or uploading them manually, they can choose to provision them from the configuration file by putting the URL in the Pvalue field of each certificate and/or key. (e.g. http://ProvisionServer_address/SIP-TLS-Certificate.pem) The phone will then process the URL, search for the appropriate certificate/Key file, download it and then apply it into the phone.
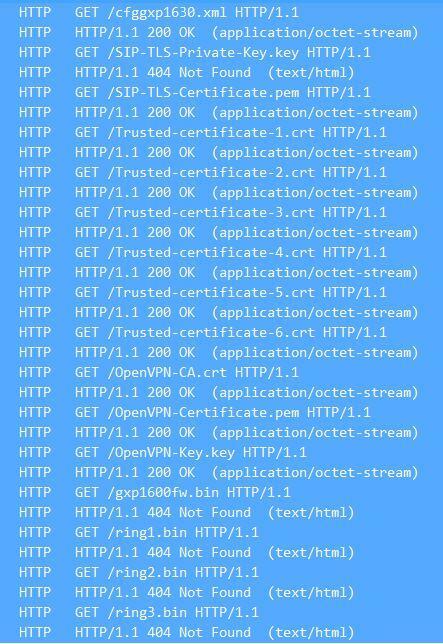
RESTORE FACTORY DEFAULT SETTINGS
Please follow the instructions below to reset the phone:
Restore to Factory Default via the LCD Menu
- Press MENU button to bring up the keypad configuration menu.
- Select “System” and enter.
- Select “Factory Reset”.
- A warning window will pop out to make sure a reset is requested and confirmed.
- Press the “OK” softkey to confirm and the phone will reboot. To cancel the Reset, press “Cancel” softkey instead.
Restore to Factory Default via the Web GUI
- Login GXP1610/GXP1615/GXP1620/GXP1625/GXP1628/GXP1630 Web GUI.
- Direct at the top right corner of the web page, click “Factory Reset” button to reset the device.
CHANGE LOG
This section documents significant changes from previous versions of user manuals for GXP1610/GXP1615/GXP1620/GXP1625/GXP1628/GXP1630. Only major new features or major document updates are listed here.
Firmware Version 1.0.7.67
- Disabled User Web Access by default. [Enable User Web Access]
Firmware Version 1.0.7.64
- Added Support of TLS authentication key for OpenVPN. [TLS Auth Key]
Firmware Version 1.0.7.56
- Added Support to configure two passwords for the same GDS “System Number”. [Grandstream Door System]
- Added Support to send EAPOL-Logoff when PC is disconnected. [802.1X Mode]
- Added Rport Support (RFC3581). [Support Rport (RFC 3581)]
- Added Support to force local ringback tone. [Ringback Tone at No Early Media]
Firmware Version 1.0.7.50
- No Major changes
Firmware Version 1.0.7.49
- Improved SIP Performance.
- Added Support to display all contacts in LDAP Directory on the LCD menu. [Configuration via Keypad🡪Contacts]
- Added Support to send HTTP commands via programmable keys. [Settings Page Definitions 🡪 Programmable Keys 🡪 Softkeys]
Firmware Version 1.0.7.33
- Added Support to generate core dump from web UI. [Status Page Definittions]
Firmware Version 1.0.7.24
- Added support for Enhanced 911 feature. [Settings Page Definitions]
- Added support to force a reboot after provisioning. [FORCE REBOOT BY PVALUE PROVISIONING]
- No major changes
- Added Ability to configure variables in the provisioning server URL [Config Server Path][Firmware Server Path]
- Added Ability to auto answer pre-defined numbers. [Auto Answer Numbers]
- Added Two accounts support on GXP1610/1615. [Table 1: GXP1610/GXP1615 Technical Specifications]
- Added support of Beirut Time zone. [Time Zone]
- Added Support of Central Africa Time zone “CAT”. [Time Zone]
- Added ability to choose minimum TLS version. [Minimum TLS Version]
- Added ability to choose maximum TLS version. [Maximum TLS Version]
- Added ability to Enable/Disable weak ciphers suites. [Enable/Disable Weak Ciphers]
- Added GNU GPL License information display on LCD and Web UI [GNU GPL License]
- Added Ability to scroll long names on the screen to display the full name. [Caller ID Display Mode]
- Added Support to input username and password via keypad for BroadSoft’s directories. [Login Credentials]
- Added Support of “Provision” mode for VPK/MPK to trigger provisioning [Provision]
- Added Ability to allow @ character in SIP user ID [SIP User ID]
- Added Support of Auth Header on Initial REGISTER [Add Auth Header On Initial REGISTER]
- Add Support to include DHCP Option 12 into DHCP Inform message [Host name (Option 12)]
- Increased SIP Certificate length limitation from 2048 characters to 8192 [SIP TLS Certificate]
- Added Support for Emergency call under functional lock [functional lock]
- Added Support for callee ID display [callee id display]
- Added ability to create Custom Call Screen Softkey Layout [Custom Call Screen Softkey Layout]
- Added ability to customize the feature code [Feature Codes]
- Added option to specify which certificate to trust [load ca certificates]
- Added show both call session timer and hold duration timer on LCD during call hold. [Show on Hold Duration]
- Added more custom ringtone choices. [Default Ringtone]
- Added option to disable # key from acting as redial key. [Use Pound (#) For Redial]
- Added support for variable $active_url in Action URL. [action URL]
- Added upload button to upload SIP TLS Private Key. [SIP TLS Certificate] [SIP TLS PRIVATE KEY]
- Added option to hide reject softkey on ringing state [Hide/Disable reject key]
- Added option “Disable Busy Tone on Remote Disconnect” [disable busy tone]
- Added option to specify DNS SRV query frequency. [DNS Cache Refresh Time]
- Added ability to open door in idle stage for GDS integration. [GDS OpenDoor]
- Added ability to use special characters on 802.1X MD5 password. [MD5 Password]
- Added option to choose CID display behavior (static or dynamic). [Caller ID Display Mode]
- Added option to enable/disable Diversion info display. [Enable Diversion Information Display]
- Changed default value for “Enable CDP” to be “Enabled” instead of “Disabled”. [Enable CDP]
- Added options to disable hook switch. [disable hook switch]
- Added Support for SNMPv3 [SNMP]
- Added FTP/FTPS support for provisioning and firmware upgrade [Config Upgrade Via] [Firmware Upgrade Via] [UPGRADING AND PROVISIONING]
- Added support to configure device with custom certificate signed by custom CA certificate [custom CA certificate]
- Added support for local packet capture. [Packet Capture]
- Added support for Group Listening with Speaker [Group Listening with Speaker]
- Added support for more Action URL notification [Action URL]
- Added support for XML Application [XML Application]
- Added support for RTCP-XR. [GXP1610/GXP1615/GXP1620/GXP1625/GXP1628/GXP1630 Technical Specifications]
- Added Broadsoft call park notification feature [Broadsoft Call Park]
- Added Codec Negotiation Priority feature [Codec Negotiation Priority]
- Added support for “tftp://” in DHCP Option 66 [Allow DHCP Option 43 and Option 66 to Override Server]
- Added support to customize idle time to logout the web access [Web Session Timeout]
- Added support to customize number of failed attempts to access web GUI [Web Access Attempt Limit]
- Added support for BLF call pick-up to go through dial plan [Bypass Dial Plan]
- Added support of on hook dialing with Live DialPad [Enable Live DialPad]
- Added support for CID and Image from SIP NOTIFY [Caller ID Display]
- Added support to randomize TR069 Inform Interval [Randomized TR069 Startup]
- Added support to configure off-hook auto dial delay [Off-hook Auto Dial Delay]
- Added support for auto answer delay [Auto Answer Delay]
- Added more fields for Distinctive Ring Tone. [Match Incoming Caller ID]
- Add support to enable or disable Acoustic Echo Cancellation. [Enable Enhanced Acoustic Echo Canceller]
- Add support to download certificate files during provisioning. [Certificates and Keys Provisioning]
- Added support of on hold reminder tone [On Hold Reminder Tone]
- Updated phonebook string in LCD and Web UI to “Contacts” [Contacts] [Contacts Page Definitions]
- Enhanced Syslog to run on other ports instead of default port. [Syslog Server]
- Enhanced Intercom options (including Intercom Mute, Intercom Tone). [Intercom]
- Added auto provision starts when certain P-values are changed. [P-values that trigger Auto-Provision]
- Added attempt to download config files. [Attempt to download Config File again]
- Added “Provision” button to trigger Provision Requests. [Provision]
- Added “Import Group Method” to append or replace existing groups. [Import Group Method]
- Added option to validate server certificates with our trusted list for TLS connections. [Validate server certificates]
- Added option to enable or disable user web access. [Enable User Web Access]
- Added support for Cisco Discovery Protocol. [Enable CDP]
- Added option to enable CSTA Control. [CSTA Control]
- Added option to test strength of password. [Test Password Strength]
- Added option to configure the timeout of the active backlight. [Active Backlight Timeout]
- Added option to specify the transfer mode via VPK. [Transfer Mode via MPK].
- Added support for transfer when using a non-transfer MPK. [Enable Transfer via non-Transfer MPK]
- Added support for SBC. [Use SBC]
- Added option to include the MAC address on the SIP message header. [Use MAC Header]
- Force admin to change default password upon first time login. [Password on first boot]
- Added support for HTTPS server based on TLSv1.2.
- Added monitored call park MPK option and supported to be provisioned by 3CX.
- Added support to automatically log in web UI from server interface for 3CX.
- Added “Let’s Encrypt” Validation for 3CX.
- Added “Account Display” option to configure SIP account display label on LCD. [Account Display]
- Added “Disable VM/MSG Power Light Flash” option to enable/disable voicemail/message indication. [Enable / Disable VM/MSG Power Light Flash]
- Added web UI option to upload SSH public key for SSH access. [SSH Public Key]
- Added “Ring for Call Waiting” option to enable/disable ringing the speaker phone on call waiting. [Ring For Call Waiting]
- Added call forwarding configuration on web UI. [Call Forward]
- Added support for static/dynamic auto-attended transfer. [Attended Transfer Mode]
- Added support for BLF server. [BLF Server]
- Added automatic redial support. [Automatic Redial]
- Added blacklist/whitelist support in phonebook. [Blocklist, ]
- Added option to disable hook switch. [Disable Hook Switch]
- Added notification tone value configuration [Notification tone volume]
- Added SNMP support. [SNMP]
- Added support for Genesys Agent Login/Logout and status update. [Enable User Presence Subscription]
- Improved slow performance issue after phone is used for some time.
- Added Let’s Encrypt Root CA to Trusted CA.
- Increased max length of dial plan from 512 to 1024 characters.
- Added support for Syslog over TLS [Syslog Protocol]
- Added support of Provisioning “Trusted CA Certificates” [Trusted CA certificates]
- Added option to select the method for caller information display [Remote Info Display]
- Added support to enable/disable IPv4/IPv6 [Internet Protocol]
- GDS37XX OpenDoor Key support integration [Grandstream Door System]
- Allow certificate upload for OpenVPN. [Open VPN® Settings]
- Added option to sort Broadsoft phonebook by Last/First name. [Sort Phonebook]
- Added ability to lock the phone ringing volume. [Lock Speaker Volume]
- Added ability to customize the domain name on the XSI request. [XSI Actions Path]
- Changed OpenVPN to OpenVPN® for web page and added the trademark. [Open VPN® Settings]
- Added HTTP/HTTPS Authentication for phonebook XML file download. [HTTP/HTTPS ; HTTP/HTTPS Password]
- Updated syslog message to include MAC address and firmware version. [Syslog]
- Added support for concurrent G.729 calls.
- Added option to enable/disable web UI access. [Web Access Mode]
- Added option to hide the password on the display after dialing a specific prefix. [Hide Dialing Password]
- Added LDAPS support. [LDAP protocol]
- Added support for certificate DN validation for LDAPS.
- Added option to remove SIP error on LCD. [Show SIP Error Response]
- Added support of intercom button to send multicast paging. [Intercom Key Mode]
- Added option to disable custom SIP header. [Custom SIP Headers]
- Added support to send SIP log without enabling debug level. [Send SIP Log]
- Added option to bypass firmware upgrade confirmation. [Firmware Upgrade Confirmation]
- Added ability to lock settings on phone. [Maintenance 🡪 Security] [Lock Settings on the Phone]
- Added support for DHCP option 132 and 133 tunneled through DHCP option 43. [DHCP VLAN]
- Added support for DHCP option 132 for (802.1Q VLAN ID) and 133 (QOS priority level).
- Added ability to adjust ringtone level from web GUI. [Default Ringtone]
- Added support for separated QoS setting for SIP and RTP.
- Added configurable web access port. [Maintenance 🡪 Security]
- Added ability to configure record button. [Ability to Configure Record Button]
- Added ability to set forward on busy and on no answer from the LCD.
- Added ability to display more characters for account name on LCD display. [Wide Idle Screen View]
- Added option for predictive dial feature. [Predictive Dialing Feature]
- Added option to adjust the Maximum Transmission Unit (MTU) of IP packets. [Maximum Transmission Unit (MTU)]
- Spited register and subscription expiration settings. [Subscribe Expiration]
- Added ability to hide web access mode and disable SSH from LCD menu under constraint mode. [Configuration via Keypad Menu]
- Add support for Latvian Language.
- Update Polish language.
- Added ability to customize the system softkey. [Softkeys]
- Added ability to hide system softkey on main screen.
- Added support of configurable User Agent field. [User-Agent Prefix]
- Added option to disable recovery on blind transfer. [Disable Recovery on Blind Transfer]
- Added call-pickup barge-in code. [Call Pickup Barge-in Code]
- Added options to hide remote user ID based on both call type and length. [Hide Remote User ID]
- Added option to set BroadSoft’s contacts download interval. [XSI]
- Added G723.1 and iLBC codecs support. [Preferred Vocoder]
- Added Event Notification. [Maintenance]
- Added options to specify Broadsoft XSI authentication method. [XSI]
- Added DHCP option 150/160 support. [Additional Override DHCP option]
- Added ability to filter characters from dial numbers.
- Web logo and style changed.
- Added DHCP Option 125 support.
- Enabled/Disabled Broadsoft Call Park subscribe. [Broadsoft Call Park]
- Separate Firmware/Config’s upgrade via, HTTP/HTTPS username, and HTTP/HTTPS password. [Maintenance 🡪 Upgrade and Provisioning]
- Ignore Alert-Info Header. [Ignore Alert-Info Header]
- Validate Certification Chain. [Validate Certification Chain]
- Bypass Dial Plan through Call History and Directories. [Bypass Dial Plan through Call History and Directories]
- Backup Outbound Proxy. [Backup Outbound Proxy]
- Enable OPTIONS Keep Alive. [Enable OPTIONS Keep Alive]
- OPTIONS Keep Alive Interval. [OPTIONS Keep Alive Interval]
- OPTIONS Keep Alive Max Lost. [OPTIONS Keep Alive Max Lost]
This is the initial version.