
Thank you for purchasing the Grandstream GXW410x IP Analog FXO Gateway. The GXW410x is a cost-effective, easy-to-use and easy-to-configure IP communications solution for any business. The GXW410x supports popular voice codecs and is designed for full SIP compatibility and interoperability with 3rd party SIP providers, thus enabling you to fully leverage the benefits of VoIP technology, integrate a traditional phone system into a VoIP network, and efficiently manage communication costs.
This manual will help you learn how to operate and manage your GXW FXO Analog IP Gateway and make the best use of its many upgraded features including simple and quick installation, multi-party conferencing, etc. This IP Analog Gateway is very easy to manage and scalable, specifically designed to be an easy to use and affordable VoIP solution for the small–medium business or enterprise. Enable the video surveillance port to give piece of mind while you are away from your business.
Gateway GXW410x Overview
The GXW410x offers an easy to manage, feature rich feature IP communications solution for any small business or businesses with virtual and/or branch locations who want to leverage their broadband network and/or add new IP Technology to their current phone system. The Grandstream Enterprise Analog VoIP Gateway GXW410x series converts SIP/RTP IP calls to traditional PSTN calls and vice versa. There are two models – the GXW4104 and GXW4108, which have either 4 or 8 FXO ports respectively. The installation is the same for either model.
Packaging
Unpack and check all accessories. Equipment included in the package:
- One GXW410x Unit
- One universal power adaptor
- One Ethernet cable
Connecting the GXW410x
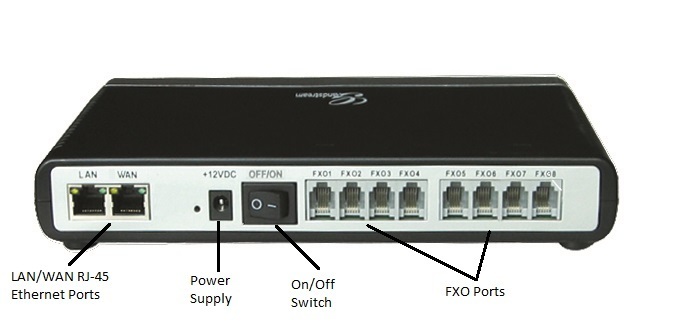
LAN/WAN RJ-45 Ethernet Ports
LAN (or PC) | Connect your PC to this port. It will then be assigned an IP address from your Router/DHCP Server. The GXW410x acts as a switch only. |
WAN | Connect to the internal LAN network or Public Internet. |
RESET | Factory Reset button. Press for 7 seconds to reset the factory default settings. |
POWER SUPPLY | Power adapter connection |
OFF/ON | Off/On switch |
FXO1 – FXO8 | FXO ports to be connected to physical PSTN lines from a traditional PSTN PBX or PSTN Central Office. |
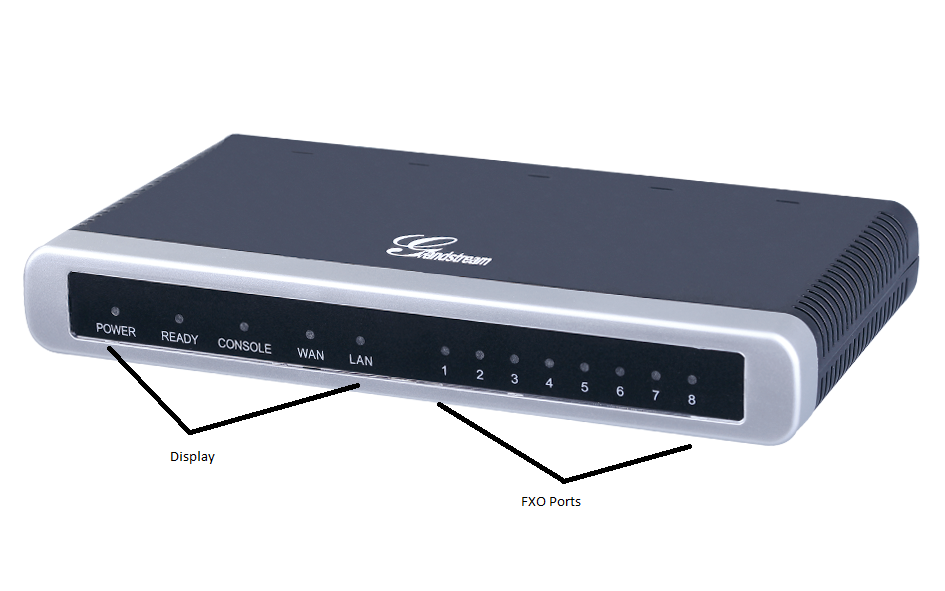
Indicates Power. Remains ON when Power is connected and unit is turned ON. | |
Ready LED | Remains ON after boot-up. |
WAN LED | Indicates WAN port activity in the back side |
LAN LED | Indicates LAN port activity in the back side |
LEDs 1 – 8 | Indicate status of the respective FXO Ports on the back panel Busy – ON Available – OFF |
Application Description
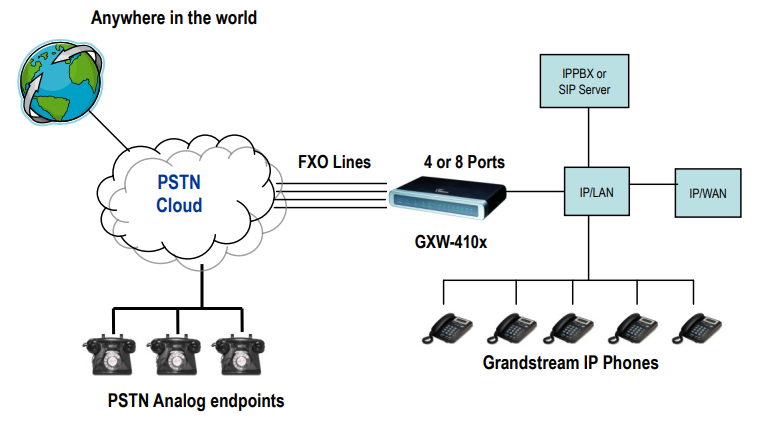
IP PBX / SIP Server with GXW410x
A SIP proxy server such as Asterisk or a SIP registrar server can be deployed with the GXW410x series. In this environment, the SIP server handles SIP registration and call control and the GXW410x processes media conversion between IP and PSTN calls.
There are 2 ways to configure GXW410x when using with a SIP Server:
- With SIP accounts configured on Channels page. In this case, the GXW acts like an endpoint requesting registration from the SIP Server. Under the Channels webpage you will need to fill in the information like SIP User ID, Password, etc. Now, when you try to make calls from IP, the call will be routed to the SIP Server which will forward it to one of the SIP accounts on the GXW410x, which will then forward it to the PSTN line.
- Without SIP accounts. In this case, you simply have to configure the SIP Server to perform forwarding of the SIP INVITE message with the FXO destination number to the gateways IP Address. The GXW410x will receive the digits and immediately forward them on the FXO lines to the destination PSTN. Most of the configuration on the Gateway for this case will remain default, except Stage Method needs to be set to 1, and SIP Server IP Address/DNS name has to be filled.
For incoming calls from the PSTN analog endpoints to the GXW410x, the device will auto forward each call to a configured IP extension. The SIP Server can then route the call based on its own configuration or IVR system.
FXS Gateway with GXW410x [No SIP Server required]
Alternatively, the GXW410x can be used without a SIP Server. You can use it in conjunction with a FXS Gateway (Ex. GXW42xx) and still be able to originate and terminate calls from IP to PSTN and vice versa. All you need to make sure is that the 2 gateways are able to locate each other (they should be on the same LAN or on Public IP addresses).
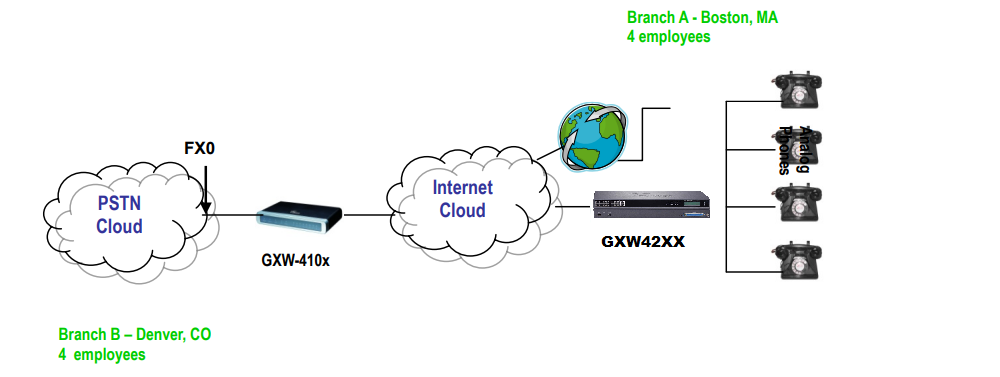
In this diagram, configure the SIP Server field to be the IP Address of the other gateway (i.e. configure IP address of FXS gateway to be SIP Server of GXW410x and vice versa). Please be sure you set SIP Registration to No.
Expected Call Flow: Analog Phone (GXW42xx) picks up and dials destination PSTN number. The call gets routed to the GXW410x which dials out the digit string onto the FXO Lines, thus reaching the destination PSTN endpoint. On the reverse, incoming calls from PSTN endpoints will be routed automatically to the FXS Gateway through the GXW410x.
| GXW42xx Gateway | GXW410x Gateway |
|---|---|
Profile 1 SIP Server – Set it to IP Address of GXW410x SIP Registration – No Outgoing Call without Registration – Yes NAT traversal – No | Advanced Settings STUN Server – Blank Use Random Port – No |
Advanced Settings STUN Server – Blank | FXO lines Wait for Dial Tone – Y or N (whichever works for your PSTN Service Provider) Stage Method – 1 Unconditional Call Forward to VOIP: ch1-8:444; @ch1-8:p1; ch1-8:5060++; |
Channels 1-8 5060 Profile 1 Local SIP Listen port (For VOIP to PSTN calls) – 5060++ | |
Profile 1 SIP Server – Set it to IP Address of GXW42xx SIP Registration – No NAT traversal – No |
Features
GXW410x is a next generation IP voice and video gateway that features full interoperability with leading IP-PBXs, SoftSwitches and SIP platforms. The Gateway series offers superb voice and video quality, traditional telephony functionality, simple configuration, feature rich functionality and an additional video port that enables the gateway to act like a video surveillance gateway.
Software Features Overview
- 4 and 8 FXO port media gateways
- External power supply
- Two RJ-45 ports (switched or routed)
- TFTP and HTTP firmware upgrade support
- Multiple SIP accounts, multiple SIP profiles (choice of 3 profiles per account)
- Supports Audio Codecs: G711U/A, G723, G729A/B and GSM
- Supports Video Codecs: H.264
- G.168 – echo cancellation
- Flexible DTMF transmission: In Audio, RFC2833, SIP Info or any combination of the 3
- Selectable, multiple LBR coders per channel
- T.38 compliant
Hardware Specification
LAN interface | 2xRJ45 10/100Mbps |
LED | 8 LEDs (GREEN) |
Universal Switching Power Adaptor | Input: 100-240V AC, 50/60Hz, 0.5A Max Output: 12V DC, 1.25A UL certified |
Dimension | 225mm (L) x 172mm (W) x 42mm (H) |
Weight | 0.29 lbs (3.5 oz) |
Temperature | 32~104°F 0~40°C |
Humidity | 10% – 90% (non-condensing) |
Compliance | FCC, CE |
GXW410x FX0 Analog Gateway Series | |
IP settings | GXW4104: 4 ports; 4 SIP accounts w/ choice of 3 SIP Server profiles |
GXW4108: 8 ports; 8 SIP accounts w/ choice of 3 SIP Server profiles | |
Round-robin port scheduling to ensure available lines to access PSTN networks | |
Telephone Interface | FXO, RJ11 |
Network Interface | Two (2) 10/100 Mbps, RJ45 |
LED Indicators | Power, Video, and Line LEDs |
On/Off Switch | Yes |
Voice over Packet Capabilities | G.168 compliant Echo Cancellation, Dynamic Jitter Buffer, Modem detection & auto-switch to G.711 |
Voice Compression | G.711U, G711A, G.723, G.729A/B, GSM |
Video Surveillance | Real-time H.264 base CIF resolution |
DHCP Server/Client | Switch Mode and PPPoE |
Fax over IP | T.38 compliant Group 3 Fax Relay up to 14.4kpbs and auto-switch to G.711 for Fax Pass-through |
QoS | Diffserv, TOS, 802.1 P/Q VLAN tagging |
IP Transport | RTP/RTCP and RTSP |
PSTN Signaling | FXO Loop start, Current Disconnect. |
DTMF Method | Flexible DTMF transmission method, User interface of In-audio, RFC2833, and SIP Info |
IP Signaling | SIP (RFC 3261) |
Provisioning | TFTP and HTTP |
Media | SRTP |
Control | TLS and SIPS (pending) |
Management | Syslog support, HTTPS and telnet (pending), remote management using Web browser |
Caller ID | Bellcore Type 1 & 2, ETSI, BT, NTT, and DTMF-based CID |
Polarity Reversal / Wink | Yes (Detection only). The PSTN lines will need to be subscribed to PR service from the Service Provider. |
EMC | GXW410x: EN55022 Class B, CFR Part 15 Class B, EN55024; GXW4104: FCC, CE (in addition) |
Safety | GXW410x: EN60950-1 GXW4108: UL60950-1 (in addition) |
Configuration Guide
Configuration with Web Browser
The GXW410x has an embedded Web server that will allow a user to configure the IP phone through any common web browser.
Accessing the Web Configuration Menu
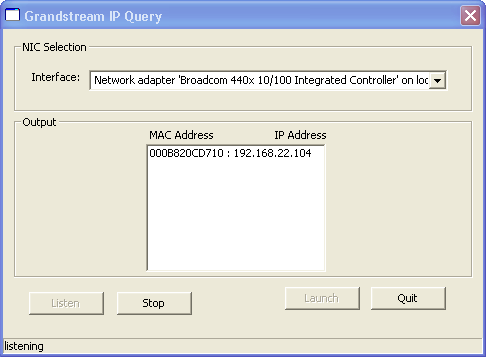
- Navigate your browser to: Grandstream IP Discovery Tool
- Run the Grandstream IPQuery tool that you just downloaded.
- Click on
 button in order to begin device detection
 - The detected devices will appear in the Output field
End User Configuration
Once this HTTP request is entered and sent from a Web browser, the GXW410x will respond with a login screen. There are two default passwords for the login page:
After login, the next configuration page is the Basic Configuration page, explained in detail in Table 6: Maintenance.
Configuring the FXO Channels
Configuring the FXO channels on the GXW – 410x is an easy process. Follow the GUI interfaces. The Device Status page terms are defined in Table 8: FXO Lines Configuration Definitions. An example of the Channel Dialing Configuration is shown in Figure 6. Please note the default is always configured. The user has the option to change the default settings as described in the Table 8.
FXO Lines | |
Settings | |
Call Progress Tones | Using these settings, user can configure tone frequencies according to user preference. By default, the tones are set to North American frequencies. Frequencies should be configured with known values to avoid uncomfortable high pitch sounds. ON is the period of ringing (ON time in ms) while OFF is the period of silence. In order to set a continuous ring, OFF should be zero. Otherwise it will ring ON ms and a pause of OFF ms and then repeat the pattern.
Please refer the document below to determine your local call progress tones (http://www.itu.int/ITU-T/inr/forms/files/tones-0203.pdf) or run the FXO Line Test (Table 9). |
Tx to PSTN Audio Gain (dB) | Allows user to set a value in dB for transmission to PSTN Audio Gain. Default is 1. Range is from -12 to 12dB. |
Rx from PSTN Audio Gain (dB) | Allows user to set a value in dB for receive from PSTN Audio Gain. Default is 0. Range is from -12 to 12dB. |
Silence Suppression | This controls the silence suppression/VAD feature of G723 and G729. If set to “Yes”, when a silence is detected, small quantity of VAD packets (instead of audio packets) will be sent during the period of no talking. If set to “No”, this feature is disabled. |
Echo Cancellation | When set to Y, Echo cancellation is enabled. |
Enable Current Disconnect | When set to Y, Current Disconnect is enabled. Certain PSTN COs require this to be enabled, in order to realize disconnect signal from PSTN side. Default is Y. If enabled use threshold: Default is 100ms. Range is 40ms to 800ms. Certain PSTN service providers have a threshold time within which the line stabilizes after off-hook. It is entirely dependent on provider, however if you experience PSTN line detection issues, please modify this setting appropriately in 100ms increments. If you are not sure if this option should be enabled please refer to Table 9 (FXO Lines Test Tab Definition). This tool will run an automated test to determine the proper PSTN configuration that the gateway should have to work with your Service Provider or analog PBX. |
Enable Tone Disconnect | Default is No. If PSTN provider uses call progress tones then it should be set to Yes in order to realize disconnect tone. Please configure accurate Call Progress Tones on Channels webpage based on PSTN provider (or traditional PBX) settings. If you are not sure if this option should be enabled or what Call Progress Tones are required please refer to Table 9 (FXO Lines Test Tab Definition). This tool will run an automated test to determine the proper PSTN configuration that the gateway should have to work with your Service Provider or analog PBX. |
Enable Polarity Reversal | Default is No. This should be set to Yes only if the FXO lines are subscribed to PR service from PSTN Service provider. It is merely a PR detect feature. ***Note: If there is no PR service from provider on the FXO line, and this setting is configured to Yes, calls will not be successful. |
Enable Call Answer Supervision | Default is No. If PSTN providers use the CAS then this option should be enabled. The Call Answer Supervision (CAS) is for billing—the telephone exchange and the customer need an accurate indication of calls through a network. |
Silence Timeout | Terminate call after long silence detected. Default is 60 seconds, max 65536. |
Incoming Call Timeout | Default value is 6 seconds. Incoming call will stop ringing when not picked up given a specific period of time. |
AC Termination Impedance | Selects the impedance of the analog line connected to the FXO port on the GXW410x. Here is some basic information which may be helpful for initial configuration: 600 Ohm – North America; 270 Ohm + (750 Ohm || 150 nF) — Most of Europe 220 Ohm + (820 Ohm || 120 nF) – Australia, New Zealand 220 Ohm + (820 Ohm || 115 nF) – Austria, Bulgaria, Germany, Slovakia, South Africa 370 Ohm + (620 Ohm || 310 nF) – UK., India If this parameter is not configured properly you may experience echo or static in the line. Please refer to Table 9 (FXO Lines Test Tab Definition). This tool will run an automated test to determine the correct impedance value to match your lines |
Number of Rings Before Pickup | Default is 4. This is the number of rings the gateway will wait to send the call to the VOIP side in case the Caller ID has yet to be detected. If there’s CID information the call will be sent right away. If your lines don’t have the CID service set this to 1. |
Caller ID Scheme | The GXW410x supports 5 different types of schemes:
Please check with your PSTN service provider (or traditional PBX specs) for which caller ID scheme they/it support. If you are not sure about which to use please refer to Table 9 (FXO Lines Test Tab Definition). This tool will run an automated test to determine the proper Caller ID Scheme so the gateway can properly detect the Caller ID. Similarly to the cases explained above we can specify a caller ID scheme for each channel independently. |
Caller ID Transport type | Default is “relay via From header”. You may also select : “relay via P_Asserted_Identity header” “Disable” : Caller ID feature will be disabled. “Send anonymous” : All calls forwarded to VOIP end will be sent as anonymous. |
DIALING | |
Wait for Dial-tone | Default is Yes. When set to Yes, the gateway will recognize dial-tone from the Central Office (CO) before it completes call. If you can’t make an outbound call, set this is No. |
Stage Method | Syntax – ch1-8:1; {all channels 1 to 8 are set to value 1 or 2} Stage method can be set to either 1 or 2. Set this parameter to 1 if you need to make a direct PSTN call from a VOIP endpoint. When you set it to 2, you will first dial one of the VOIP channel accounts from the VOIP endpoint, this will result in getting a PSTN line dial-tone to then dial out the destination PSTN number. Most implementations require this setting to be configured to 1. |
Min. Delay before Dial PSTN | Default is 500ms. This needs to be equal to or greater than the Current Disconnect threshold setting. Once the threshold is reached the gateway can dial out. This parameter should only be used if there are PSTN line detection issues. |
Round Robin and/or Flexible | Default is rr:1-8; The syntax is pretty straight-forward here. The rr stands for Round Robin and the numbers stand for the ports that belong to that round robin group. For example: rr:1-8; -> Round robin within the first 8 ports i.e. outgoing calls will be forwarded to the next available port within the group of ports 1 to 8. rr:1,3-6,8;rr:2,7; -> Round robin within port 1,3,4,5,6 and 8; Second round robin group within ports 2 and 7 i.e. outgoing calls to ports 1,3,4,5,6 and 8 will be forwarded to the next available port within this group ONLY. Outgoing calls to port 2 and 7 will be forwarded to the next available port between ports 2 and 7 ONLY. ** In order to terminate a call on FXO port 2 or 7 you will need to change its Local SIP Listen port accordingly. |
Prefix to specify Port (1 stage dialing method) | Default is 99. Syntax to USE this feature: prefix# (that is 99) + ch# (could be anything from 1 to 8) + dialing# will result in this call forwarded to FXO port (ch#) immediately. |
Dial Plan | The Dial Plan feature implemented is applicable for VOIP to PSTN calls only. You may configure a dial plan based on the following grammar:
x – any digit from 0-9; xx+ – at least 2 digit number; xx. – at least 2 digit number; ^ – exclude; [3-5] – any digit of 3, 4, or 5; [147] – any digit 1, 4, or 7; <2=011> – replace digit 2 with 011 when dialing WARNING – illegal input will fall back to default
Example 1: {[369]11 | 1617xxxxxxx} – Allow 311, 611, 911, and any 10 digit numbers of leading digits 1617.
Example 2: {^1900x+ | <=1617>xxxxxxx} – Block any number of leading digits 1900 and add prefix 1617 for any dialed 7 digit numbers.
Example 3: {1xxx[2-9]xxxxxx | <2=011>x+} – Allow any length of number with leading digit 2 and 10 digit-numbers of leading digit 1 and leading exchange number between 2 and 9; If leading digit is 2, replace leading digit 2 with 011 before dialing Example 4: { [x#]+ | [x*]+ } – Allow any length of number with leading * or # in number to dial.
Default: PSTN Outgoing – {x+} Note: If you do not plan to use this feature set to default {x+} |
Hookflash Duration (X10ms) | Default 600ms. This value can accept any value in the 100-2000ms range. |
Use DTMF Parameter from RFC2833 or SIP Info | Default Yes, No means to use DTMF parameter settings according to DTMF Digit Length, DTMF Digit Volume and DTMF Dial Pause. |
DTMF Digit Length | Default value is 100ms. Please note that the value will be multiplied by 10ms |
DTMF Digit Volume | Default value is -11dB. |
DTMF Dial Pause | Default value is 100ms. Please note that the value will be multiplied by 10ms. |
Check Device Status
You may access the Device Status page which provides details of the GXW product. The Device Status page terms are defined in Status Page Definitions.
Saving the Configuration Changes
Once a change is made, press the “Update” button in the Configuration Menu. The GXW410x will display the following screen to confirm that the changes have been saved. To activate changes, reboot or power cycle the GXW410x after all changes are made.
Rebooting from Remote
The administrator can remotely reboot the unit by pressing the “Reboot” button at the bottom of the configuration menu. The following screen will indicate that rebooting is underway.
The user can re-login to the unit after waiting for about 30 seconds.
Firmware Upgrade
Software upgrade can be done via either TFTP or HTTP. The corresponding configuration settings are in the ADVANCED SETTINGS configuration page.
Firmware Upgrade through TFTP/HTTP/HTTPS
To upgrade via TFTP or HTTP/HTTPS, the “Firmware Upgrade and Provisioning upgrade via” field needs to be set to TFTP HTTP or HTTPS, respectively. “Firmware Server Path” needs to be set to a valid URL of a TFTP or HTTP server, server name can be in either FQDN or IP address format. Here are examples of some valid URL.
e.g. firmware.mycompany.com:6688/Grandstream/1.4.1.5
e.g. firmware.grandstream.com
NOTES:
- Firmware upgrade server in IP address format can be configured via IVR. Please refer to the CONFIGURATION GUIDE section for instructions. If the server is in FQDN format, it must be set via the web configuration interface.
- Grandstream recommends end-user use the Grandstream HTTP server. Its address can be found at https://www.grandstream.com/support/firmware. Currently the HTTP firmware server address is firmware.grandstream.com. For large companies, we recommend to maintain their own TFTP/ HTTP/HTTPS server for upgrade and provisioning procedures.
- Once a “Firmware Server Path” is set, user needs to update the settings and reboot the device. If the configured firmware server is found and a new code image is available, the GXW410x will attempt to retrieve the new image files by downloading them into the GXW410x ’s SRAM. During this stage, the GXW410x’s LEDs will blink until the checking/downloading process is completed. Upon verification of checksum, the new code image will then be saved into the Flash. If TFTP/HTTP/HTTPS fails for any reason (e.g. TFTP/HTTP/HTTPS server is not responding, there are no code image files available for upgrade, or checksum test fails, etc), the GXW410x will stop the TFTP/HTTP/HTTPS process and simply boot using the existing code image in the flash.
- Firmware upgrade may take as long as 15 to 30 minutes over Internet, or just 5 minutes if it is performed on a LAN. It is recommended to conduct firmware upgrade in a controlled LAN environment if possible.
- Grandstream’s latest firmware is available https://www.grandstream.com/support/firmware.
Overseas users are strongly recommended to download the binary files and upgrade firmware locally in a controlled LAN environment.
- Alternatively, user can download a free TFTP or HTTP server and conduct local firmware upgrade. A free windows version TFTP server is available for download from http://www.solarwinds.com/register/?Program=52&c=70150000000CcH2. Our latest official release can be downloaded from http://www.grandstream.com/firmware.htm.
Instructions for local firmware upgrade:
- Unzip the file and put all of them under the root directory of the TFTP server.
- Put the PC running the TFTP server and the GXW410x device in the same LAN segment.
- Please go to File -> Configure -> Security to change the TFTP server’s default setting from “Receive Only” to “Transmit Only” for the firmware upgrade.
- Start the TFTP server, in the phone’s web configuration page
- Configure the Firmware Server Path with the IP address of the PC
- Update the change and reboot the unit
End users can also choose to download the free HTTP server from http://httpd.apache.org/ or use Microsoft IIS web server.
Configuration File Download
Grandstream SIP Device can be configured via Web Interface as well as via Configuration File through TFTP or HTTP/HTTPS. “Config Server Path” is the TFTP or HTTP/HTTPS server path for configuration file. It needs to be set to a valid URL, either in FQDN or IP address format. The “Config Server Path” can be same or different from the “Firmware Server Path”.
A configuration parameter is associated with each particular field in the web configuration page. A parameter consists of a Capital letter P and 2 to 3 (Could be extended to 4 in the future) digit numeric numbers. i.e., P2 is associated with “Admin Password” in the ADVANCED SETTINGS page. For a detailed parameter list, please refer to the corresponding firmware release configuration template.
When Grandstream Device boots up or reboots, it will issue request for configuration file named “cfgxxxxxxxxxxxx”, where “xxxxxxxxxxxx” is the LAN MAC address of the device, i.e., “cfg000b820102ab”. The configuration file name should be in lower cases.
Firmware and Configuration File Prefix and Postfix
Firmware Prefix and Postfix allows device to download the firmware name with the matching Prefix and Postfix. This makes it the possible to store ALL of the firmware with different version in one single directory. Similarly, Config File Prefix and Postfix allows device to download the configuration file with the matching Prefix and Postfix. Thus multiple configuration files for the same device can be stored in one directory.
In addition, when the field “Check New Firmware only when F/W pre/suffix changes” is set to “Yes”, the device will only issue firmware upgrade request if there are changes in the firmware Prefix or Postfix.
Managing Firmware and Configuration File Download
When “Automatic Upgrade” is set “Yes, every” the auto check will be done in the minute specified in this field. If set to “daily at hour (0-23)”, Service Provider can use P193 (Auto Check Interval) to have the devices do a daily check at the hour set in this field with either Firmware Server or Config Server. If set to “weekly on day (0-6)” the auto check will be done in the day specified in this field. This allows the device periodically check if there are any new changes need to be taken on a scheduled time. By defining different intervals in P193 for different devices, Server Provider can spread the Firmware or Configuration File download in minutes to reduce the Firmware or Provisioning Server load at any given time.

Restore Factory Default Setting
Factory Reset
Reset Button
Reset default factory settings following these four (4) steps:
- Unplug the Ethernet cable.
- Locate a needle-sized hole on the back panel of the gateway unit next to the power connection.
- Insert a pin in this hole, and press for about 7 seconds.
- Take out the pin. All unit settings are restored to factory settings.
Examples of GXW410x Configurations
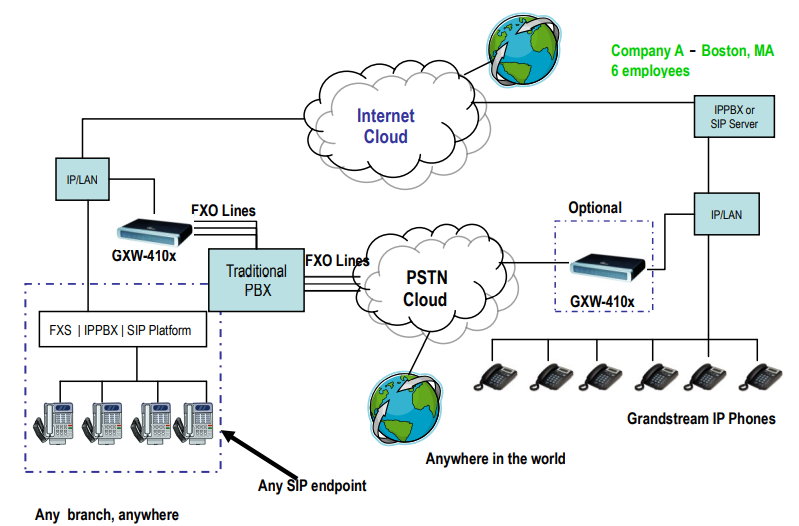
Application 1: GXW connected with an IP-PBX or SIP Server
Scenario: A business with a traditional phone system (with or without broadband access) and an IP PBX or SIP Servers connecting to an Internet Telephone Service Provider (ITSP).
Application 2: Use GXW to Extend a Traditional PBX Scenario
Scenario: a small business with traditional analog PBX lines and broadband access who want to extend their traditional PBX to virtually anywhere in the world, using the internet.
Application 3: Using a GXW for Pure IP- IP Communication Configuration
Scenario Four: The GXW410x offers an IP to IP pure IP Communications System configuration, where all locations use IP phones.