
Overview
This document introduces how to deploy Wave Desktop clients in batches for enterprise employees’ computers and configure parameters to help employees to quickly use the Wave Desktop clients throughout the enterprise.
This document uses the Microsoft Intune tool as an example to describe how to deploy Wave Desktop clients in batches on Windows and MAC OS.
Prerequisites
The administrator needs to register a Microsoft Intune account, and the computers under the enterprise have registered on the Microsoft Intune platform.
Microsoft Intune is a Microsoft tool for managing devices and deploying Windows/MAC OS applications in batches. For more details, please refer to Microsoft official website.
Batch Deploy Wave on Windows
Step 1: Deploy Wave Desktop Clients in Batches
- Log in to the Endpoint Manager Admin Center of Intune.
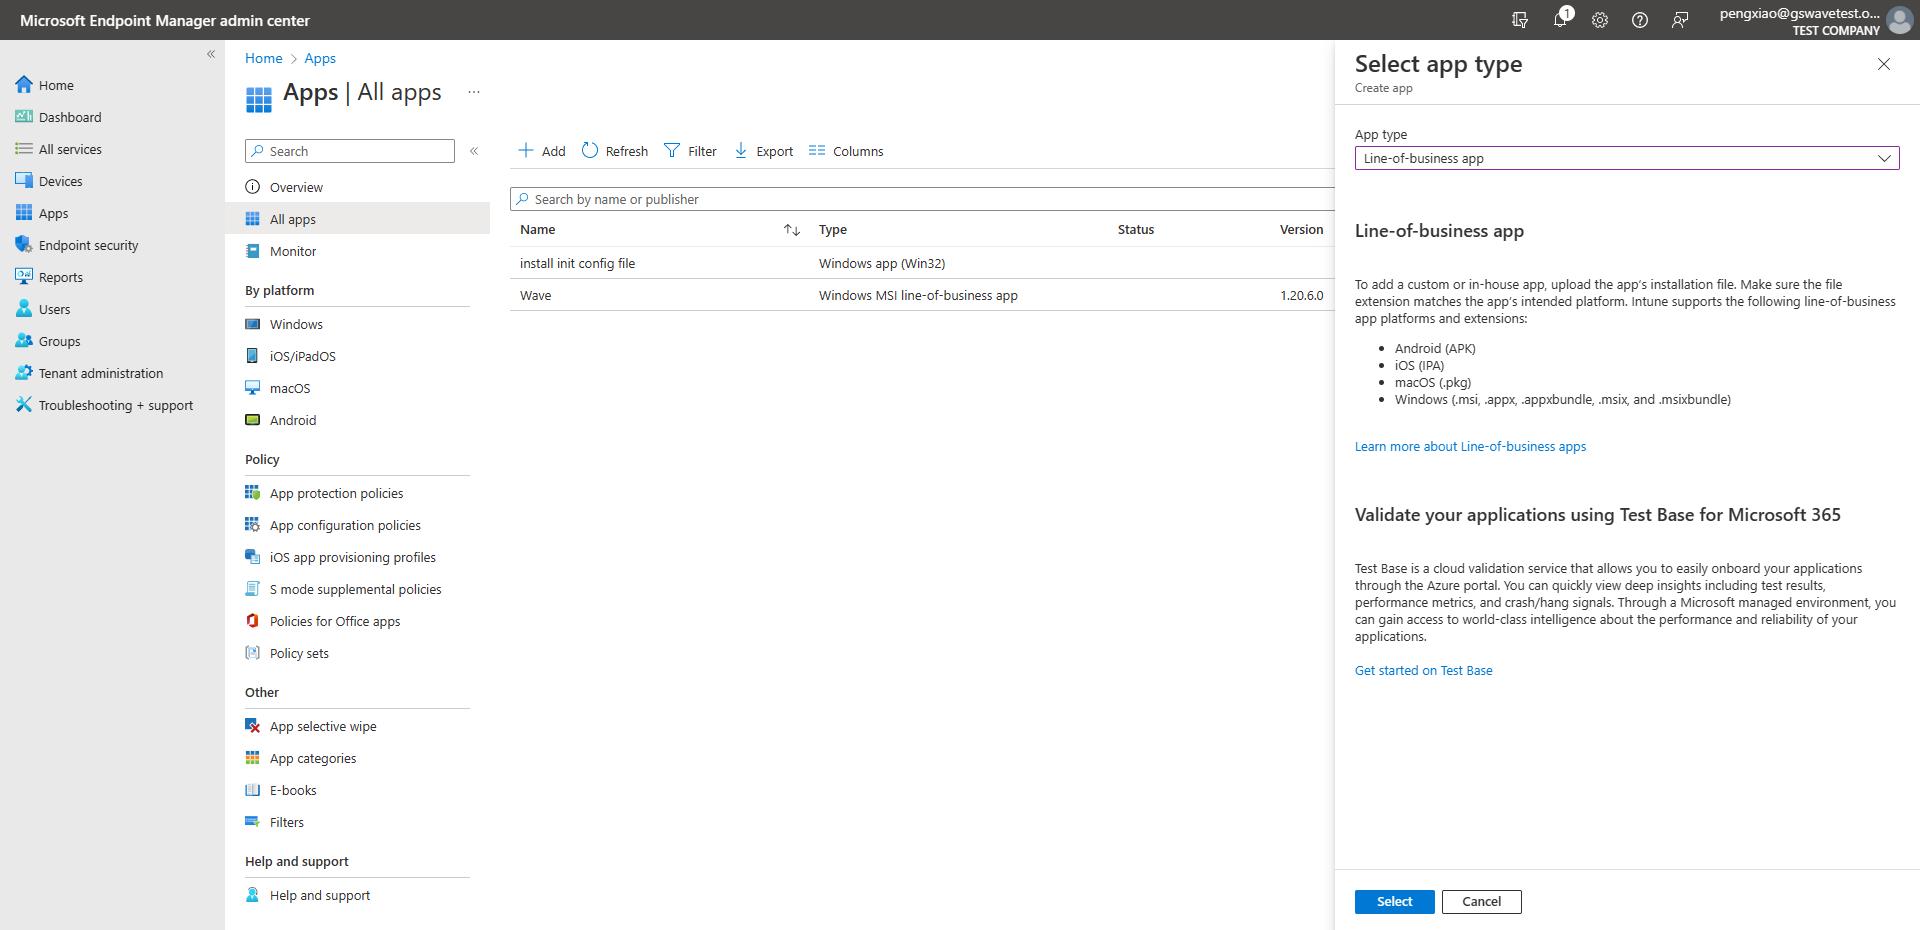
- Click the “Add” option on the “Apps” -> “All apps” page to add the application, select the option “Line-of-business app” for the “App type”, and click the “Select” option as the screenshot shows below:
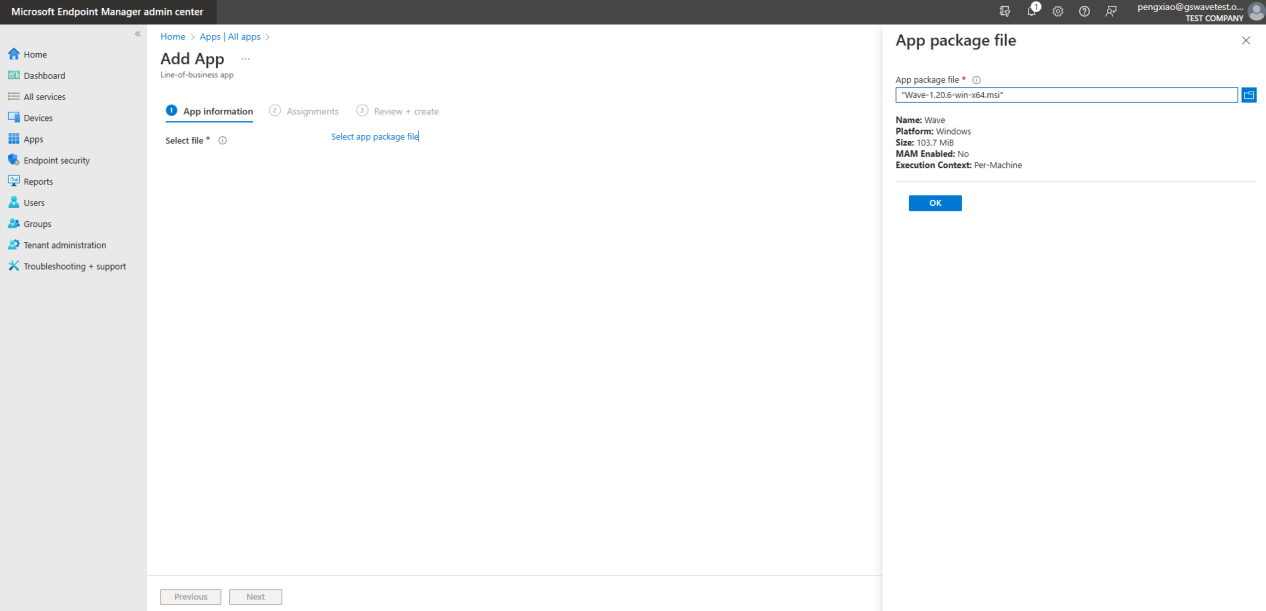
3. Upload the Wave Desktop MSI installation package and click the “OK” option:
4. Configure the relevant parameters of the App according to your requirements, and click the “Next” option:

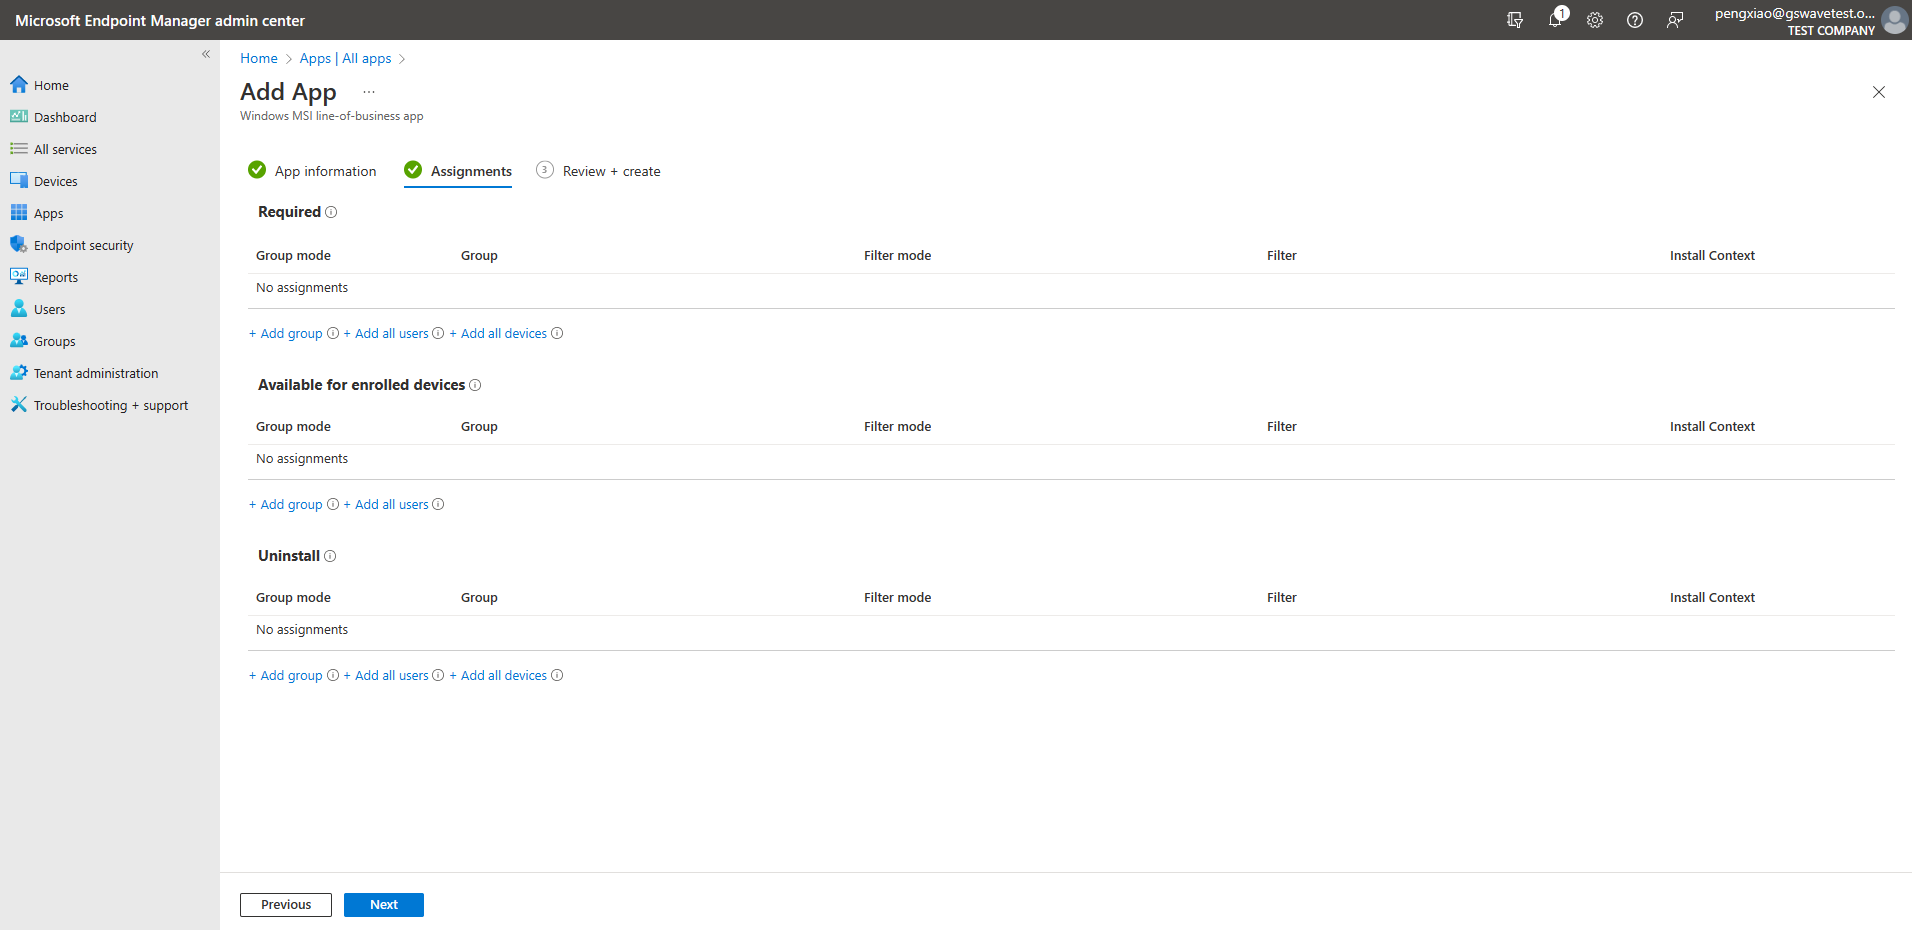
5. Select users, groups, or devices that you want to install the Wave Desktop client and click the “Next” option:
6. After the above operations are complete, the Wave client will be automatically installed on the user’s computer at the next check-in.
Step 2: (Optional) Batch Deploy Wave Initial Configuration Files
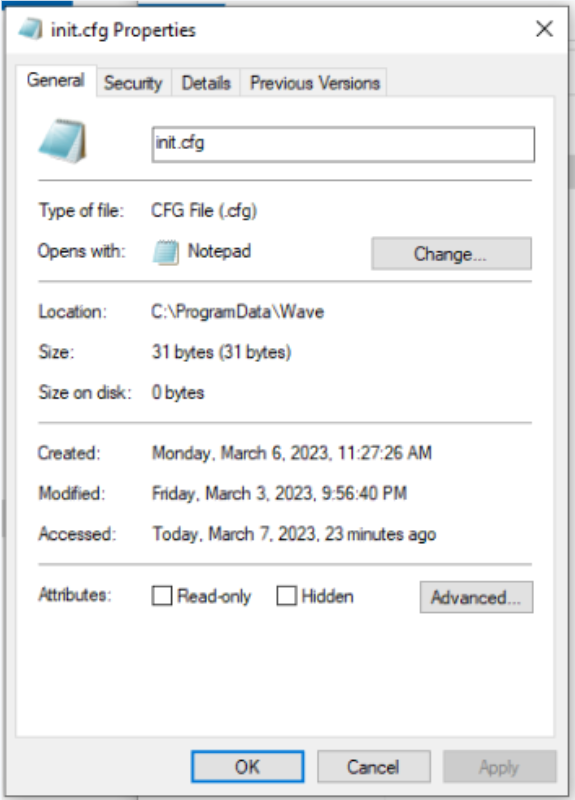
When Wave Desktop is initialized, it will read the configuration file in the specific directory (%appdata%/Wave/). You only need to edit the configuration file and copy it to the corresponding user directory before initialization.
- Create the Wave initialization configuration file “init.cfg” and edit it in the following format (you only need to copy the parameters that you need to configure):
init.cfg:
#Server address
ServerAddress=https://xxxxx.a.gdms.cloud

# The default language setting is English. The following languages are supported.
# Prompt: The explanation of the language is in the brackets.
# en-US(English), zh-CN(简体中文), el-GR(Ελληνικά), it-IL(Italiano),
# es-LA(Español (América Latina)), es-ES(Español (Europe)), ar-EG(العربية), fr-FR(Français),
# ru-RU(Pусский), de-DE(Deutsch), pl-PL(Polskie), pt-PT(Português),
# vi-VN(Tiếng Việt), th-TH(ภาษาไทย), cs-CZ(Čeština), tr-TR(Türkçe),
# he-IL(עִברִית)
language=en-US

# 0: No  1: Yes
isLaunchOnSystemStartup=1

# 0: No  1: Yes
isAutoAnswer=0

# 0: disable  1: enable
enableMessageNotificationSound=1

# 0: disable  1: enable
enableIncomingCallAndMeetingReminderSound=1

# 12: 12 Hour Clock  	24: 24 Hour Clock
timeFormat=24

# YYYY/MM/DD, DD/MM/YYYY or MM/DD/YYYY
dateFormat=MM/DD/YYYY

# Pre-install Add-in and Related Parameters
#preInstallPlugins=[{"Google Drive": {}},{"IPVideotalk":{"account":"xxxx","password":"xxx"}}]

# Call Ringtone , such as "C:\Users\AppData\Wave\CustomRinging\helloWorld.wav"
callRingtonePath=C:\Users\AppData\Wave\CustomRinging\helloWorld.wav

#0: disable  1: enable
enableUpgrade=1
2. Create PowerShell scripts “install.ps1” and ”uninstall.ps1” by referring to the following contents:
install.ps1 :
$TargetFolder = "$env:APPDATA\Wave"
$SourceFolder = $PSScriptRoot
$ProgramDataFolder = "$env:ProgramData\Wave"


If (!(Test-Path $TargetFolder)){
    New-Item -Path $TargetFolder -ItemType Directory -Force
}
Copy-Item -Path "$SourceFolder\init.cfg" -Destination $TargetFolder -Recurse -Force -ErrorAction Stop

If (!(Test-Path $ProgramDataFolder)){
    New-Item -Path $ProgramDataFolder -ItemType Directory -Force
}
Copy-Item -Path "$SourceFolder\init.cfg" -Destination $ProgramDataFolder -Recurse -Force -ErrorAction Stop
uninstall.ps1:
$TargetFolder = "$env:APPDATA\Wave"
$ProgramDataFolder = "$env:ProgramData\Wave"

If (Test-Path $TargetFolder){
   Remove-Item -Path "$TargetFolder\init.cfg" -Recurse -Force -ErrorAction Stop
}

If (Test-Path $ProgramDataFolder ){
   Remove-Item -Path "$ProgramDataFolder" -Recurse -Force -ErrorAction Stop
}
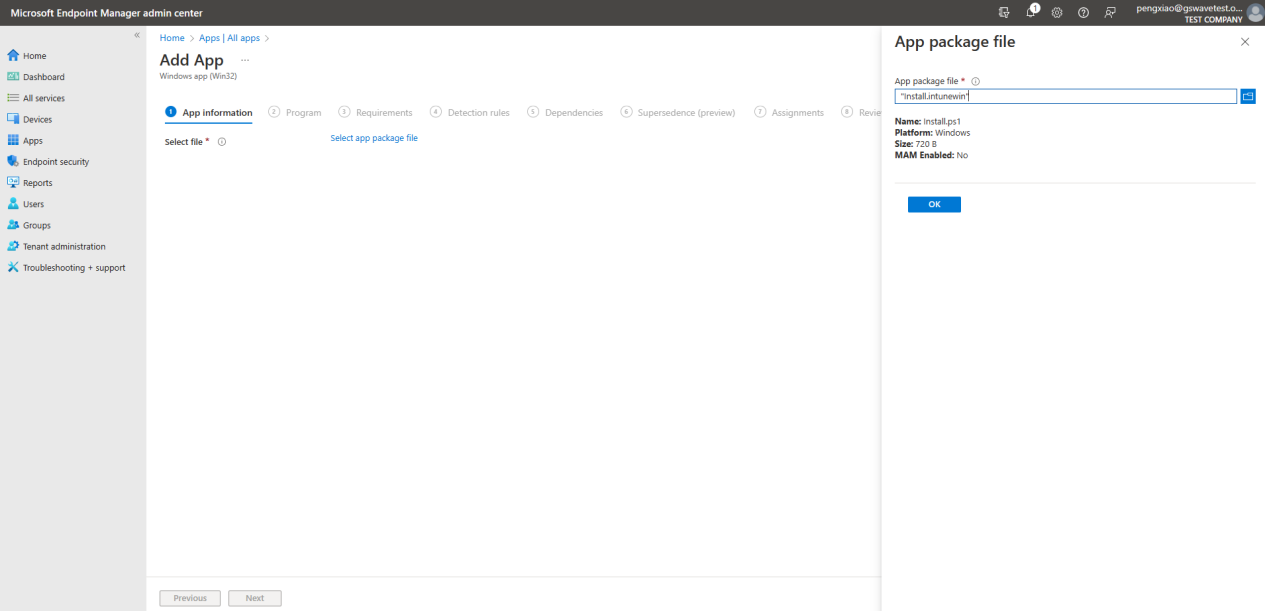
3. Store the three files above (”init.cfg”, “install.ps1”, “uninstall.ps1”) on your computer and use the Microsoft-Win32-Content-Prep-Tool to pack the files to the installation package in .intunewin format.
Official instructions for packaging to .intunewin format
Packing command:
IntuneWinAppUtil.exe -c "C:\Users\xxxxxxxx\Desktop\WaveScript" -s install.ps1 -o "C:\Users\xxxxxxxxx\Desktop" -q
4. Log in to the Endpoint Manager Admin Center of Intune and deploy the Wave initial configuration file as a Win32 APP.
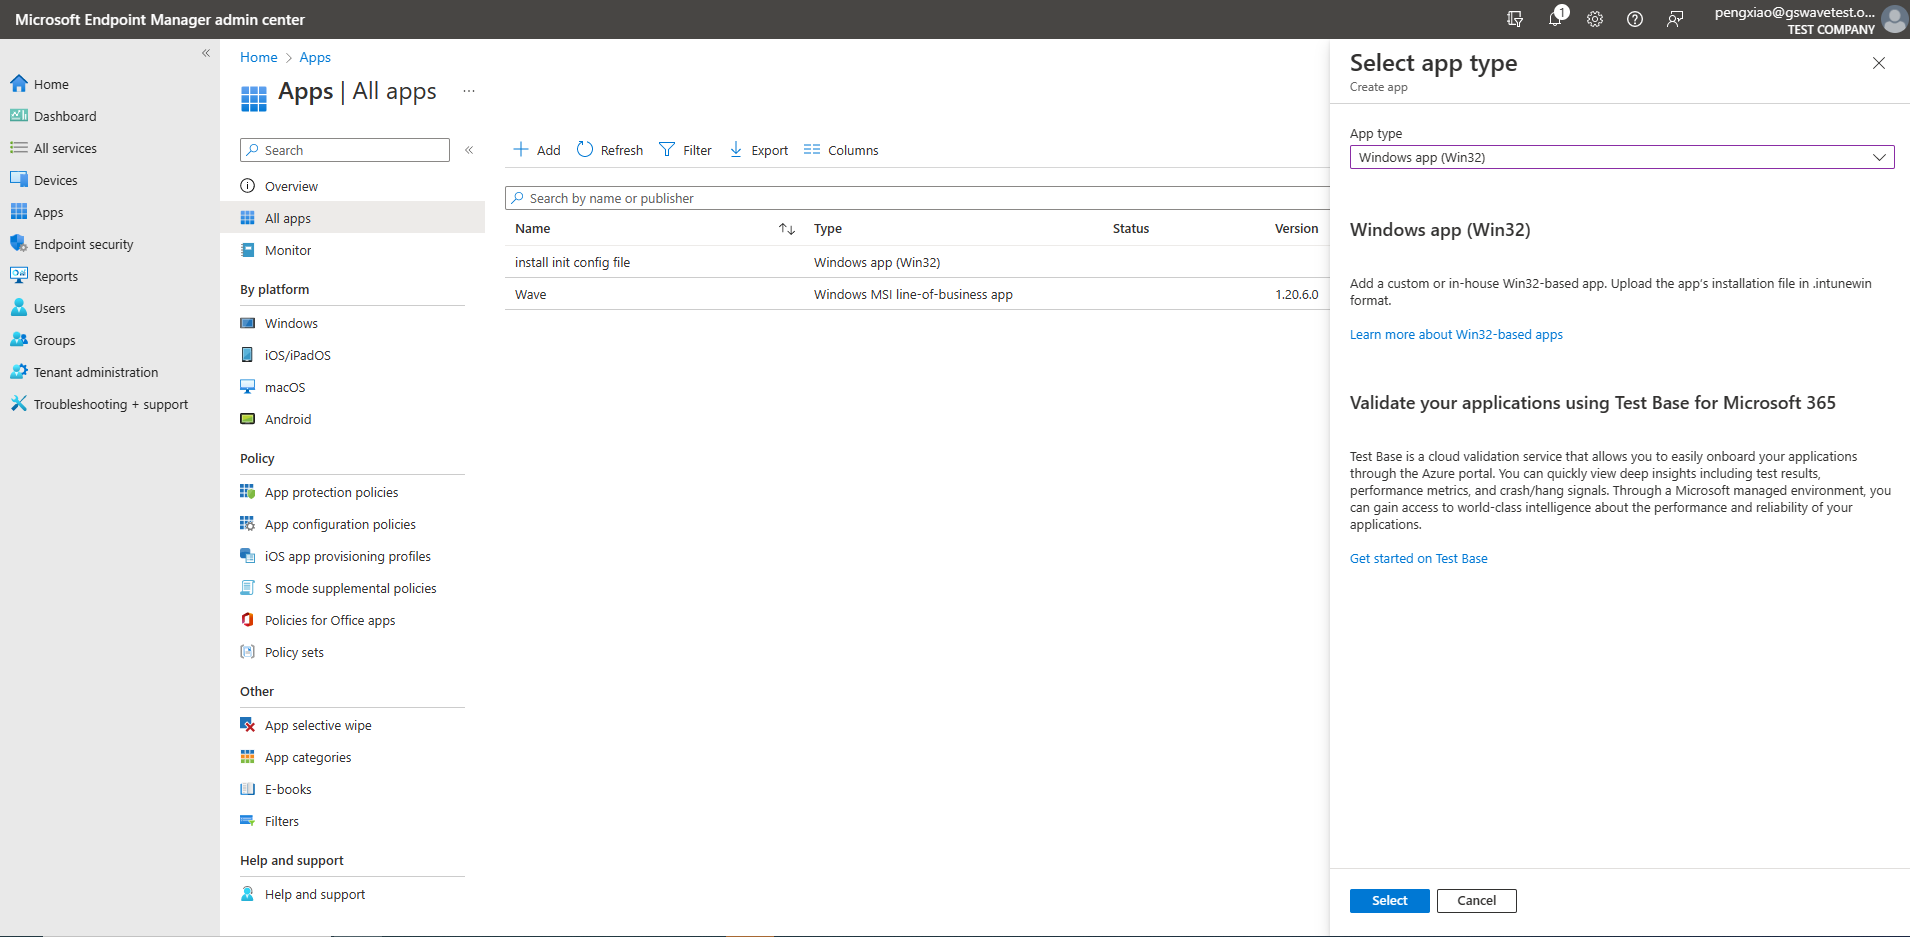
5. Click the “Add” option on the “Apps” -> “All apps” page to add the application, select the option “Windows app(Win32)” for the “App type”, and click the “Select” option as the screenshot shows below:
6. Upload the packaged Wave configuration and installation package (in .intunewin format) and click the “OK” option:
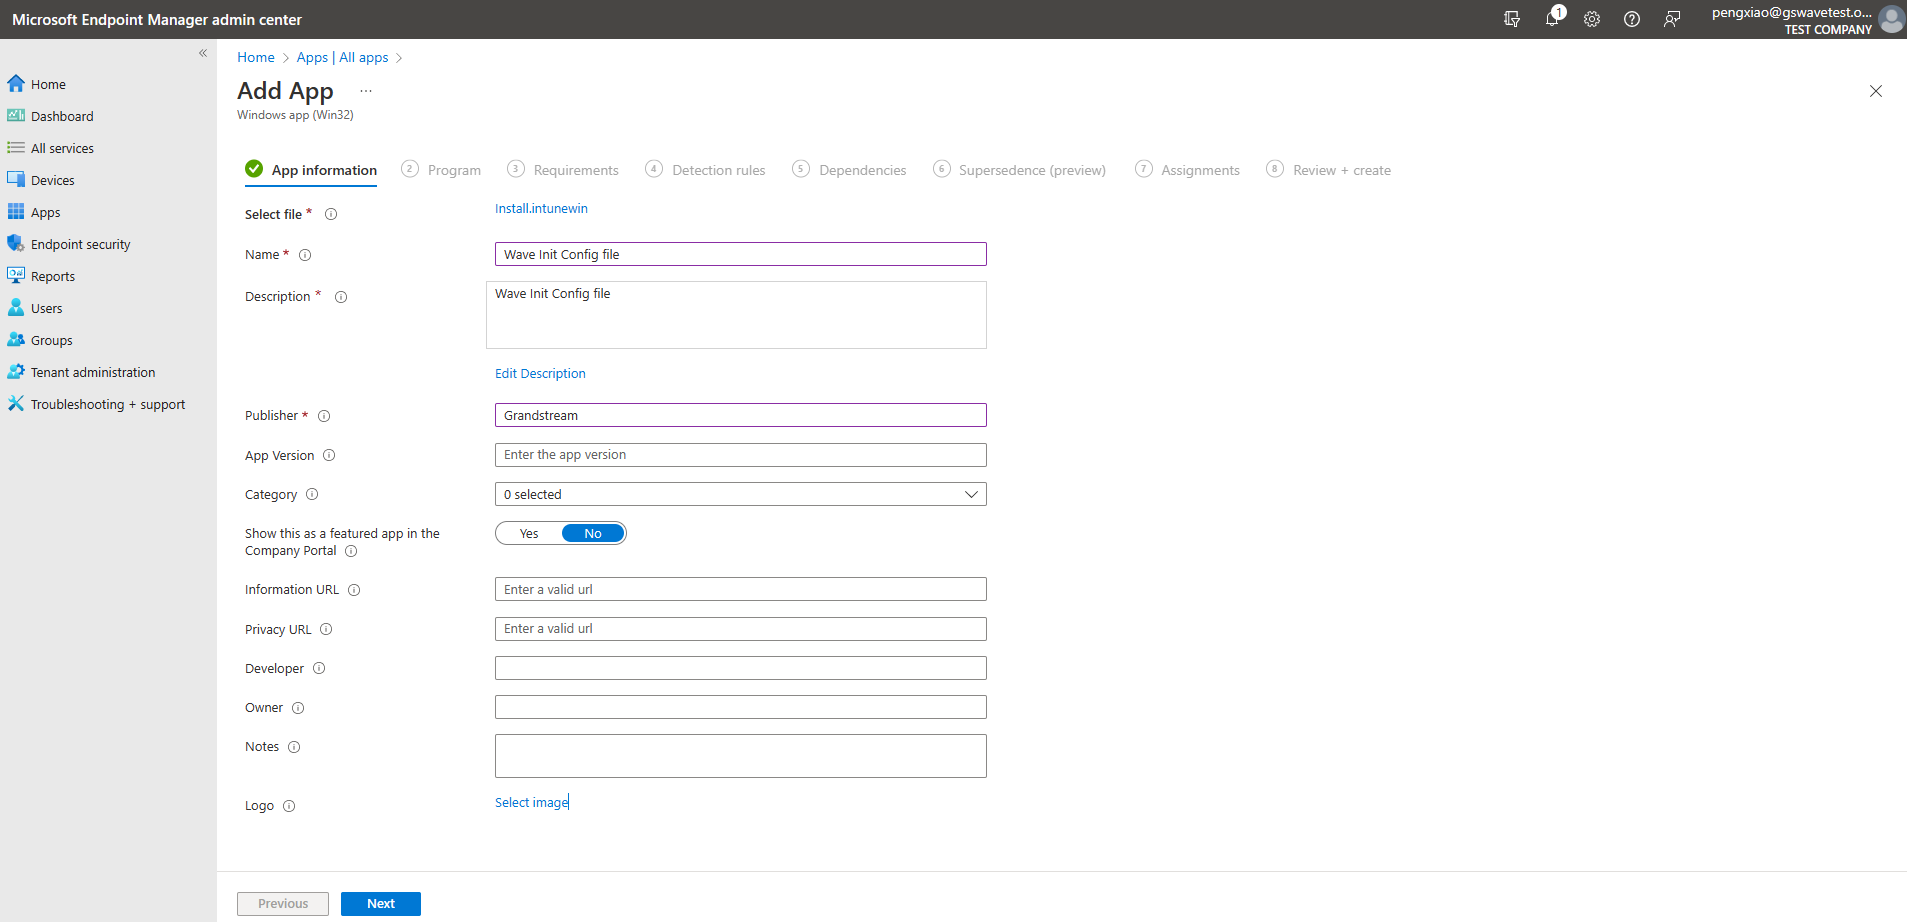
7. Configure the relevant parameters of the App according to your requirements, and click the “Next” option:
8. Configure the install and uninstall commands. Please refer to the commands below. Then, you can click the “Next” button:
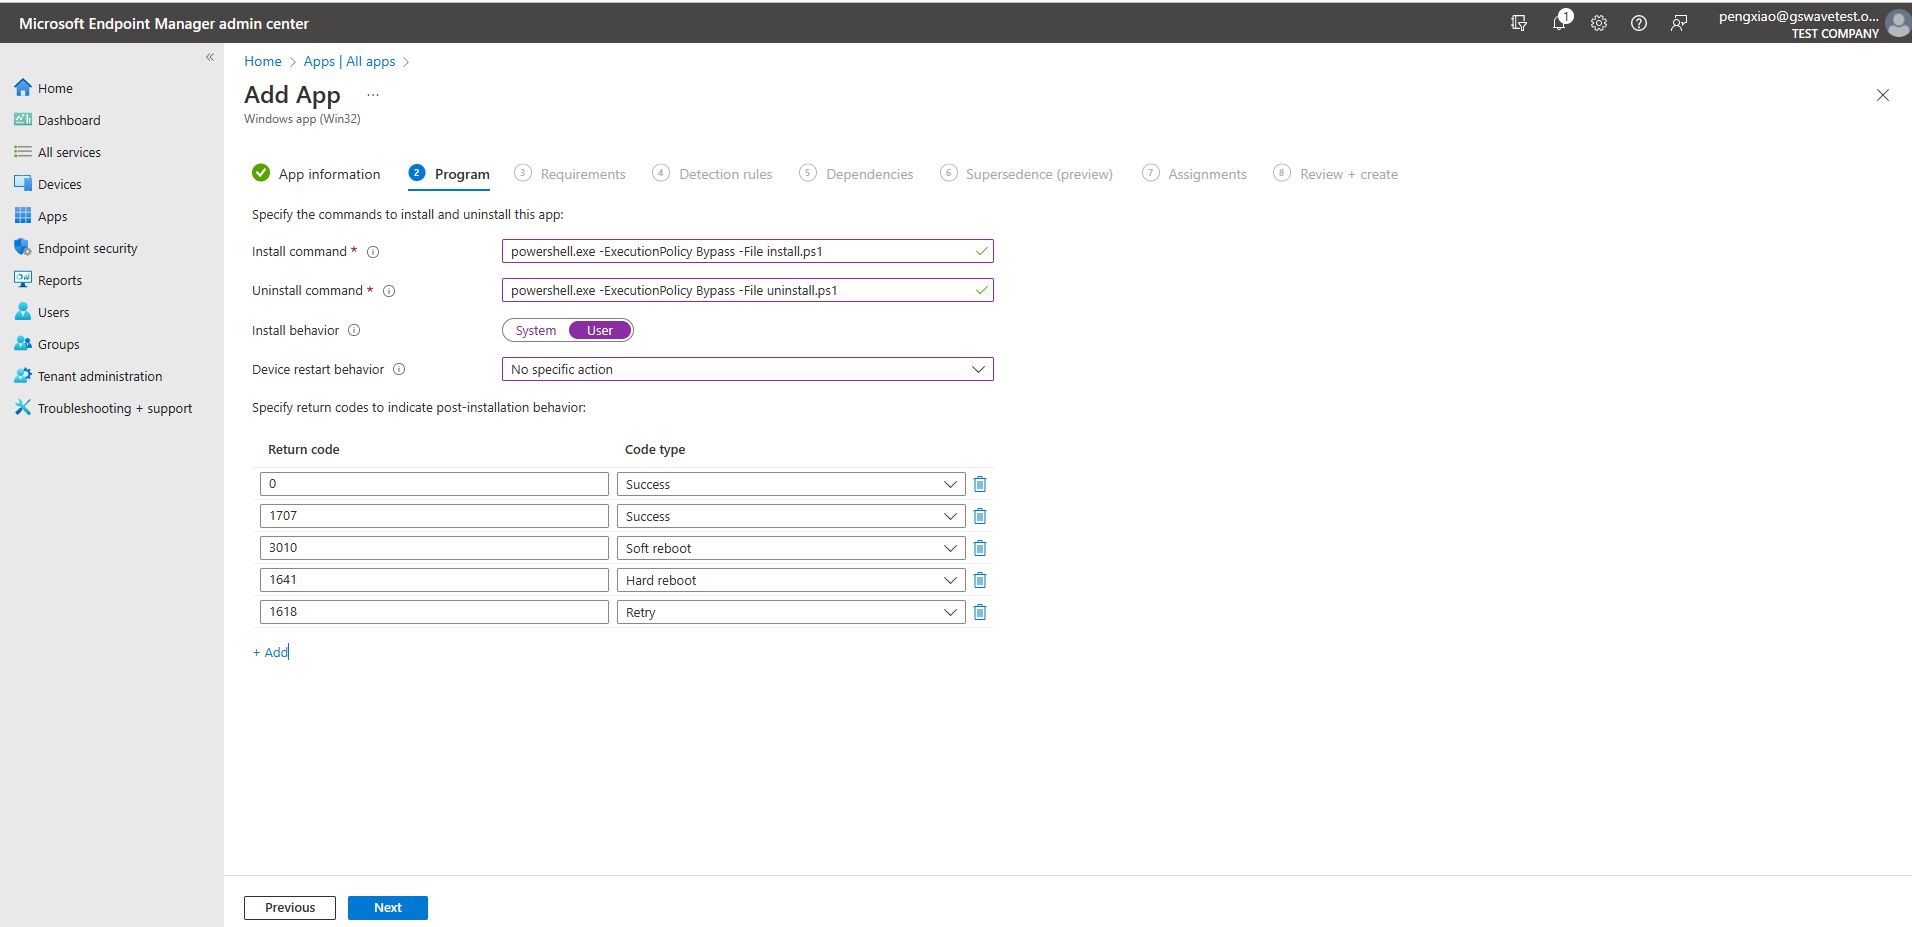
Install command:
powershell.exe -ExecutionPolicy Bypass -File install.ps1
Uninstall command:
powershell.exe -ExecutionPolicy Bypass -File uninstall.ps1
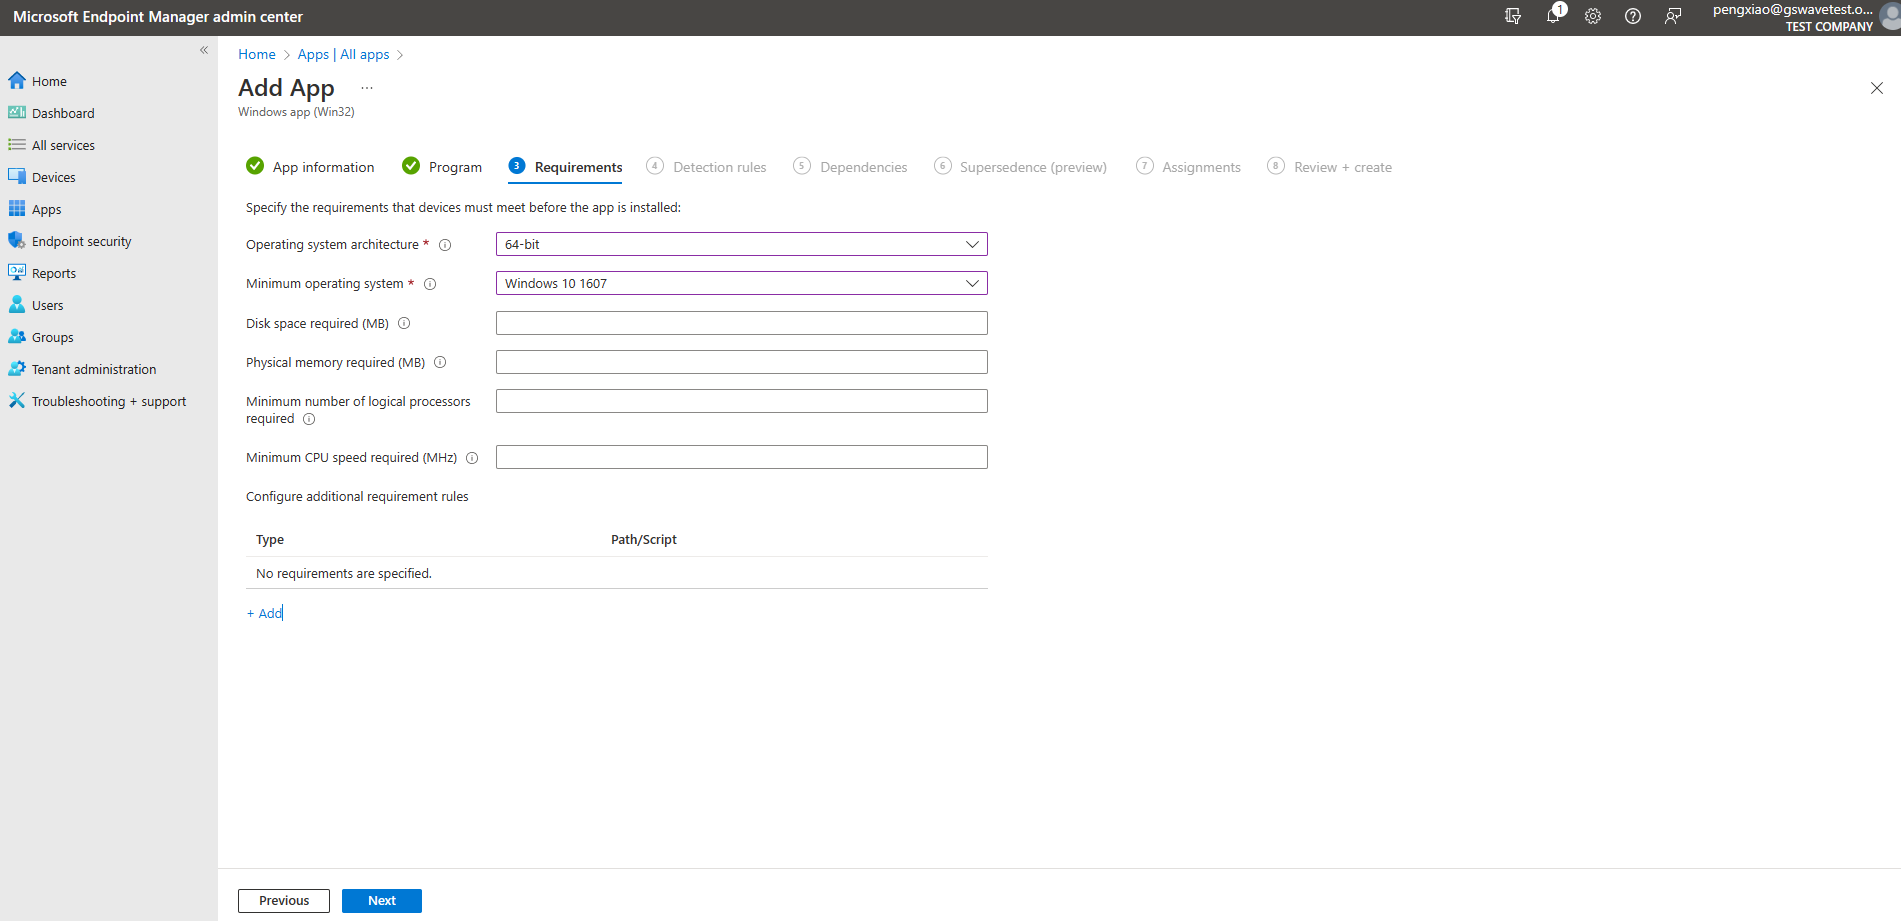
9. Configure the configuration required for APP installation and click the “Next” option as the screenshot shows below:
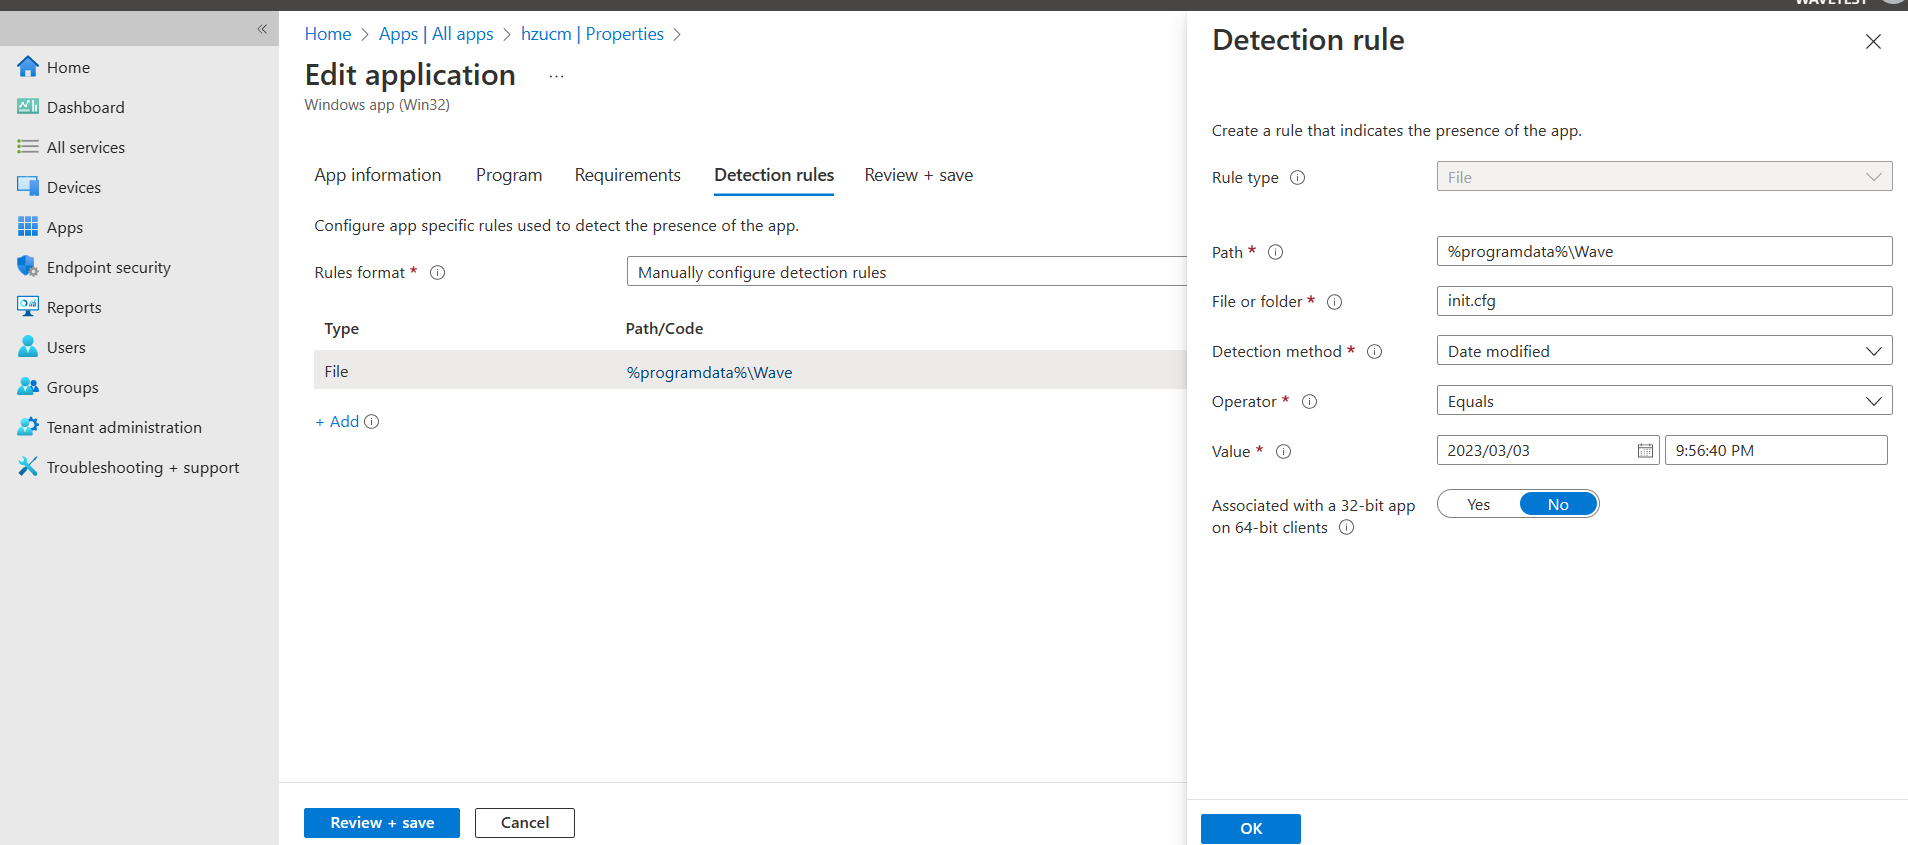
10. Set “Detection rules”, select the option ”Manually configure detection rules“, and click the button “Review+save” as the screenshots show below:
11. After the operations above are complete, the configuration file will be written to the corresponding Wave directory after the employee’s computer check-in. The configuration parameters will take effect after the Wave client starts.
Batch Deploy Wave on MAC
Step 1: Deploy Wave Desktop Client in Batches
- Log in to the Endpoint Manager Admin Center of Intune.
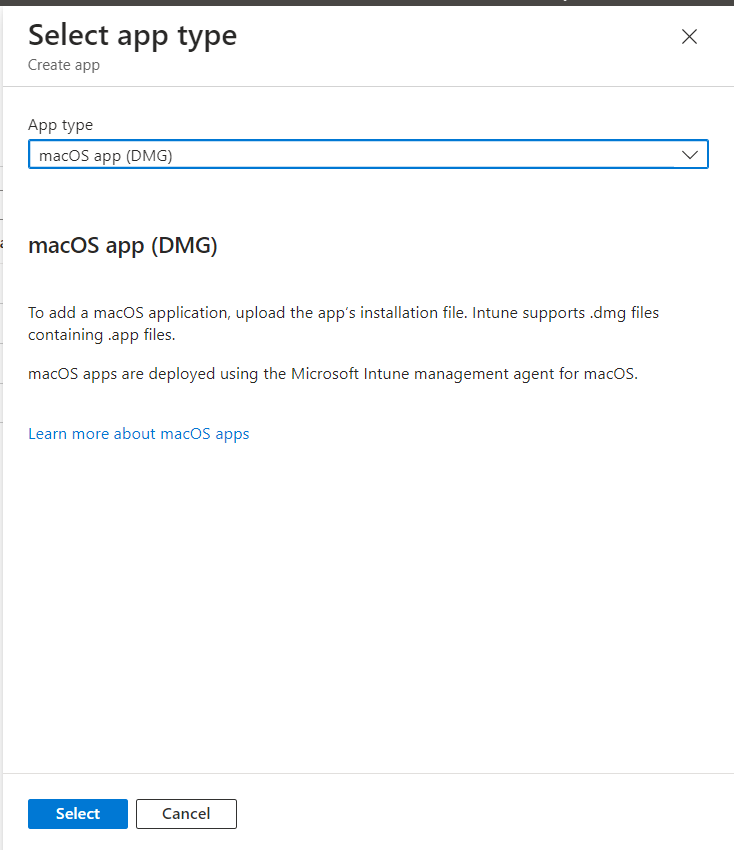
- Click the “Add” option on the “Apps” -> “All apps” page to add the application, select the option “macOS app(DMG)” for the “App type”, and click the “Select” option as the screenshot shows below:
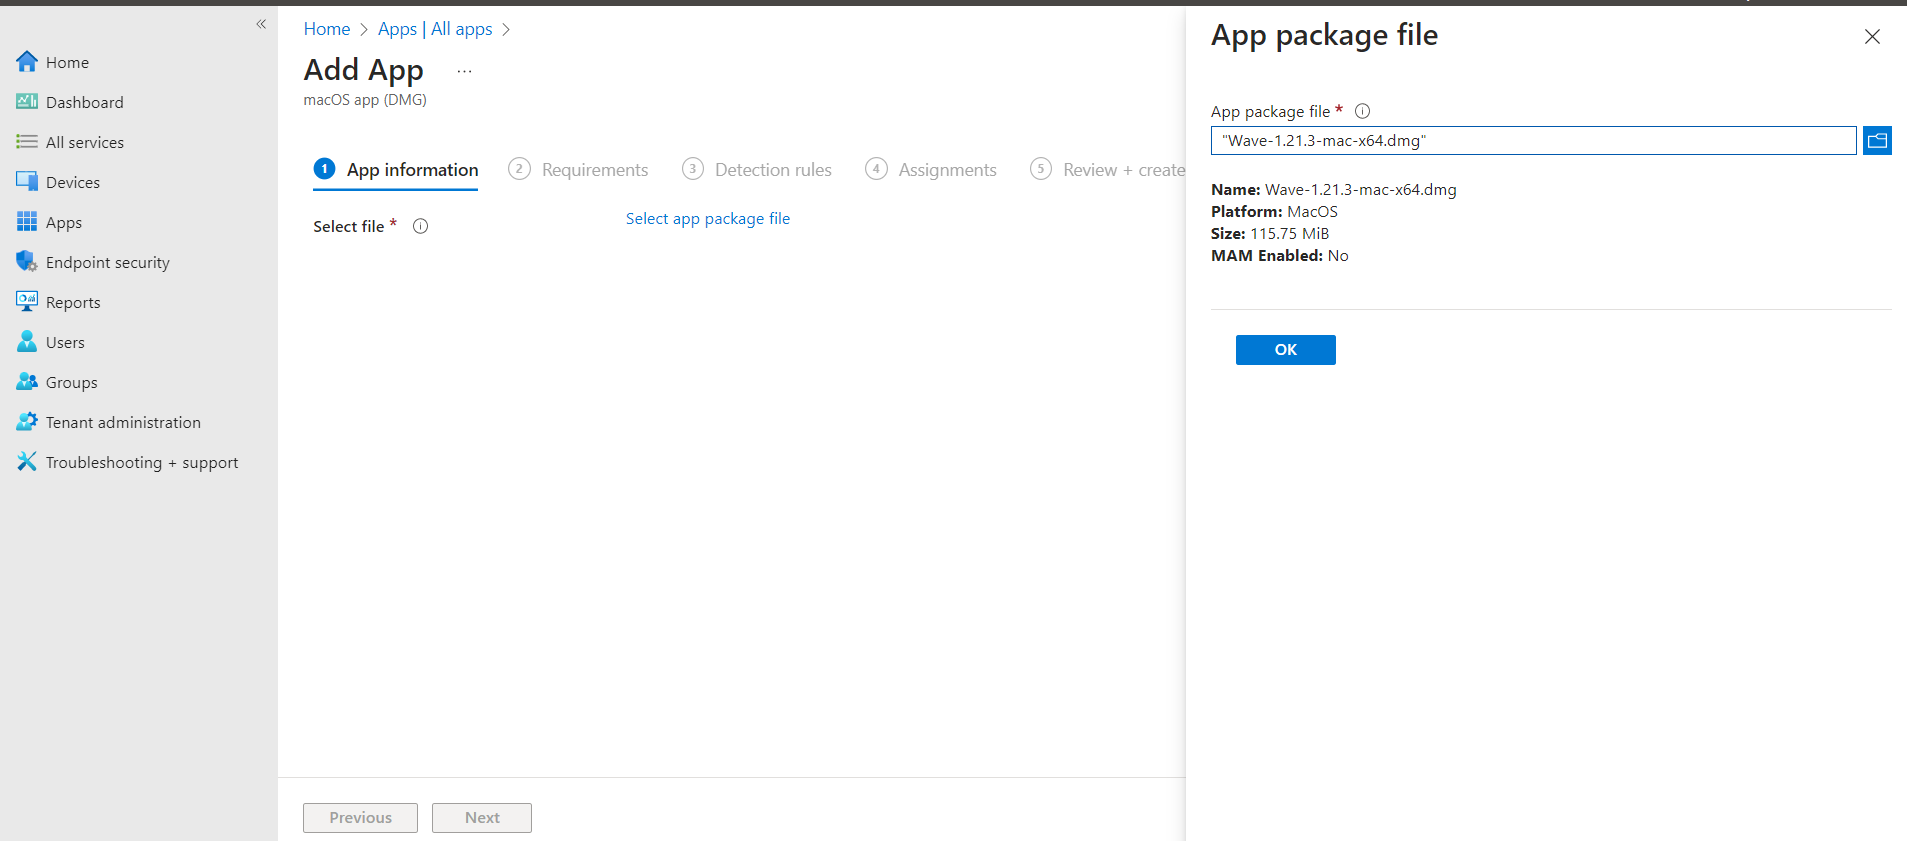
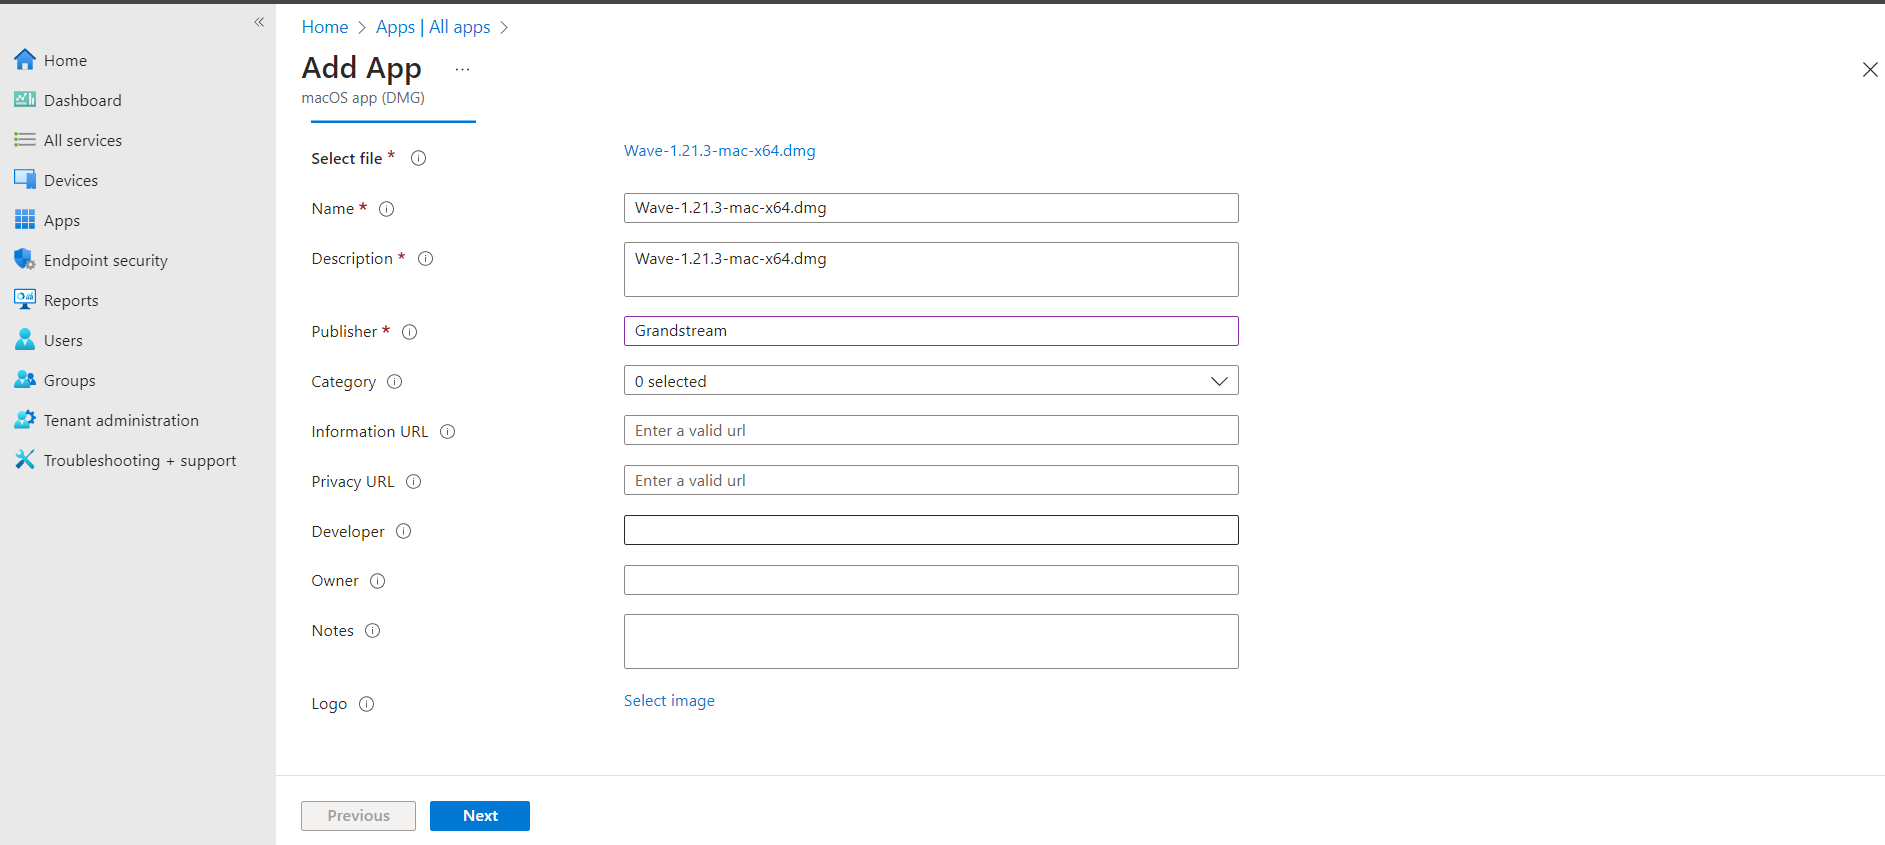
3. Upload the dmg installation package for Wave Desktop client and click the “OK” option:
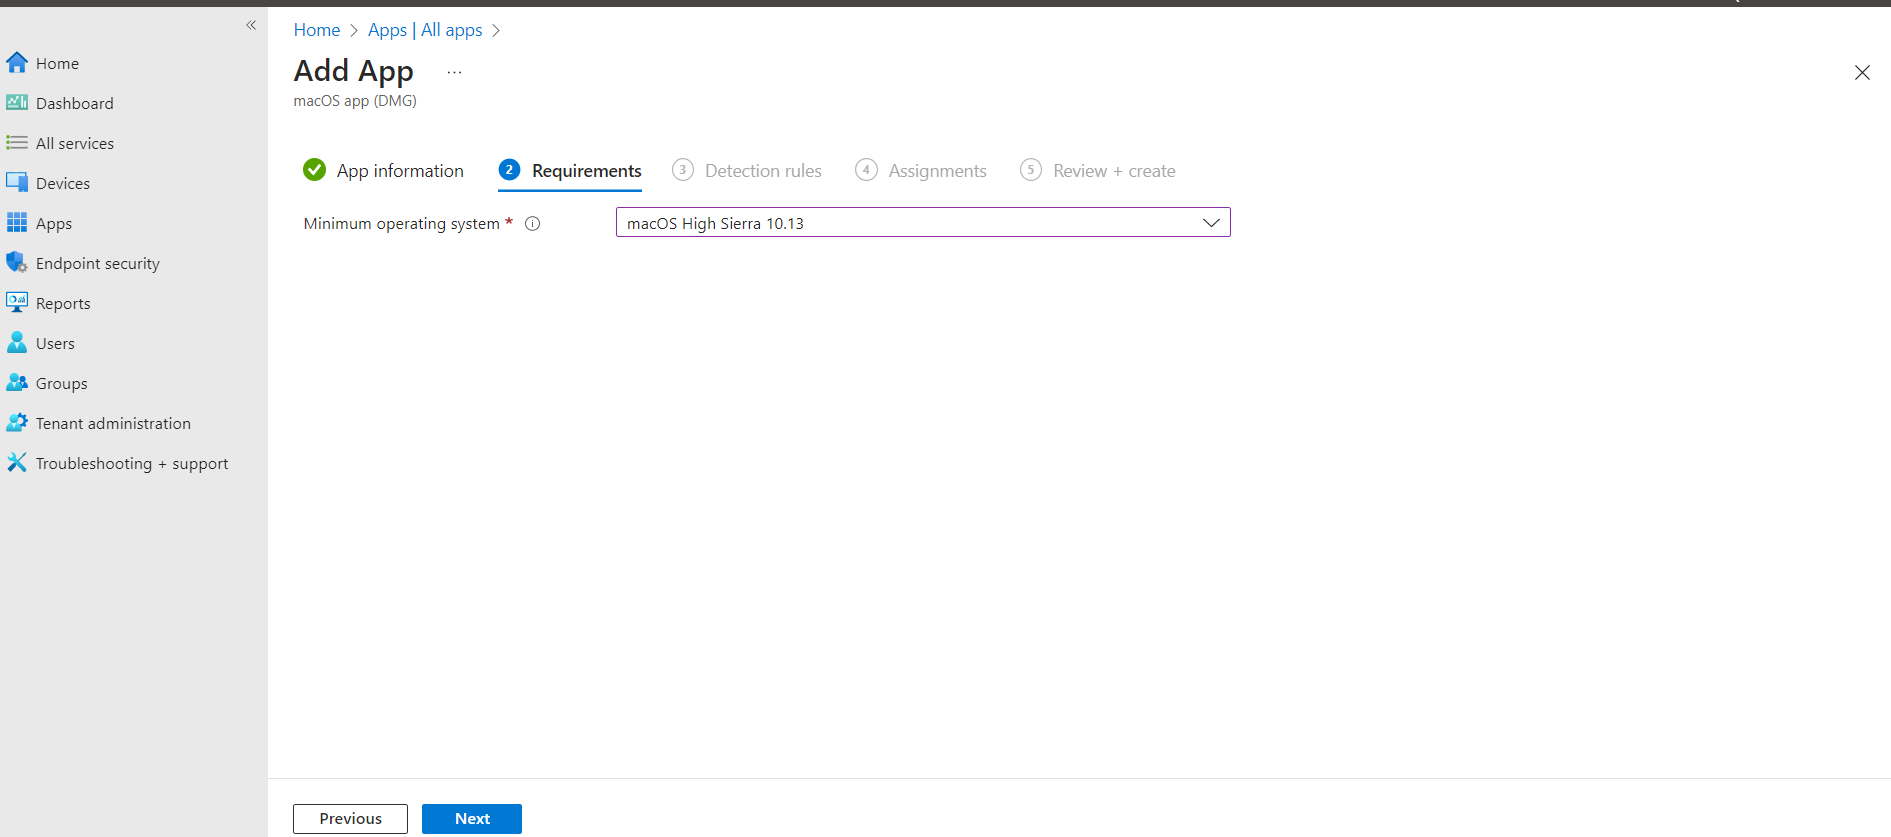
4. Configure the relevant parameters of the App according to your requirements, and click the “Next” option:
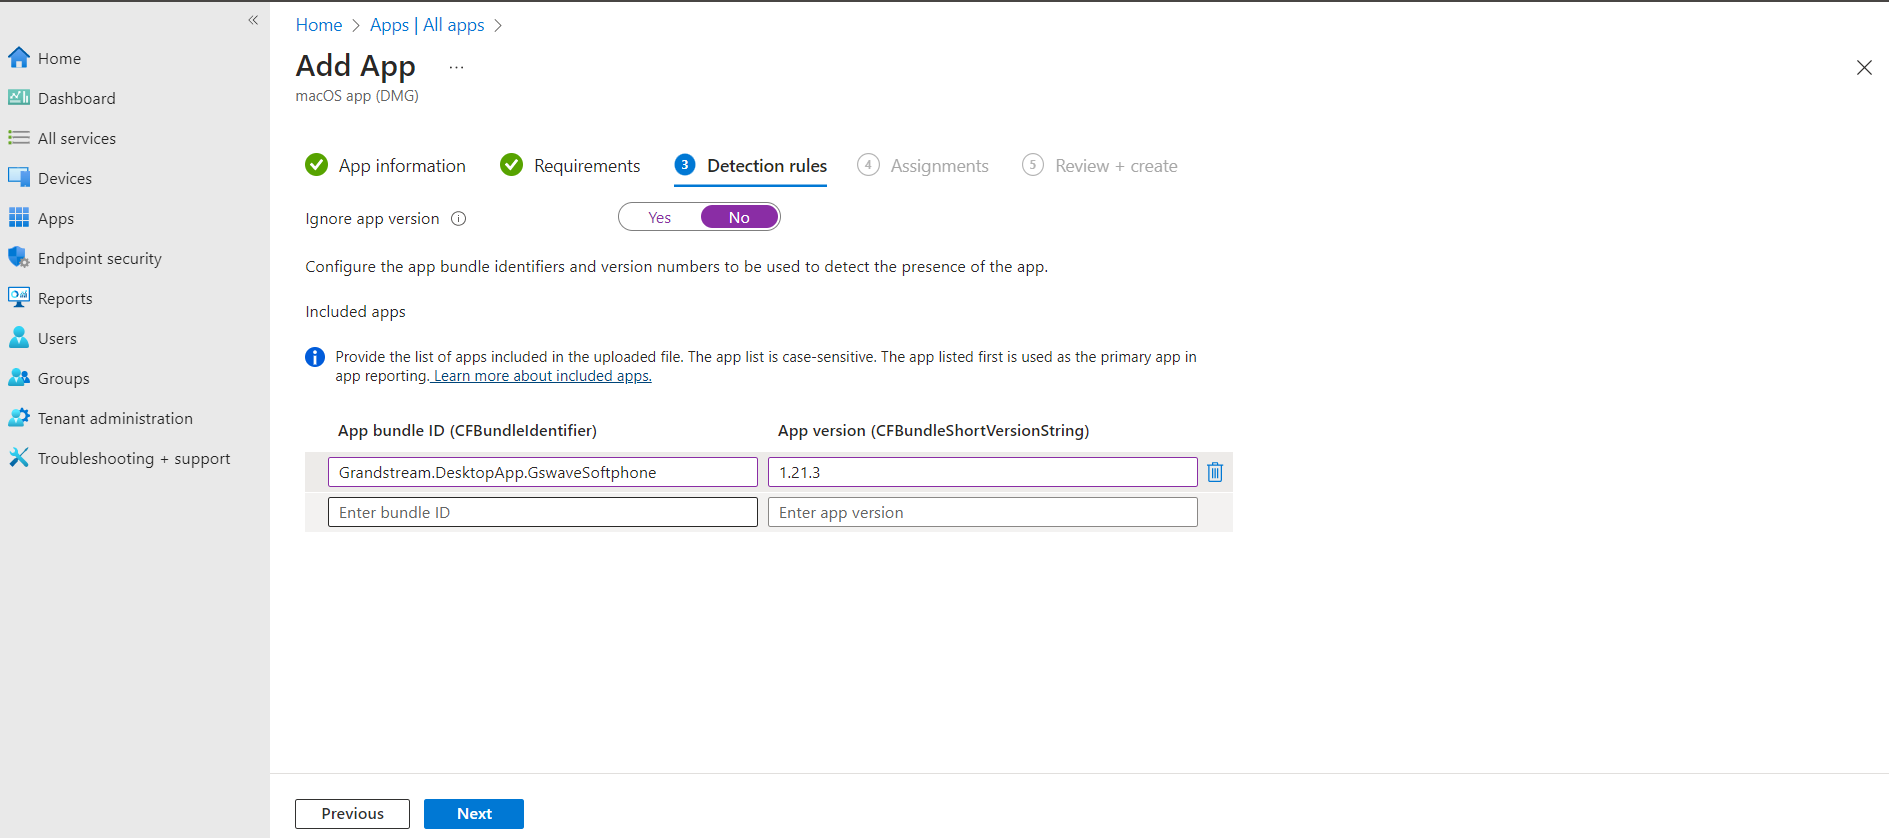
5. Fill in ”Grandstream.DesktopApp.GswaveSoftphone” to ”App bundle ID (CFBundleIdentifier)” field under the tab “Detection rules”, and fill in the Wave client actual version number (e.g. 1.21.3) to ”App Version (CFBundleShortVersionString)” field and click the “Next” option:
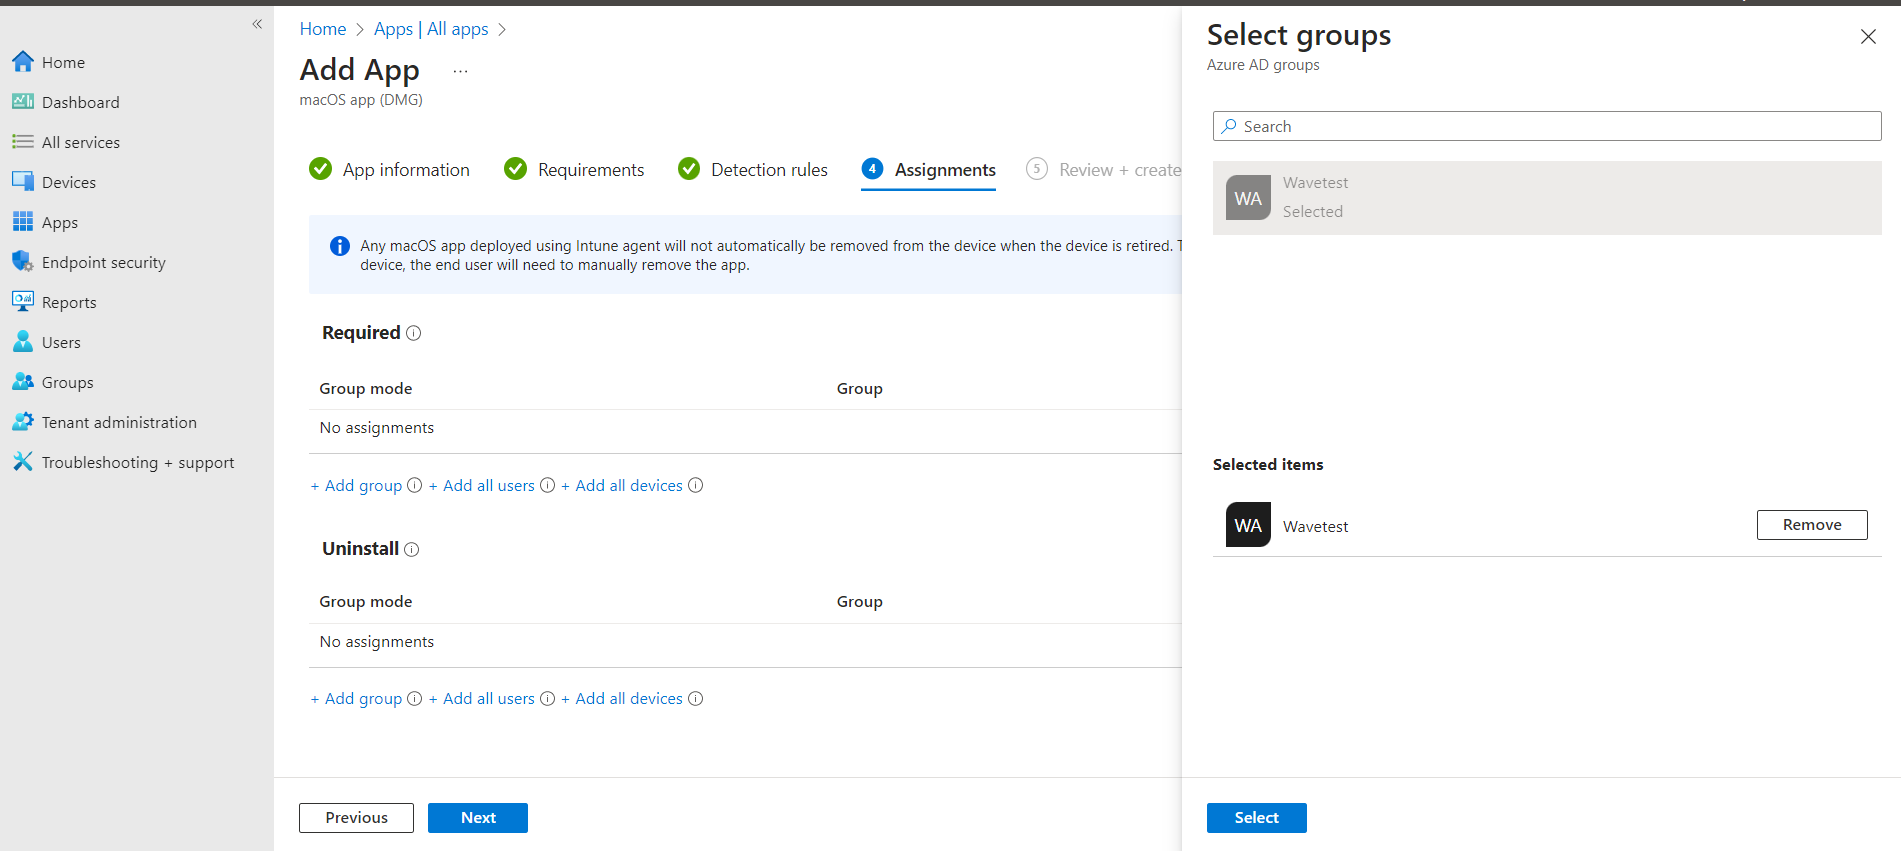
6. Select users, groups, or devices that you want to install the Wave Desktop client and click the “Next” option:
7. After the above operations are complete, the Wave client will be automatically installed on the user’s computer at the next check-in.
Step 2: (Optional) Batch Deploy Wave Initial Configuration Files
When Wave Desktop is initialized, it will read the configuration file in the specific directory (~/Library/Application Support/Wave/). You only need to edit the configuration file and copy it to the corresponding user directory before initialization.
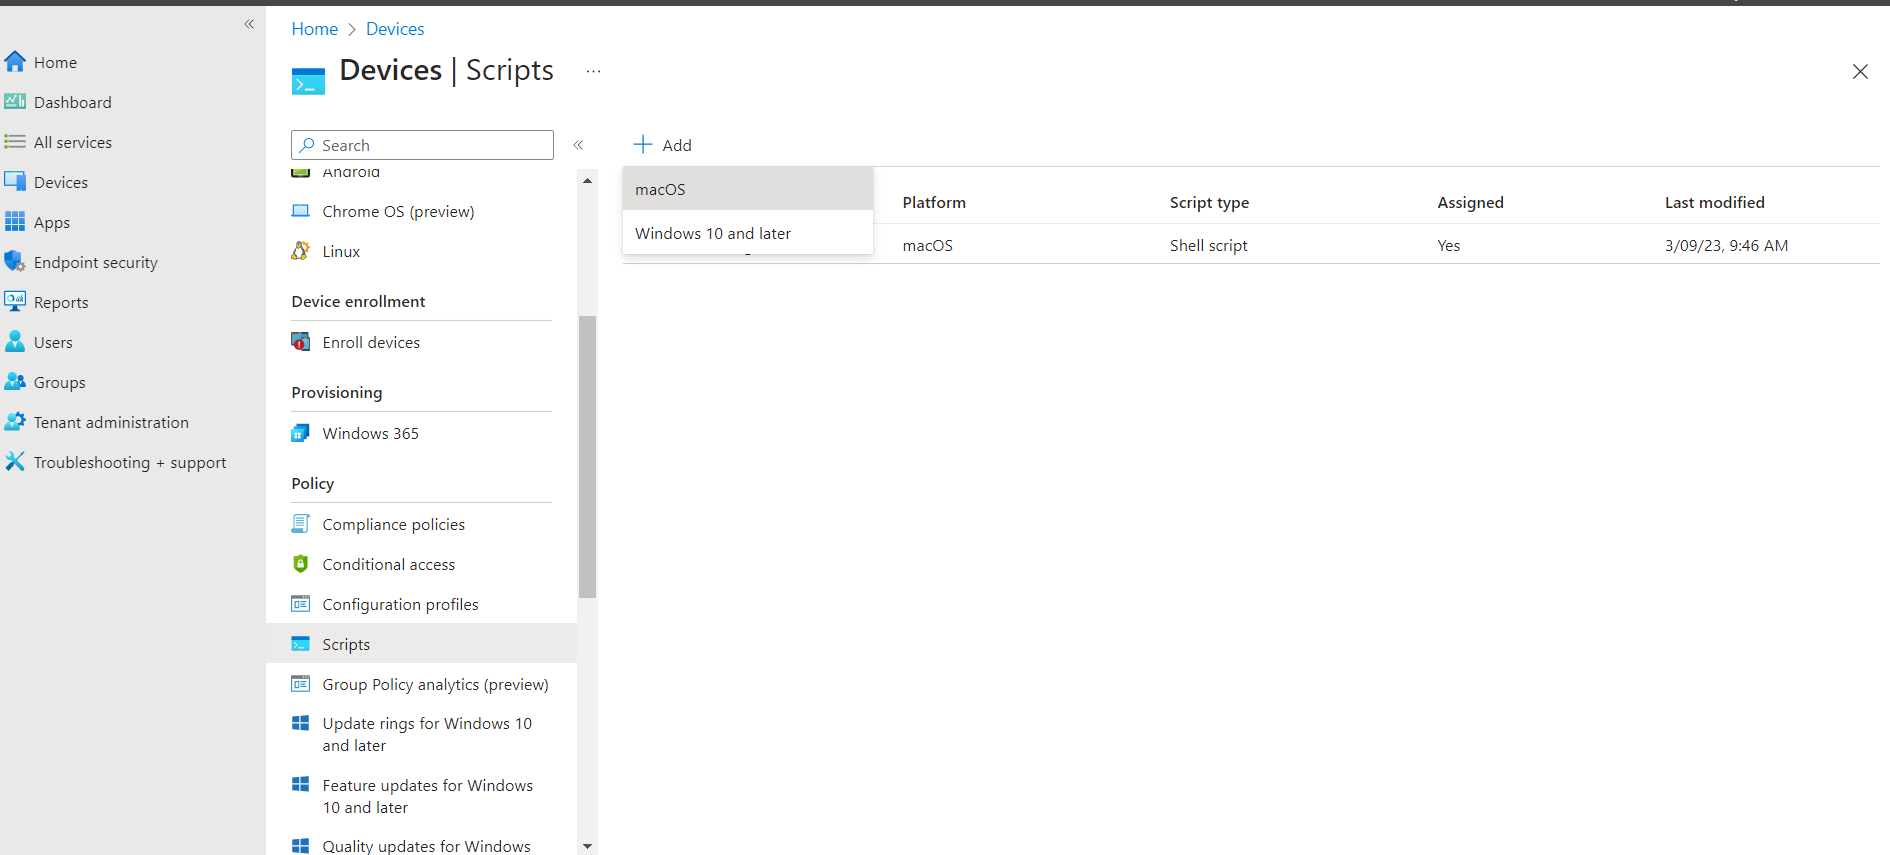
- Log in to the Endpoint Manager Admin Center of Intune.
- Go to “Devices” -> “Scripts” page, click the “Add” option, and select the “macOS” option:
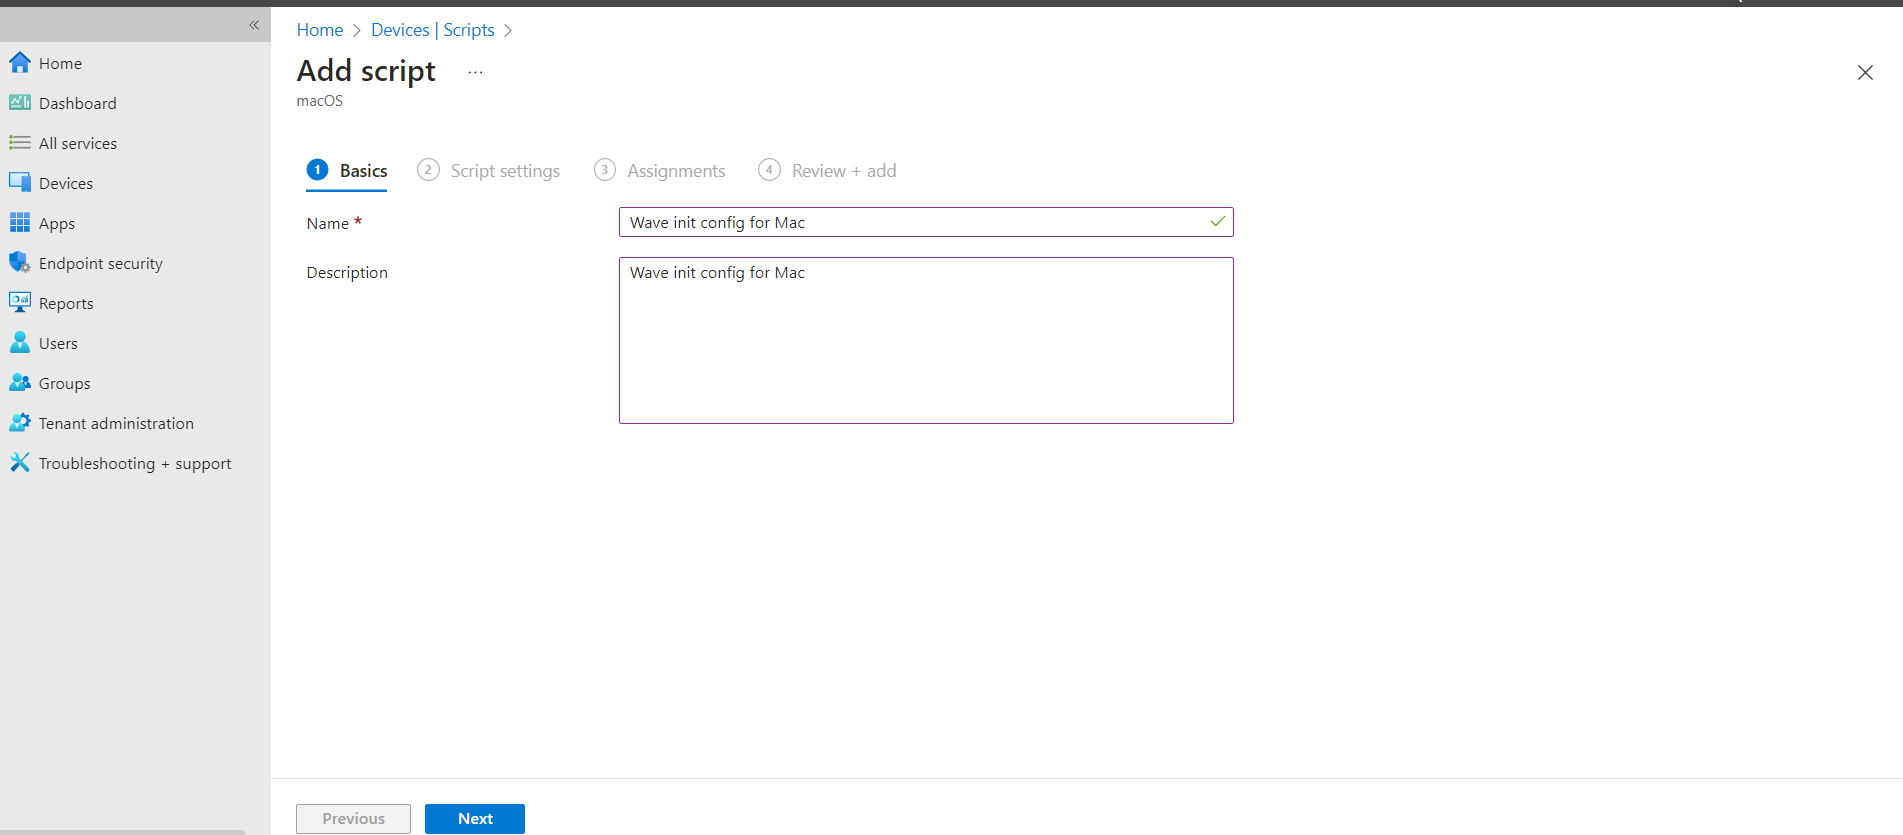
- Set parameters in the script and upload the script:
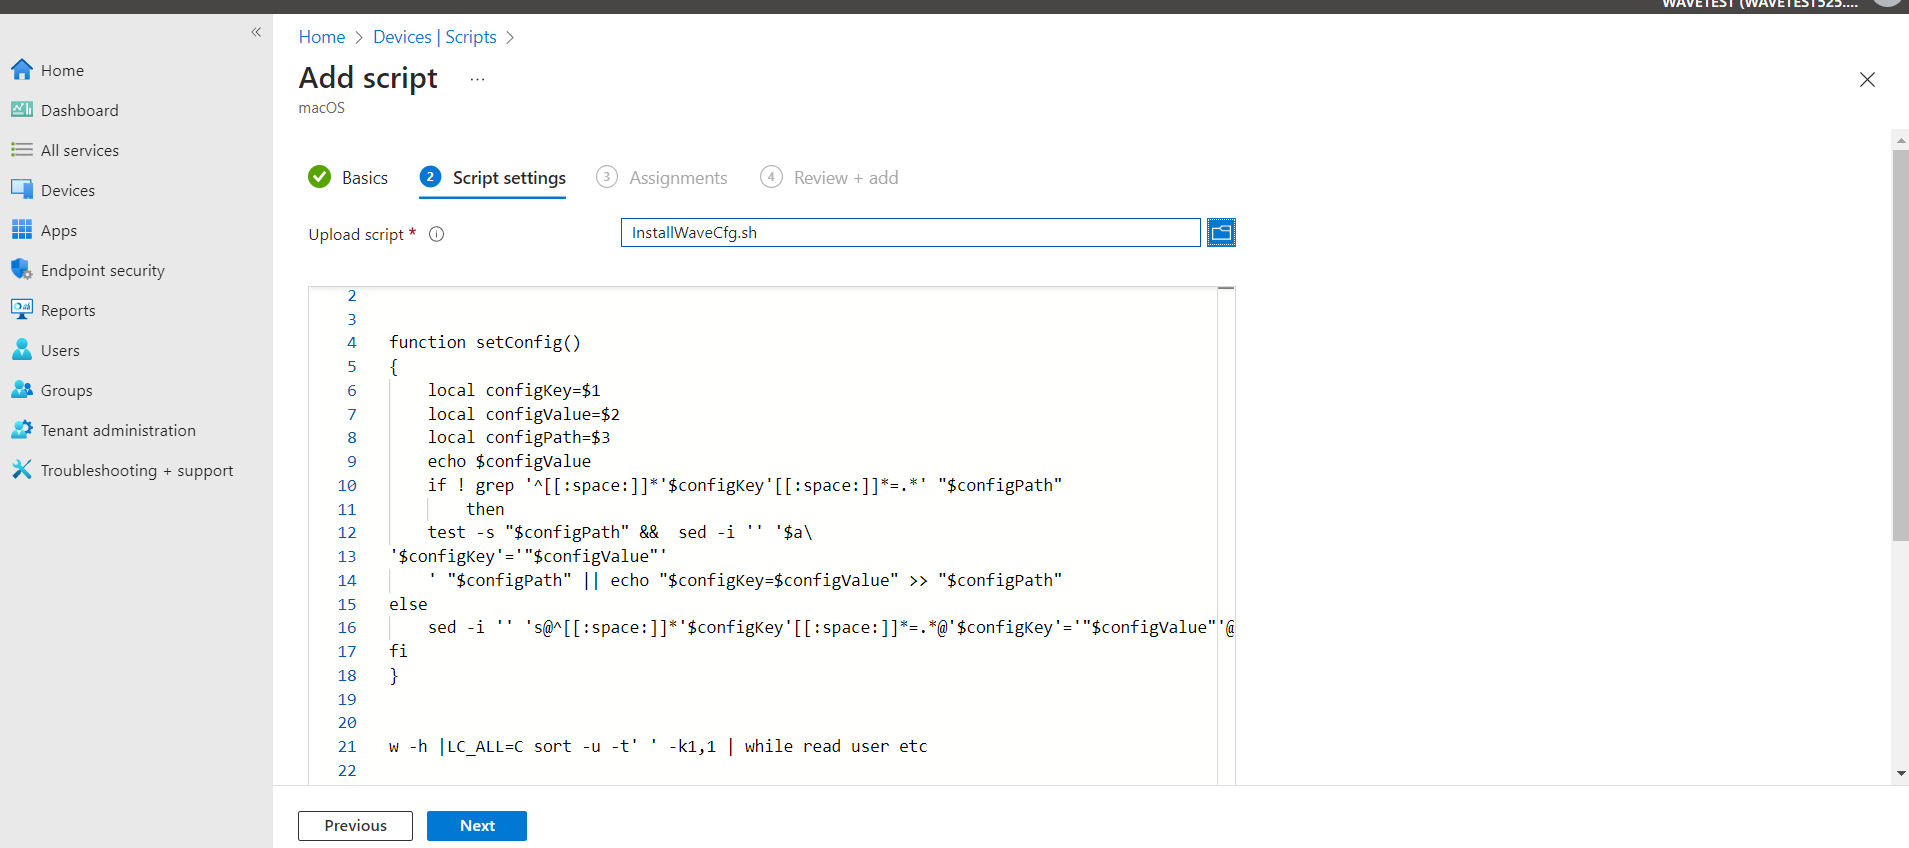
Please refer to the script contents below (you only need to copy the parameters you need to configure):
#!/bin/bash
function setConfig()
{
	local configKey=$1
	local configValue=$2
	local configPath=$3
    echo $configValue
	if ! grep '^[[:space:]]*'$configKey'[[:space:]]*=.*' "$configPath"
		then
	test -s "$configPath" &&  sed -i '' '$a\
'$configKey'='"$configValue"'
	' "$configPath" || echo "$configKey=$configValue" >> "$configPath"
else
	sed -i '' 's@^[[:space:]]*'$configKey'[[:space:]]*=.*@'$configKey'='"$configValue"'@g' "$configPath"
fi
}


w -h |LC_ALL=C sort -u -t' ' -k1,1 | while read user etc

do
homedir=$(dscl . -read /Users/$user NFSHomeDirectory | cut -d' ' -f2)
WaveInitCfgFile="$homedir/Library/Application Support/Wave/init.cfg"


if [ ! -f "$WaveInitCfgFile" ]
then
	touch "$WaveInitCfgFile"
fi

# add config here

# Server address
setConfig "ServerAddress" "https://xxxxx.a.gdms.cloud" "$WaveInitCfgFile"

# The default language setting is English. The following languages are supported
# Prompt: The explanation of the language is in the brackets
# en-US(English), zh-CN(简体中文), el-GR(Ελληνικά), it-IL(Italiano),
# es-LA(Español (América Latina)), es-ES(Español (Europe)), ar-EG(العربية), fr-FR(Français),
# ru-RU(Pусский), de-DE(Deutsch), pl-PL(Polskie), pt-PT(Português),
# vi-VN(Tiếng Việt), th-TH(ภาษาไทย), cs-CZ(Čeština), tr-TR(Türkçe),
# he-IL(עִברִית)
setConfig "language" "en-US" "$WaveInitCfgFile"

# 0: No  1: Yes
setConfig "isLaunchOnSystemStartup" "1" "$WaveInitCfgFile"

# 0: No  1: Yes
setConfig "isAutoAnswer" "0" "$WaveInitCfgFile"

# 0: disable  1: enable
setConfig "enableIncomingCallAndMeetingReminderSound" "1" "$WaveInitCfgFile"

# 0: disable  1: enable
setConfig "enableMessageNotificationSound" "1" "$WaveInitCfgFile"

# 12: 12 Hour Clock      24: 24 Hour Clock
setConfig "timeFormat" "24" "$WaveInitCfgFile"

# YYYY/MM/DD, DD/MM/YYYY or MM/DD/YYYY
setConfig "dateFormat" "MM/DD/YYYY" "$WaveInitCfgFile"

# Pre-install Add-in and Related Parameters
#setConfig "preInstallPlugins" "[{\"Google Drive\":{}}]" "$WaveInitCfgFile"

# Call Ringtone
setConfig "callRingtonePath" "~/Library/Application Support/Wave/Ring.wav" "$WaveInitCfgFile"

#0: disable  1: enable
setConfig "enableUpgrade" "1" "$WaveInitCfgFile"

done
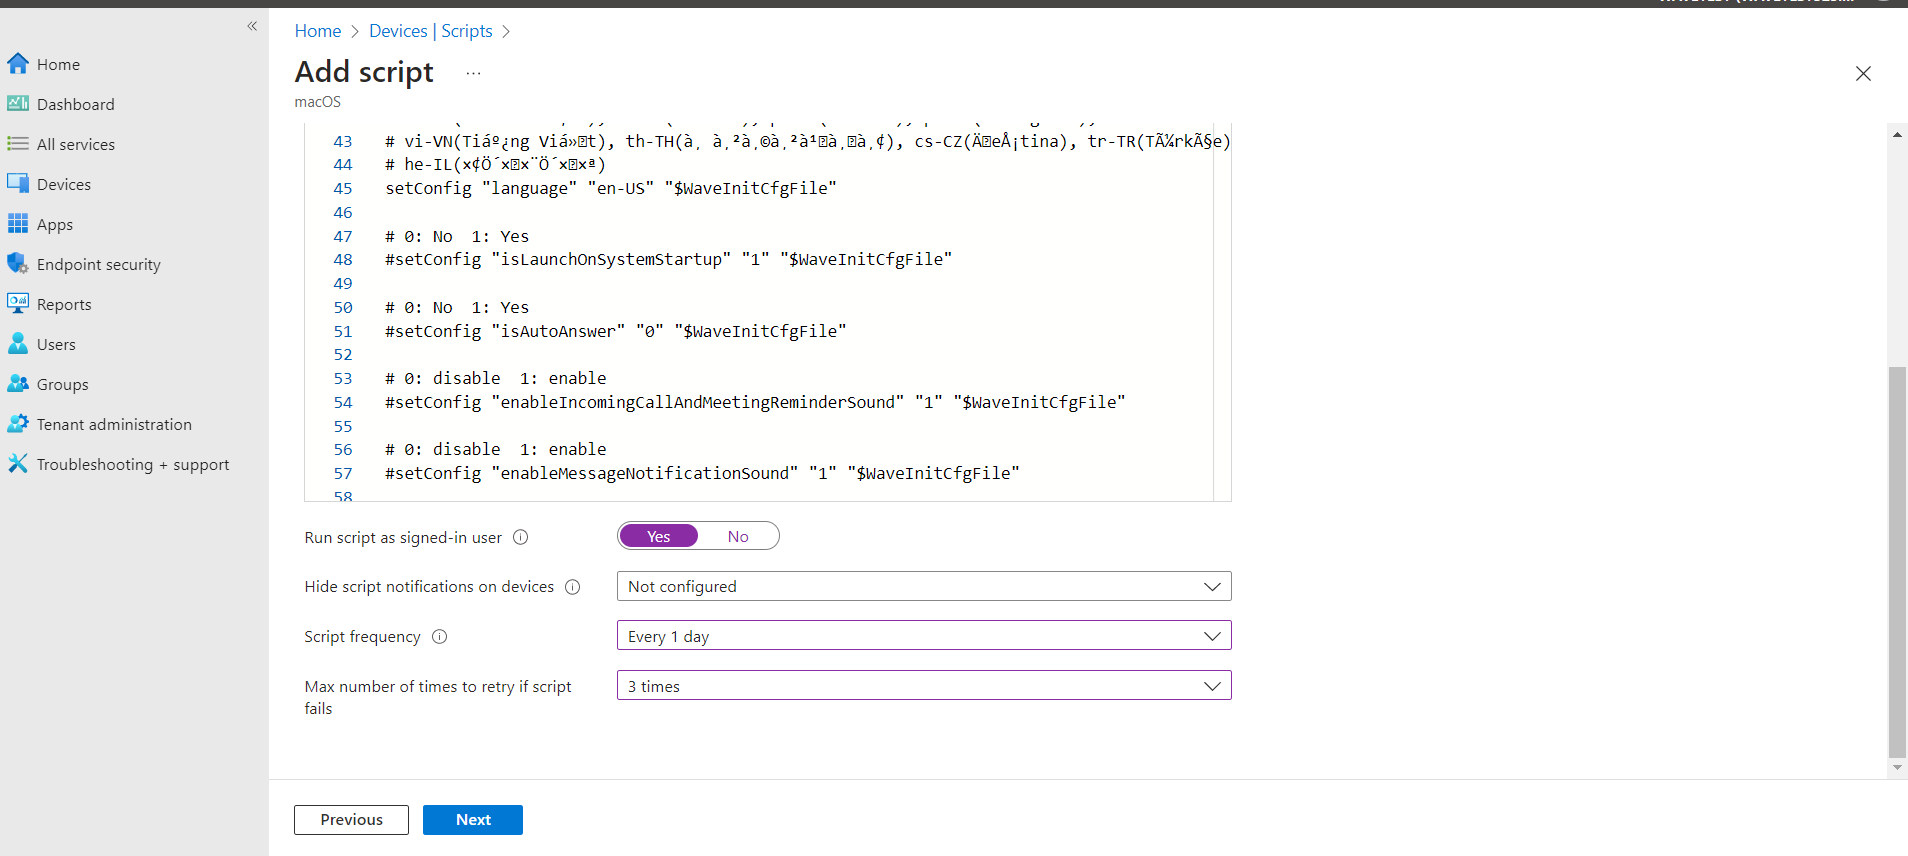
4. Adjust other parameters in the script as required, and click the “Next” option as the screenshot shows below:
5. Select users, groups, or devices that you want to install the Wave Desktop client and click the “Next” option:

6. After the operations above are complete, the configuration file will be written to the corresponding Wave directory after the employee’s computer check-in. The configuration parameters will take effect after the Wave client starts.