This document introduces management methods for CloudUCM through the GDMS platform.
Functions of CloudUCM System
Switching to CloudUCM System

Dashboard
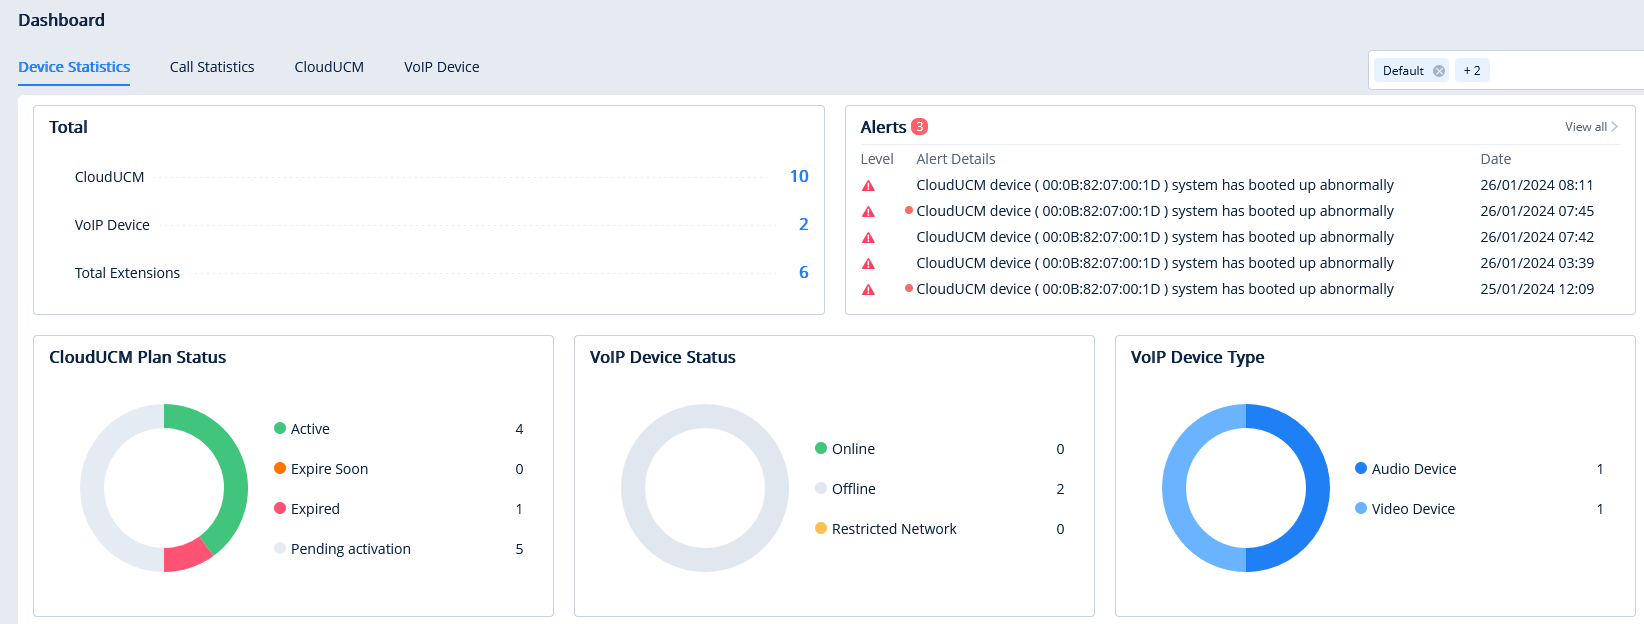
Support filtering by one or more organizations:
|
Module |
Description |
|---|---|
|
Total |
|
|
Alert |
Display the latest 5 high and medium-level alert messages of the CloudUCM devices in the enterprise. |
|
CloudUCM Plan Status |
|
|
VoIP Device Status |
Display the number of devices that are currently online, offline, and network restricted:
|
|
VoIP Device Type |
Display the number of devices in each category: audio and video.
|
|
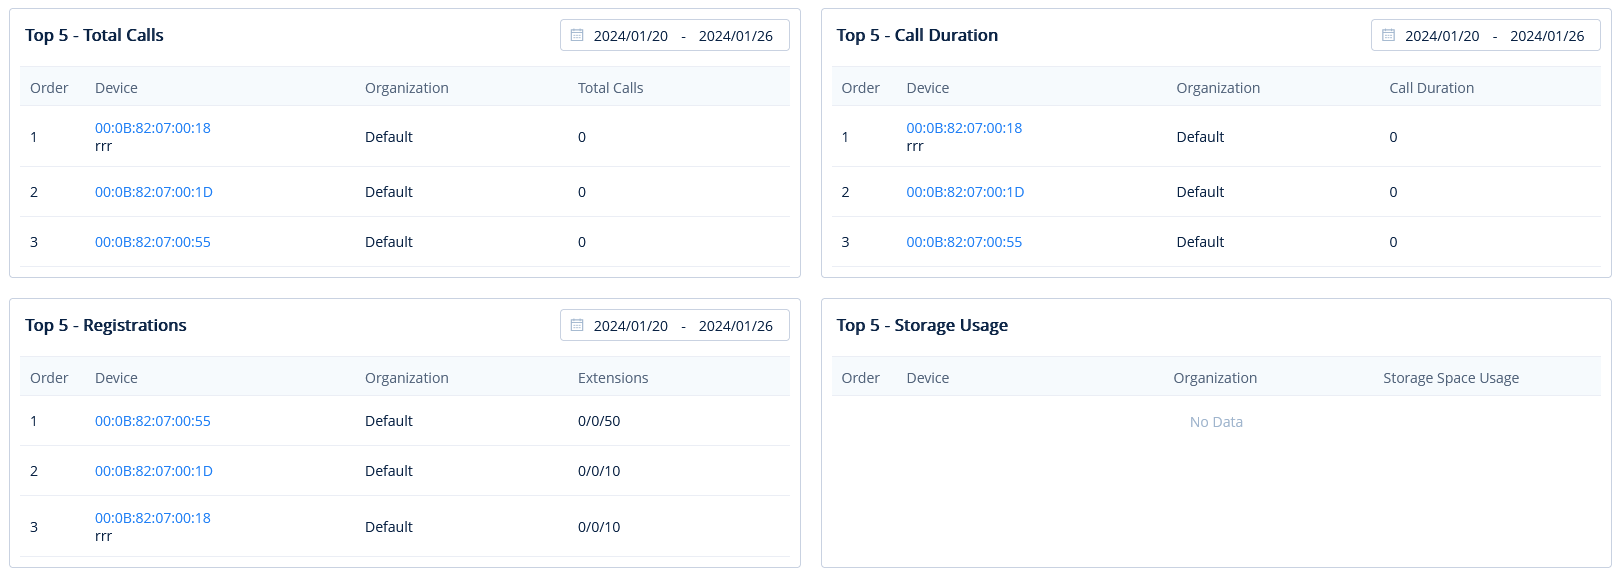
Top5 |
Display the top 5 usage status under the current company or organization searching results: Top5 Total Calls: The statistics is depending on the total number of calls in the selected time range, and it displays the top 5 CloudUCM devices. Top5 Call Duration: The statistics is depending on the cumulative call duration in the selected time range, and it displays the top 5 CloudUCM devices. Top5 Registered Extensions: The statistics is depending on the highest number of registered extensions in a day in the select time range, it displays the top 5 CloudUCM devices. Top5 Storage Space Usage: It displays the top 5 CloudUCM devices in storage space usage. |
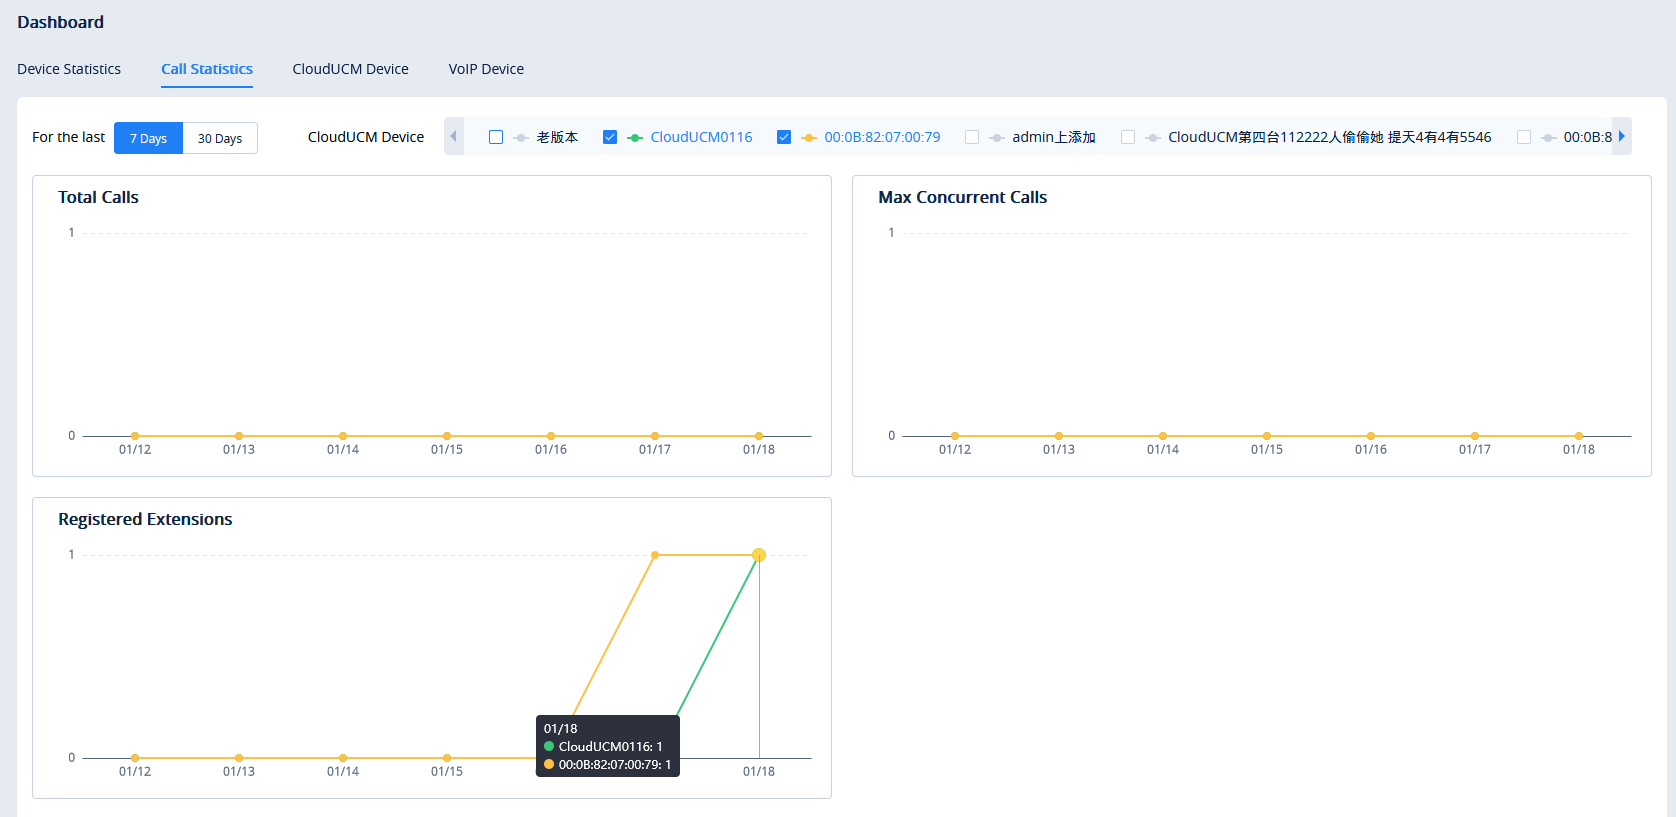
Call Statistics Chart:
You can select multiple CloudUCM devices to view the latest 7-days or 30-days call status chart.
Total Calls: Chart of the total number of calls per day
Total Calls: Chart of the number of concurrent calls per day
Registered Extensions: Chart of the number of registered extensions per day
CloudUCM Device List:
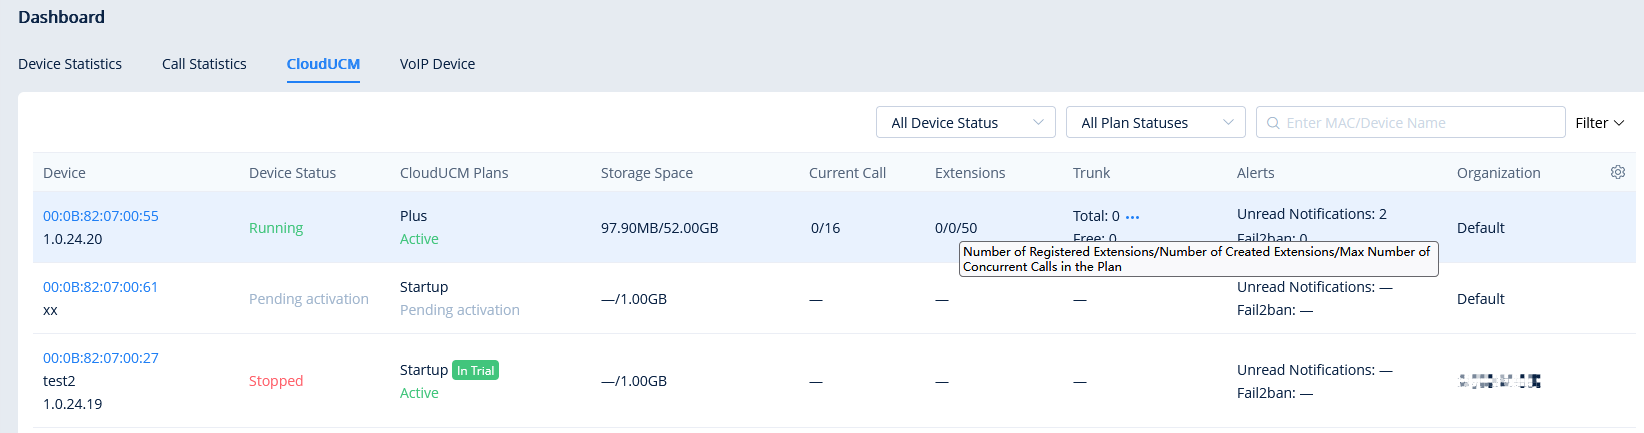
Display the real-time status of all CloudUCM devices in the current GDMS platform:
- Device: Display the MAC address of the device.
- Device Status: Display the status of the device. The value can be “To be Activated”, “Running”, “Stopped”, “Starting”, or “Deploying”.
- CloudUCM Plan: Display the current plan information and status.
- Storage Space: Display the storage space details of UCM local and cloud space usage.
- Current Calls: Display the current number of calls/the maximum number of concurrent calls of the plan.
- SIP Extension: Display the number of currently registered extensions/the number of created extensions/the maximum number of extensions of the plan.
- Trunk: Display the number of total trunks, the number of trunks in idle/busy/abnormal state, and the number of trunks that are unmonitored.
- Alerts: Display the number of unread notifications and IP addresses blocked by Fail2ban.
- Organization: Display the organization where the device resides.
VoIP Device List: The rules are the same as the VoIP Device List in the Dashboard of UCMRC.

Extension
This module is the same as the Extension module in the UCMRC System. After adding a CloudUCM device, the extension of the CloudUCM device will be synchronized to the GDMS platform automatically. If the extension is deleted by the CloudUCM, the user will see the icon ![]() , which indicates the extension is no longer available for registration.
, which indicates the extension is no longer available for registration.
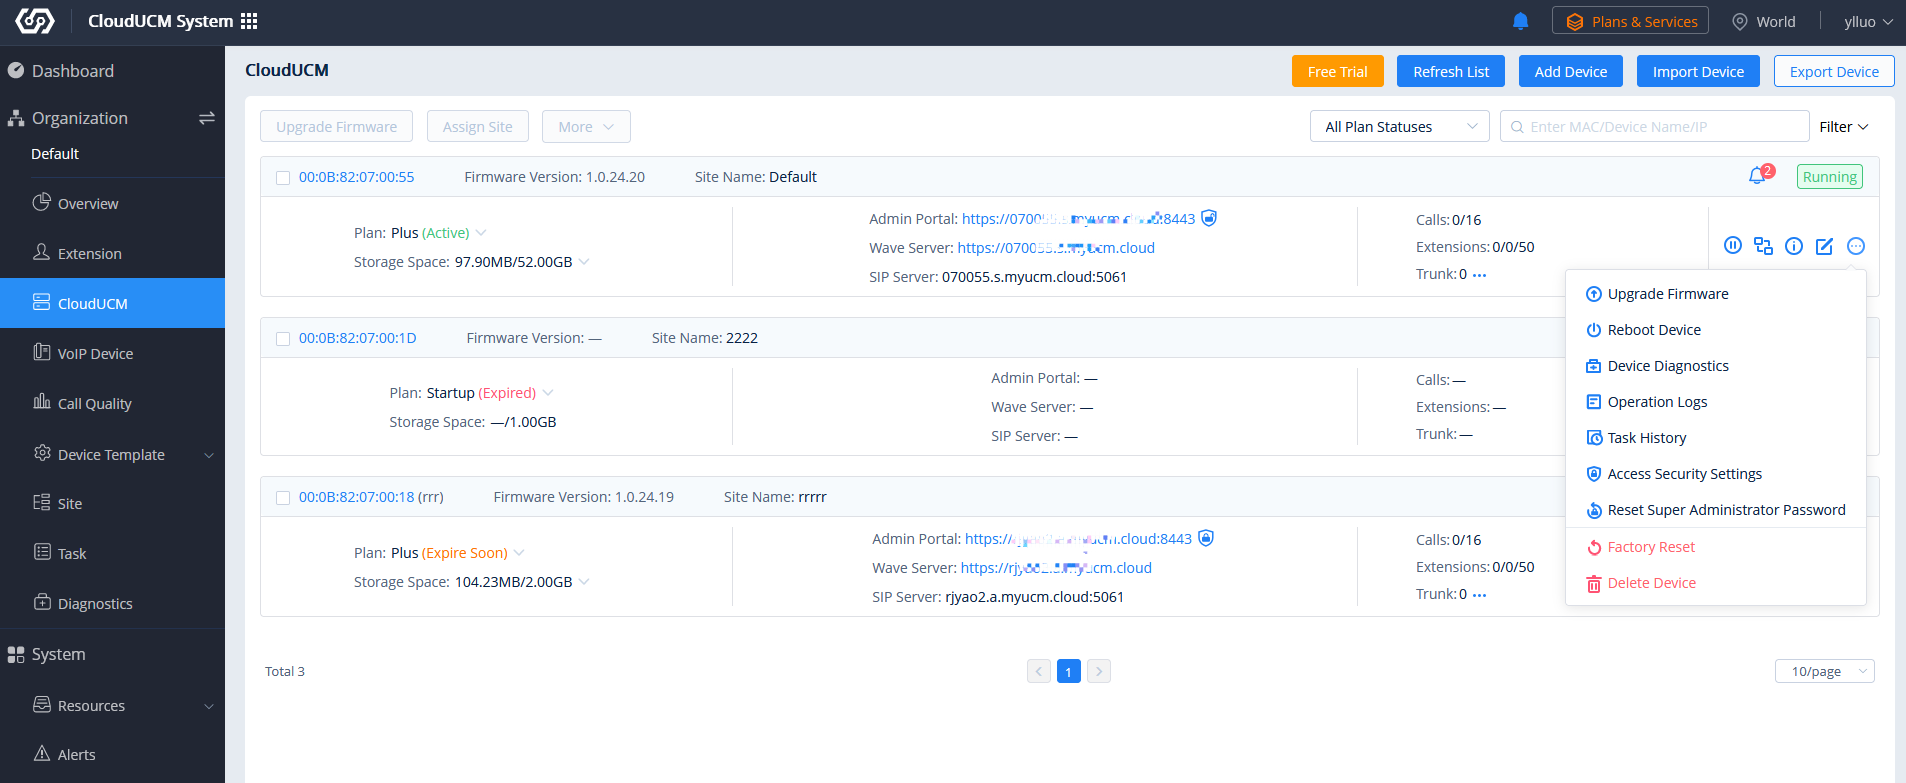
CloudUCM Device
In the CloudUCM Device List, all CloudUCM devices in the current organization are displayed, along with device status, plan information, storage space, CloudUCM server address, the number of calls in real-time, extension number (the number of currently registered extensions/the number of created extensions/the maximum number of extensions in the plan), and Trunk status.
Status Descriptions:
|
Status |
Description |
|---|---|
|
Device Status |
|
|
The firmware version is too low |
|
|
The Plan is about to expire |
|
|
Trunk Abnormal |
|
|
Unread Notification |
|
|
Fail2ban |
|
Server Address Descriptions:
Admin Portal: This specifies the CloudUCM device Web UI access address. The username and password of the device are required. Admin Portal User Manual
Wave Server: This specifies the server address of the Wave client. Wave User Manual
SIP Server: This specifies the SIP server address used for registering extensions. IP Phone Configuration User Manual
Filter Device:

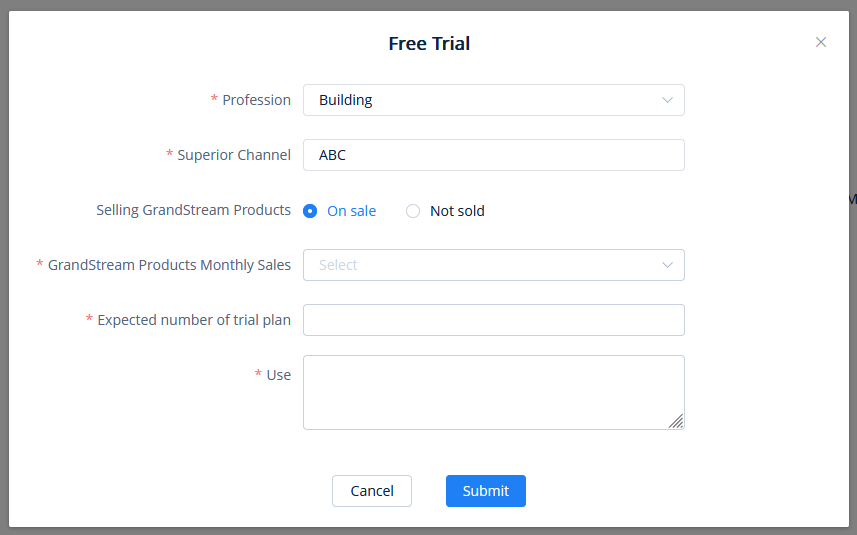
Apply for CloudUCM Free Trial
Users can apply for the CloudUCM free trial. If you need more free trials, you can contact your superior channel or Grandstream Support for help. Learn more about CloudUCM Free Trial.
- Apply in the CloudUCM Device List:

- After applying for the free trial, click the option “Activate Now” in the pop-up window or click the button
 in the CloudUCM Device List to activate the device. After activating the device, the free trial will be started.
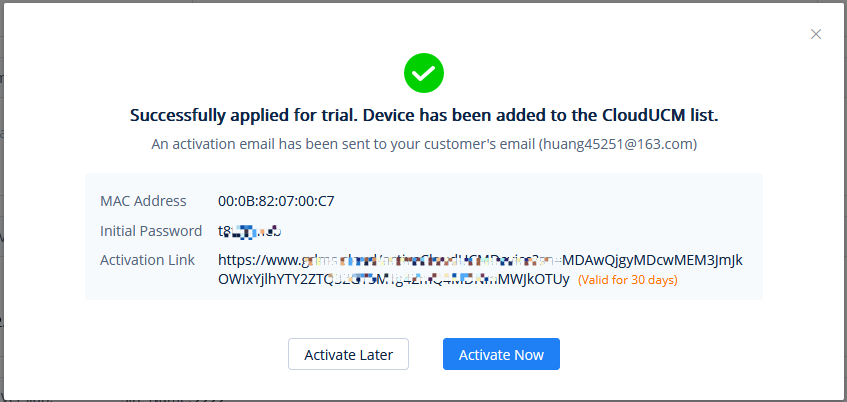
- If you have entered the customer’s email address, an activation email is automatically sent to that configured email address. (Individual and company users do not have the “Customer Email Address” option.)
Activate CloudUCM Device
For a newly created CloudUCM device, you need to activate the device before you can start using it.
- You can activate the CloudUCM device by clicking the icon
 in the activation email or in the CloudUCM Device module of the GDMS platform.
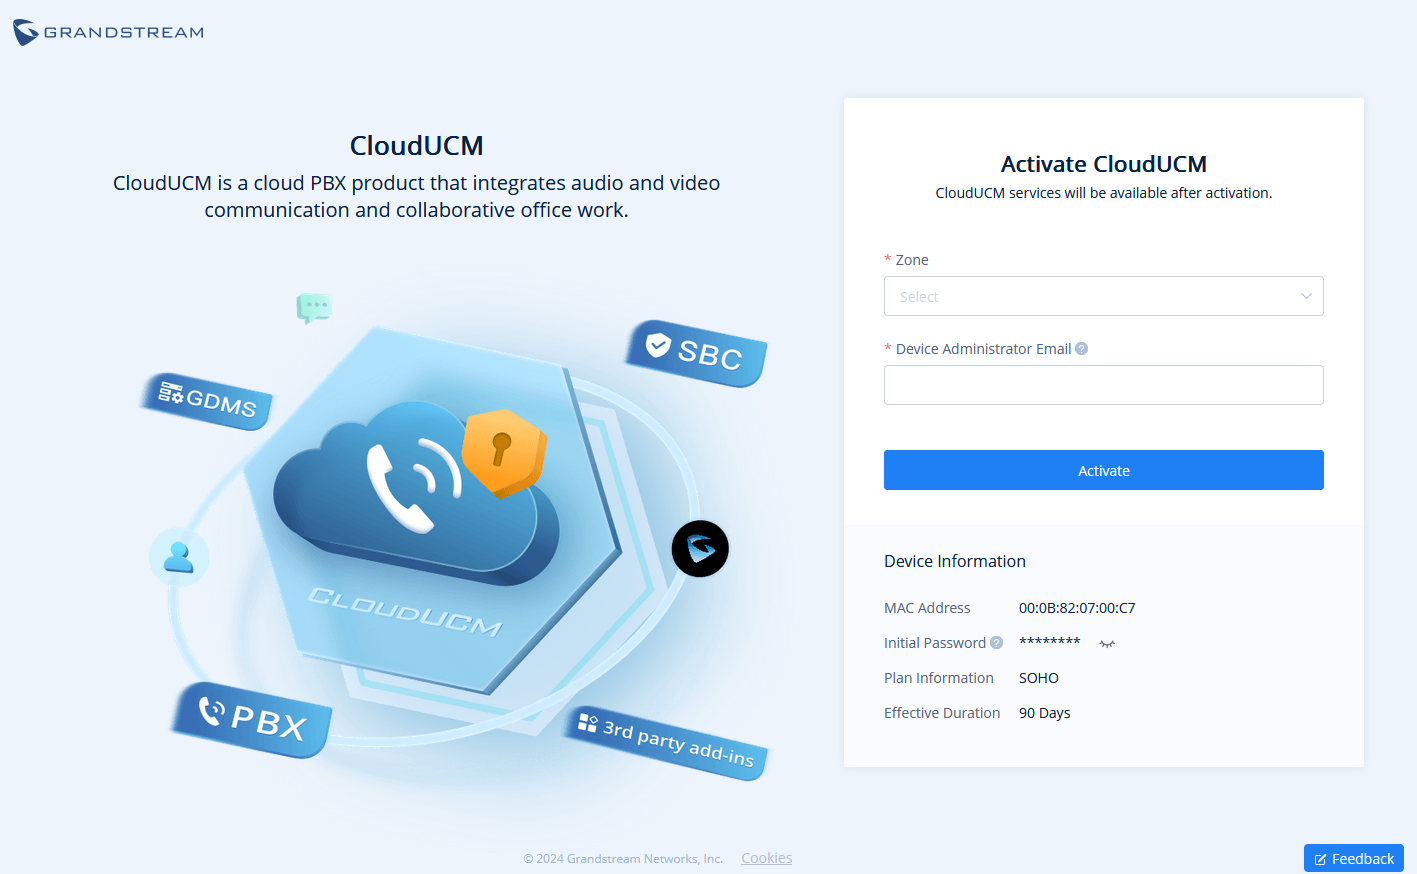
- Before activating the CloudUCM device, you need to fill in the following information:
|
Zone |
Select the nearest data center for quick access. |
|
CloudUCM Server Address |
Enter your custom service address for easy memorization. Note: Only advanced plans support this function. |
|
Device Administrator Email |
Enter the administrator email of your CloudUCM device so that you can use it to retrieve the password, receive plan notifications, storage space alerts, etc. |
The device information will be displayed after filling the information:
|
MAC Address |
It indicates the virtual MAC address of the CloudUCM device, as a unique identifier for this device. |
|
Initial Password |
It indicates the initial password of the CloudUCM device, and it is also the initial password of the super administrator for logging in to the CloudUCM Web UI. |
|
Plan Information |
It indicates the plan name for this CloudUCM device. |
|
Valid Duration |
It indicates the validity period of this CloudUCM device’s plan. |
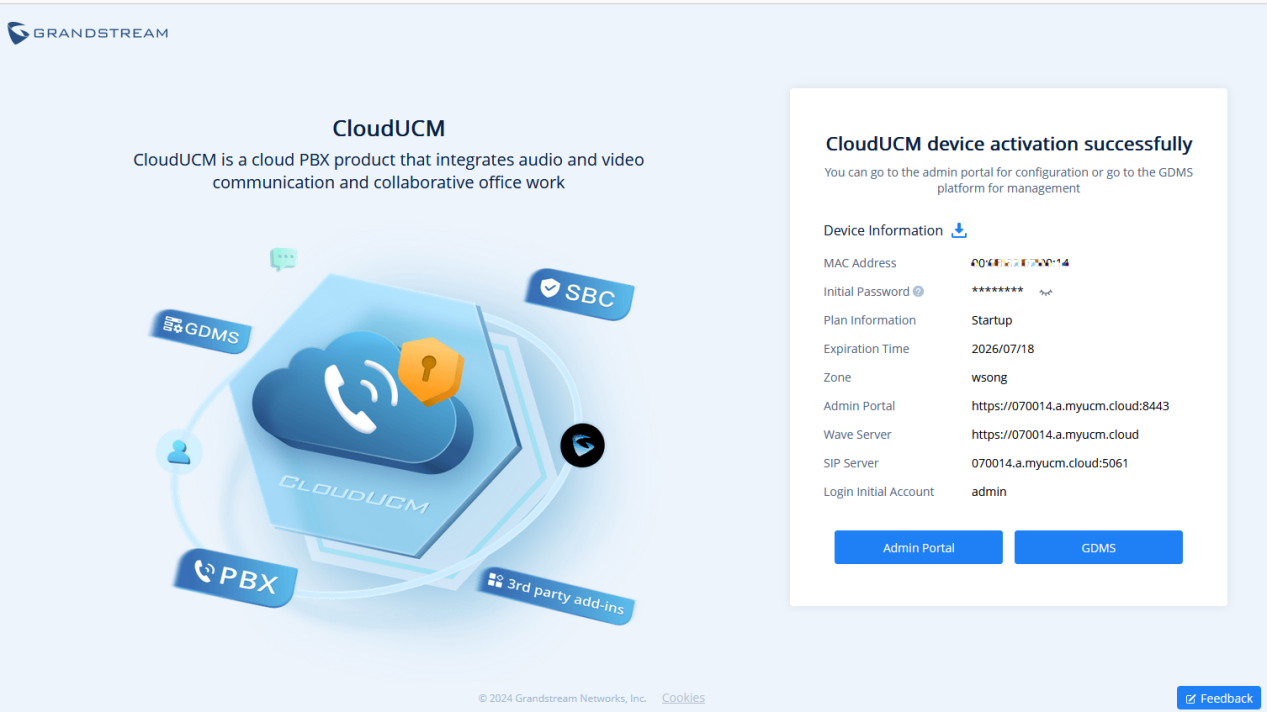
- The activation may take several minutes. After activating the CloudUCM device, you can quickly access the CloudUCM admin portal to configure the CloudUCM service or add it to the GDMS platform for management.
Please refer to the CloudUCM Admin Guide to learn more details.
Add CloudUCM Device
You will need to enter the MAC address and initial password of your CloudUCM device to add it. The rules are the same as adding UCM devices in the UCMRC System.

Import CloudUCM Devices in Batches
The rules are the same as importing UCM devices in batches to the UCMRC System.
Start/Stop CloudUCM Device
![]() Start Device: When the CloudUCM device stops running or needs to be activated, you can manually start the device. If the current plan has expired, it cannot be started.
Start Device: When the CloudUCM device stops running or needs to be activated, you can manually start the device. If the current plan has expired, it cannot be started.
![]() Stop Device: When the CloudUCM device is running, you can click the option
Stop Device: When the CloudUCM device is running, you can click the option ![]() to stop the device. After stopping the device, the device is no longer accessible.
to stop the device. After stopping the device, the device is no longer accessible.
Remotely Access CloudUCM Device Web UI
Click the option ![]() to remotely access the Web UI of the CloudUCM device on the device list.
to remotely access the Web UI of the CloudUCM device on the device list.
- You can access the CloudUCM device Web UI without entering a password. Once the permission is assigned, the user can remotely access the UCM Web UI through the GDMS platform without entering the UCM password.
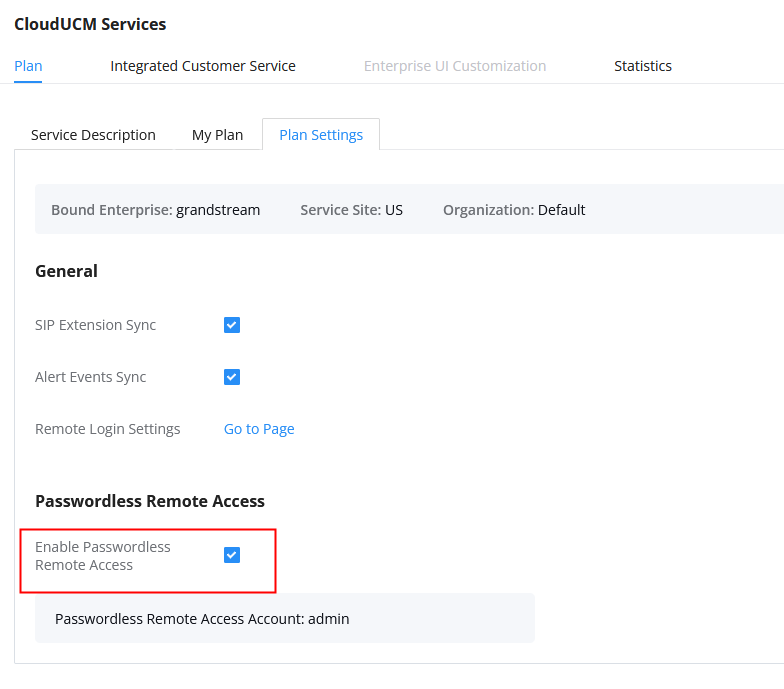
You can also set the CloudUCM device Web UI to be accessible only through the GDMS platform:

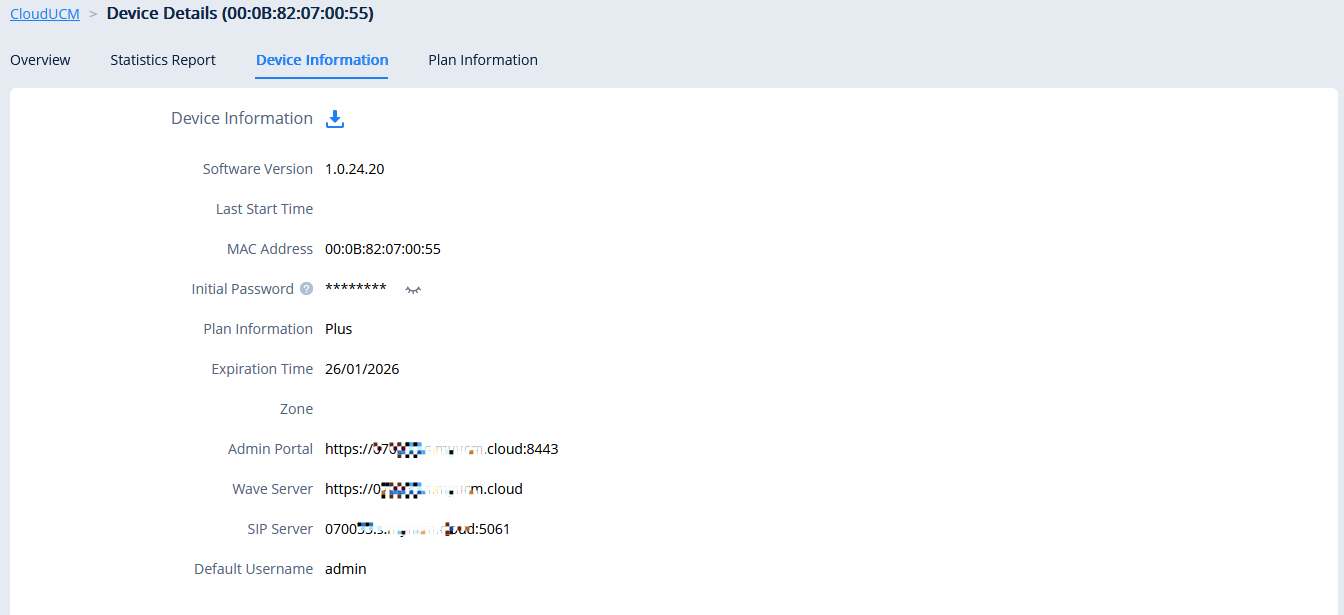
View Device Details
In the CloudUCM Device List, you can click the option ![]() to view the device details, including the current extension registration status, VoIP device status registered with the extension, storage space usage status, the number of terminals connected to the server address, alert statistics, call statistics, and extension registration statistics.
to view the device details, including the current extension registration status, VoIP device status registered with the extension, storage space usage status, the number of terminals connected to the server address, alert statistics, call statistics, and extension registration statistics.
You can view the CloudUCM device daily statistical reports, basic device information, plan information, etc.
Server Address Descriptions:
Admin Portal: This specifies the CloudUCM device Web UI access address. The username and password of the device are required. Admin Portal User Manual
Wave Server: This specifies the server address of the Wave client. Wave User Manual
SIP Server: This specifies the SIP server address used for registering extensions. IP Phone Configuration User Manual
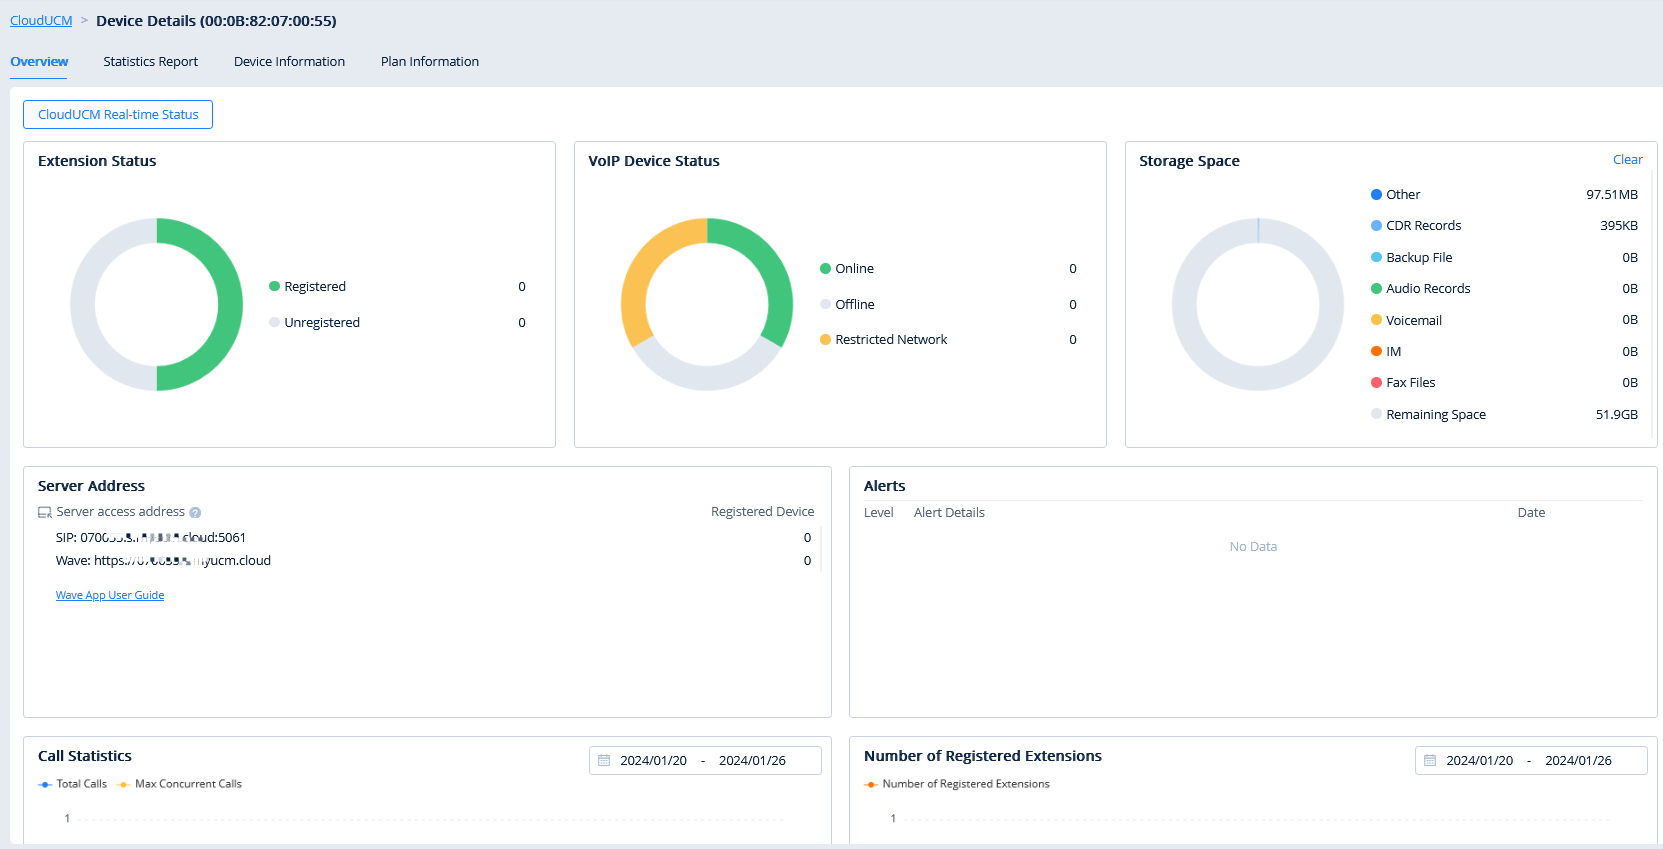
View Statistics
Daily Report
The CloudUCM device collects the data report of the day and sends it to the GDMS user or the configured email box.
Please refer to the screenshot below for the daily report email:
View Statistics Report (Last 30 days)
Except for the fields below, all other rules are the same as UCM devices in the UCMRC System.

View CloudUCM Device Plan
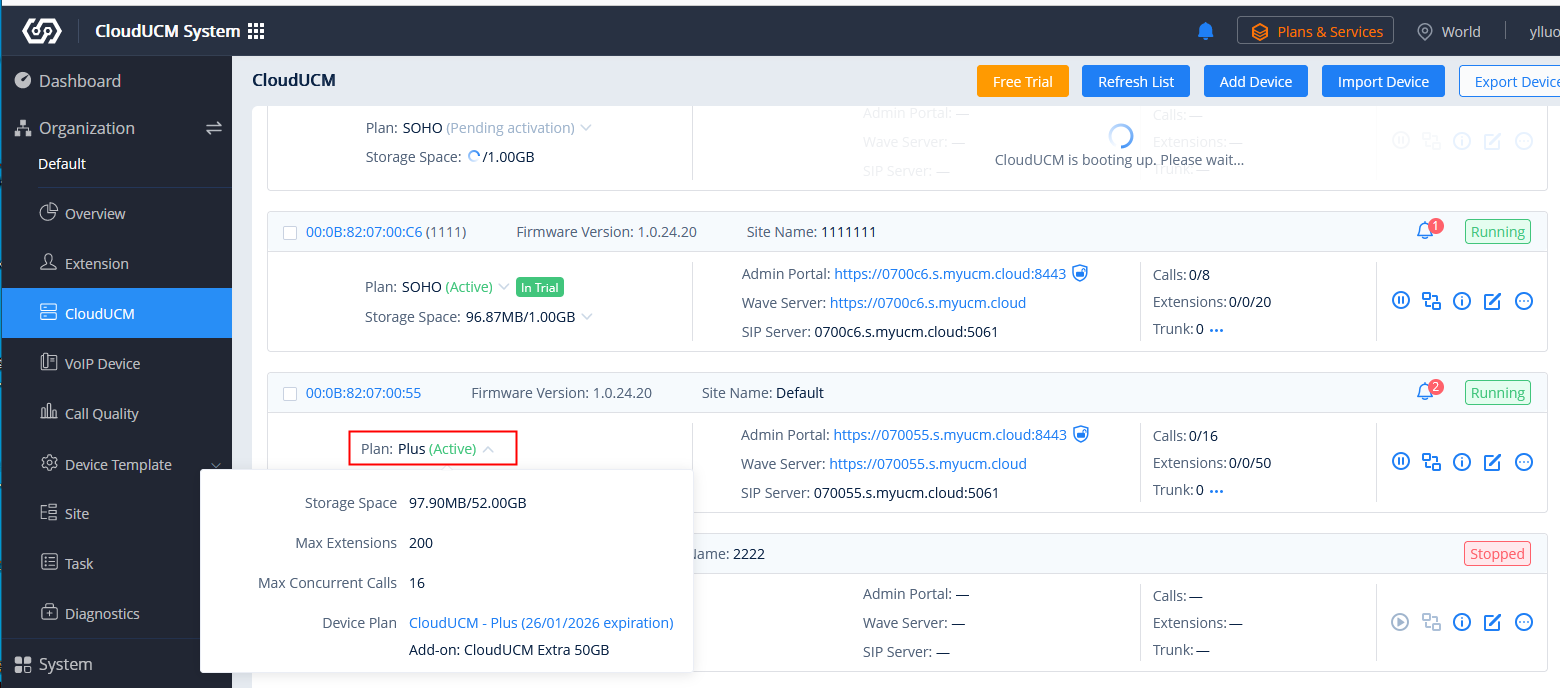
It displays the storage space (currently used) of the plan, the maximum number of extensions in the plan, the maximum number of concurrent calls, the plan name, and the expiration time.
Edit CloudUCM Device
You can click the option ![]() in the CloudUCM Device List to edit the device:
in the CloudUCM Device List to edit the device:

Customer Email: Enter the email address of the customer who uses this device.
Customer Remarks: Enter remarks of the customer who uses this device.
Device Remarks: Enter remarks of the device. The device remarks of the CloudUCM device will be synchronized to the GDMS platform.
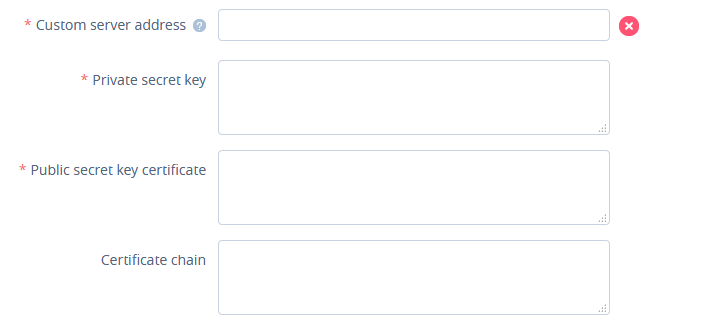
Server Address: Enter the server address of the CloudUCM device. The advanced plan allows you to customize the domain name for this server address.
Custom Server Domain Name
Prerequisite: The CloudUCM advanced plans support custom server domain names.
- On the CloudUCM device editing page, users can customize the server domain name.
- You can enter the preferred URL, such as {yourdomain}.a.myucm.cloud.

- If the plan has a custom domain name function, the user can click on the “Custom Server Domain Name” option and enter the server address with the private domain name, and the user also needs to enter the custom certificate of the domain name.
Reboot Device
After the device is restarted, its status changes to ”Starting”. After a few minutes, its status changes to “Running”. Other rules are the same as those for UCM devices in the UCMRC System.
Upgrade Firmware
It only supports upgrading to the official CloudUCM firmware version, and it cannot be upgraded if the current firmware is the latest one.
Downgrading the firmware version is not currently supported. Please contact the Grandstream Support if needed.
Other rules are the same as those for UCM devices in the UCMRC System.

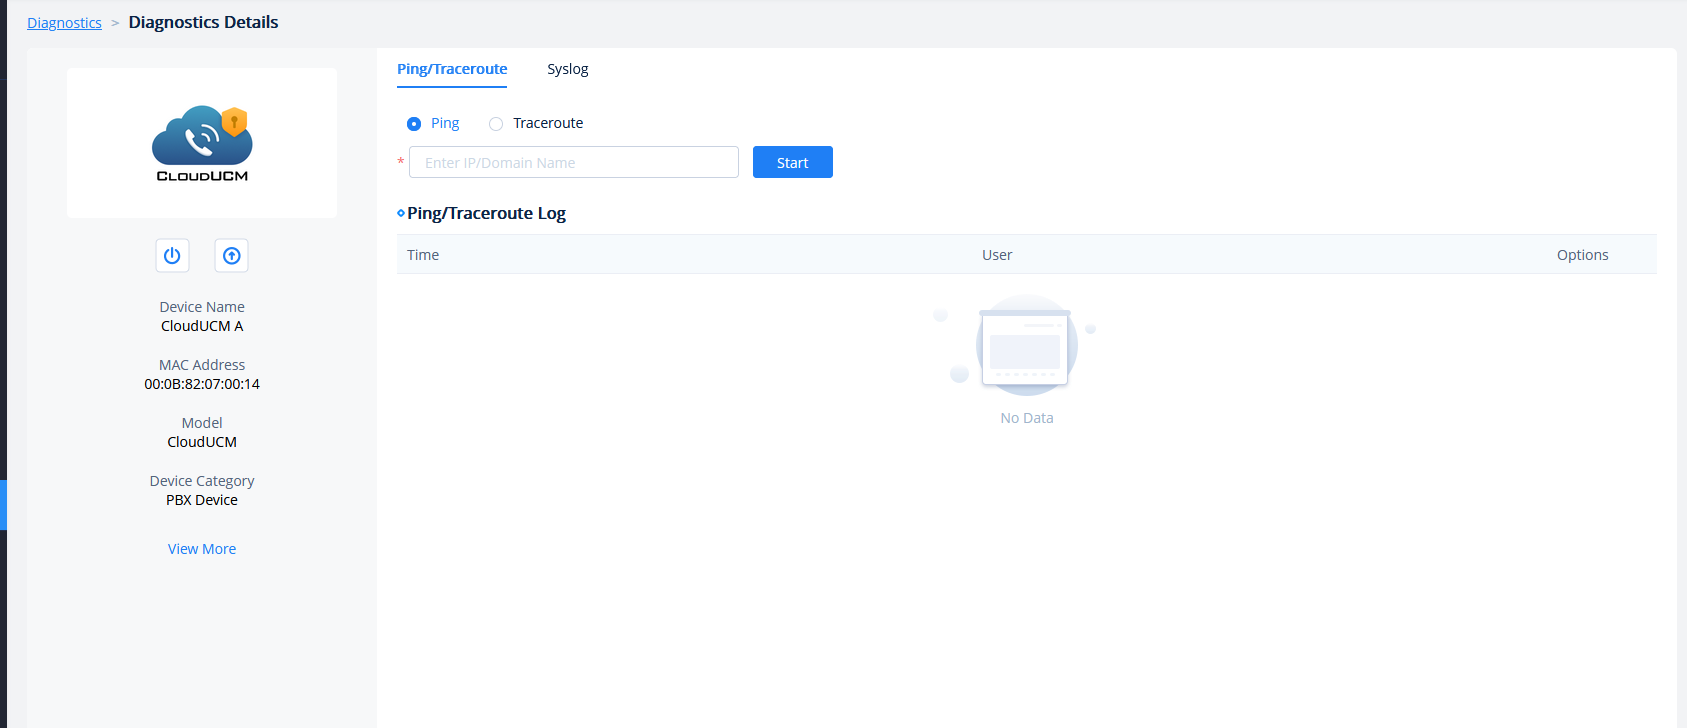
CloudUCM Device Diagnostics
CloudUCM devices only support Ping/Traceroute and Syslog, which are the same as those in the UCMRC System.

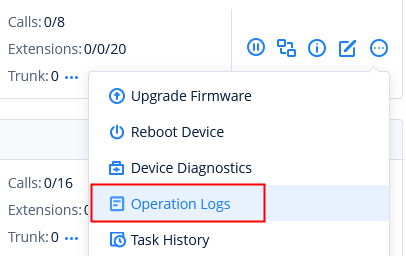
View Device Operation Logs
In the CloudUCM Device List, you can click to view operation logs of devices. The rules are the same as those for UCM devices in the UCMRC System.
Factory Reset
You can factory reset a single CloudUCM device. After resetting the device, the firmware version is still used the same one before restoration.
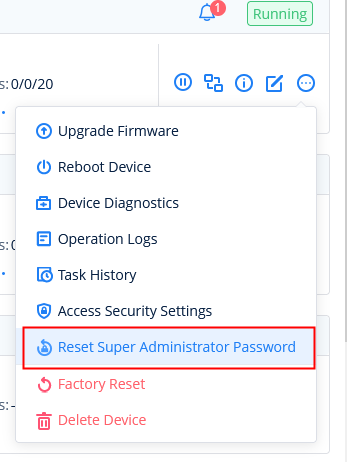
Reset CloudUCM Super Administrator Password
- In the CloudUCM device list, you can click the option
 and click the option “Reset Super Administrator Password”.
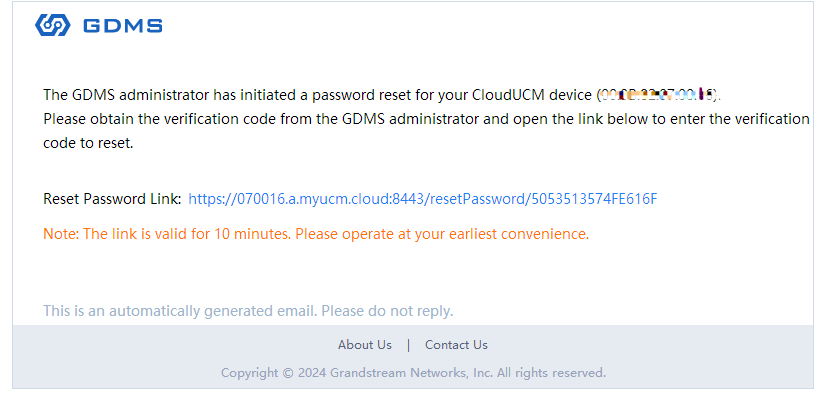
- After confirming the reset, an email will be sent to the email address of the device administrator:
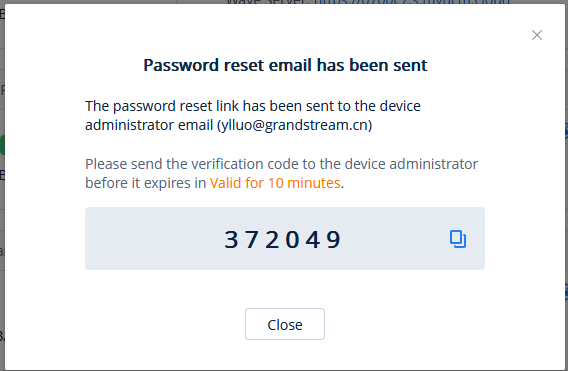
- The device administrator can click the link in the reset password email and enter the 6-digit verification code, then after the verification passes, the device administrator can enter a new password.
Modify Sites in Batches
Users could edit the site of a batch of CloudUCM devices on the GDMS platform. The default site is “default”.
- Select the desired devices and click on the “Site Management” button.

- Select the site to assign the selected devices.
- Click on the “Save” button, and all the selected devices will be transferred to the selected site.
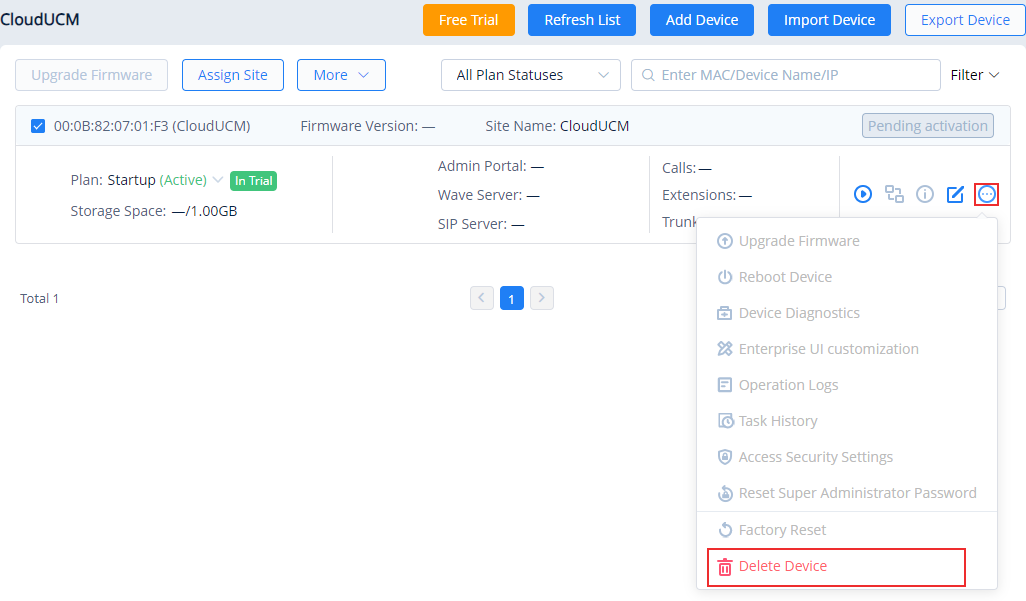
Delete CloudUCM Device
To delete a CloudUCM Device, the user can go click on ![]() then click “Delete Device” as shown in the screenshot below.
then click “Delete Device” as shown in the screenshot below.
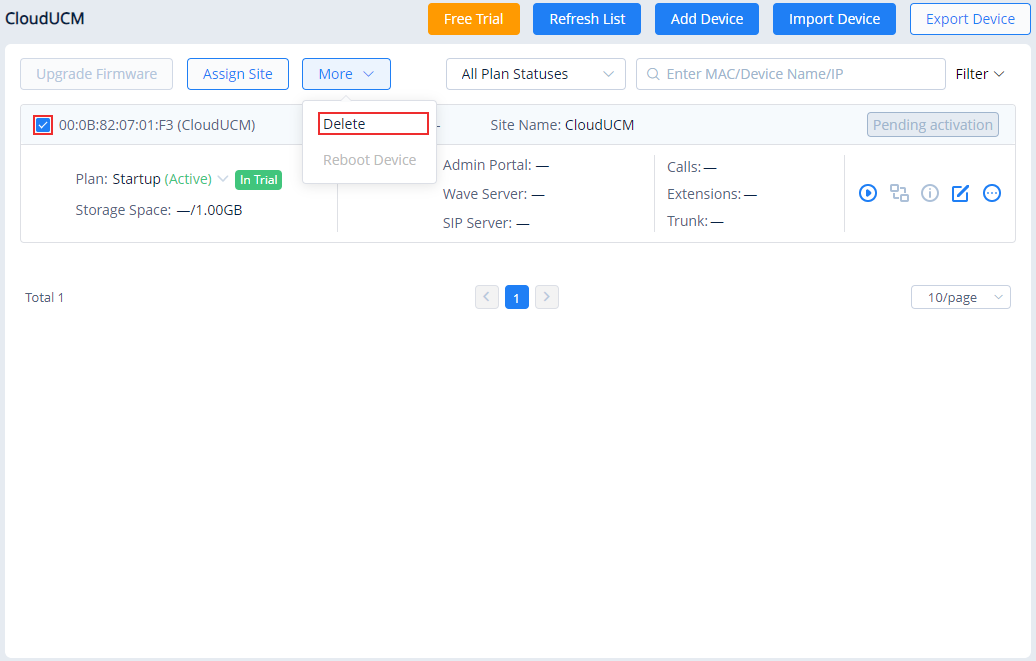
Or, to delete multiple CloudUCM devices at once, please select the device by ticking the box nex to the device’s MAC address then go to “More”, then select “Delete”.
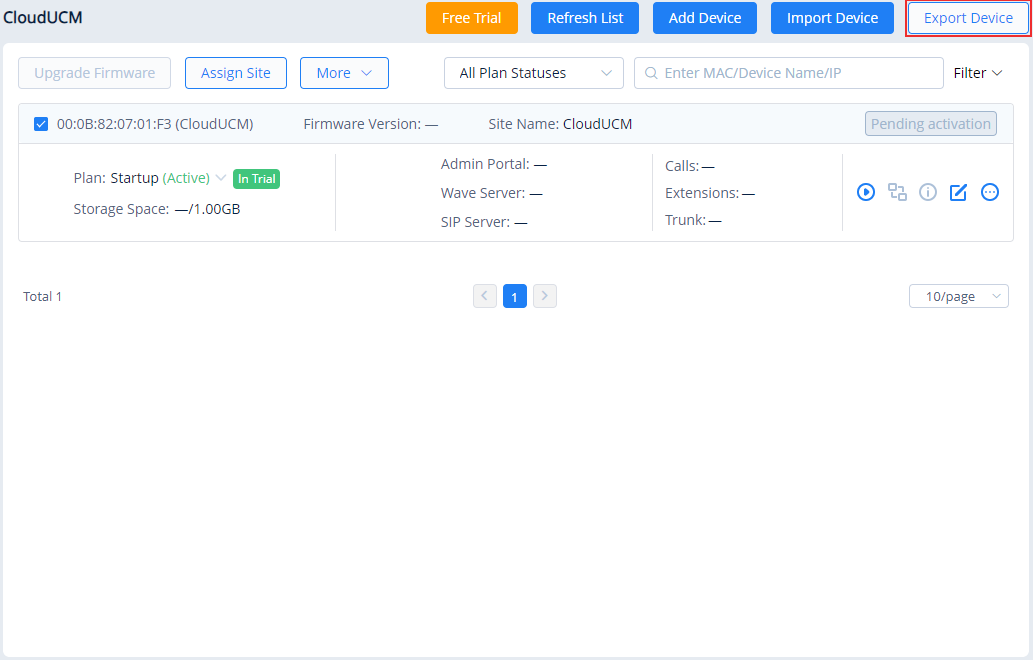
Export CloudUCM Device
To export the list of CloudUCM devices, click on ![]() button. The list created will be in .xls format, and it will include all the CloudUCM devices which are added to the organization. If the user wishes to select the devices to be exported, he/she can tick the box next to the CloudUCM MAC address, then click on “Export Device” to export only those selected devices.
button. The list created will be in .xls format, and it will include all the CloudUCM devices which are added to the organization. If the user wishes to select the devices to be exported, he/she can tick the box next to the CloudUCM MAC address, then click on “Export Device” to export only those selected devices.
Synchronize CloudUCM Device Alerts to GDMS
- Users need to enable CloudUCM alert notifications on the management platform of the CloudUCM device. For details, please refer to the CloudUCM User Guide on the CloudUCM product page.
- The alerts generated in the CloudUCM device will be synchronized to the GDMS platform.
- Users can view all CloudUCM alert notifications in the GDMS platform, and set the alert notification methods: Email Notification, Message Notification, or SMS Notification.
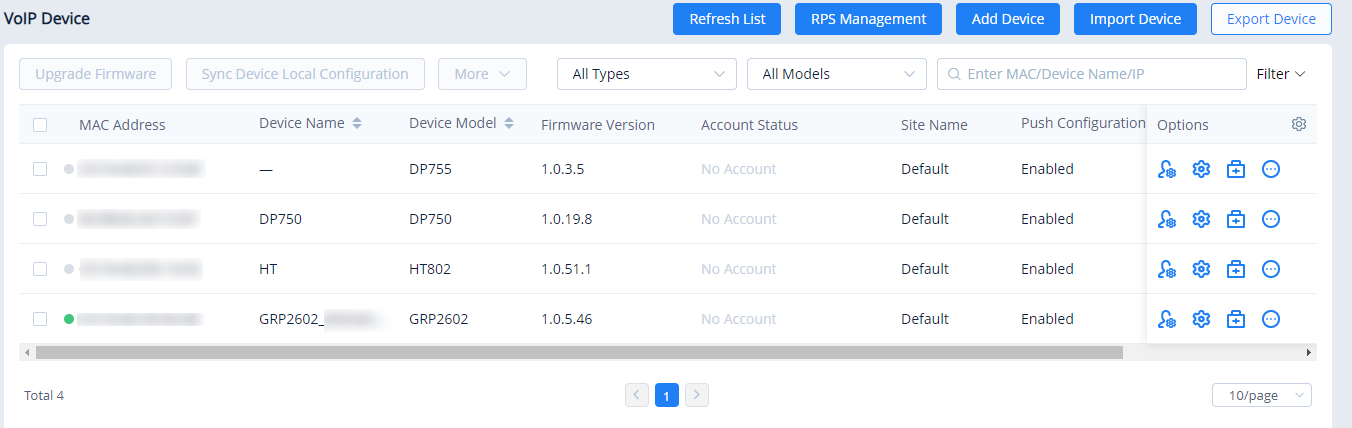
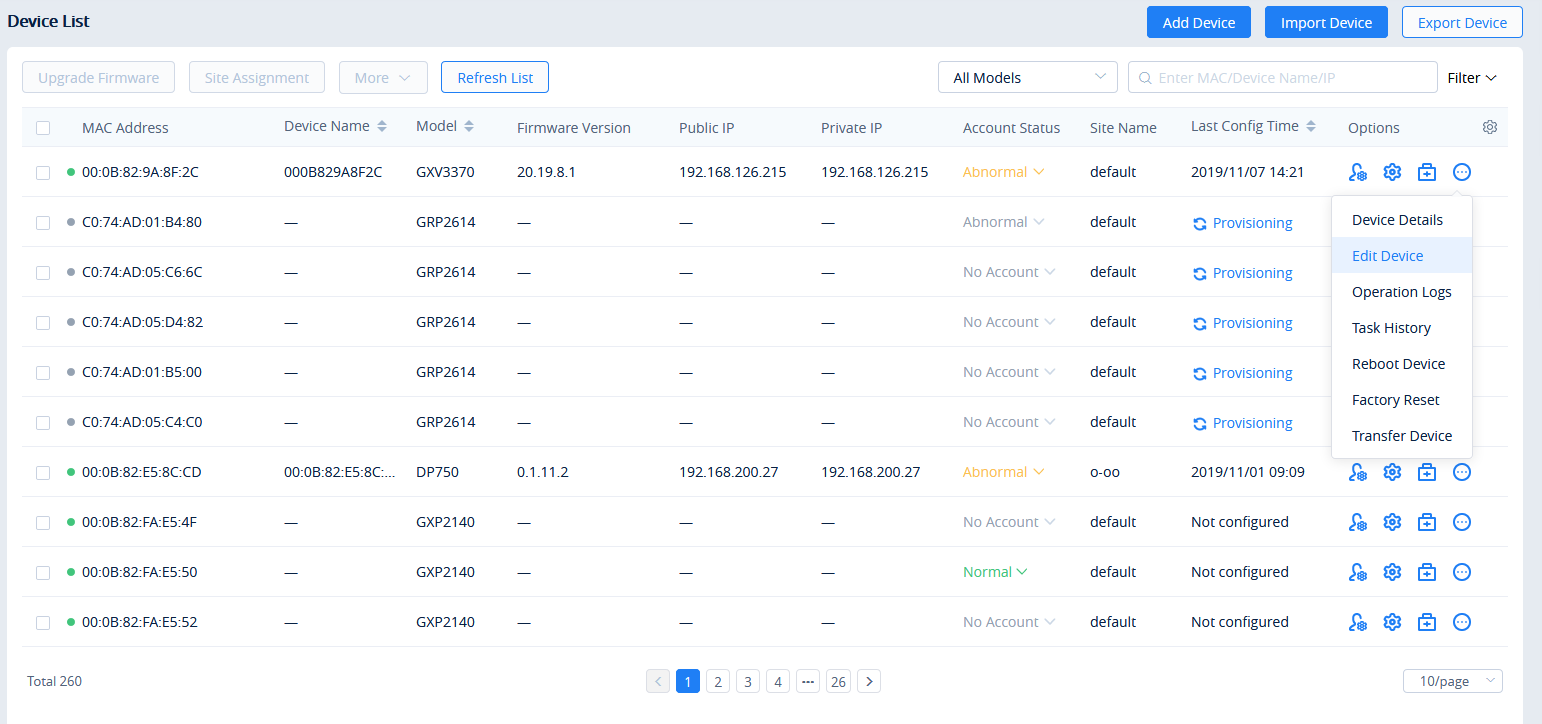
VoIP Device
The Device page shows all the associated VOIP devices. Users can view the information and status of the devices, the allocated account information, etc. GDMS platform supports to allow users to configure parameters, upgrade firmware, reboot/factory reset devices, view device details, device diagnostics, and other operations.
| Status | Description |
|---|---|
|
Status Indicator |
|
|
Account Status | Normal: The allocated accounts from the GDMS platform to the devices are registered successfully, and all accounts can be used normally. When an account is registered normally, the extension number will be displayed.Abnormal: Some of the device’s allocated accounts are unregistered. This may be due to the following reasons:
No Account: GDMS platform does not allocate any account to the device. |
|
Last Config Time |
Synchronizing: If the account and device parameters were modified, the changes will immediately be pushed to the device. This status will be shown while this is happening. Date/Time: The date and time of the last successful provisioning. |
|
Call Status | Idle: The SIP account is in an idle state. Busy: The SIP account is on a call. |
|
HS Status |
|
| Operation | Description |
|---|---|
|
Sorting |
Click on the sorting buttons |
|
Custom Display Option |
Click on the |
|
In addition to being able to search for devices with the search bar near the top-right corner of the page, users can further refine search results by clicking on the Filter button by specifying account status, device status, site, city, and firmware version. |

Add VoIP Device
To add a new device to GDMS, click on the Add Device button. The following window will appear:
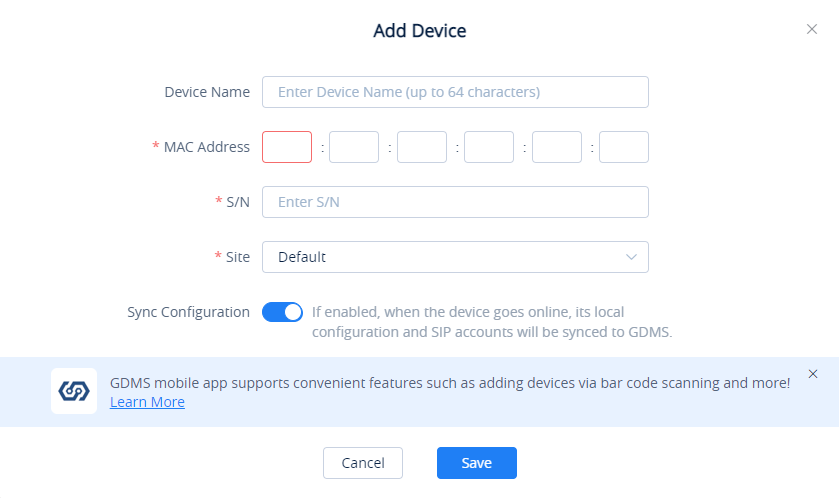
Device Name | (Optional) This option is used to set the name of the device so that the users could identify this device. The maximum number of the input characters is up to 64. |
MAC | (Required) This option is used to enter the MAC address of the device. (Locate the MAC address on the MAC tag of the unit, which is on the underside of the device, or on the package) |
Serial Number | (Required) This option is used to enter the serial number of the device. (Locate the Serial Number on the MAC tag of the unit, which is on the underside of the device, or on the package) |
Select Site | (Required) This option is used to set which site this device belongs to. The default setting is “Default” site. |
Sync Configuration | If enabled, when the device goes online, its local configuration and SIP accounts will be synced to GDMS. |
Add VoIP Device
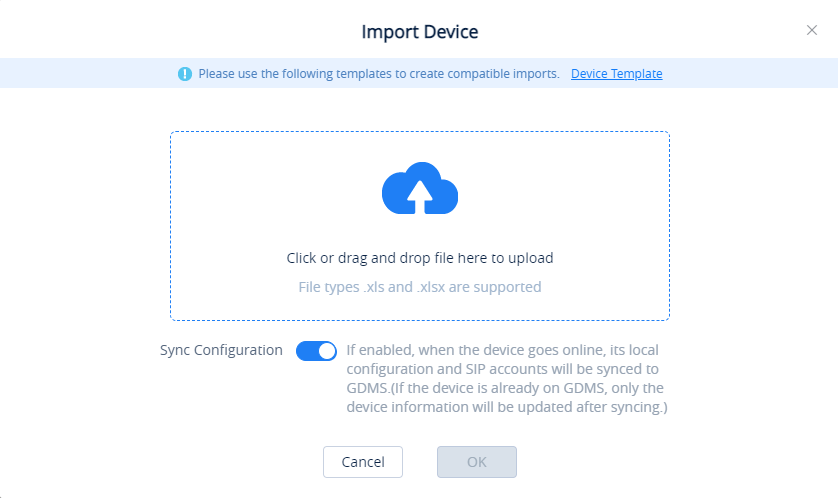
Batch Import VoIP Devices
Users can import multiple devices by uploading a file. Click on the Import Devices button on the Device page to get started. The following window will appear:
- Click on the
 button to download the template. Users must follow the instructions to enter the required information.
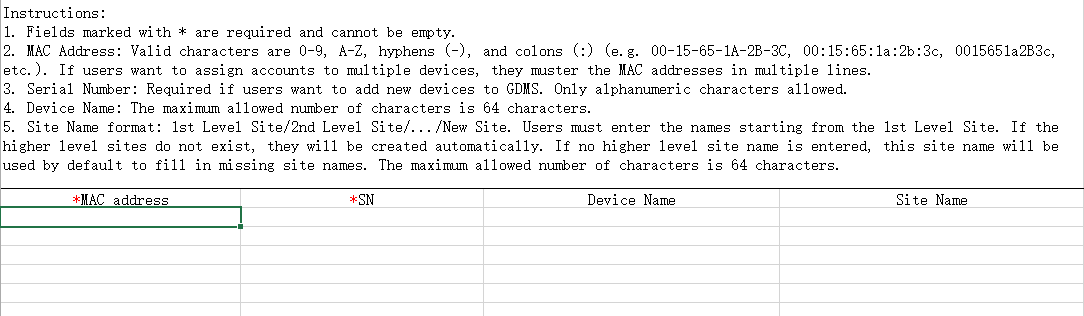
- The template will have the following fields:
MAC Address | Users need to fill in the MAC address of the device in this field (Required). For instance, 000B82E21234, and it supports to fill “:” and “-” characters in this field. |
SN | Users need to fill in the serial number of the device in this field (Required). |
Device Name | This option is used to set the name of the device so that the users could identify this device (Optional). The maximum number of the input characters is up to 64. |
Site Name | Enter the site to assign this device to (Required). If the site is under more than one level, all site levels must be included in the site name (e.g. first_level/second_level/…/new_site). If the site level does not exist, it will be automatically created. Maximum character limit is 64. |
Import VoIP Device Template
- Users can drag the file to the pop-up window, or they can click the upload button to select a file from their PC to import.
- Once the file is imported into GDMS, the result window will appear. If any data failed to import successfully, users can export the problematic data, re-edit, and attempt to import them into GDMS again.
- The user can choose to sync the devices’ configuration by enabling “Sync Configuration”. Once that is enabled, the local configuration and SIP accounts will be synchronized to the GDMS.
Configure SIP Account (Non-DP Devices)
Users can configure SIP accounts for each device from the Device page.
- In the devices list, click on the icon
 corresponding to the account to access the Account configuration page.
 - After clicking the button, users will see the Account configuration page as the figure shows below:
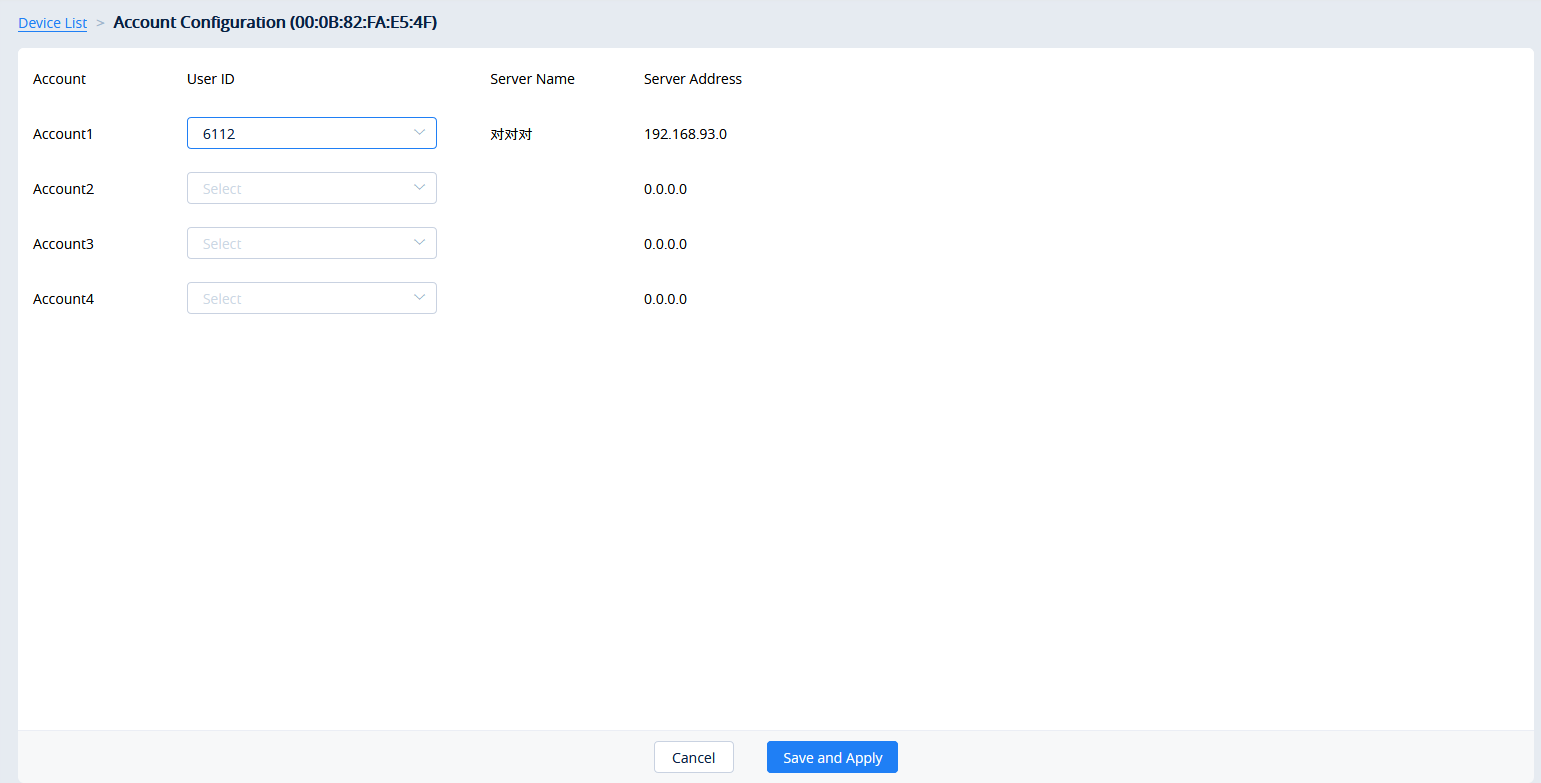
- On this Account Configuration page, users can select the SIP accounts created on the SIP Account page to assign to the device.
- Users could also select to replace the existing SIP account with a specific account or delete the existing accounts.
- Click on the Save and Apply button. The accounts will then be assigned to the device.
Configure SIP Account/Line (DP Devices)
Users could configure SIP accounts and lines for DP devices. GDMS platform supports to allow users to view the existing SIP accounts for current devices and edit/delete the accounts.
- In the devices list, click on the icon
 corresponding to the account to access the Account configuration page.
 - After clicking the button, users will see the figure as shown below:
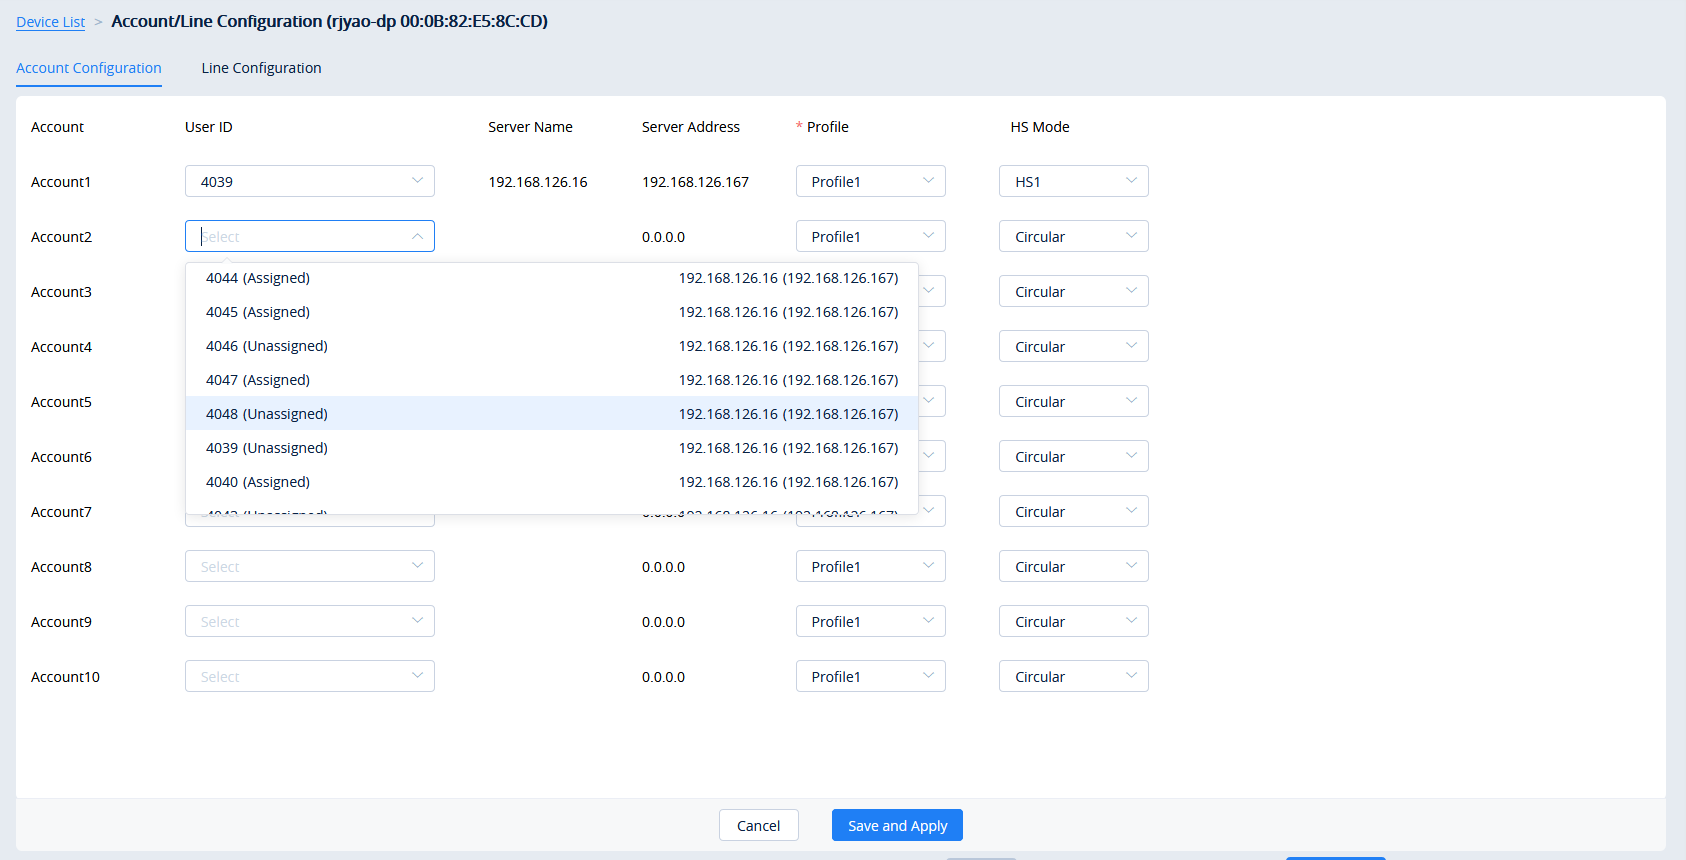
|
User ID |
Allocated: This SIP account has already been allocated to other devices; Unallocated: This SIP account has not been allocated to any device. |
|
Profile |
Different SIP servers cannot be set to the same profile. |
|
HS Mode |
If this field is not filled, the default setting is “Circular” mode. |
- To configure the lines for each HS mode, click on the Line Configuration tab.
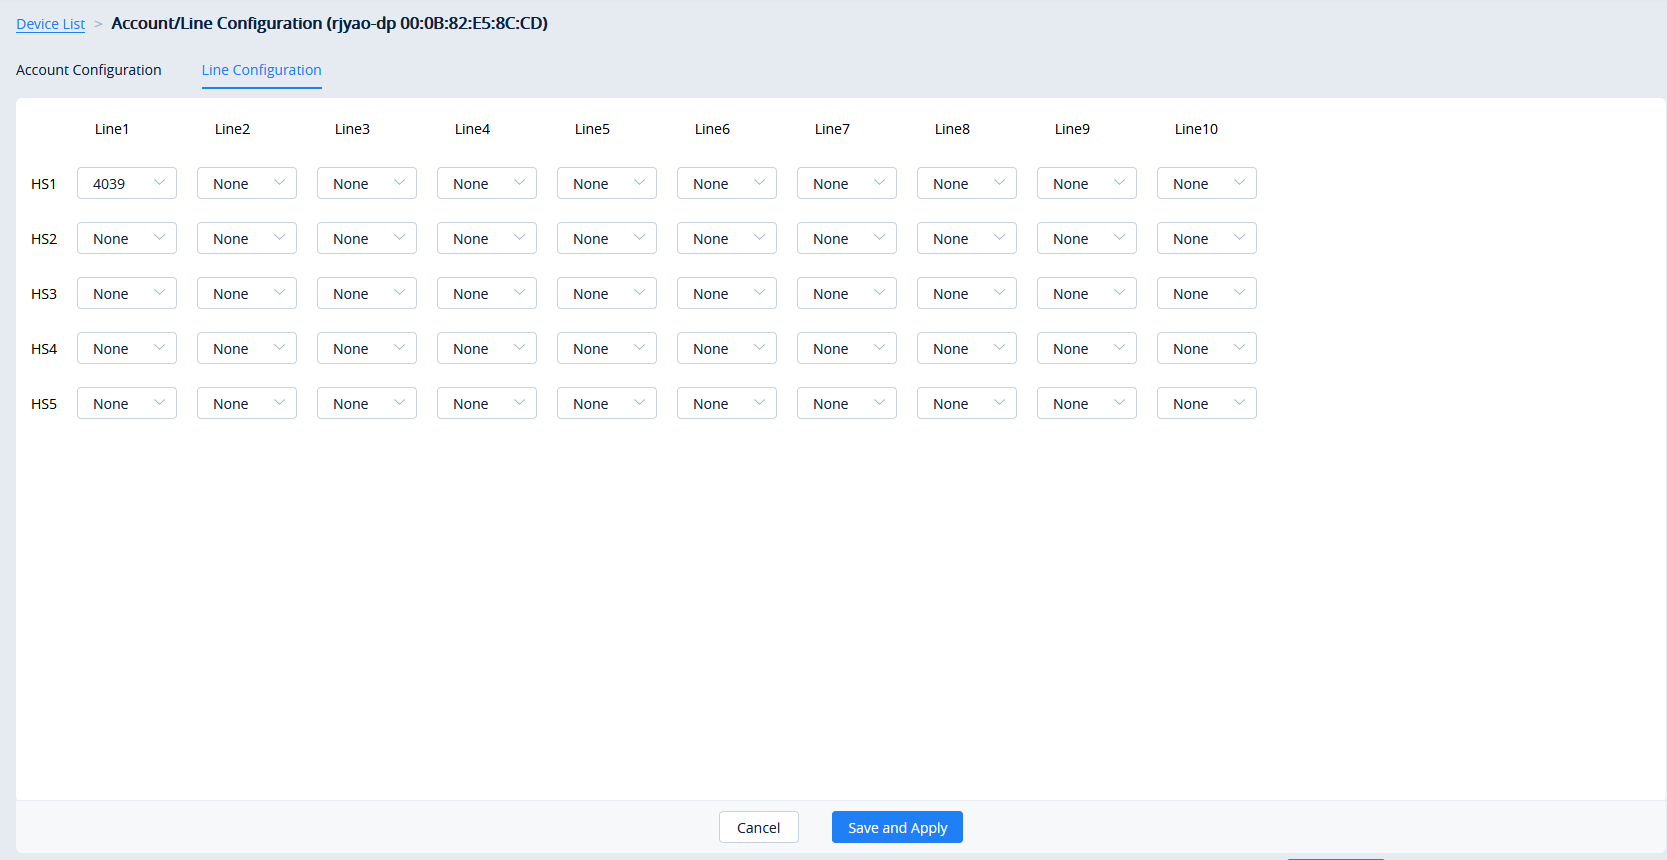
- Select the desired SIP accounts to use for each line and handset.
- Click on the button Save and Apply to allocate the SIP accounts or lines to the devices.
Device Parameters Configuration
Users can modify the configuration parameters for a single device.
- In the device list, click on the
 button to go to the Device Parameters Configuration page, as shown in the figure below:

- Clicking on the Select All button will select every option on the current page. Clicking on it again will deselect all the options.
- Clicking on the Reset Settings button will restore all settings on the current page to default values.
- Clicking on the button
 following the account, users can copy and paste the current account configuration to other accounts.
- When users try to configure the device wallpaper or screensaver image, users can select a picture from the resources list, or upload the local picture to GDMS and configure it to the device.

- Modify the desired settings on the page or click on the Switch to GUI Editor to configure device settings via text editing (i.e. p-values).
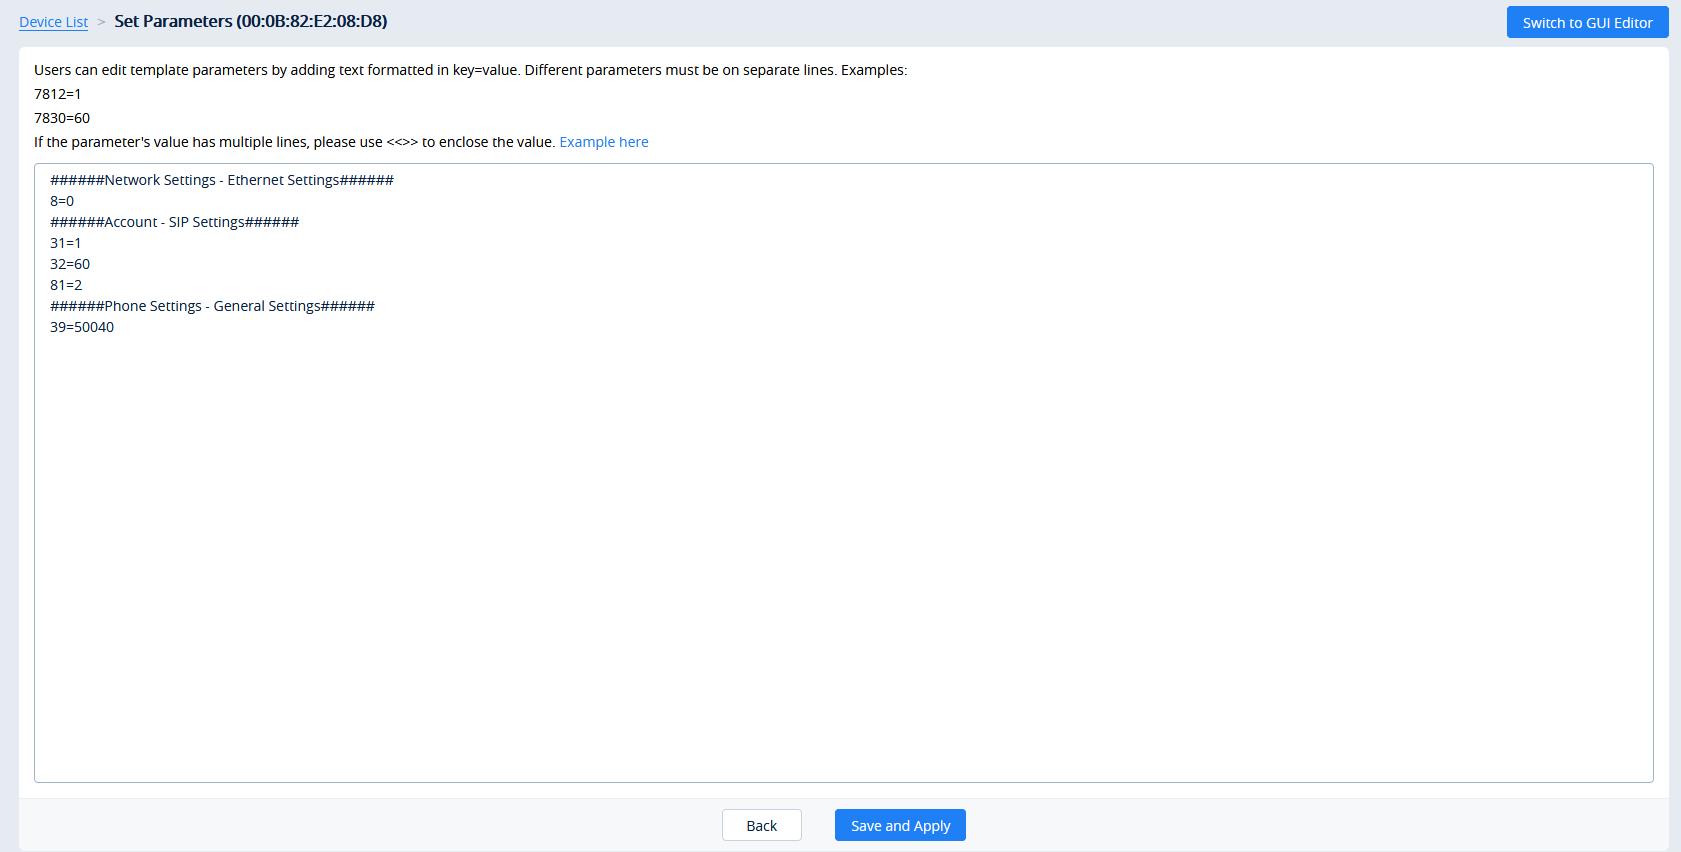
- The format requirement is key=value. The key can be either a P-value or an alias.
- Users can enter the latest parameters and values of a device in the text editor even if the GDMS configuration page does not display the configuration options.
- Click on the Save and Apply button to finalize changes. Only settings that are checked will be pushed to the device.
MPK Stickers Printing
Certian Grandstream IP phones have a MPK sticker placement (GRP2604, GRP2634, GRP2636, GXP2130, GXP2160) to label the MPKs as the user desires. GDMS offers a way to print the stickers when configuring the devices.
You can select whether to pring the background color, whether to display the border, or whether to print repeatedly on the A4 paper.
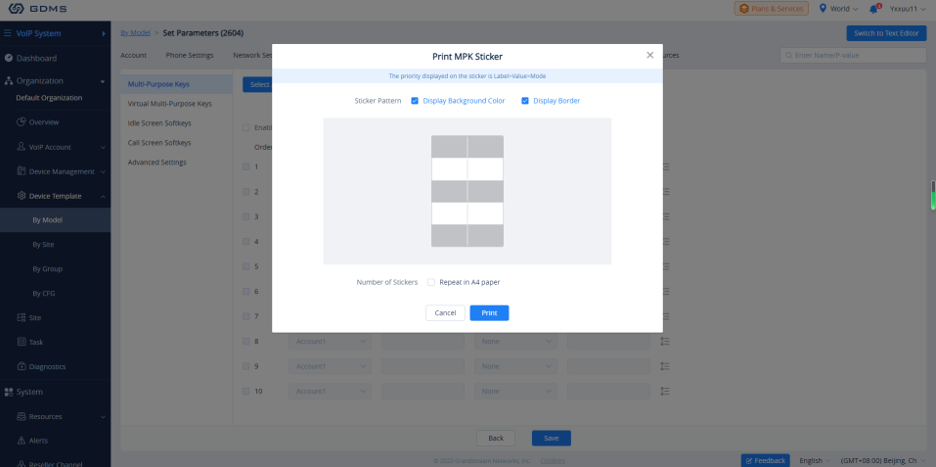
When the user prints MPK sticker repeatedly on an A4 paper, it will be displayed as following.
If you want to print on the native sticker provided with the IP phone unit. Please refer to the following video: https://v.youku.com/v_show/id_XNDc3MDczOTIwOA==.html
Upgrade The Firmware
You can select the firmware path from the existing firmware resource list or directly upload your firmware file by clicking the “Upload” button following the option. Please refer to the screenshot below.
Configure Resource Files
Users can configure custom ringtones and languages for devices (Supported models: GXP/DP series).
- On the Device list, click on the
 button to go to the Device Parameters Configuration 🡪 Resource Configuration page, as shown in the figure below:
- On the “Custom Ringtone” page, for Ringtone 1 to Ringtone N, select a ringtone file from the resources for each ringtone index.
- On the “Language Configuration” page, select a language pack from the resources for the device.
- Click on the “Save and Apply” button, the device will download the selected resources from the firmware path.
Synchronize Device Local Configuration
Before the device is configured, the user can synchronize the device’s local configuration to the GDMS server.
- Select a specific device, click icon
 and select the option “Synchronize Device Local Configuration”.
 - Click “OK” to confirm synchronization on the pop-up window. Then, the GDMS server will synchronize all the account configurations and parameters of the current device to the GDMS server.
- Enable Sync SIP Account if you wish to have your SIP accounts synchronized to the GDMS.
Disable Push Configuration
If the user does not want to push any configuration to the device through the GDMS server, please follow the steps below:
- Select a specific device, click icon
 and select the option “Disable Push Configuration”.
 - Click “OK” to confirm the operation, the account configuration or parameters will not be pushed to the device through the GDMS server anymore, including the scheduled tasks. The configuration that has not been pushed to the device will not be pushed to the device anymore.
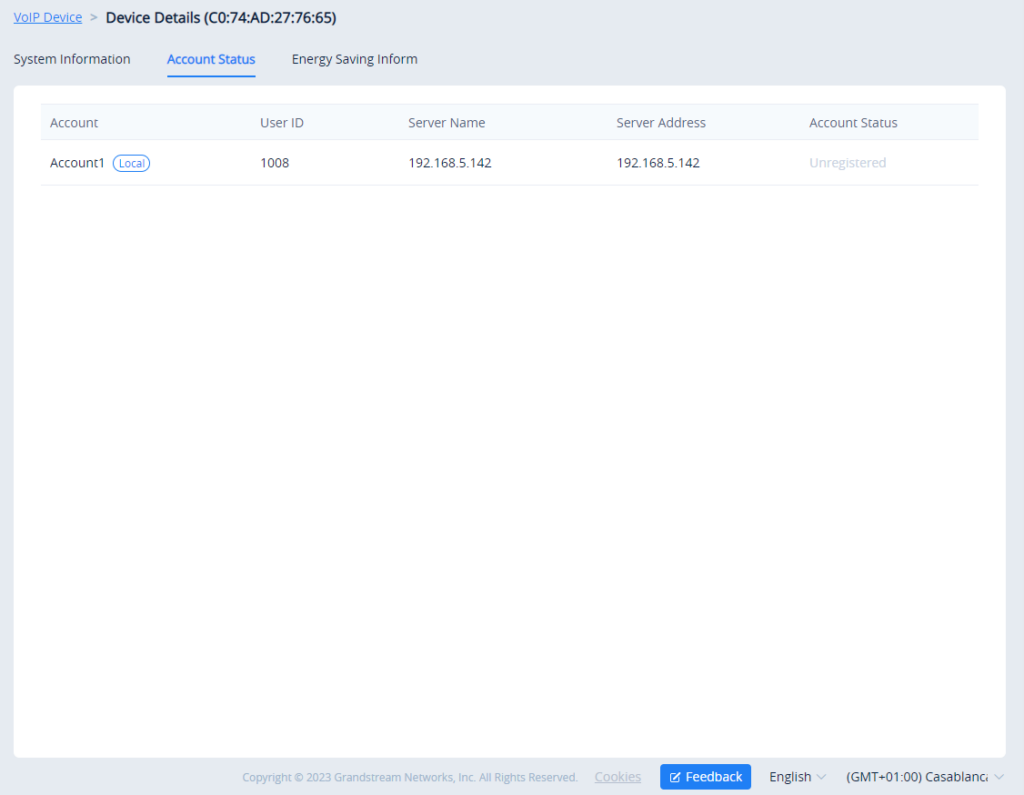
View VoIP Device Details
Click on the ![]() button to view a specific device’s system information and account status.
button to view a specific device’s system information and account status.
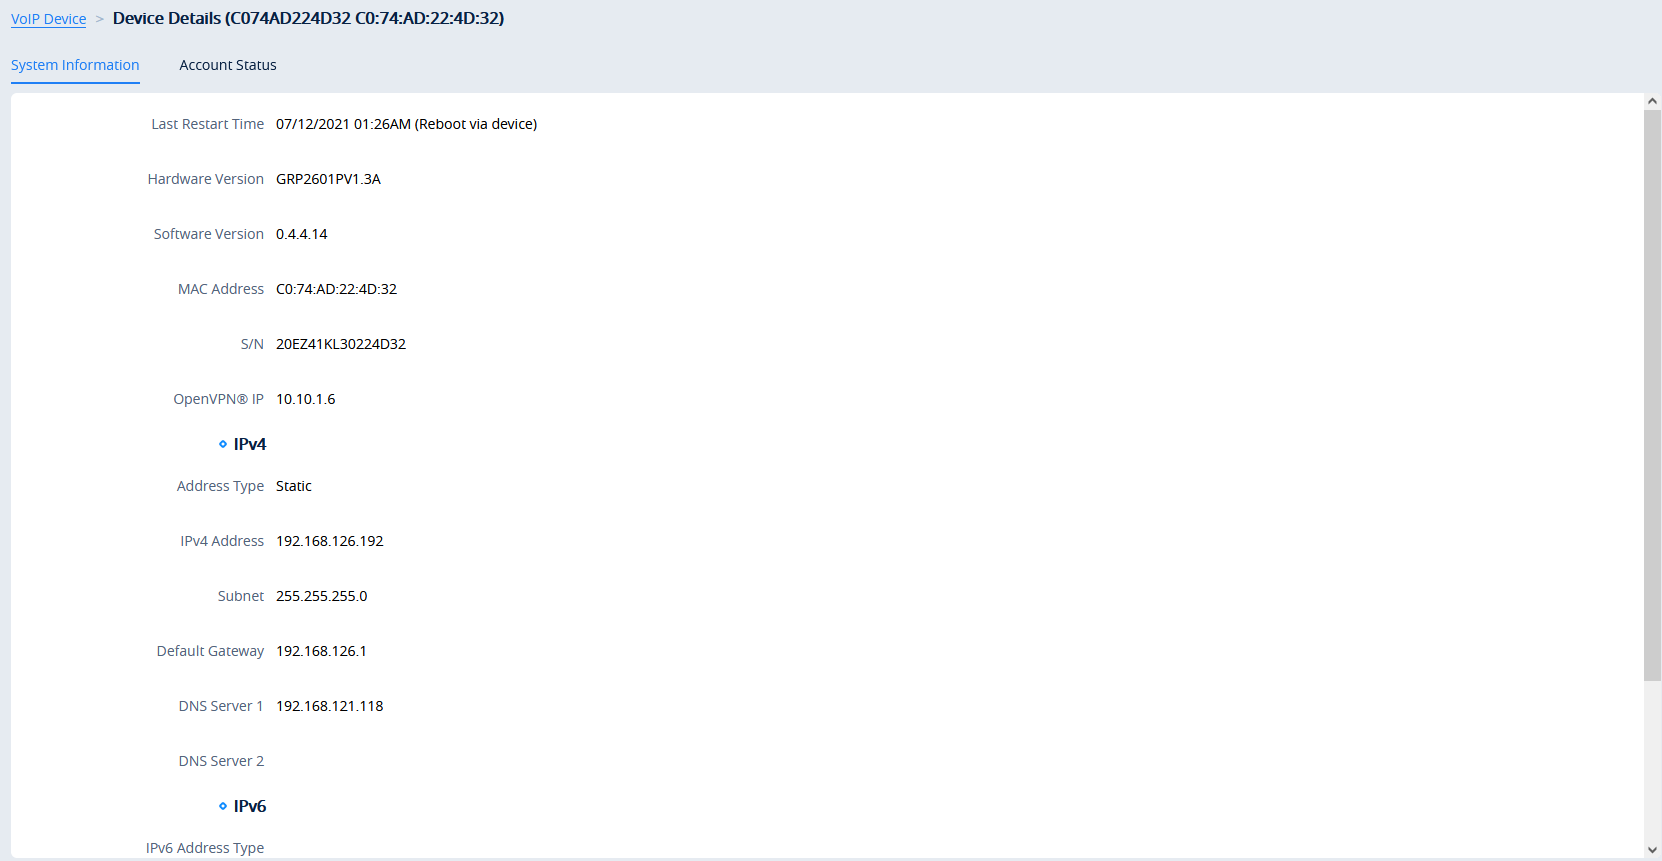
System Information
The device details include System information, Network information, Account status, etc.
Account Status
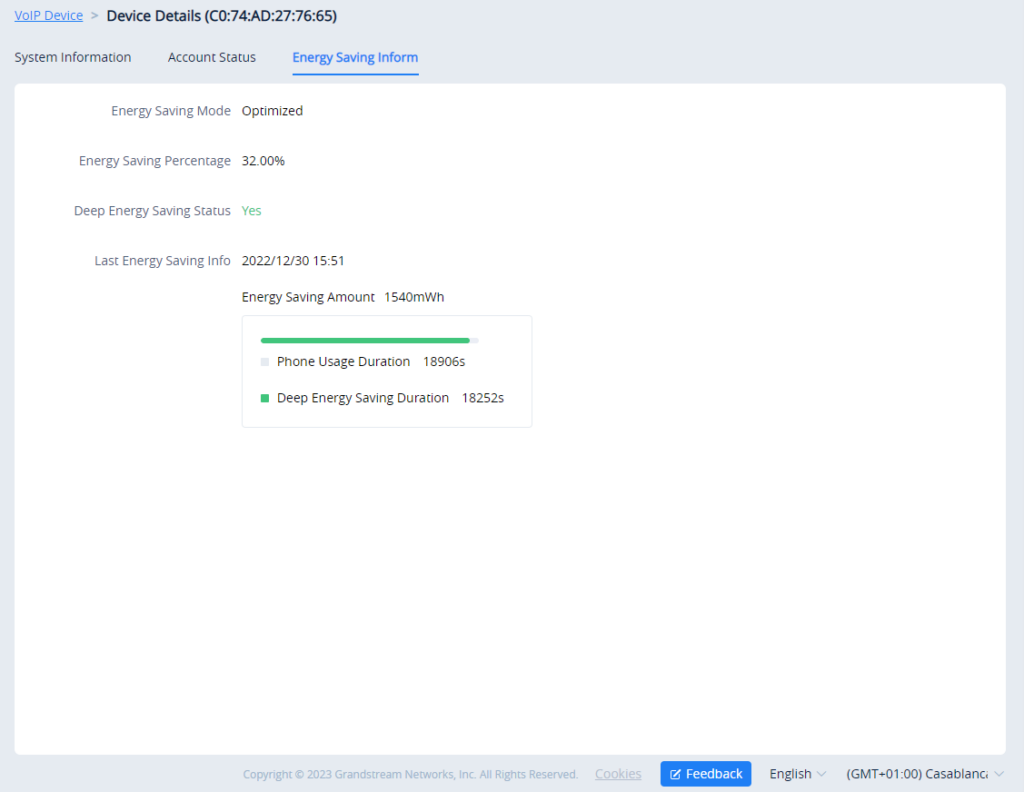
Energy Saving Inform (GRP Series Only)
If you are viewing the detail of a GRP series IP phone, an additional tab will appear Energy Saving Inform. This tab contains information about your GRP device power usage. It provides information about which Energy Saving Mode has been configured on your device, the percentage of the energy saved, whether Deep Energy Saving has been enabled, and information about when the Energy Saving has been enabled with all the related information of how much energy has been saved and how long the phone has been operational under energy saving mode.
Edit VoIP Device
Users could edit the Device name and which site the device belongs to.
- In the device list, click on the button
 which is following the device, and select Edit Device to access the device editing page.
- Users will see the device editing page as the figure shows below:
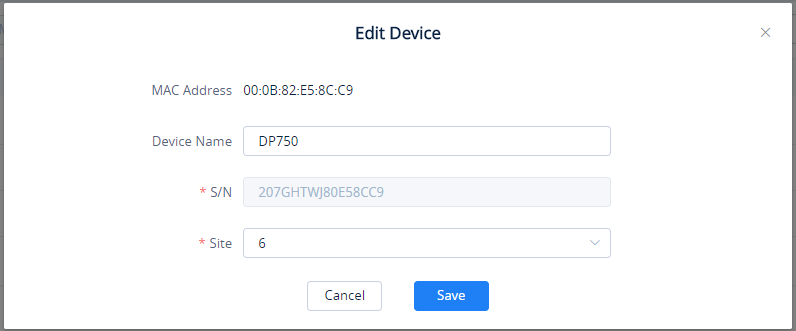
- Click on the Save button to apply the changes on the GDMS platform.
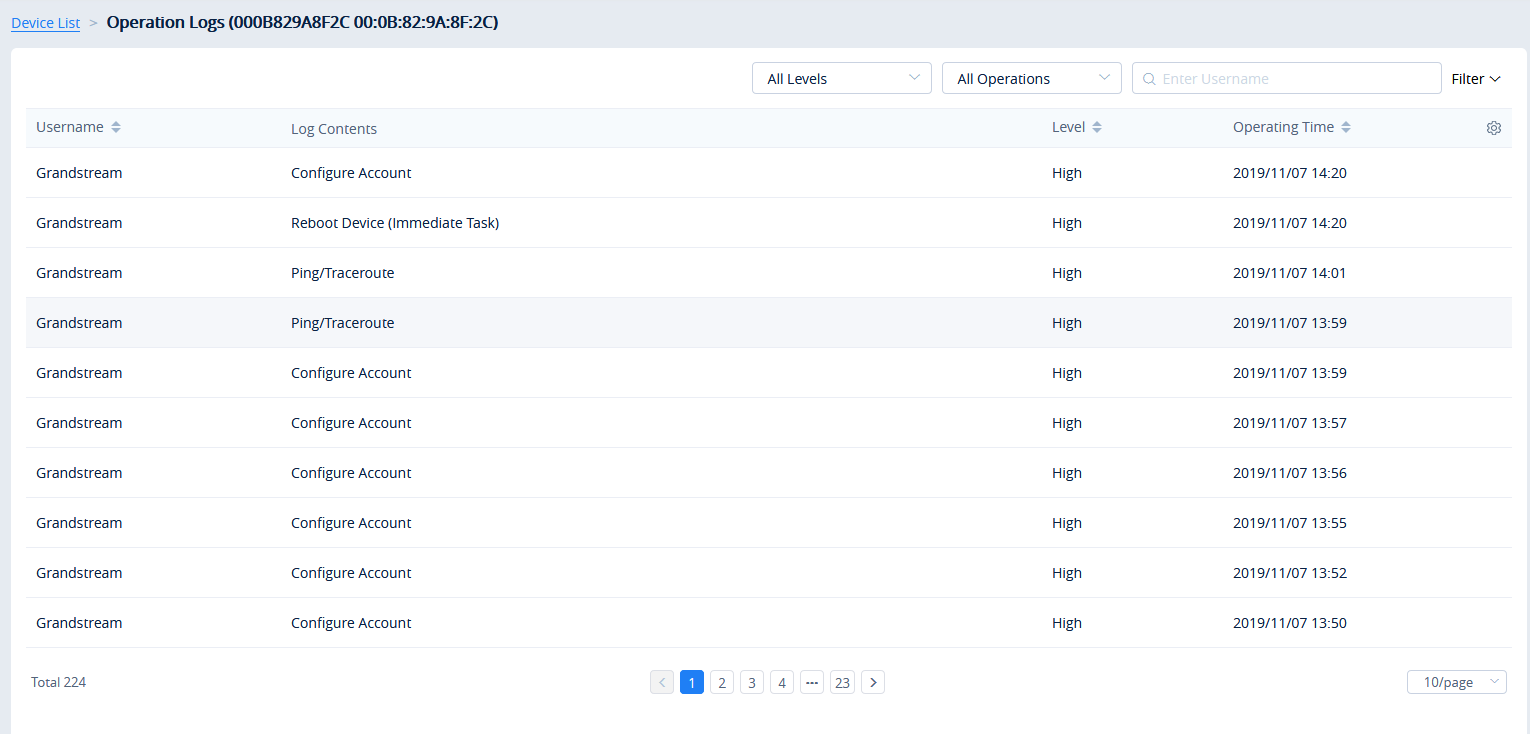
View VoIP Device Operation Logs
Users could view all operation logs for a specific device on the GDMS platform.
- On the Device List, select the menu button
 following the specific device, and click on the “Operation Log” button.
 - Access to the Operation Log menu of the device, the menu includes the operation logs of device SIP account configuration, updating configuration parameters, device rebooting, device upgrading/downgrading, device factory reset, device diagnostics, etc.
Note:
Users could only view the device operation logs for the last 30 days.
View VoIP Device Task History
Users could view all task histories in the sub-system for a specific device on the GDMS platform, including immediate tasks and timed tasks.
- On the Device List, select the menu button
 following the specific device, and click on the “Task History” button.
 - Access the Task management page, and search for all tasks of the specific device.
Firmware Upgrade
Users could upgrade firmware for a batch of devices to a specific firmware version.
- In the device list, check multiple devices, and then click on the button Upgrade Firmware on the top of the Device page.
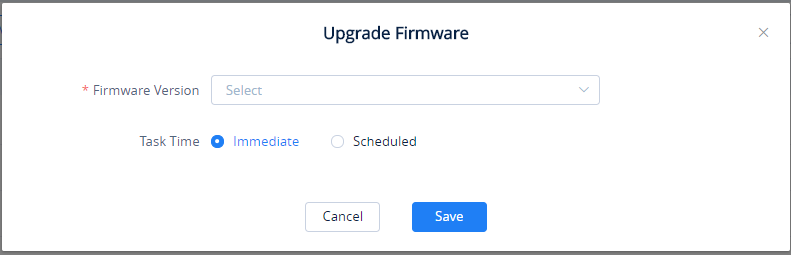
- Users need to select the firmware version to upgrade to.
- Task Time: Select when to start the firmware upgrade. Users can choose to upgrade immediately or to schedule the firmware upgrade for a specific time.
- Click on the Save button to create the task. Users can check the status of the upgrade by navigating to the Task Management page.
Site Assignment
Users could edit the site of a batch of devices on the GDMS platform. The default site is “default”.
- Select the desired devices and click on the Site Assignment button.

- Select the site to assign the selected devices.
- Click on the Save button, and all selected devices will be transferred to the selected site.
Move Device
Users can move devices to other organizations.
- Select the desired devices and click on More 🡪 Move Device.
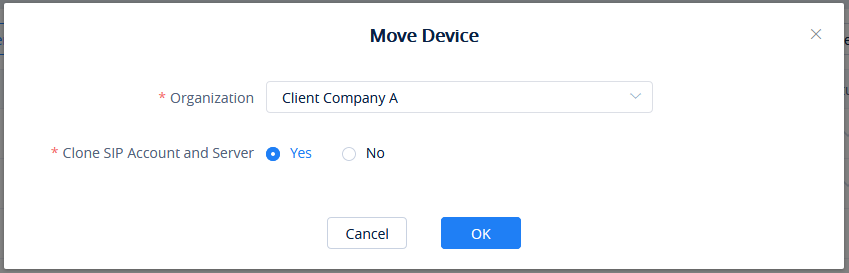
- Select the target organization where to transfer the device.
- The user needs to select whether to clone the SIP account and server which have been configured in the devices. If the user selects “No”, only the device data are transferred to the new organization, and the configured SIP accounts become empty after moving the devices.
Assign RPS
To assign an RPS to the devices, please click on ![]() and pick an RPS from the list, then select the devices to configure with the selected RPS.
and pick an RPS from the list, then select the devices to configure with the selected RPS.
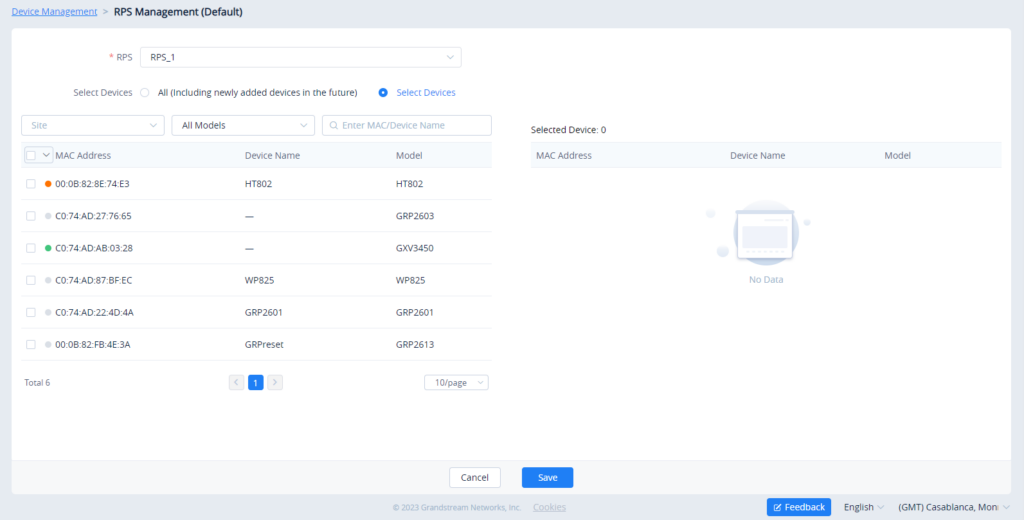
If no RPS has been created, please refer to RPS Management section.
Remote Access to Device Web UI
On the GDMS platform interface, even though the VoIP device is under the internal network, the user can remote access the VOIP device Web UI through the external network for viewing data and configuration.
- Go to the VoIP Device interface, click the “More” settings for a VoIP device 🡪 Remote access to Device Web UI, as the screenshot shows below:
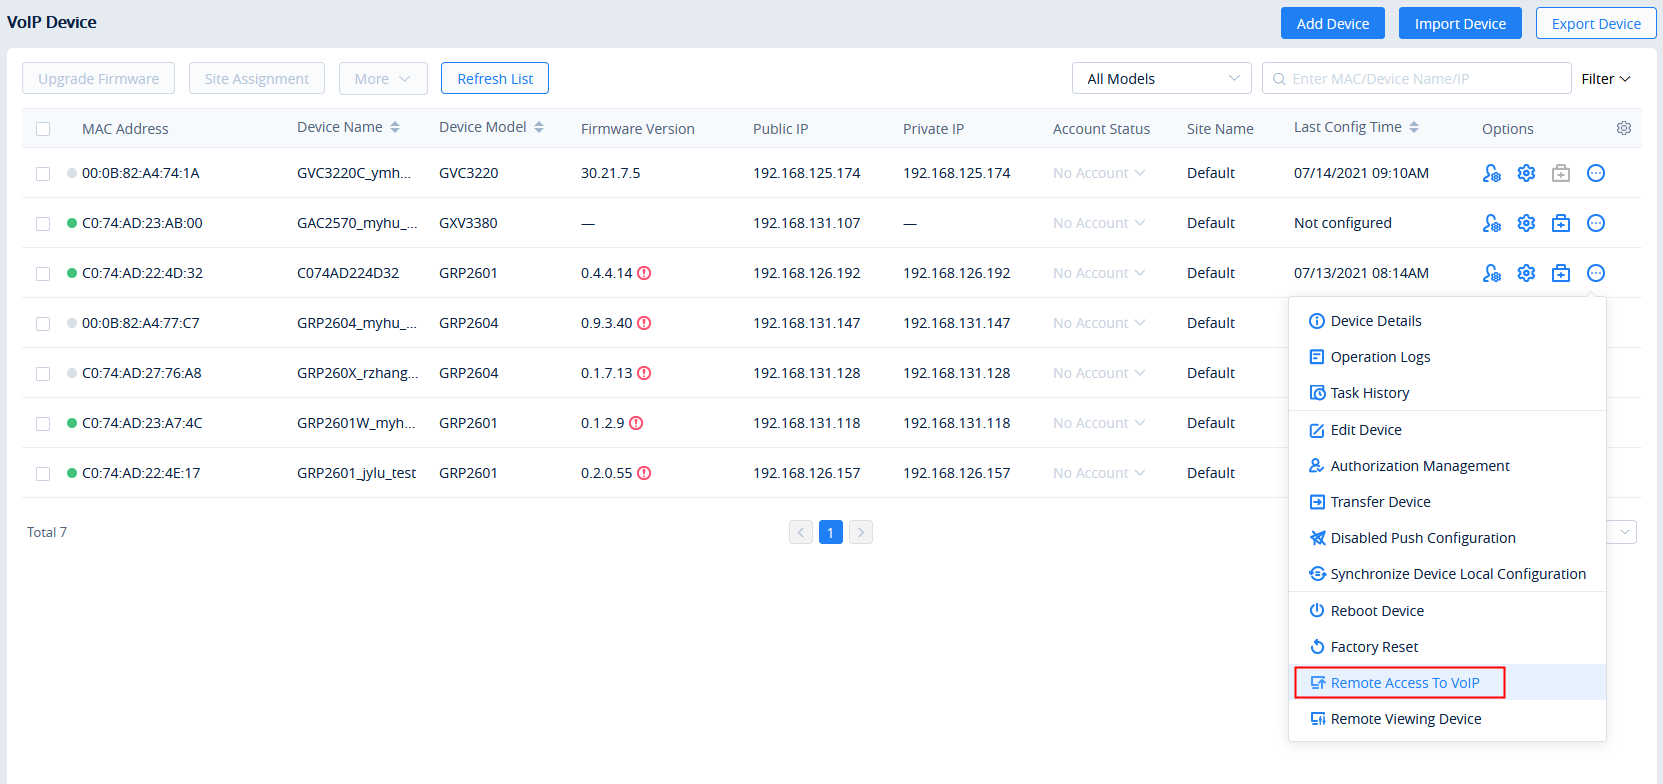
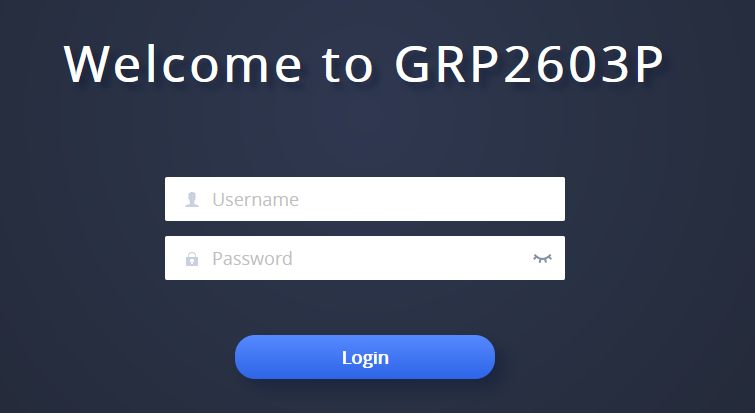
- Go to the Web UI, and log in to the VoIP device through the username and password. As the screenshot shows below:
Remote Access to Device Interface
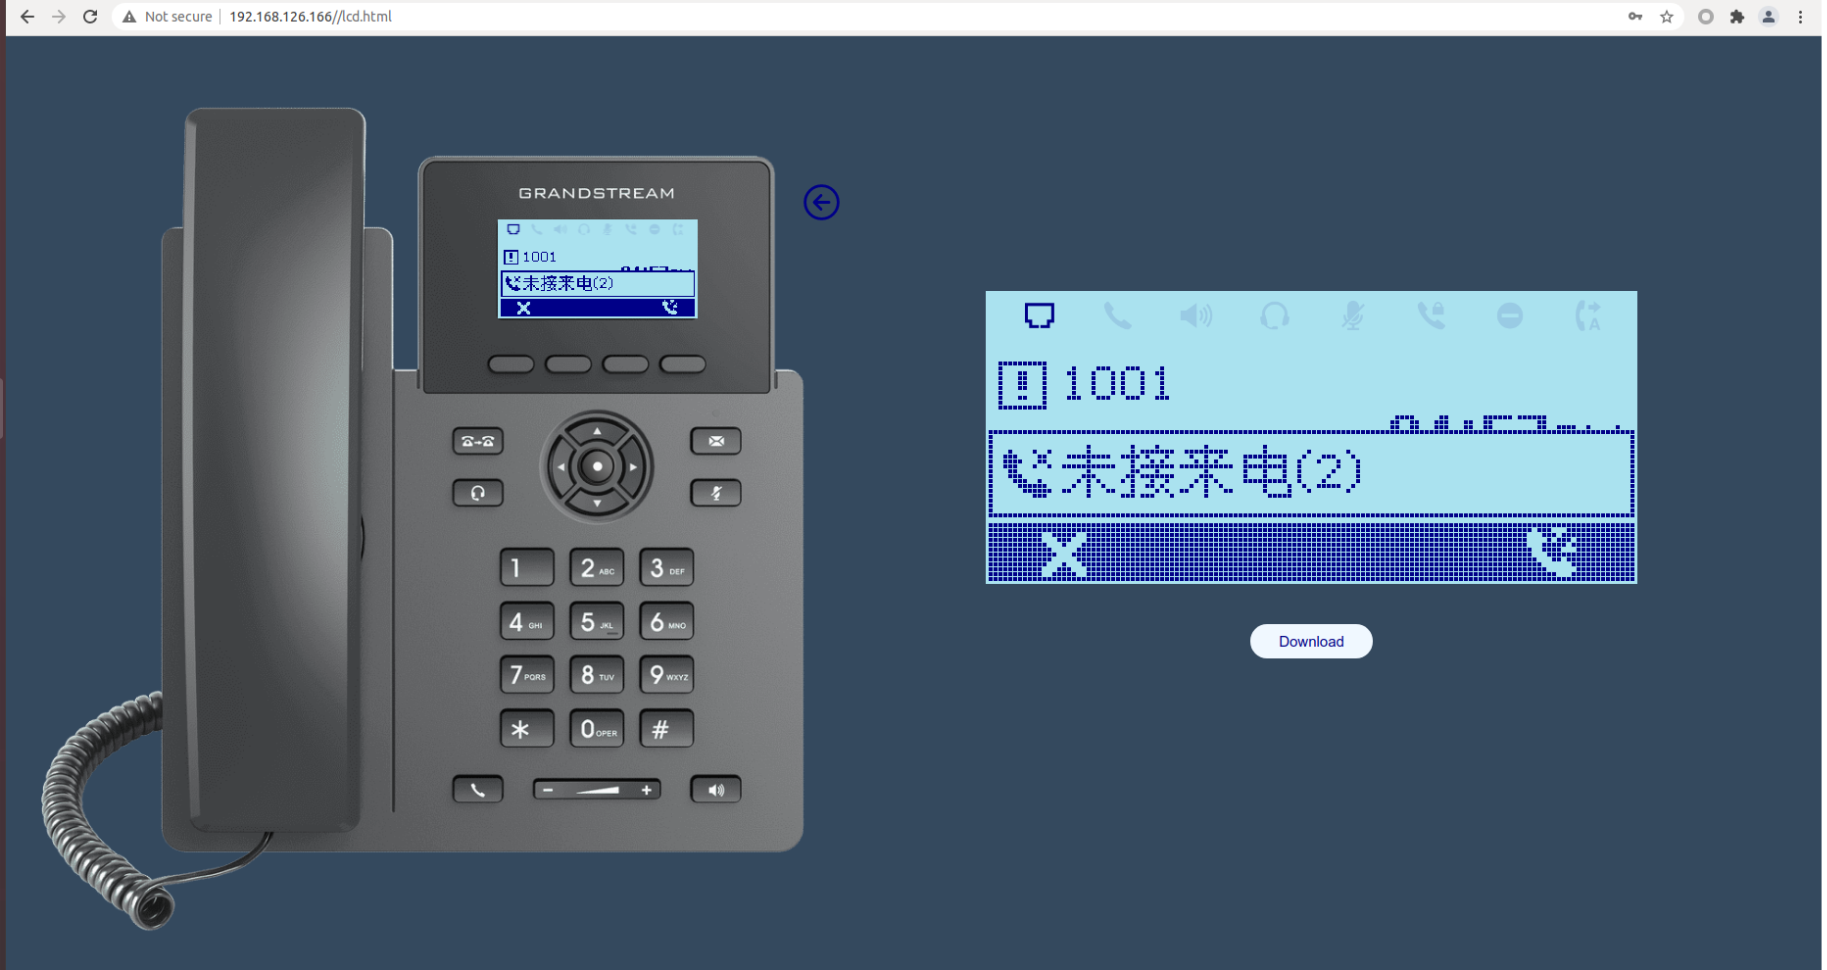
The user can remote access Grandstream devices using the GDMS. This can be performed even if the device is behind a NAT router, and the user will be able to view the screen of the device.
- Go to VoIP Device interface, click the “More” settings for a VoIP device 🡪 Remote access to Device Interface, as the screenshot shows below:
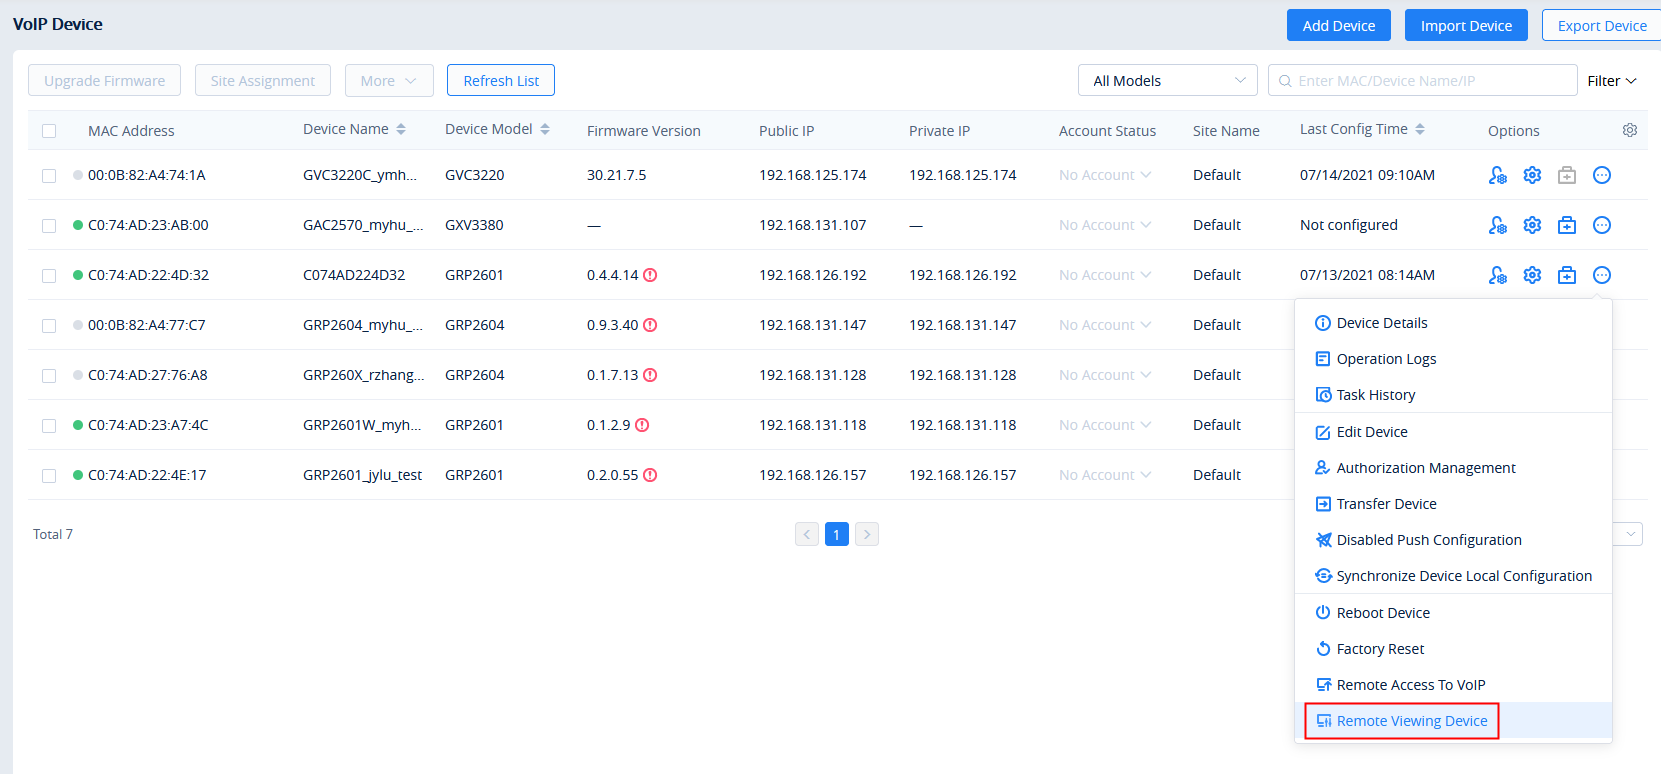
- Enter the virtual device interface, the user can control the virtual buttons on the device and the LCD screen, as the screenshot shows below:
Reboot VoIP Device
Users could reboot one device or a batch of devices on the GDMS platform.
- Select the desired devices and click on More 🡪 Reboot Device.

- Task Time: Select when to start the device reboot. Users can choose to reboot immediately or schedule the reboot for a specific time.
- Click on the Save button to create the task. Users can check the status of the reboot by navigating to the Task Management page.
Factory Reset
Users could factory reset one device or a batch of devices on the GDMS platform.
- Select the desired devices and click on More 🡪 Factory Reset.

- Task Time: Select when to factory reset the device. Users can choose to factory reset the device immediately or to schedule the factory reset for a specific time.
- Click on the Save button to create the task. Users can check the status of the reboot by navigating to the Task Management page.
Delete VoIP Device
Users could delete one device or a batch of devices on the GDMS platform.
- Select the desired devices and click on More 🡪 Delete.
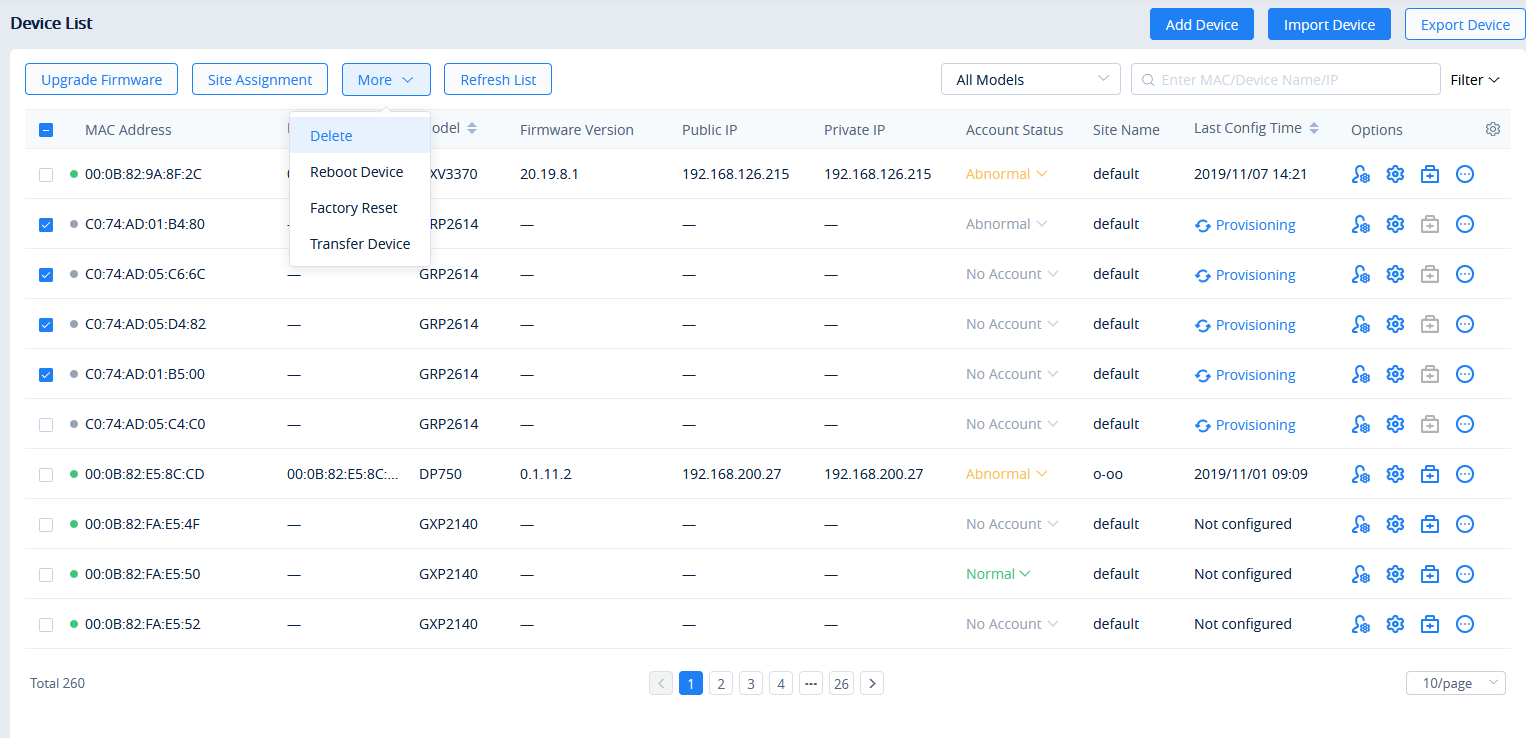
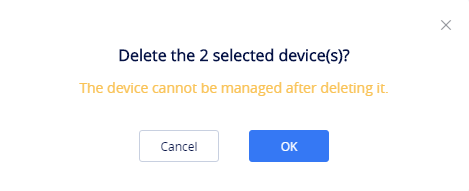
- Click on the OK button on the pop-up window to confirm deleting the devices, and the selected devices will be deleted immediately from the GDMS platform. The scheduled tasks involving the deleted devices will be canceled too.
Export VoIP Device
To export the entire device list, click on the ![]() button in the top-right corner of the device list page. The exported list includes all device and account information.
button in the top-right corner of the device list page. The exported list includes all device and account information.
Manage Device via GDMS Support
If the user’s device is abnormal and wants Grandstream Support to troubleshoot the problem, the user can enable to manage the device through GDMS Support.
After the authorization is assigned, Grandstream Support can diagnose the device and assign parameters to the device.
- On the VoIP Device list, click the “More” button
 following the device and select to access the “Authorization Management” interface, as the screenshot shows below:
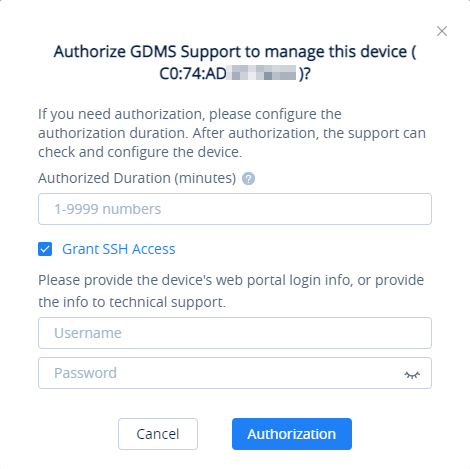
- Enter the authorization duration, which can be set between 1 to 9999 minutes, according to the time required for problem troubleshooting.
- Tick “Grant SSH Access” box to grant access using SSH, then enter the username and password of the VoIP endpoint device SSH information.
- Once the user clicks the “Authorization” button, Grandstream Support can only manage the device within the authorization period. Once the authorization period ends, Grandstream Support cannot manage the device.
Stop Authorizing Manually
- When the problem is confirmed, the user can end authorization manually. The user can click the “More” button
 following the device, and select to access the “Authorization Management” interface, as the screenshot shows below:
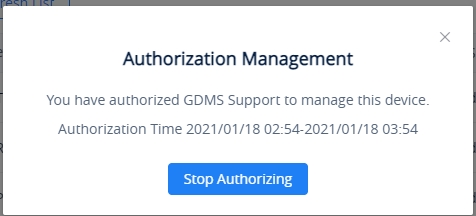
- The user can click the “Stop Authorizing” button to stop managing the device immediately, and then Grandstream Support cannot manage the device.
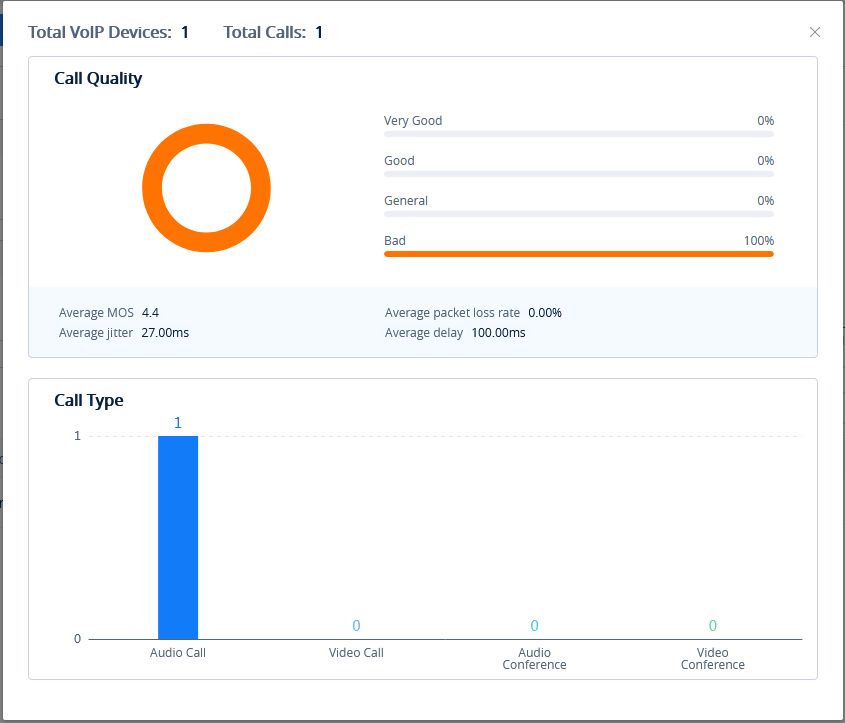
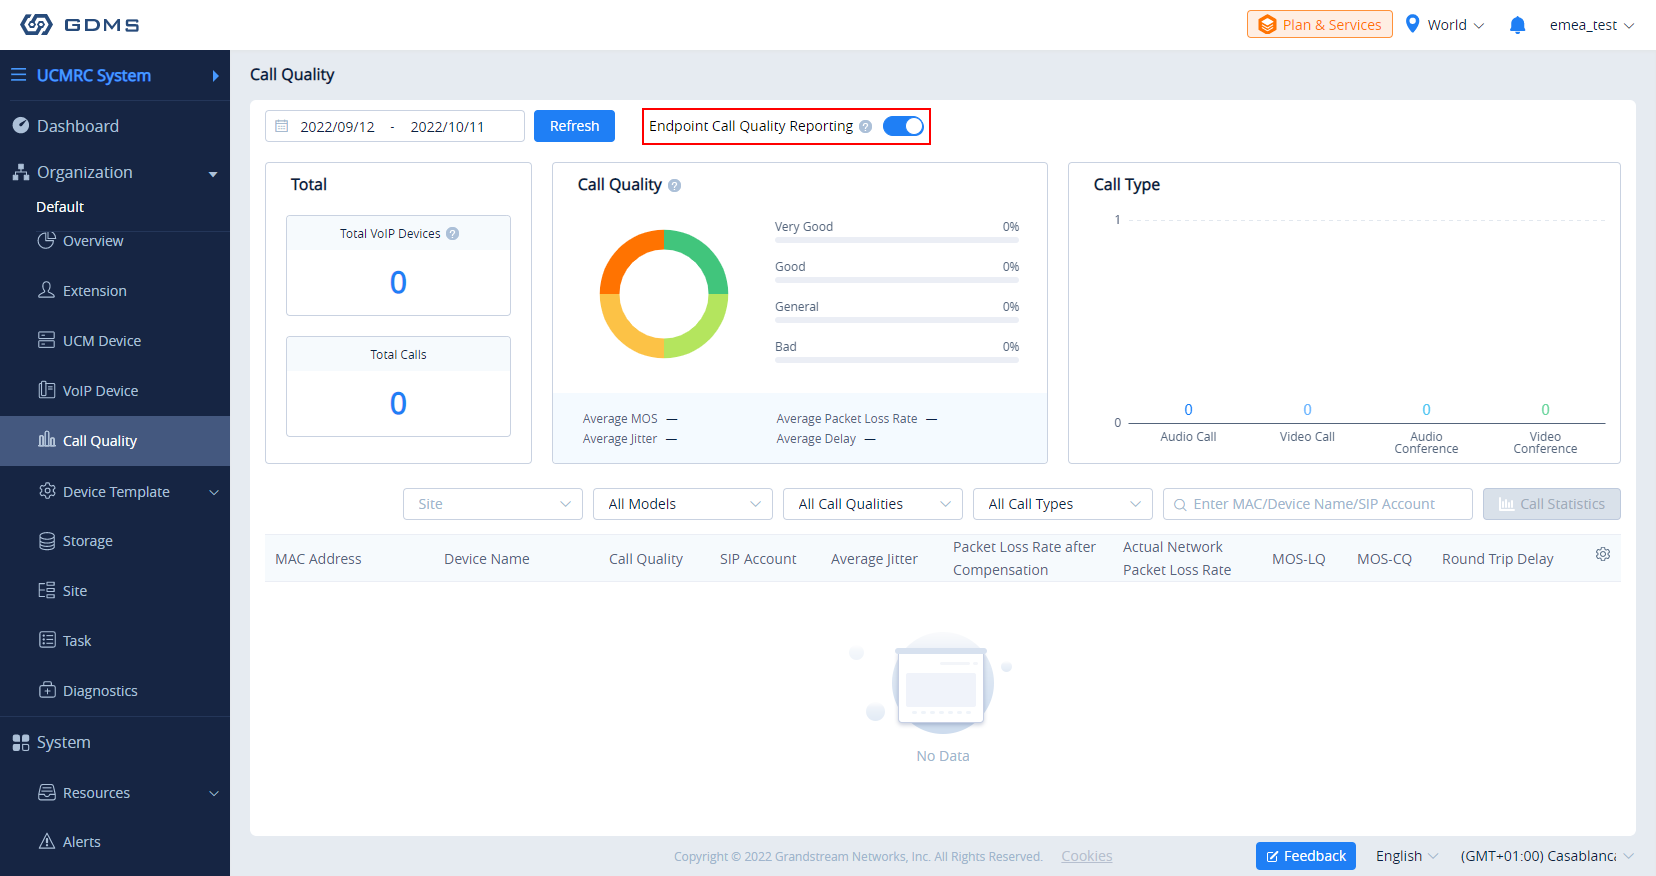
Call Quality
Statistics Overview
The interface below displays the call quality reported by the device on the GDMS platform.
Prerequisites: The device must use the SIP account in the UCM server which has the UCM RemoteConnect service so that the device can report the call quality to the GDMS platform. This function is only supported for certain UCM RemoteConnect plans. To check which plans support this feature please refer to the RemoteConnect website: https://ucmrc.gdms.cloud/home
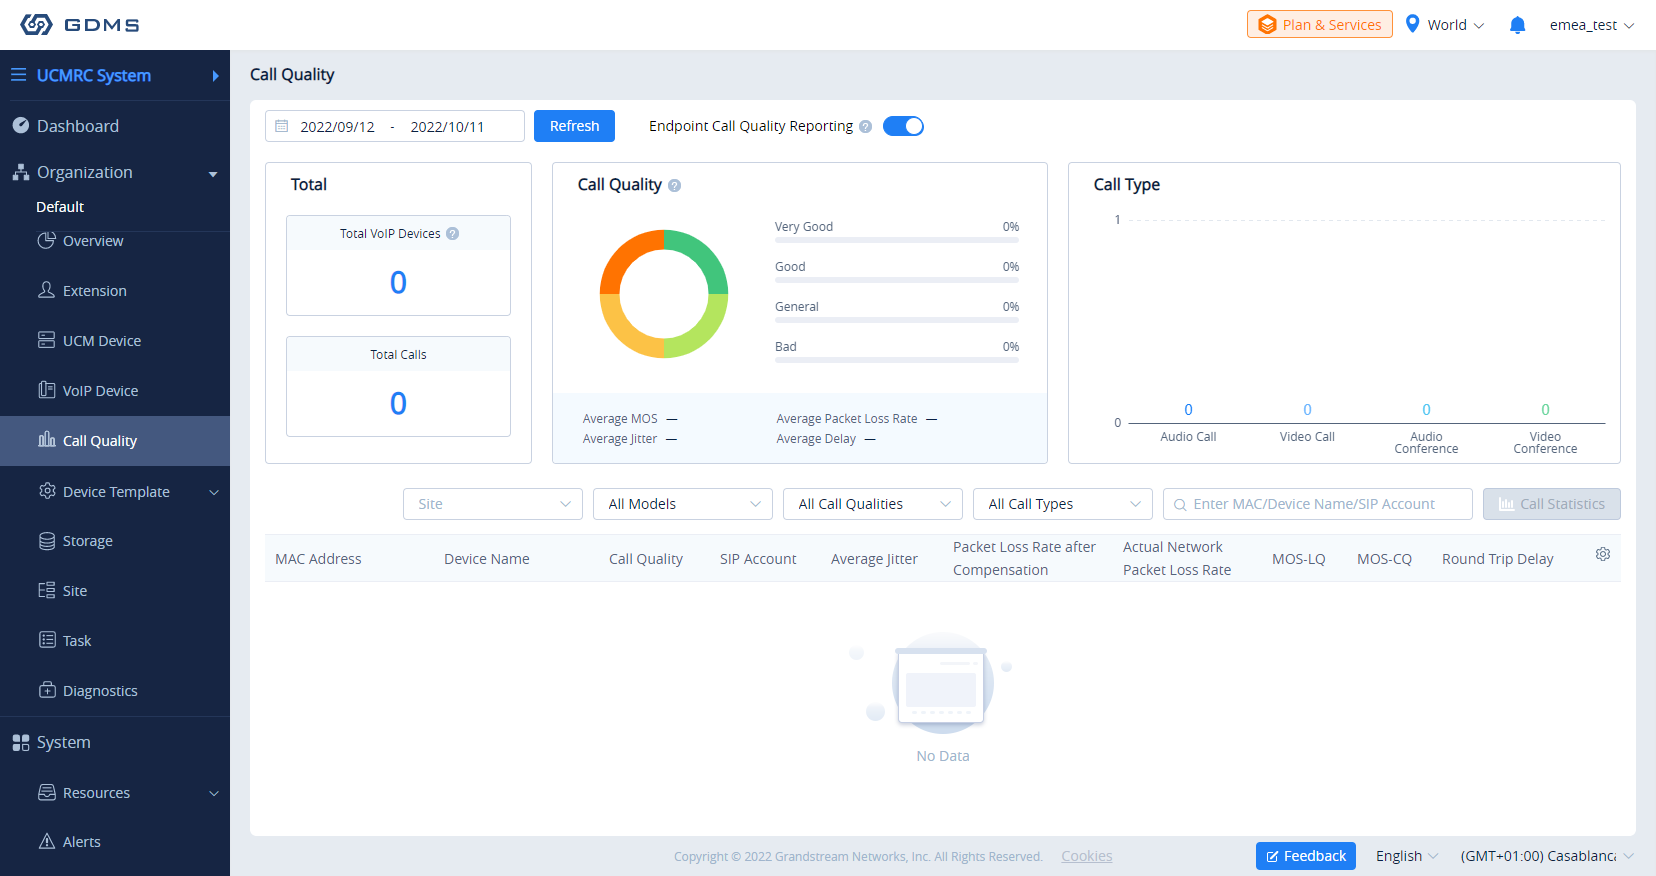
| Module | Description |
|---|---|
|
Total VoIP Devices | Display the number of VoIP devices reported by the current organization (only display the statistics report for the current filter time) |
|
Total Calls | Display the number of calls reported by the current organization (only display the statistics report for the current filter time) |
|
Call Quality | Display the call quality ratio and average values for the reported call history by the current organization (only display the statistics report for the current filter time) |
|
Call Type | Display the call types for the reported call history by the current organization (only display the statistics report for the current filter time) |
Call Quality Record
GDMS platform displays all reported call quality records on the Call Quality interface.
Please see the screenshot below:

- GDMS platform supports filtering call quality records by date.

- GDMS platform supports search call quality records by site, device model, call quality, and call type.
- GDMS platform supports to search of call quality records by device MAC address, device name, and SIP Account.
- Click the Call Statistics button
 to view the statistical report of the filtered call quality records.
Enable/Disable Call Quality Reporting
Users can enable/disable reporting call quality on the GDMS platform. If the user does not want to view the call quality report, the user can disable this function on the GDMS platform.
On the Call Quality interface, the user can click Phone reports the call quality button ![]() to disable reporting call quality. When this function is disabled, the devices under the current organization will no longer report the call quality to the GDMS platform.
to disable reporting call quality. When this function is disabled, the devices under the current organization will no longer report the call quality to the GDMS platform.
RPS Management
RPS (Redirection & Provision Server) allows creating and pushing configuration to many Grandstream devices, this reduces the time and effort spent on configuring the devices manually, which improves the deployment process greatly and lessens the frequency of mistakes that occur when configuring the device manually.
The user can create instances of RPS (Redirection and Provisioning Server).
To configure this option, the user needs to create an RPS server by providing the IP address or FQDN domain of the server, and then select the protocol used for upgrading.
Server Name | Enter the server name. |
Config Upgrade Via | Select the protocol used for configuration upgrade.
|
Config Server Path | Enter configuration server path. |
Config Server Username | Enter the username to authenticate into the server. |
Config Server Password | Enter the password to authenticate into the server. |
Always Authenticate Before Challenge | Only applies to HTTP/HTTPS. If enabled, the phone will send credentials before being challenged by the server. |
Config File Prefix | If configured, only the configuration file with the matching encrypted prefix will be downloaded and flashed into the phone. |
Config File Postfix | If configured, only the configuration file with the matching encrypted postfix will be downloaded and flashed into the phone. |
To assign a specific RPS to an organization, click on the three dots and add an organization as indicated in the figure below.

When an RPS is edited, the new RPS will be automatically delivered to the associated devices. If an RPS has been deleted, it only deletes the association between the RPS and the device. The RPS configuration will not be deleted from the device.
Device Template
The Device Template page allows users to create templates that can be used to provision devices of the same model or in the same group. Additionally, users can upload configuration files for individual devices and manage them individually.
By Model
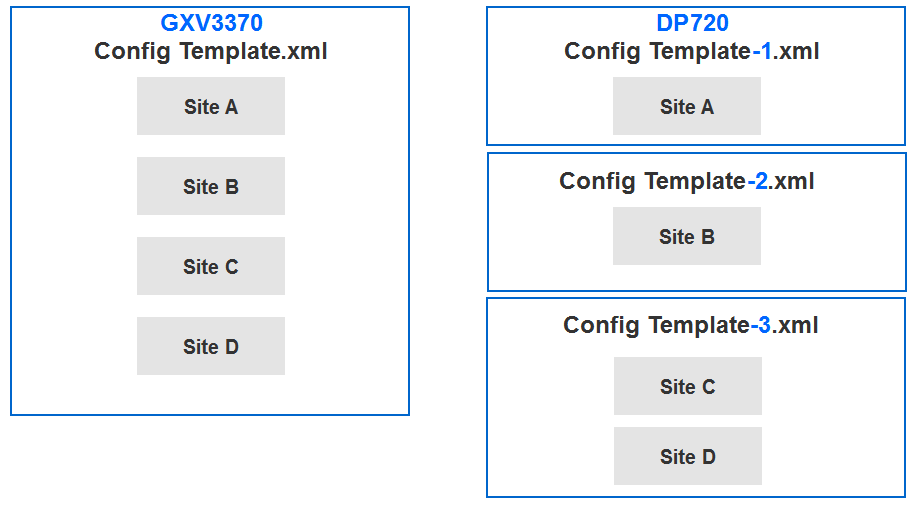
Users could customize the configuration template and classify the templates by device model and site. Users could also configure a batch of devices on the GDMS platform, which means users could create a configuration template for all the same models of devices or create multiple templates for different sites.
Automatic Configuration Push
When a device is added to GDMS for the first time, it will automatically obtain and use the configuration template for its model.
Manual Configuration Push
To manually push the configuration to specific device models, click on the ![]() button of the desired models.
button of the desired models.
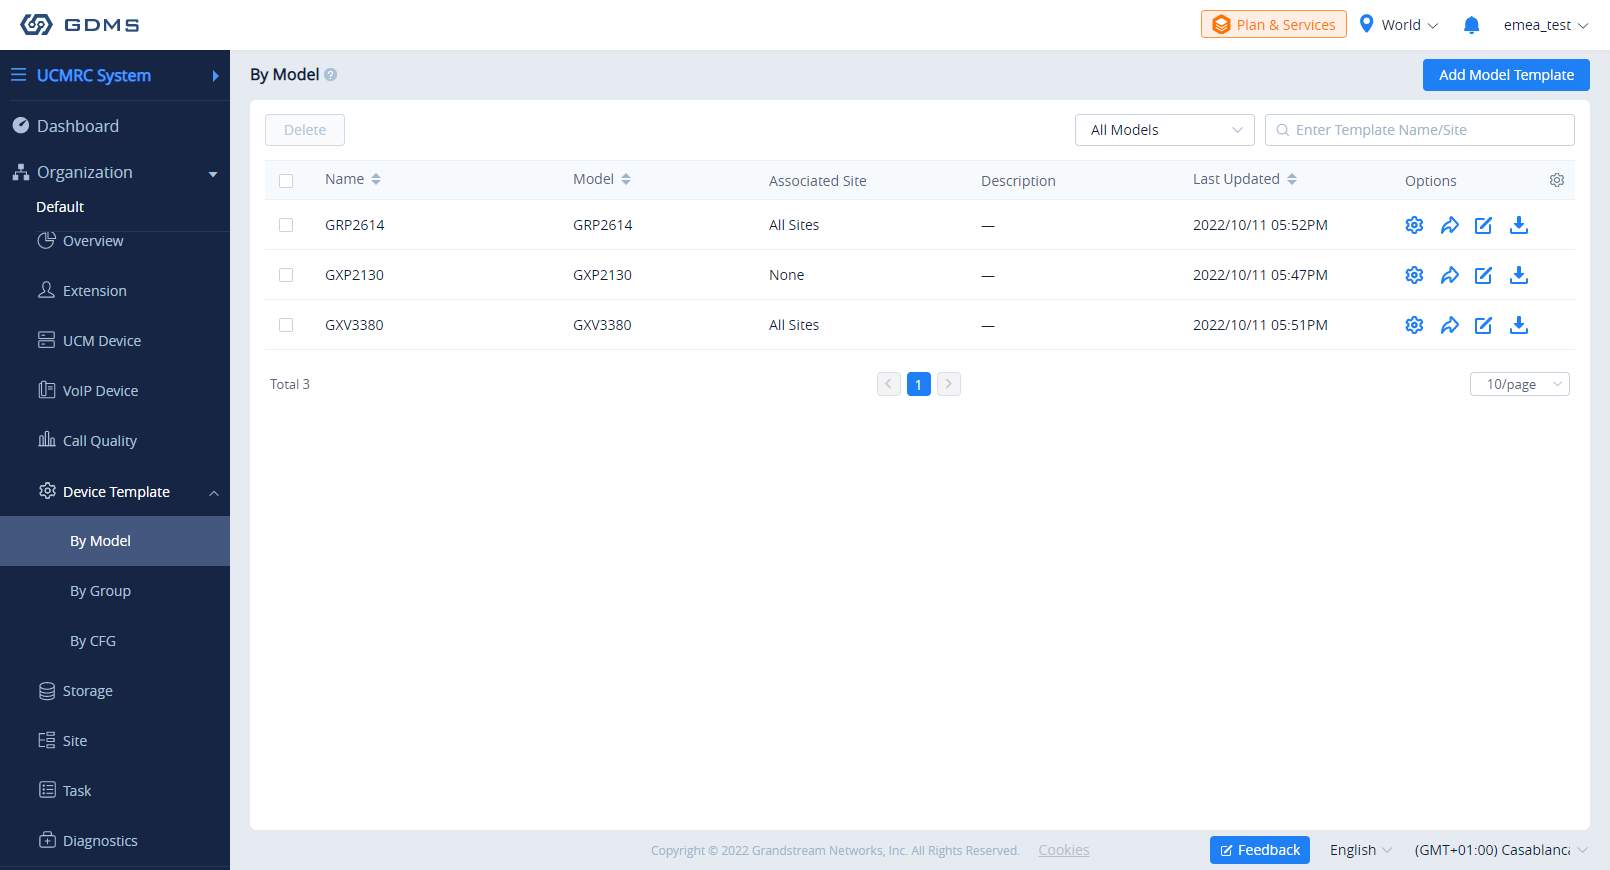
Example:
For GXV3370 devices, all sites are using the same configuration template and all the devices under site A – D will acquire the same configuration template – GXV3370 Config Template.xml.
For DP720 devices, different sites have different configuration templates. The DP720 in site A will acquire the DP720 configuration file – Config Template -1.xml; the DP720 in site B will acquire the DP720 configuration file – Config Template -2.xml.
Add Template
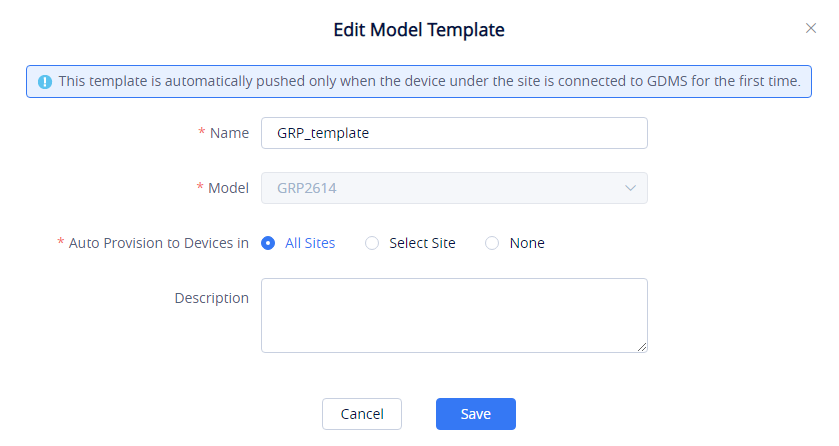
To add a configuration template for a specific device model, click on the Add Template button on the By Model page and enter the following information:
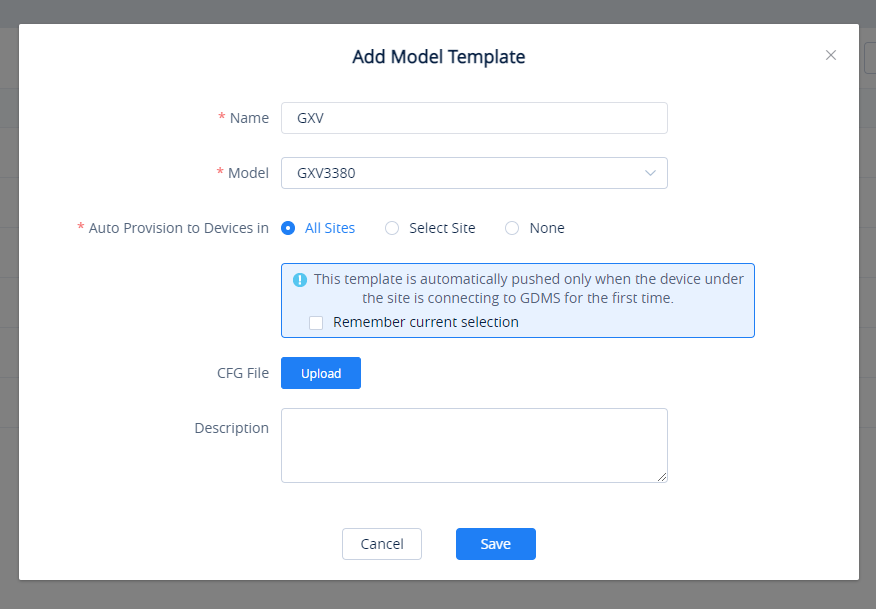
Name | Enter the name of the template. This name must be unique and has a maximum character limit of 64. |
Model | Select the device model of the template. |
Select Site | Select the site for which the template will be used.
|
Description | Users could input the descriptions of the template and the purpose. |
Add Template
Once complete, users will be redirected to the Set Parameters page to modify the device settings of the template.
Set Parameters
Users can configure model-specific settings when editing model templates.
- To configure these model-specific settings, click on the
 of the desired template.
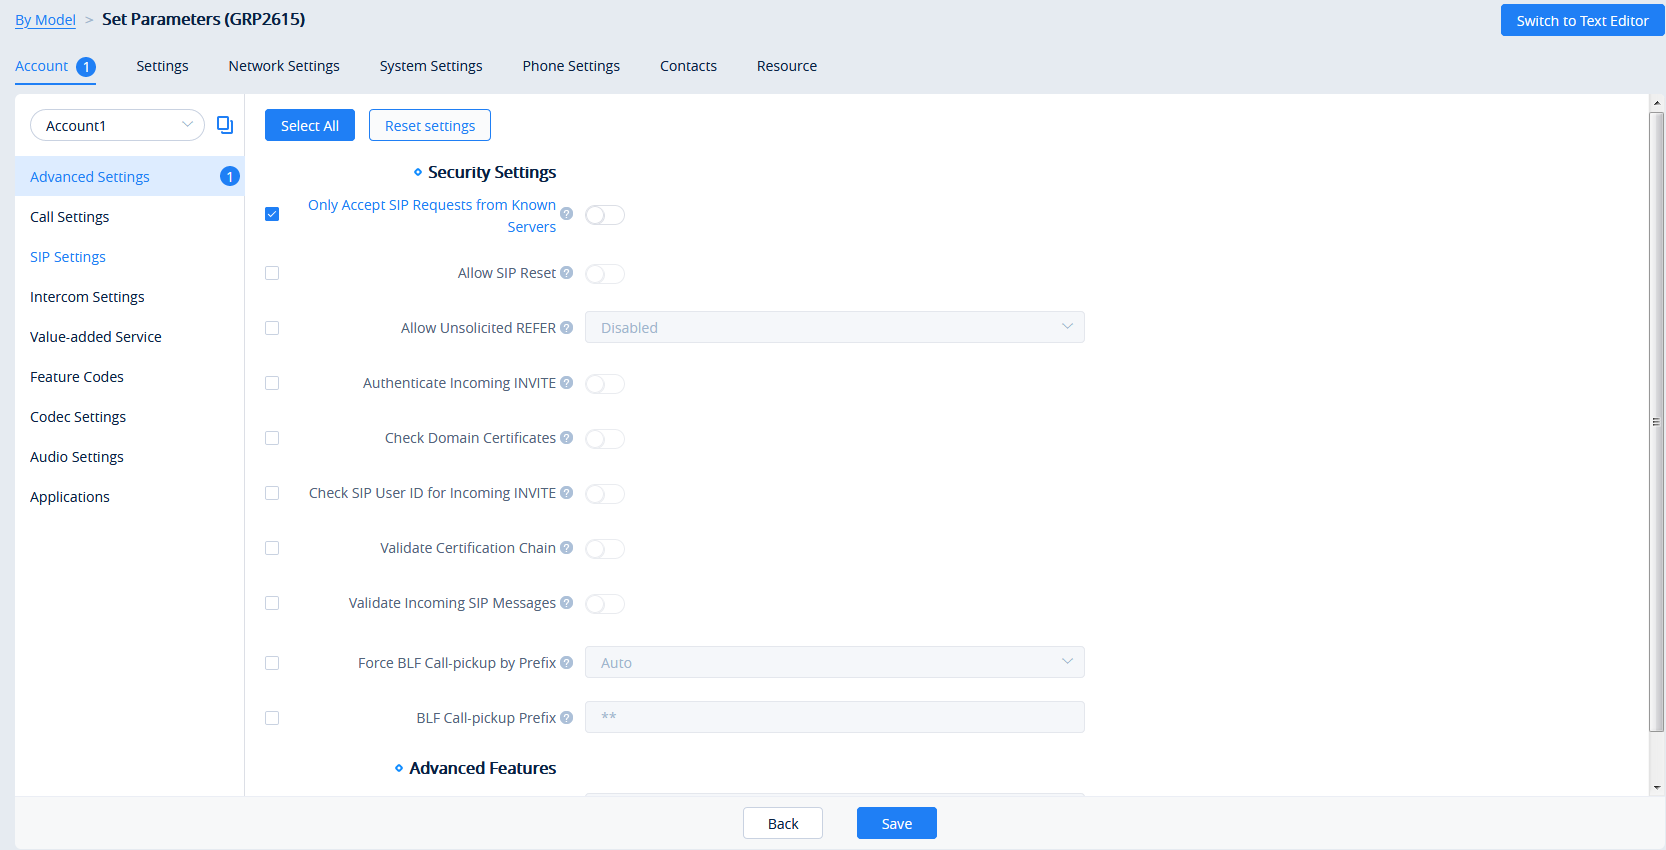
- Clicking on the Select All button will select every option on the current page. Clicking on it again will deselect all the options.
- Clicking on the Reset Settings button will restore all settings on the current page to default values.
- Clicking on the button
 following the account, users can copy and paste the current account configuration to other accounts.
 - When users try to configure the device wallpaper or screensaver image, users can select a picture from the resources list, or upload the local picture to GDMS and configure it to the device.

- Modify the desired settings on the page or click on the Switch to Text Editor to configure device settings via text editing (e.g. p-values). The key can be either a P-value or an alias.
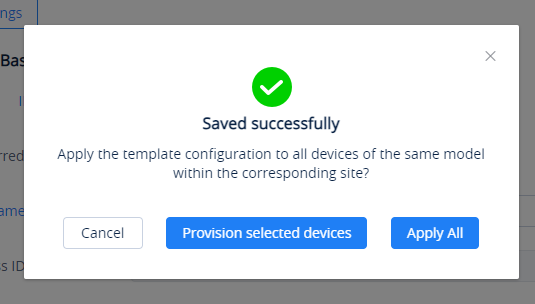
- After setting the parameters, the user can click the “Save” button to save the changes. The user can select to apply the template configuration to all the same model devices on the corresponding site. The user can click the option “Provision to Selected Devices” to select the devices to which the user wants to push the parameters. The user can also click the button “Apply All” to push the parameters to all devices.
Configure Resource Files
Users can configure custom ringtones and language for devices (Supported models: GXP/DP series).
- To configure these model-specific settings, click on the button
 of the desired template to go to the Parameters Configuration 🡪 Resource Configuration page, as shown in the figure below:
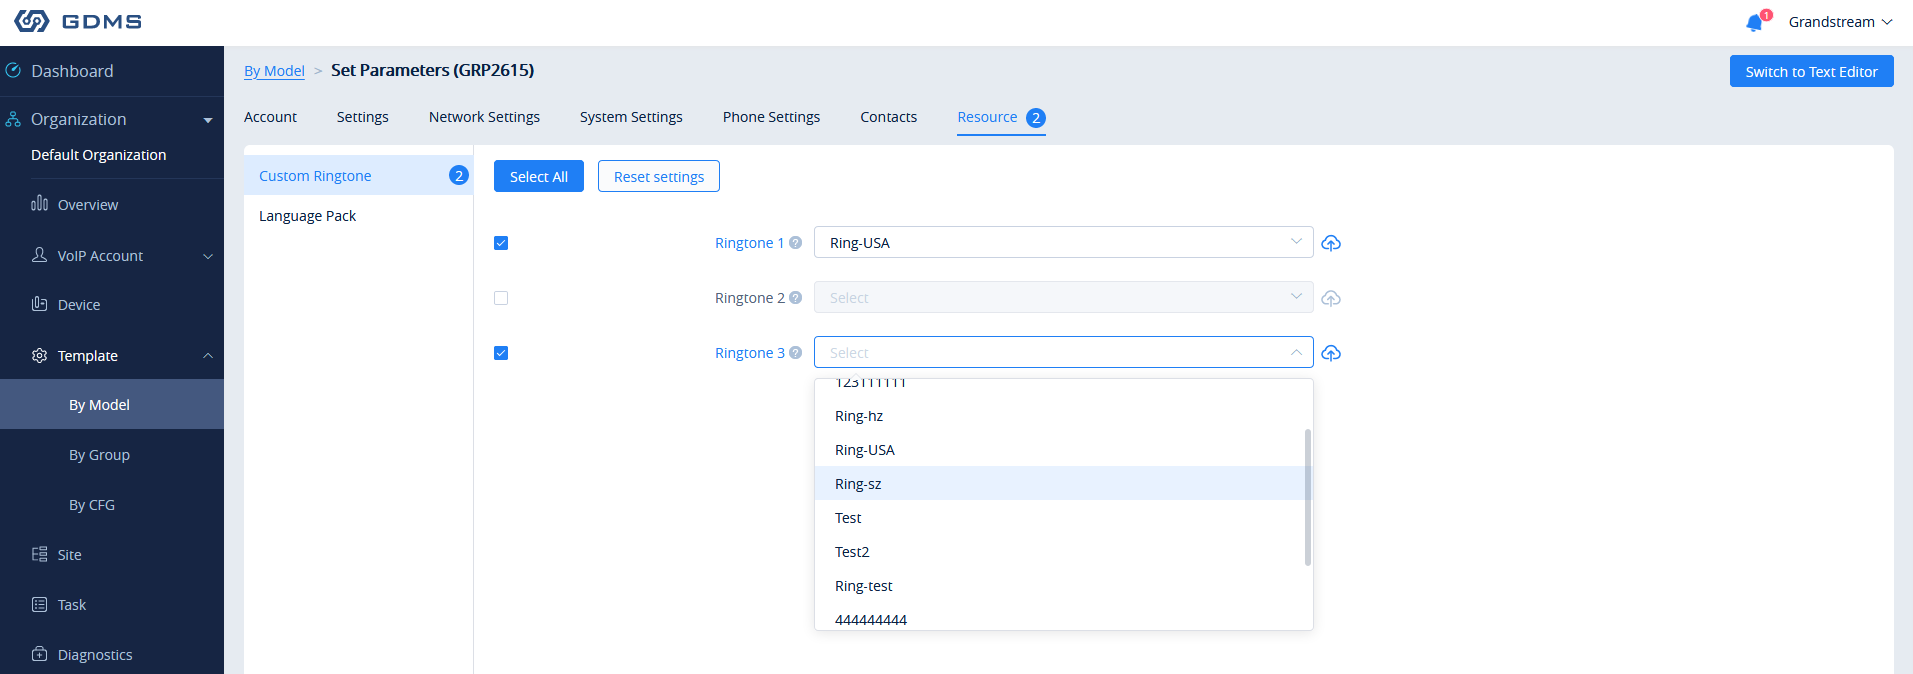
- On the “Custom Ringtone” page, for Ringtone 1 to Ringtone N, select a ringtone file from the resources for each ringtone index.
- On the “Language Configuration” page, select a language pack from the resources for the device.
- After clicking the “Save” button, the device of this model will download the resource file from the firmware path once the device is connected to the GDMS platform for the first time.
- Or, users can click the “Push” button to push the template of the model to the device. Then, the device will download the resource file from the firmware path.
Push Update
Users could push the configuration template to the device manually.
- Select a specific configuration template, and click on the button
 following the template.
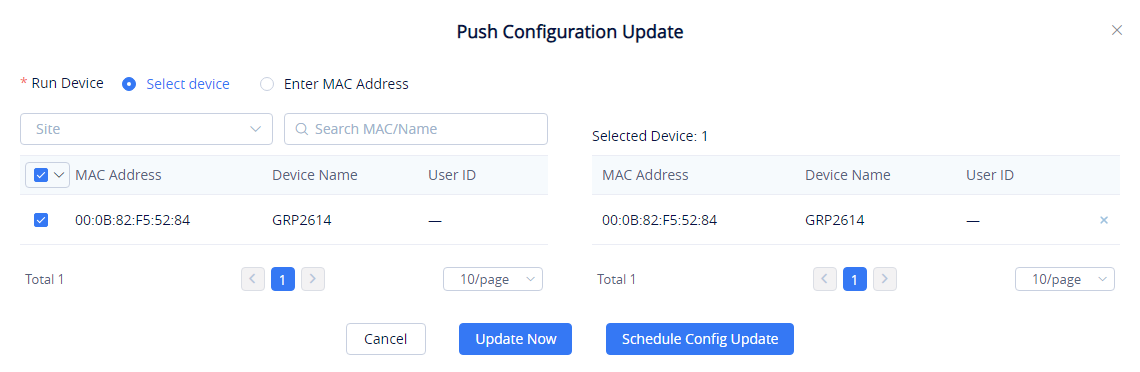
- Users could select any device in this device model to push the configuration template, and the device will be updated with the configuration template.
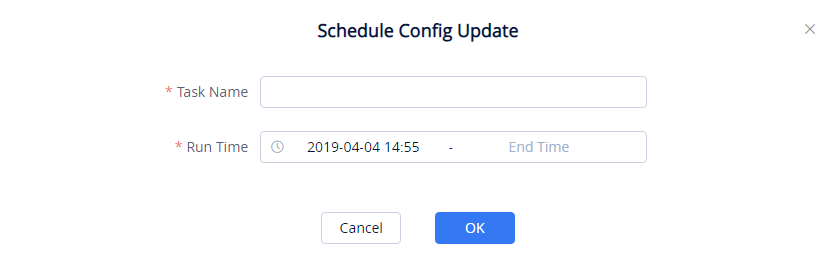
- Users can either push the configuration template immediately or schedule the configuration push for a specified time. If the latter is selected, users will need to enter a name and time for the scheduled push.
- Click on the Save button to finalize the task. Users can check the task status on the Task Management page.
Edit Template
To edit the configuration template’s name, site, and description, click on the ![]() button for the desired template.
button for the desired template.
Download Model Template Configuration
To download the configuration template of a device model, click on the ![]() button for the desired template.
button for the desired template.

Copy Model Template
On the main page of the Model Template, the user can copy one or multiple templates and apply them to a different organization, this allows the user to copy the configuration easily across many organizations.
To copy a template, please tick the box on the left side of the template name, then select ![]() .
.
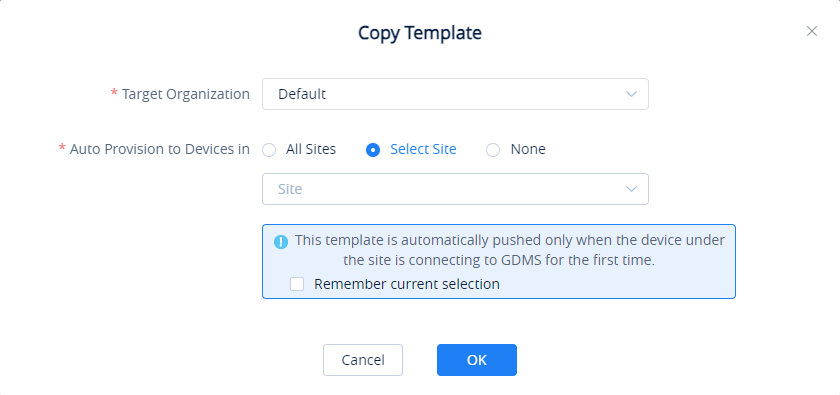
- Target Organization: Select the organization to which you want to copy the template to.
- Auto Provision to Devices in: You can select “All Sites”, “Select Sites”, or “None”. The rules are the same as those for creating model template.
After the templates have been copied successfully, the templates will be added to the “By Model” page of the selected organization, and the template’s name will be “Original Template Name_Copy”.
Delete Model Template
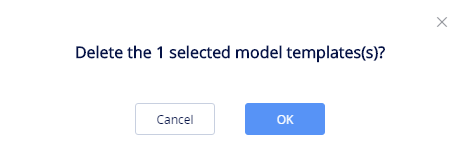
To delete configuration templates from GDMS, select the desired templates and click on the Delete button in the top left corner of the By Model page.
By Site
Users can customize device templates based on sites. The users will be able to configure devices based on the sites to which they have been assigned.
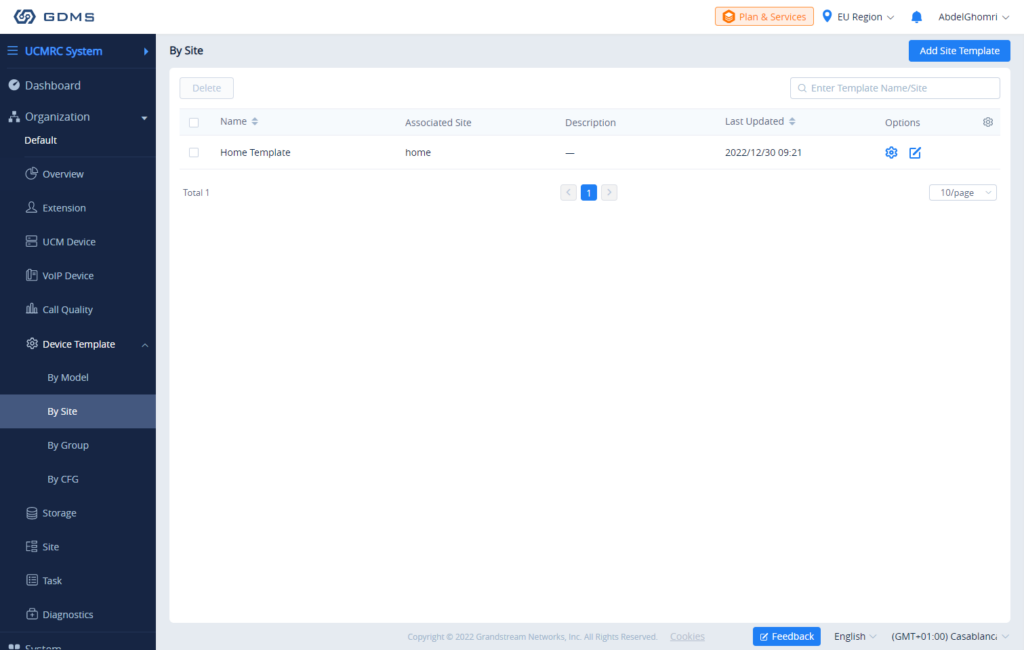
Add Site Template
To add a template, please click ![]()
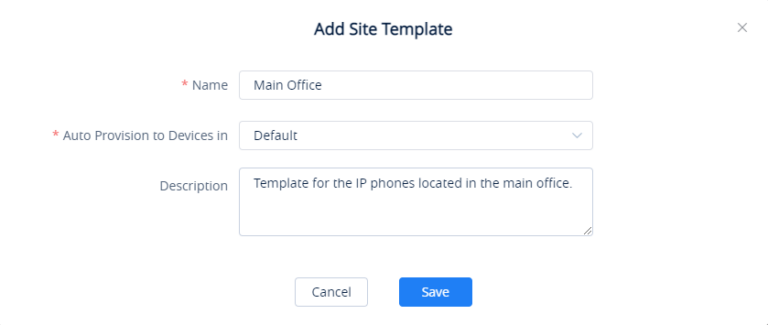
- Name: Enter the name of the template.
- Auto Provision to Devices in: Choose the site on which the template will be applied to.
- Description: Enter a description for the template.
![]() : Use this button to edit the information related to the template.
: Use this button to edit the information related to the template.![]() : Use this button to change the configuration of the template.
: Use this button to change the configuration of the template.
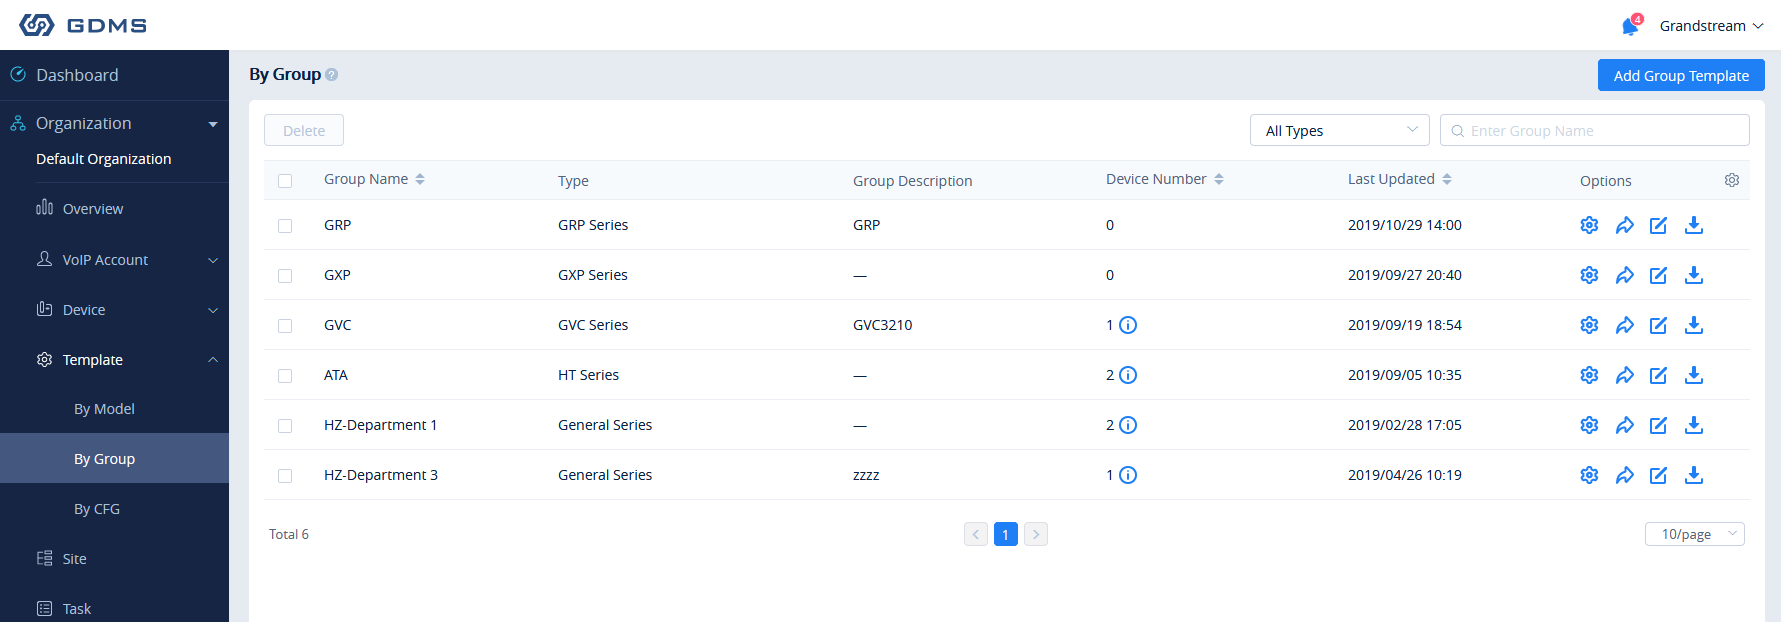
By Group
Users could customize the configuration template by group. Users could configure a group and update the configuration template by group. For example, users could classify a batch of devices into a group and configure/manage the devices in the group. Users could push the configuration template to the group members on the GDMS platform.
Users could view the group configuration template and the devices list in each group.
Users could modify the configuration parameters, push the configuration to the devices, edit the group and members, and download the configuration template by group.
Add Group
Users can add a group at any time on the GDMS platform.
- Click on the Add Group button at the top right of the By Group page.
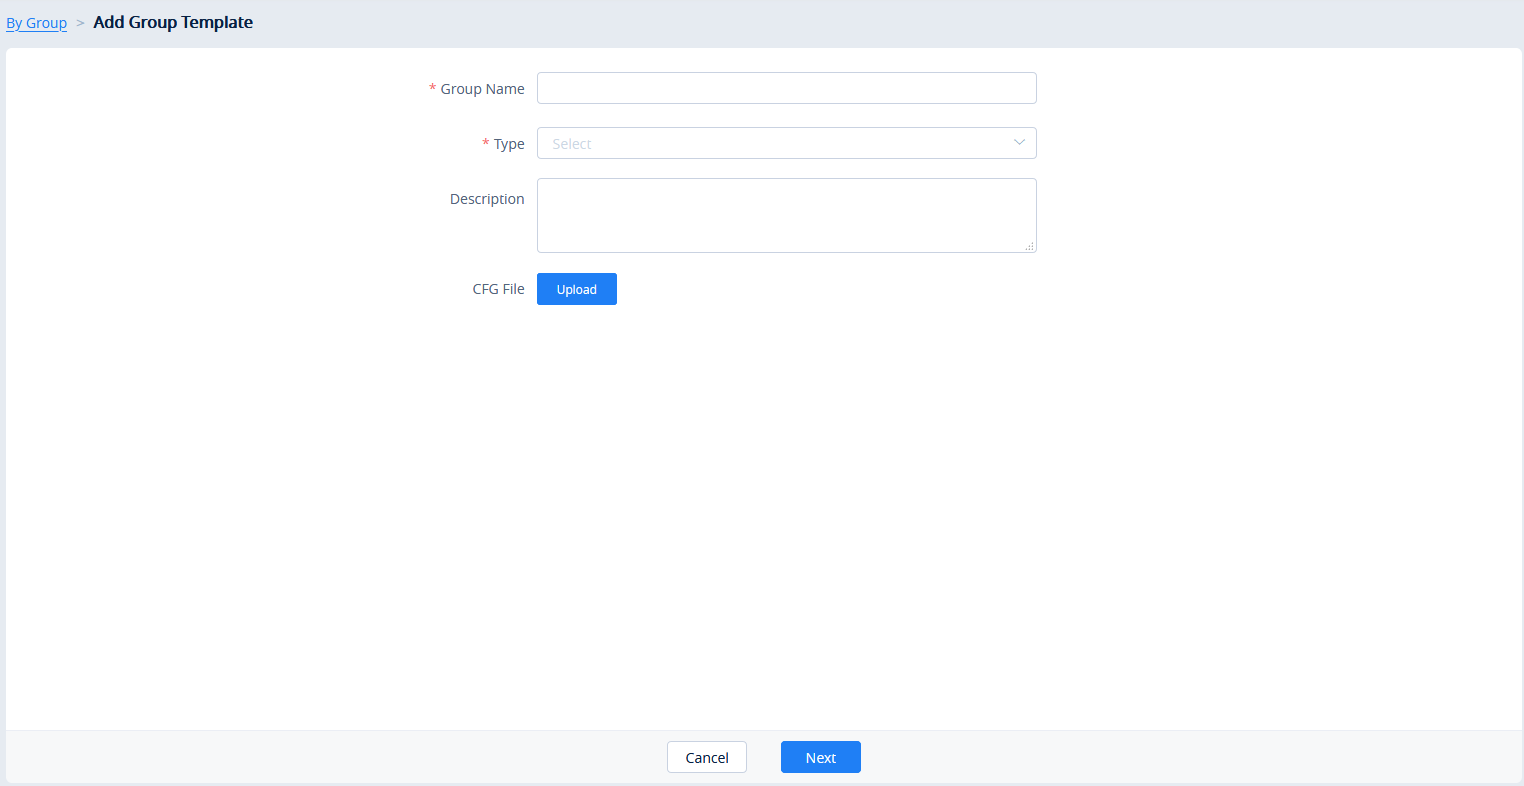
|
Group Name | Enter the name of the group to identify it easily. Names must be unique and have a maximum character limit of 64. |
|
Type |
Users need to select the type:
|
|
Description |
Enter the detailed description and purpose of the configuration template. |
- Once complete, users will be redirected to the device selection page to add devices to the group. Users can either select devices from the list or manually enter the MAC addresses of the devices. Selected devices will be moved to the Selected Device list on the right of the page.
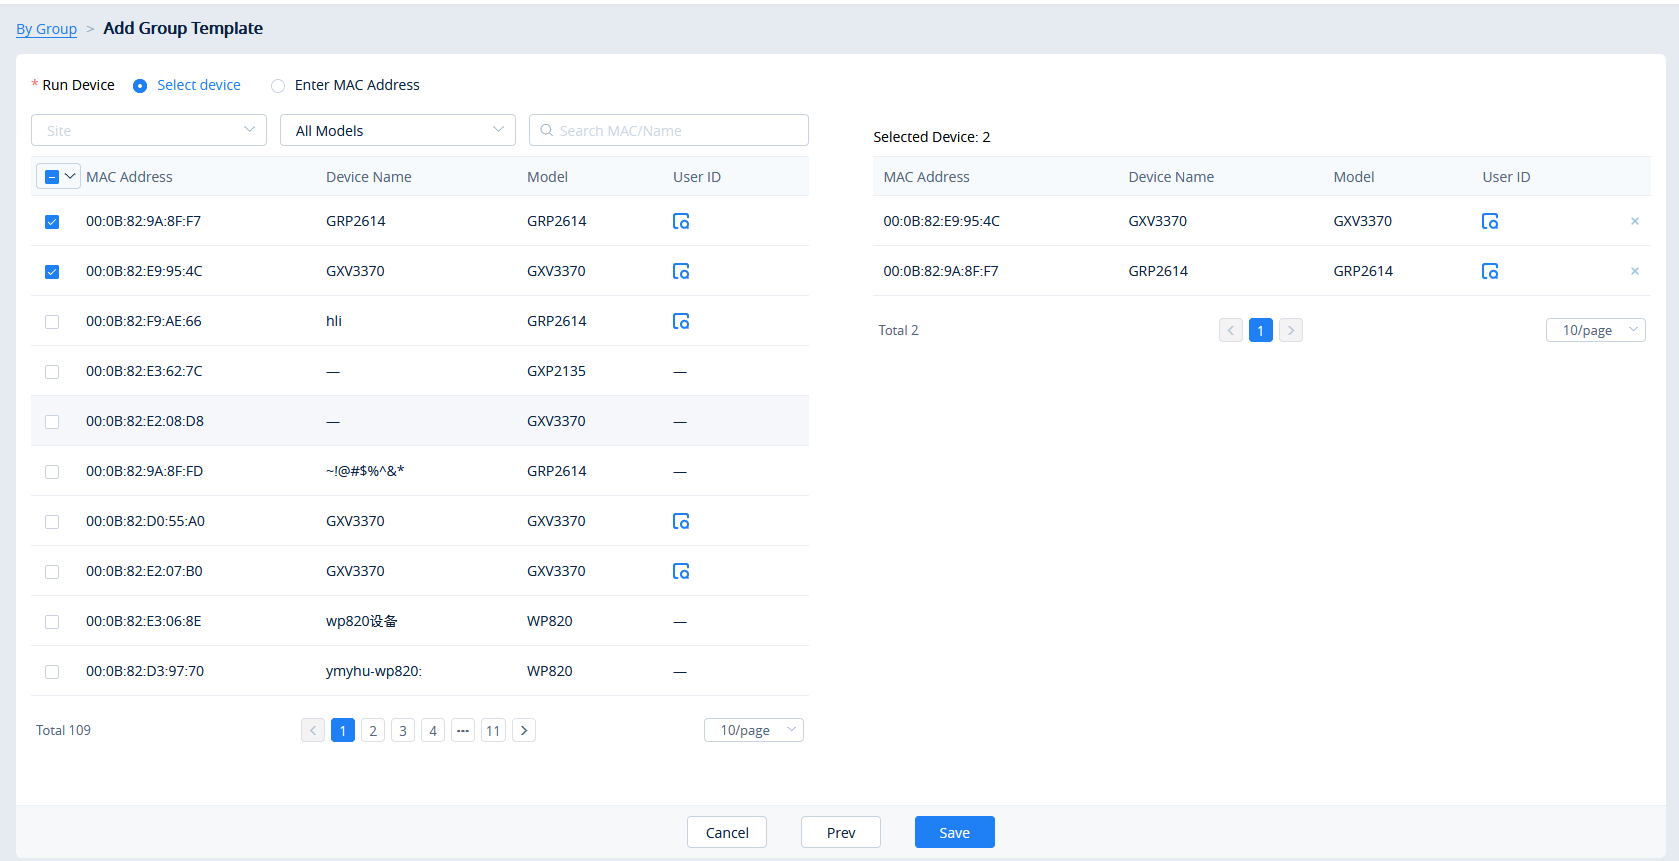
- Users could click on the “Prev” button to go back to the group configuration page to re-edit the group information.
- Click on the Save button to complete the group member selection. Users will then be redirected to the Set Parameters page.
Set Parameters
Users could set the unique parameters of the devices in the group in the configuration template to push the unique parameters to the devices in the group.
Select a specific group, and click on the button ![]() to access the group member parameters configuration page.
to access the group member parameters configuration page.
- Clicking on the Select All button will select every option on the current page. Clicking on it again will deselect all the options.
- Clicking on the Reset Settings button will restore all settings on the current page to default values.
- Clicking on the button
 following the account, users can copy and paste the current account configuration to other accounts.
 - When users try to configure the device wallpaper or screensaver image, users can select a picture from the resources list, or upload the local picture to GDMS and configure it to the device.

- Modify the desired settings on the page or click on the Edit Configuration File to configure device settings via text editing (i.e. p-values). The key can be either a P-value or an alias.
Configure Resource Files
Users can configure custom ringtones and language for devices (Supported models: GXP/DP series).
- Select a specific group, and click on the button
 to access the group member parameters configuration page.
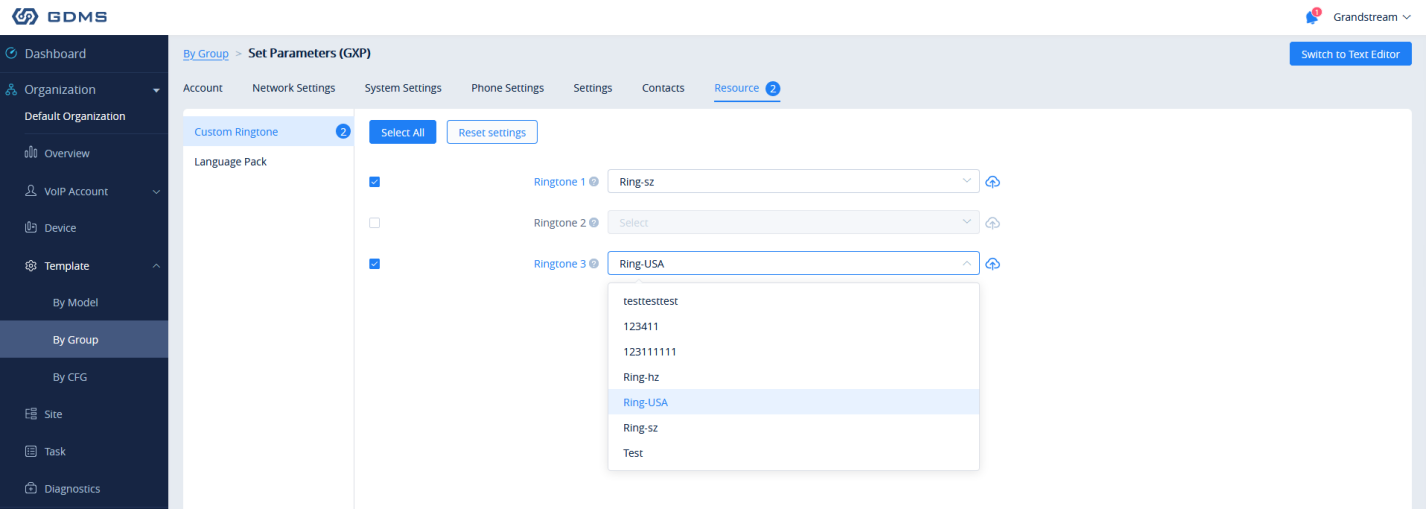
- On the “Custom Ringtone” page, for Ringtone 1 to Ringtone N, select a ringtone file from the resources for each ringtone index.
- On the “Language Configuration” page, select a language pack from the resources for the device.
- After clicking the “Save” button, the configured parameters and resources will be saved in the system. When the user clicks the “Push” button to push the template to the device, the device will download the resource file from the firmware path.
Push Update
Users could push the group configuration template to the device manually.
- Click on the
 button for the desired group.
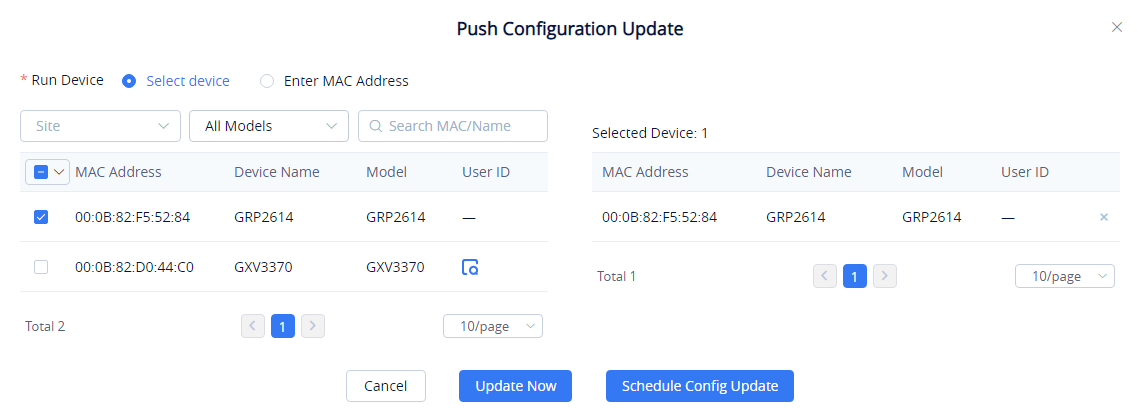
- In addition to being able to push the configuration template to all or select members of the group, users can also push it to non-members.
- Users can either push the configuration template immediately or schedule the configuration push for a specified time. If the latter is selected, users will need to enter a name and time for the scheduled push.
- Click on the Save button to finalize the task. Users can check the task status on the Task Management page.
Edit Group Template
Users could edit the group name, descriptions, and group members.
- Click on the
 button for the desired group.

- Modify the desired settings and click on the Save button to finalize changes.
Download Group Template Configuration
Users can download the group configuration template by clicking on the ![]() button for the desired group.
button for the desired group.

Copy Group Template
On the main page of the Group Template, the user can copy one or multiple templates and apply them to a different organization, this allows the user to copy the configuration easily across many organizations.
To copy a template, please tick the box on the left side of the template name, then select ![]() .
.

Select the organization to which you want to copy the template to by selecting the organization name from the “Target Organization” list.
Delete Group Template
Users can delete groups by selecting the desired groups and clicking on the Delete button in the top-left corner of the By Group page.
By CFG
Users can import configuration files for specific devices. Settings in these uploaded files will be used for their specified device.
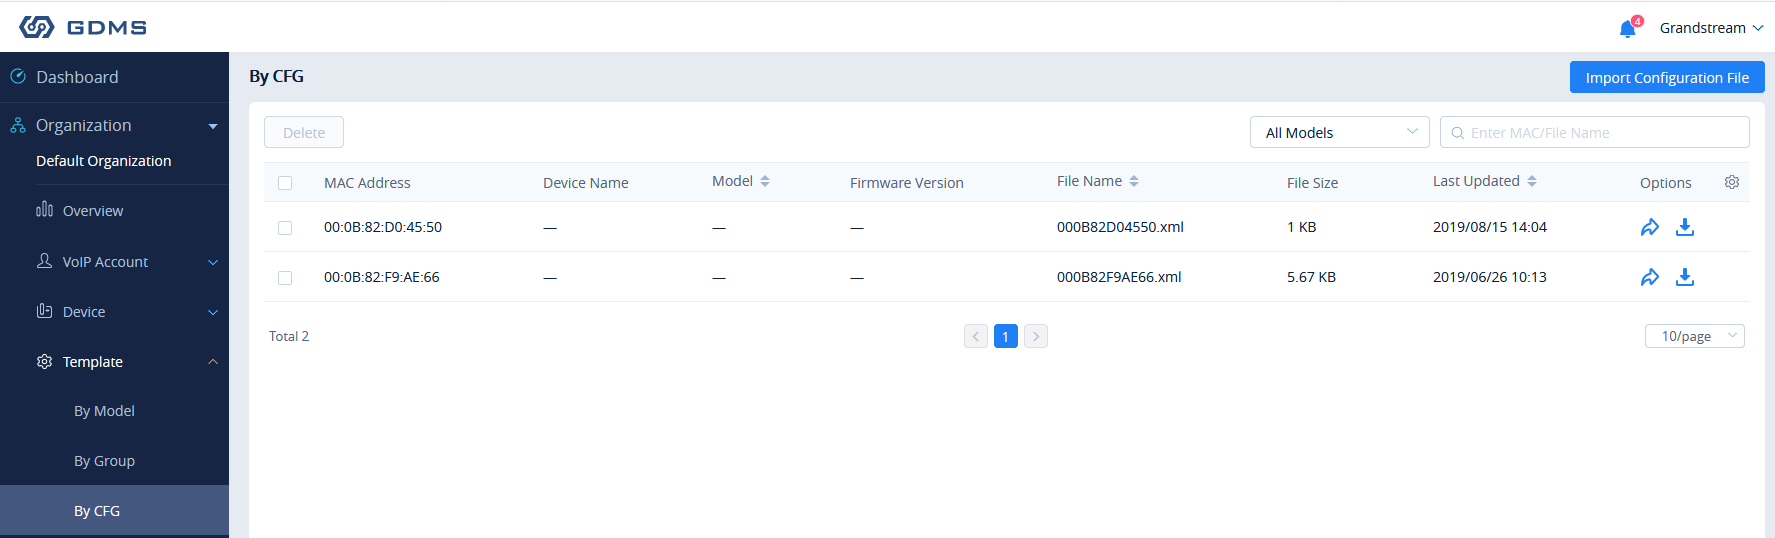
Upload CFG File
Users could upload the custom configuration file to the GDMS platform and push the custom configuration file to the device.
- Click on the Import Configuration File button at the top-right corner of the By CFG page. The following window will appear:
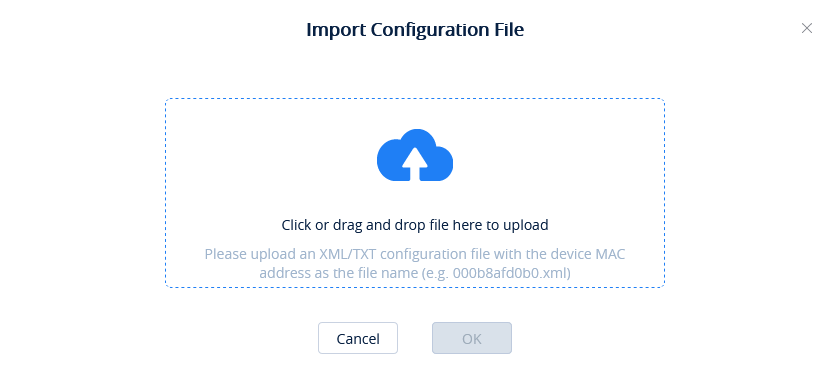
- Drag and drop the file to the window or click on the upload icon to select a file from your PC.
- Click on the OK button to finalize the import.
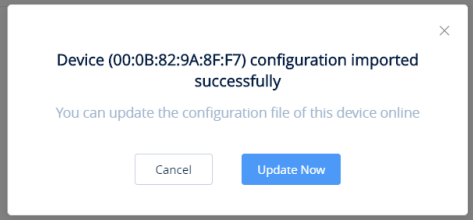
- The following window will appear asking the user to either push the configuration to the specified device immediately or to cancel the configuration push.
Push Update
Click on the ![]() button for the desired device to manually push the configuration to it.
button for the desired device to manually push the configuration to it.

Download Configuration File
Click on the ![]() button for the desired device to get its configuration file.
button for the desired device to get its configuration file.
Delete CFG File
To delete uploaded configuration files from GDMS, select the desired devices in the list and click on the Delete button at the top left of the By CFG page.
Site Management
Site Management allows users to organize their devices by sites and categories.
Add Site
Users can add a site at any time on the GDMS platform.
- Click on the Add Site button at the top right of the Site Management page. To quickly add a sub-site under a specific site, click on the
 button next to the desired site. Users can create a total of 7 different levels of sites.
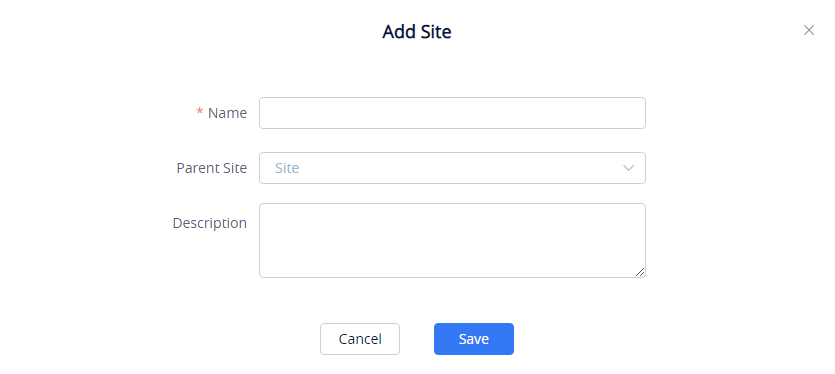
|
Site Name | Enter a name for the site to identify it easily. Sites on the same level cannot have the same name. |
|
Superior Site |
The parent level of the site. This field can be left blank if the created site is a top-level site. |
|
Site Description |
Enter the descriptions of the site. |
- Once the site is created, users can then assign devices to it.
Batch Import Sites
Users could import a batch of sites into the GDMS platform.
- Click on the Import Site button at the top right corner of the Site Management page. The following window will appear:
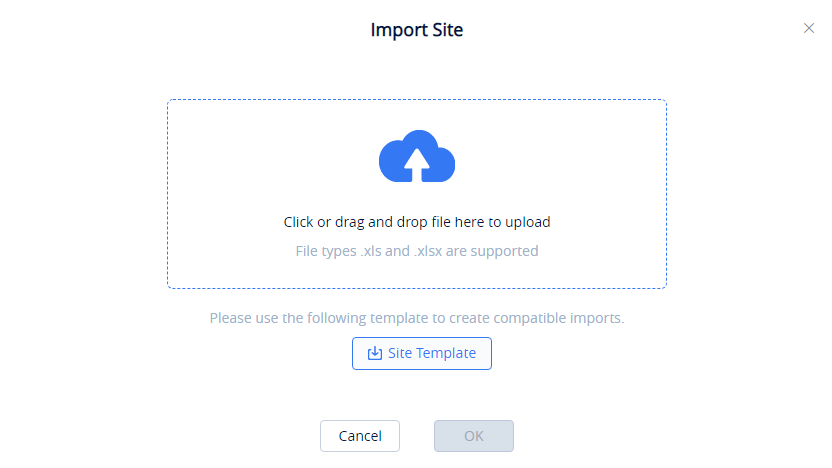
- Click on the Download button to get a template that will be used to import site information.
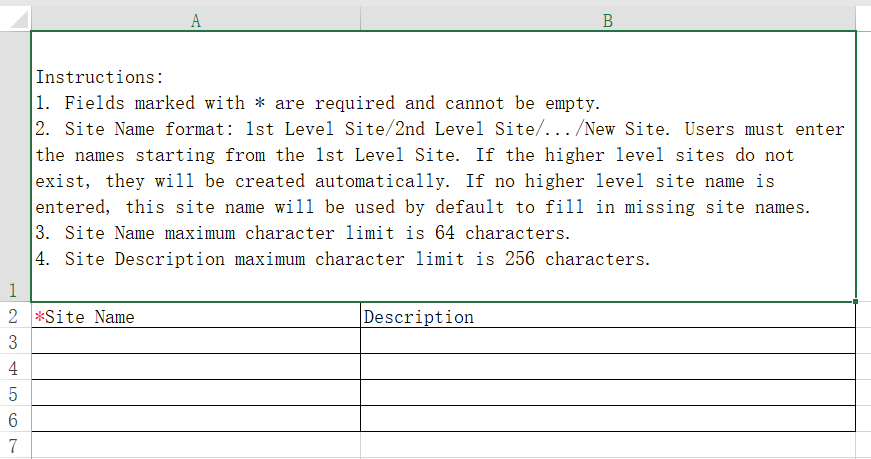
|
Site Name | Enter the name of the site. If the site is the child of another site, users must enter the entire path (e.g. top-level site/second-level site/third-level site/…new site name). |
|
Description |
Enter the descriptions of the site. |
- Once the template is filled out, drag, and drop the file to the upload window or select the file from your PC. Click on the Import button to confirm the import.
- When the Excel file is imported into the GDMS platform successfully, the GDMS platform will prompt the execution result. If there is data that failed to be imported, the user could export the failed data and re-edit the Excel file.
Edit Site
Users could edit the information of the site on the GDMS platform.
- Click on the
 button next to the desired site.

- Edit the desired fields and click on the Save button to finalize changes.

Delete Site
To remove a site from GDMS, click on the ![]() button next to the desired site.
button next to the desired site.
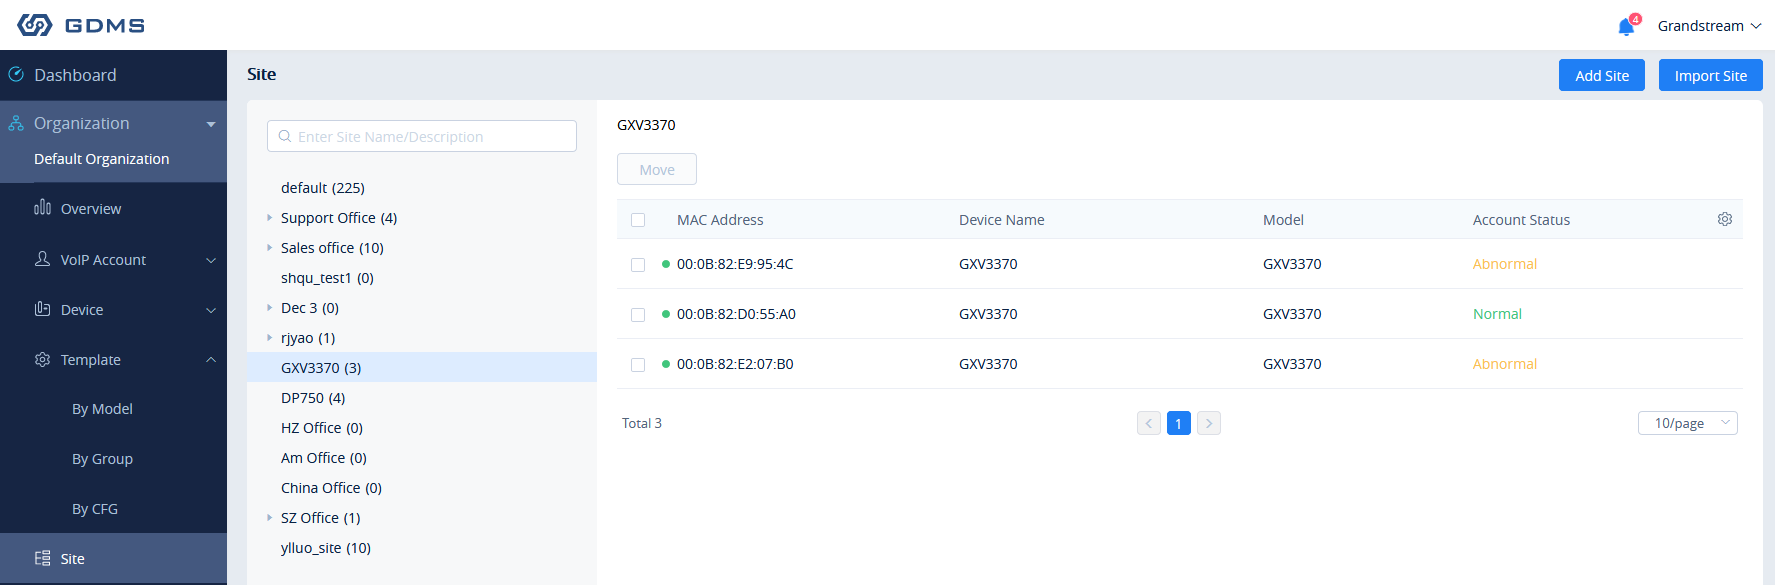
View Devices
To view all the devices under a specific site, click on the desired site in the Site Management list.
Transfer Site
Users can select devices on a site and move them to another site by clicking on the Move button.

Clicking on the Save button will finalize the move to the specified site.
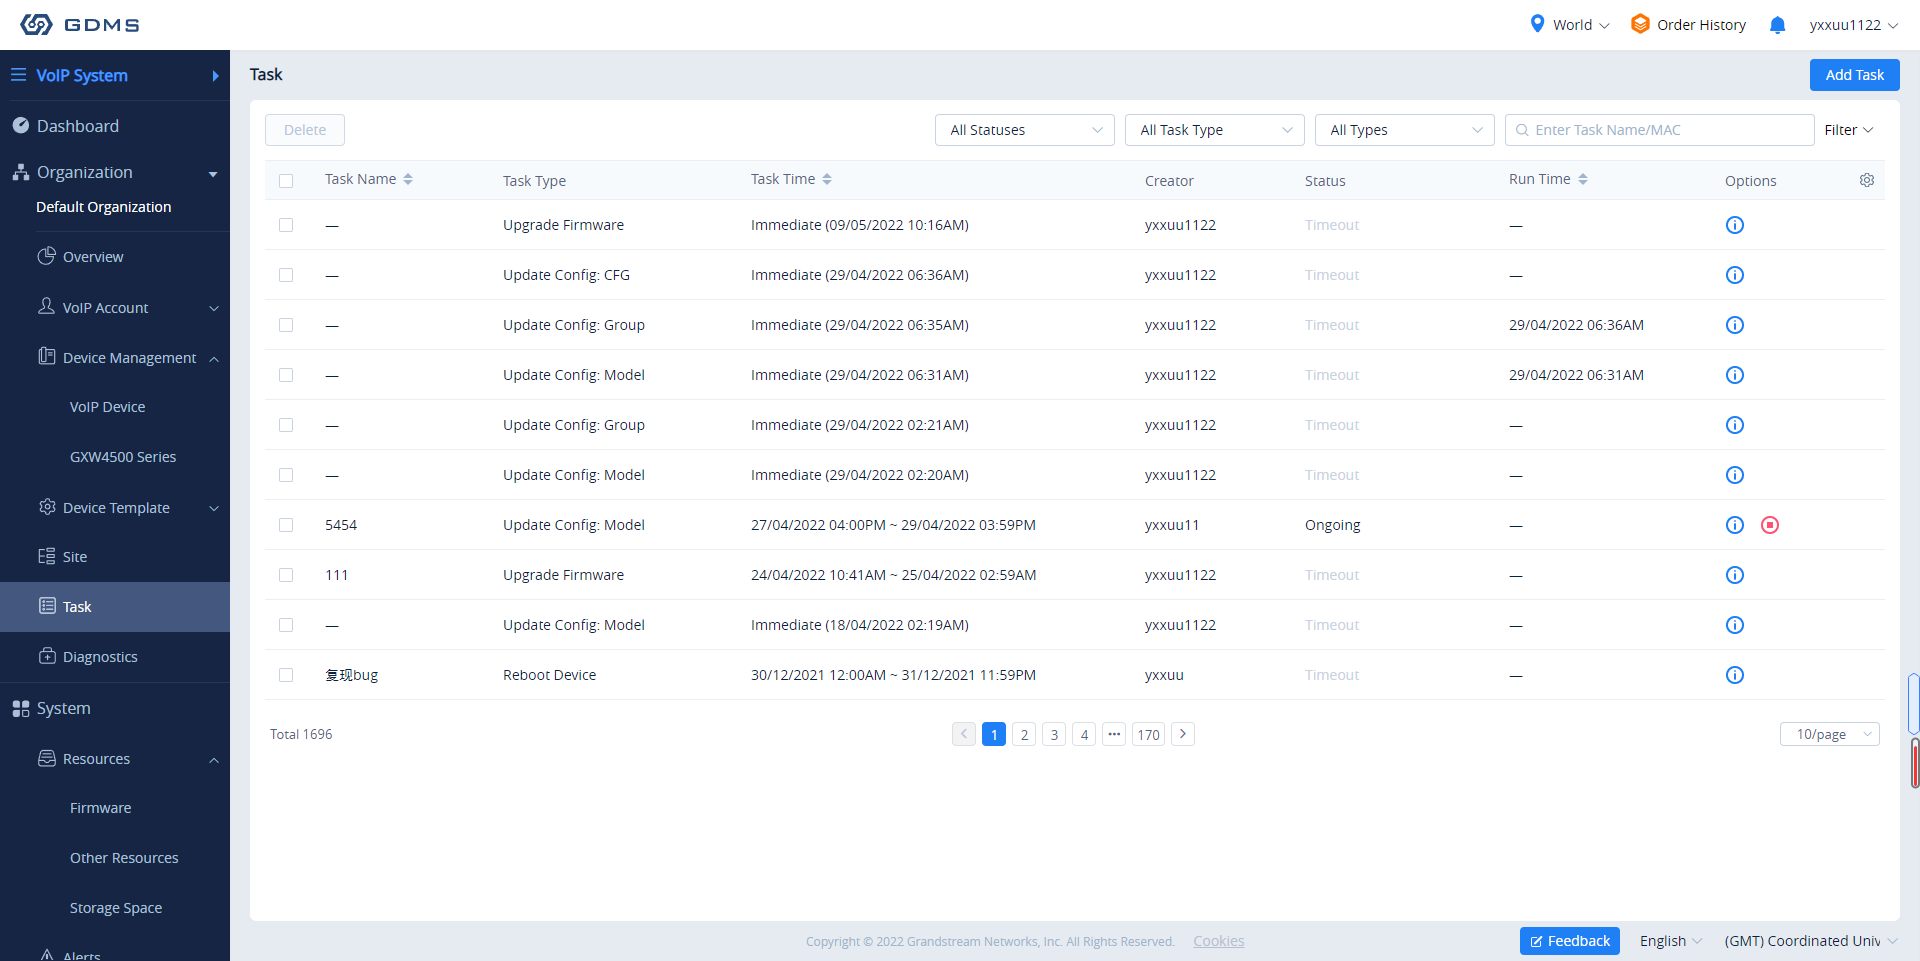
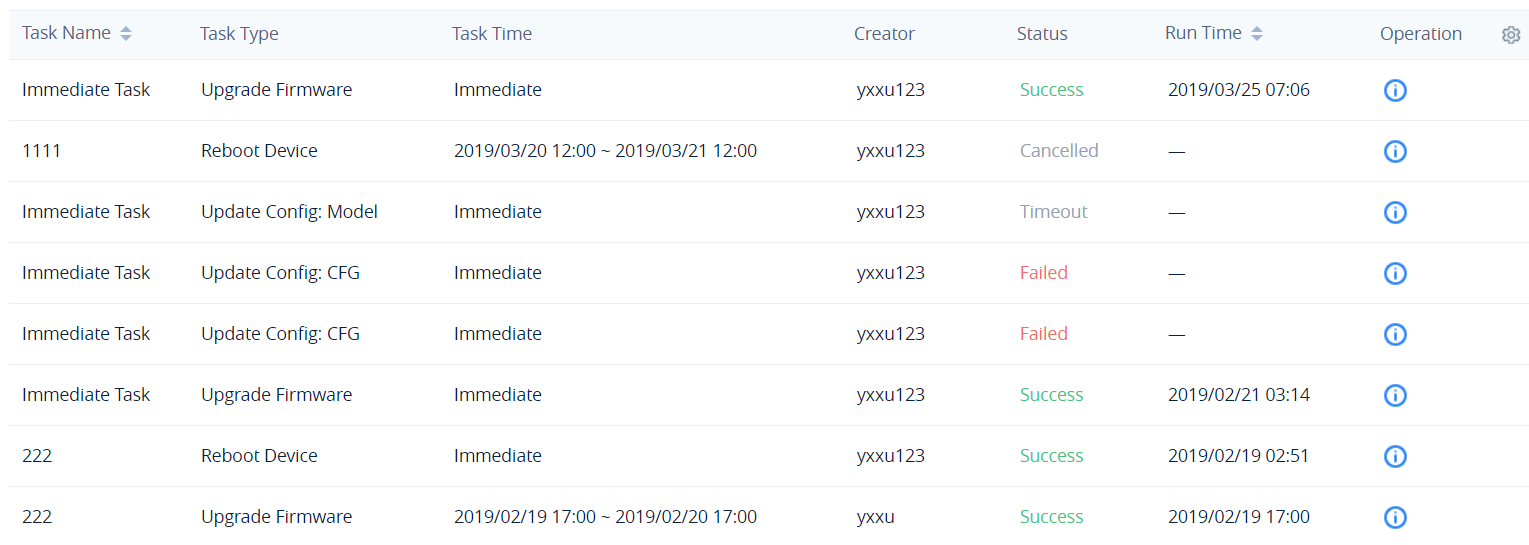
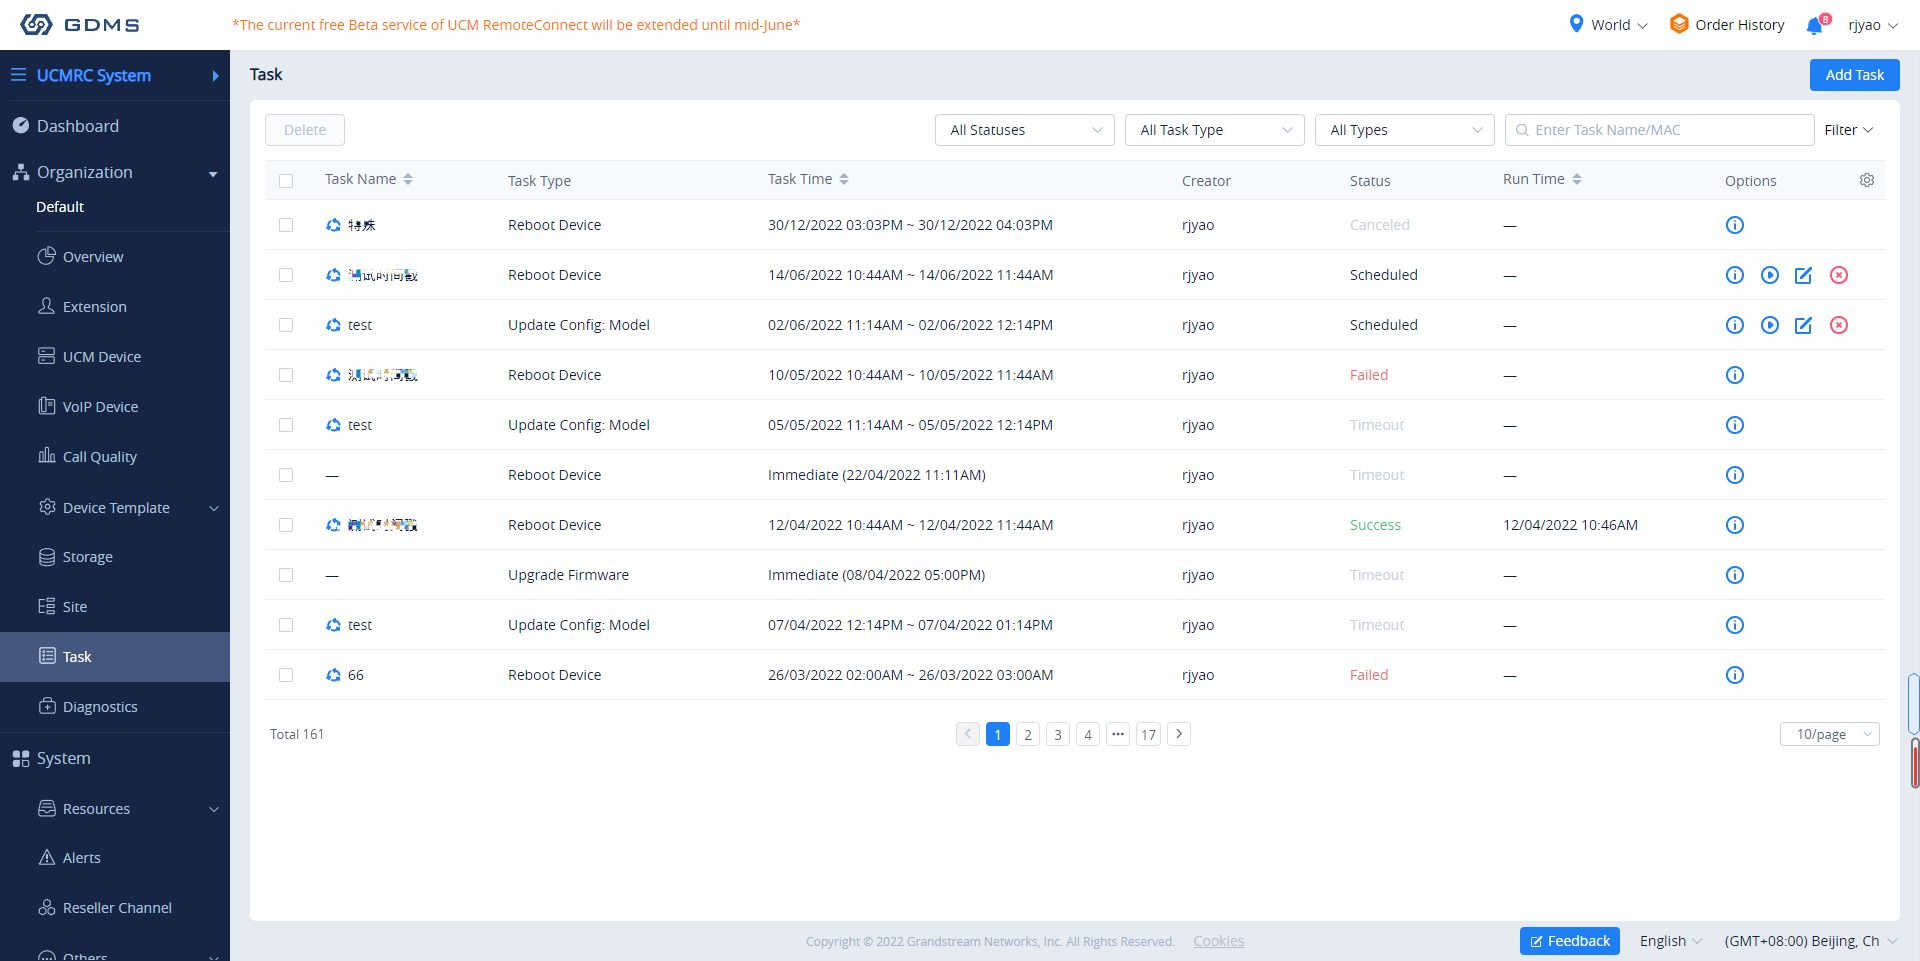
Task Management
The Task Management page displays all queued and completed tasks in GDMS such as configuration pushes, firmware upgrades, reboots, and factory resets. Users can add, edit, and delete tasks from this page.
Add Task
To add a task to GDMS, click on the Add Task button.
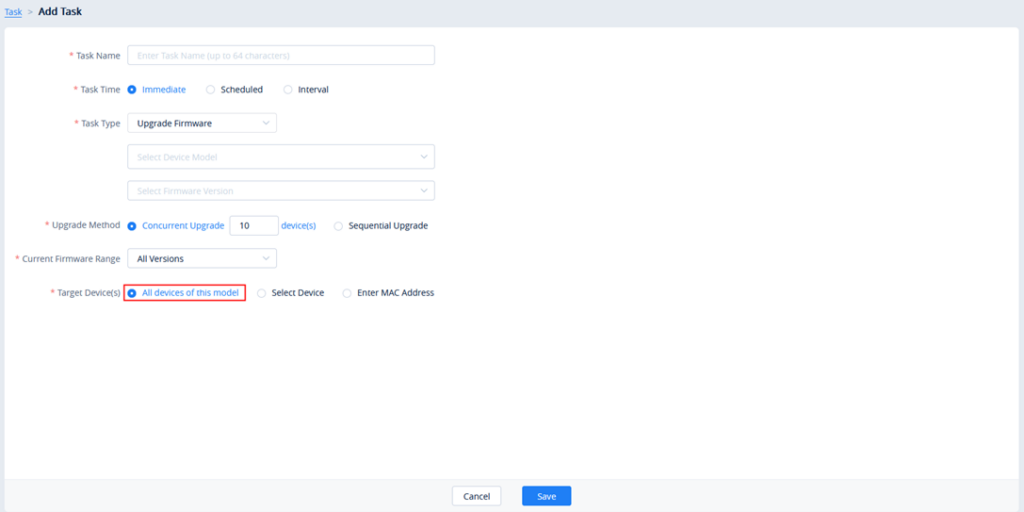
Task Name | Enter the name of the task. |
Task Time |
|
Task Type |
|
Upgrade Method | This option is available only when Upgrade Firmware is selected as the Task Type.
 |
Current Firmware Range | This option is available only when Firmware Upgrade is selected as the Task Type. Devices will be upgraded only if they meet certain requirements:
|
Target Device(s) |
|
Add Task
Click on the Save button to finalize the task creation. Users can view this task in the Task Management list.
View Task Status
Users can see the status of all completed and pending tasks by looking at the Status column.
|
Pending |
The task has not been executed yet. |
|
Executing |
The task is currently in progress. |
|
Success |
The task has been completed successfully. |
|
Failed |
The task has failed. |
|
Canceled |
The task was canceled. |
|
Timeout | The task was not executed when it arrived at the ending time. |
|
Ended |
The task was ended before it could be completed. Some of the involved devices may not have run the task before it ended. |
To view more details about a task, click on the ![]() button for the desired task. Users can view the task status of each device involved.
button for the desired task. Users can view the task status of each device involved.

|
Pending Executed |
The task has not been run yet. |
|
Executing |
The task is currently ongoing. |
|
Success |
The task has been completed successfully. |
|
Failed |
The task has failed. A failure reason will be shown. |
|
Timeout |
The task has been sent to the device, but the device has not responded yet. |
|
Success (Timeout) |
The task has been completed successfully for this device, but it was completed later than the specified time. |
|
Canceled |
The task has been canceled before the starting time. |
|
Ended |
The task was ended before it could be completed. Some of the involved devices may not have run the task before it ended. |
Users could re-create tasks for the executed failed devices or all devices. If the user re-creates tasks for certain devices, all attributes of the task and all executed devices information will be logged on the “Re-create Task” page.
Start Scheduled Tasks
Users can start pending scheduled tasks immediately by clicking on the ![]() button.
button.
Cancel Pending Tasks
To cancel a pending task, click on the ![]() button for the desired task. The task status will be changed to Cancelled. To run the task again after it is completed, click on Task Details 🡪 Run Again for the desired task.
button for the desired task. The task status will be changed to Cancelled. To run the task again after it is completed, click on Task Details 🡪 Run Again for the desired task.
If the task is recurring, users could select whether to cancel the entire recurring task or just cancel the single task.
End Task
To stop a running task, click on the ![]() button to immediately end it.
button to immediately end it.
If the device has already executed the task (e.g. Reboot Device), the device will finish the task; if the device does not start to execute the task, the device will not execute the task anymore.
Search Task
Users can search for specific tasks by using the search bar and filters at the top-right of the top right corner of the Task Management page.
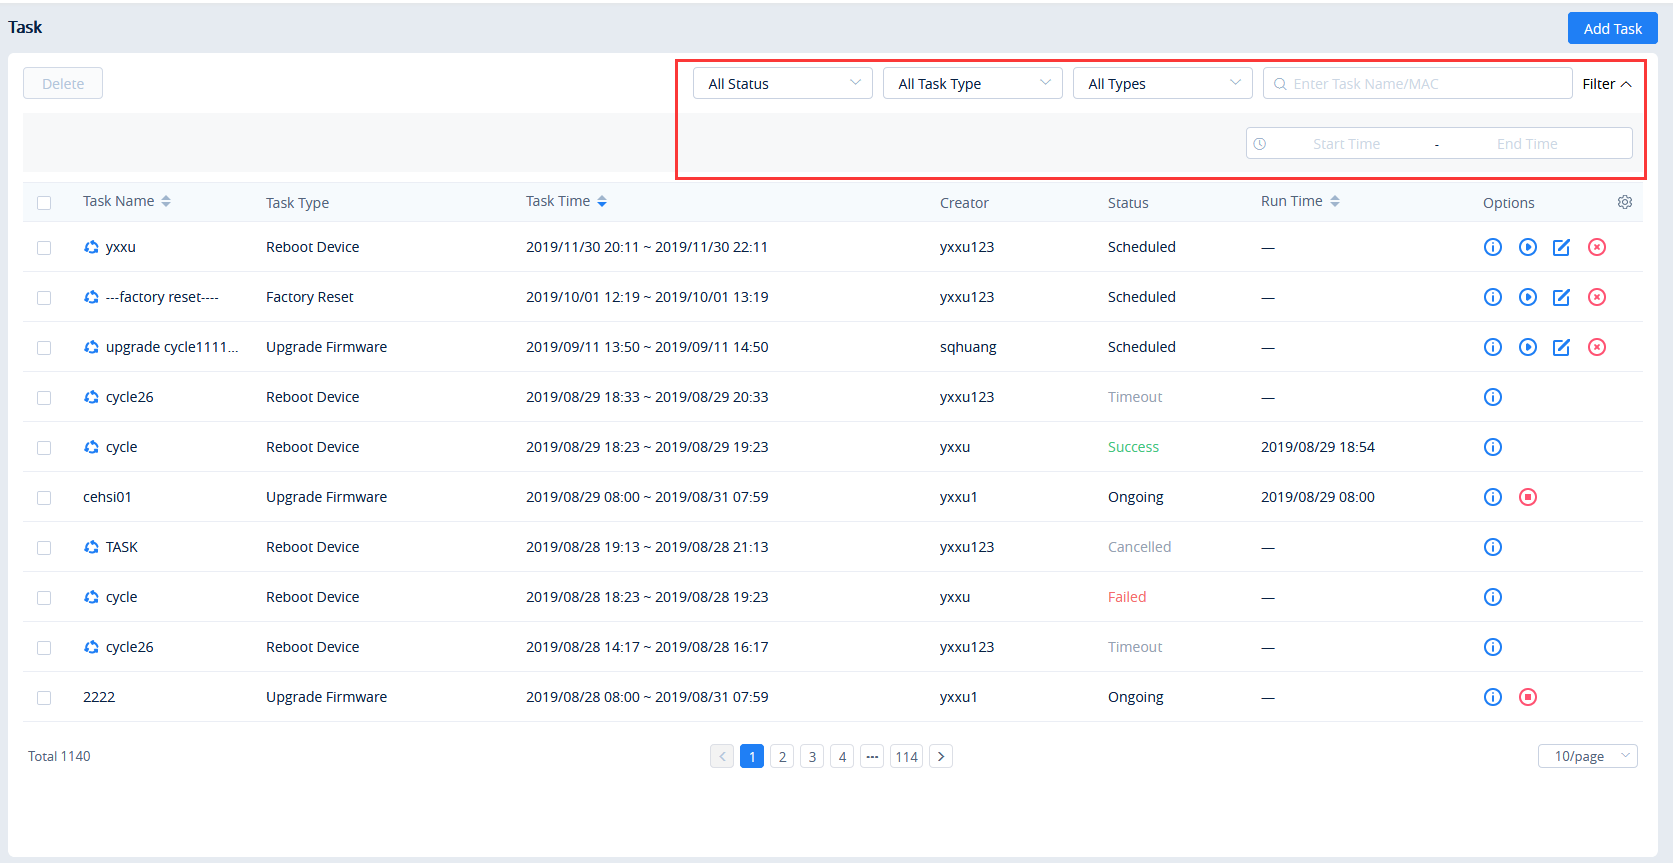
Delete Task
Users can delete tasks at any time. Select one or more tasks and click on the Delete button at the top of the page to delete them.
CloudUCM devices only support reboot and factory reset tasks.
Diagnostics
It displays all diagnostics records for VoIP devices and CloudUCM devices.
CloudUCM devices only support Ping/Traceroute and Syslog, which are the same as those in the UCMRC System.
GDMS Global Function Descriptions (regardless of system)
Alert Settings
The CloudUCM tab has been added to email alert settings, message alert settings, SMS alert settings, and App alert settings. You can subscribe to CloudUCM-related alert settings there.

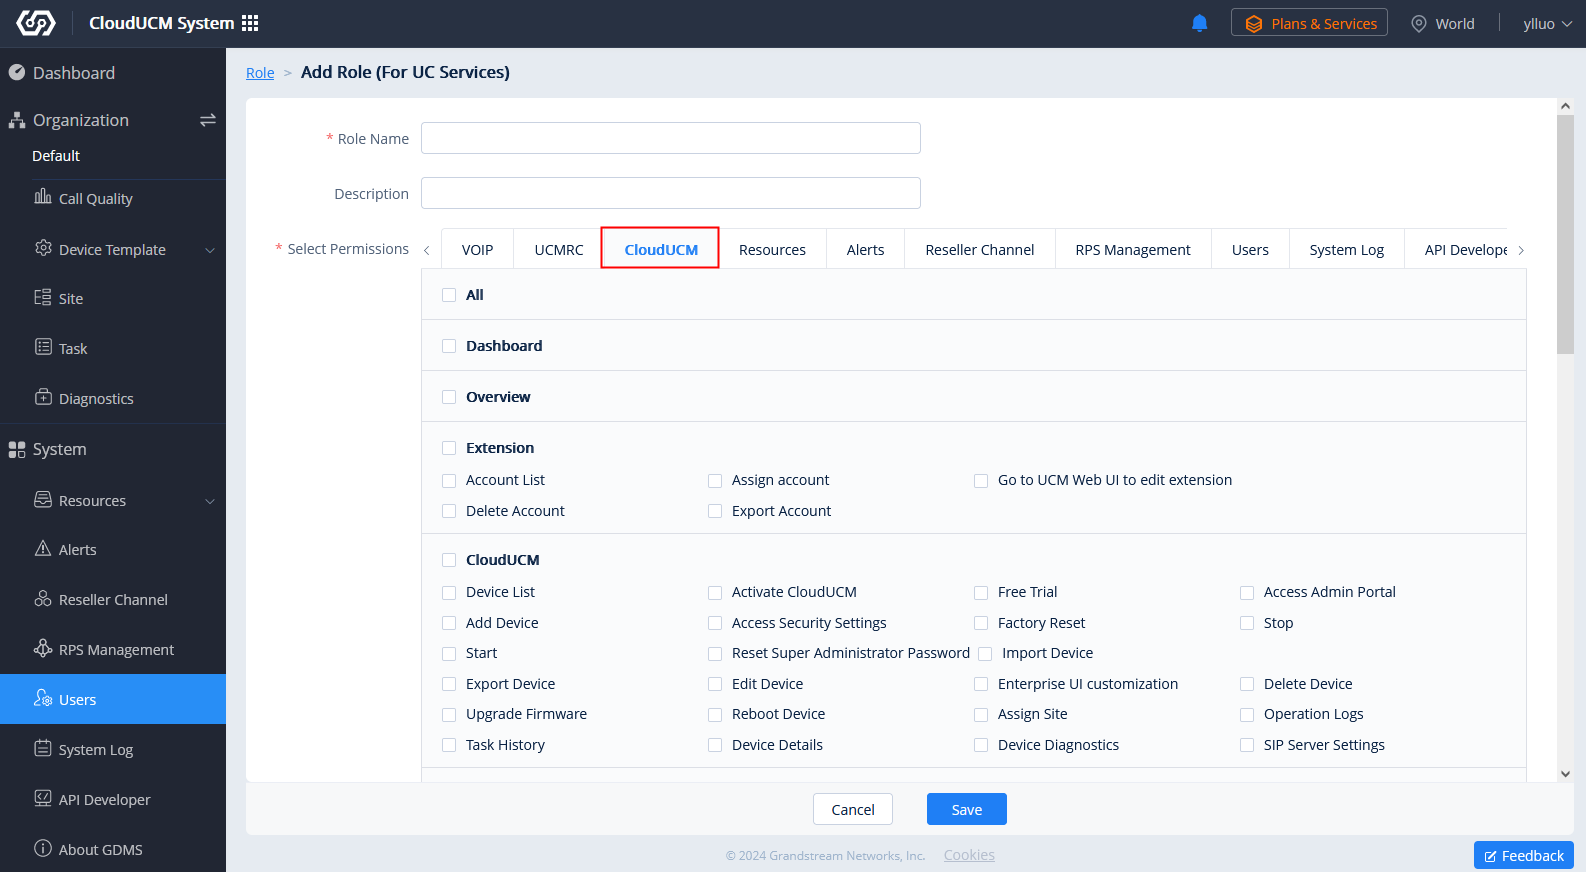
Role
Added CloudUCM system-related functions in the permission configuration.