
One of the major benefits using UCM6XXX VoIP IPPBX systems is “Clients’ Mobility” allowing users to be connected from remote locations such as home office, remote office to the VoIP system and use it as if they are locally connected, enjoying all VoIP features (making/receiving calls between extensions, voicemail, call transfer, video calls, conference, using UCM6XXX resources such as SIP and analog trunks remotely…).
Customers using UCM6XXX are no more restricted to be physically connected to the same network as UCM6XXX, opening borders for them to be connected from anywhere in the world across Internet network.
The UCM6XXX should be connected to Internet (using router with NAT) and an easy configuration needs to be made to achieve this as described in following sections in this guide.

NAT Configuration on UCM6XXX
Prerequisites
In this guide, we assume the following:
On the UCM6XXX:
- Extensions previously created.
- UCM6XXX is using default SIP port 5060 and RTP range 10000-20000.
On the router:
- SIP ALG feature is disabled.
- Ports forwarding to UCM6XXX configured.
General:
- Public Static IP is available. For example: 212.156.69.86.
- DDNS account (if no public static IP is available). For example: gstest.ddns.com.
UCM6XXX NAT Settings
At first, the UCM6XXX needs to be configured with its external IP address or domain name (if using DDNS) to be reachable from external networks/Internet allowing remote users to register their extensions, make/receive calls and use other call features. Following steps provide needed configuration:
- Access UCM6XXX web GUI🡪PBX Settings🡪SIP Settings🡪NAT.
- Configure the settings as following:
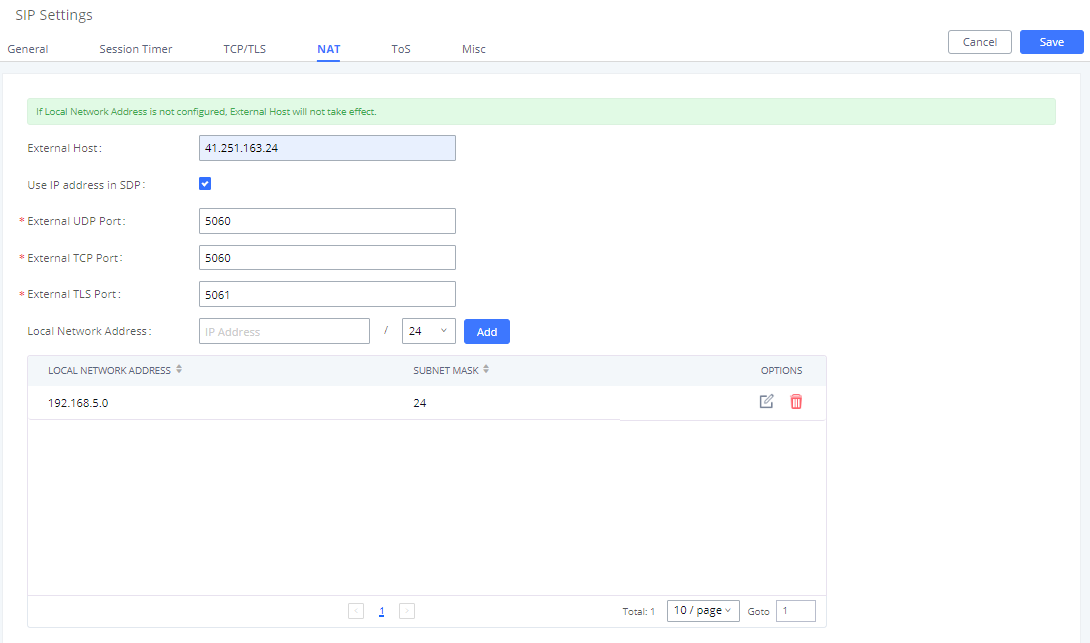
External Host | Static IP address and port used in outbound SIP messages if the UCM6XXX is behind NAT. If it is a host name, it will only be looked up once.
|
Use IP address in SDP | Check to enable this parameter (recommended), the SDP connection will use the IP address resolved from the external host. |
External UDP port | Configures the externally mapped UDP port when the UCM6XXX is behind a static NAT or PAT. In this guide: Keep default port 5060. |
External UDP port | Configures the externally mapped TCP port when the UCM6XXX is behind a static NAT or PAT. In this guide: Keep default port 5060. |
External TLS port | Configures the externally mapped TLS port when the UCM6XXX is behind a static NAT or PAT. In this guide: Keep default port 5061. |
Local Network Address | Specifies a list of network addresses that are considered inside of the NAT network. Multiple entries are allowed. If not configured, the external IP address will not be set correctly. In this guide: 192.168.5.0/24 and 192.168.6.0/24 used by local phones. |
-
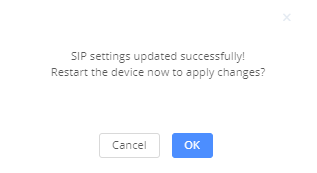
Press
 button to store the configuration.
-
Press
 button in “Information prompt” window to reboot the UCM6XXX and apply the configuration.
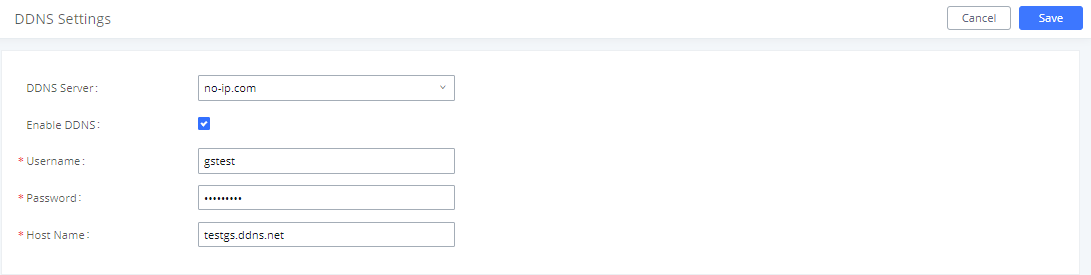
Configuring DDNS Settings (Optional)
In environments where public static IP is not available, customers may use DDNS (Dynamic DNS) to avoid the need to assign allocated dynamic public IP each time on UCM6XXX (NAT settings) and on client sides when public IP is updated from the provider.
Assuming DDNS account is available, follow below steps to configure:
- Access UCM6XXX web GUI🡪System Settings🡪DDNS Settings.
- Select DDNS Server from dropdown list. (Available servers are: “dydns.org”, “freedns.afraid.org”, “zoneedit.com”, “no-ip.com” and “oray.net”).
- Fill Username, Password and Hostname as given from DDNS provider.
- Save and Apply the changes.
Configuring NAT Extension Settings
When the UCM6XXX is on a public IP communicating with devices hidden behind NAT (e.g., broadband router), NAT parameter needs to be enabled on extensions to use on remote phones (enabled by default).
Follow below instructions to check and enable NAT setting on needed extensions:
- Access UCM6XXX web GUI🡪Extension / Trunk🡪Extensions.
-
Select extension and press
 to edit the settings.
- Go to Media tab and check NAT parameter.
- Press Save and Apply Changes buttons to store and apply configuration.

SIP Client Configuration Sample
This chapter provides basic configuration to be done on remote SIP clients.
In this guide, GXP2170 is used as example for manual configuration and GS-Wave (free mobile softphone) for auto-configuration.
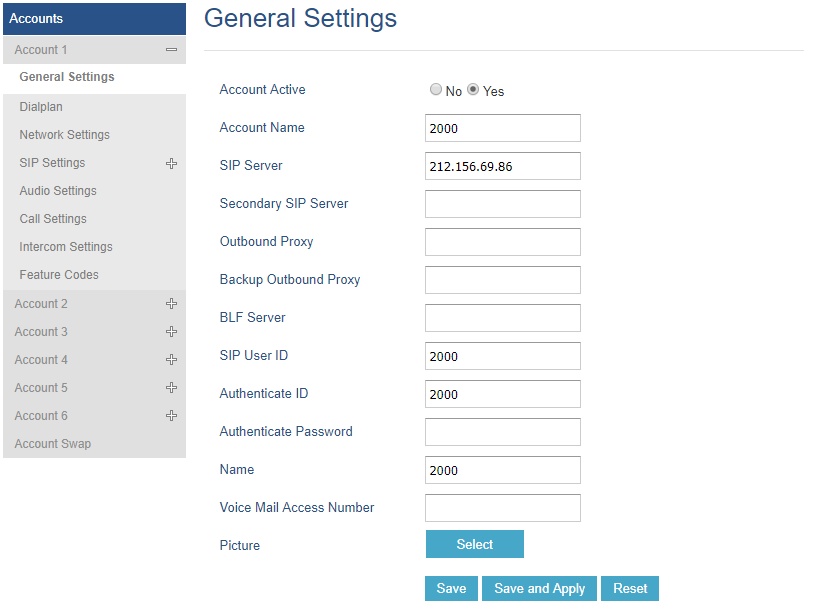
Manual Configuration using GXP2170
- Access phone web GUI🡪Accounts🡪General Settings.
- Type in extension credentials including SIP User ID, Authenticate ID and Authenticate Password.
- In SIP Server field, type in value of “External Host”. Please refer to [UCM6XXX NAT Settings].
- Click “Save and Apply”.
If the phone is not registered at this stage, users can adjust NAT settings on the phone side as described in below instructions:
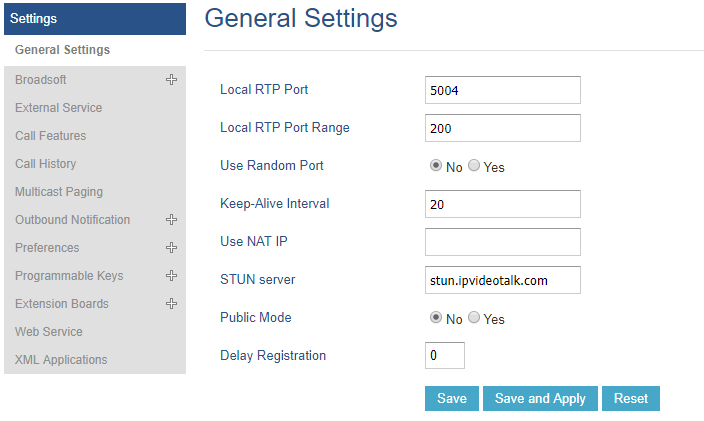
- Access the phone web GUI🡪Settings🡪General Settings.
- Configure STUN Server. For example: “stun.ipvideotalk.com”.
- Click on Save and Apply.
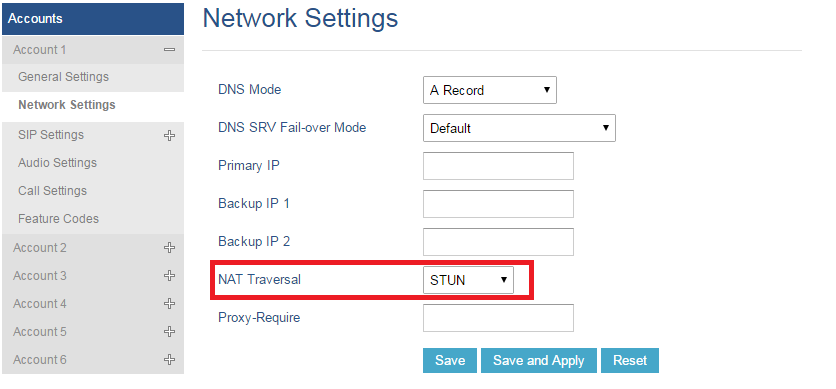
- Go to Account🡪Account X🡪Network Settings.
- Set NAT Traversal to STUN as shown below.
Auto-Configuration using GS-Wave
UCM6XXX has the ability to send extension credentials via email to GS-Wave mobile SIP client to be auto-configured. The following steps describe needed instructions:
- Access UCM6XXX web GUI🡪Extension / Trunk🡪Extensions.
- Select the Extension and click on ”More” then “E-mail Notification” button.

- Press OK in “Prompt information” pop-up window.
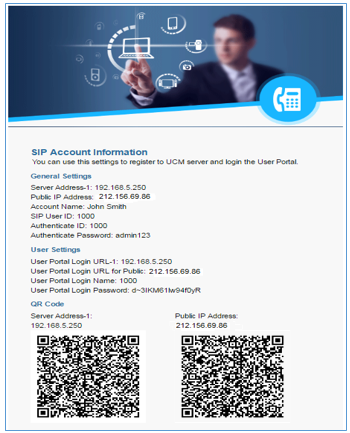
Once the email is sent the Email Status (in Figure 9) will change to “Sent”. And the User will receive an email containing information about the account as shown below.
After receiving the email, follow below steps to auto-configure GS-Wave account on the mobile phone. (GSWave is availabe in Google PlayStore):
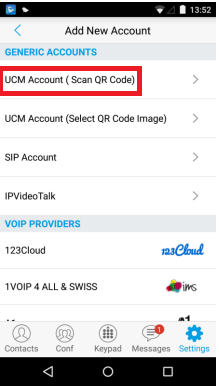
- Open GS-Wave softphone application installed on Android™ or iOS™ mobile phones.
- Access to Settings🡪Add New Account🡪UCM Account (Scan QR Code).
- Using integrated QR Code reader tool, scan Public IP Address QR Code to get extension credentials. Please refer to [Figure 10].
GS-Wave will create the account using provided information from QR Code and register on the UCM6XXX.