
INTRODUCTION
Thank you for purchasing the UCM6301/UCM6302/UCM6304/UCM6308 IP PBX. The Grandstream UCM6300 series IP PBX is based on Asterisk 16 system. It provides powerful functions, a friendly interface for remote management, and an easy-to-expand all-in-one communication solution to enterprises of all sizes. The UCM6300 series IP PBX supports up to 3000 extensions with PBX features including audio/video calling, video conferencing, video surveillance, PBX data management and analysis, UCM RemoteConnect, and device remote access. It is an ideal choice for enterprises looking for an all-in-one solution for users to communicate efficiently and work productively.
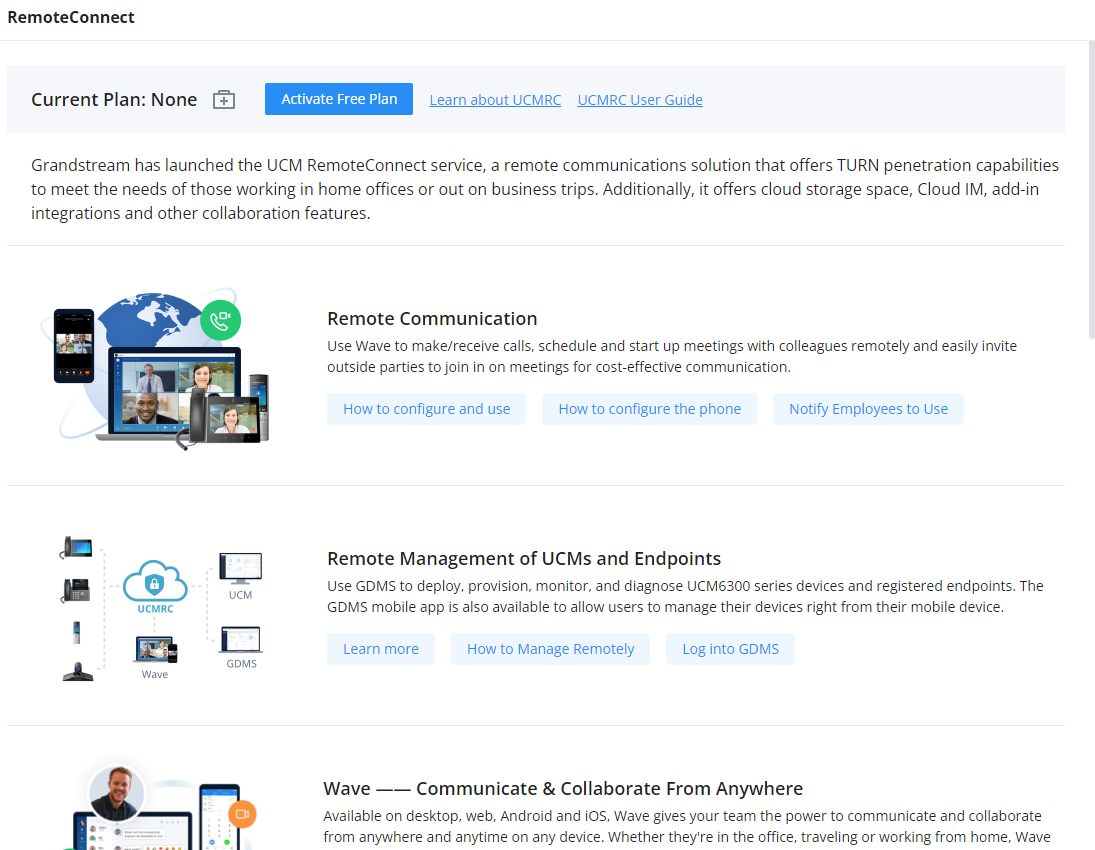
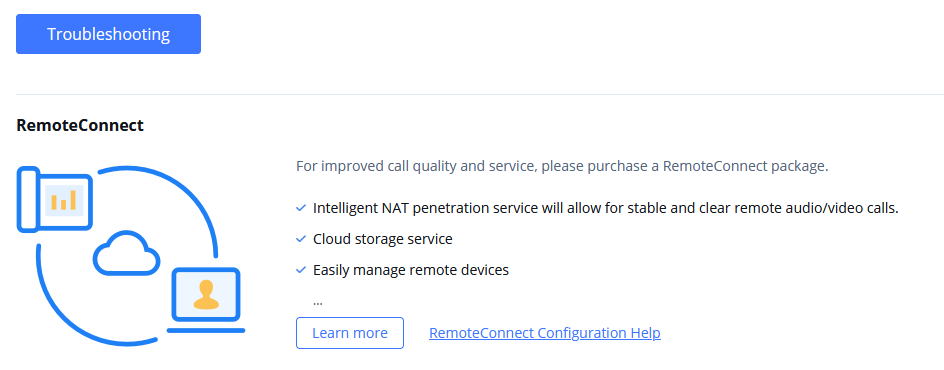
The UCM6300 series IP PBX provides UCM RemoteConnect service which offers users a quick setup to start working remotely including Grandstream Wave web app using WebRTC and Wave mobile app on Android and iOS system to communicate and join meetings, synchronize, and manage extension, receive alerts, and reports, view, and managed storage via cloud, and much more. The UCM6300 UCM RemoteConnect service is offered via Grandstream Device Management System (GDMS). Please visit the GDMS platform for UCM RemoteConnect service plan information and purchasing plan, device remote management, cloud storage management, etc.
This document describes how to use the UCM6300 series IP PBX UCM RemoteConnect service with UCM6300 and GDMS.
PREREQUISITE
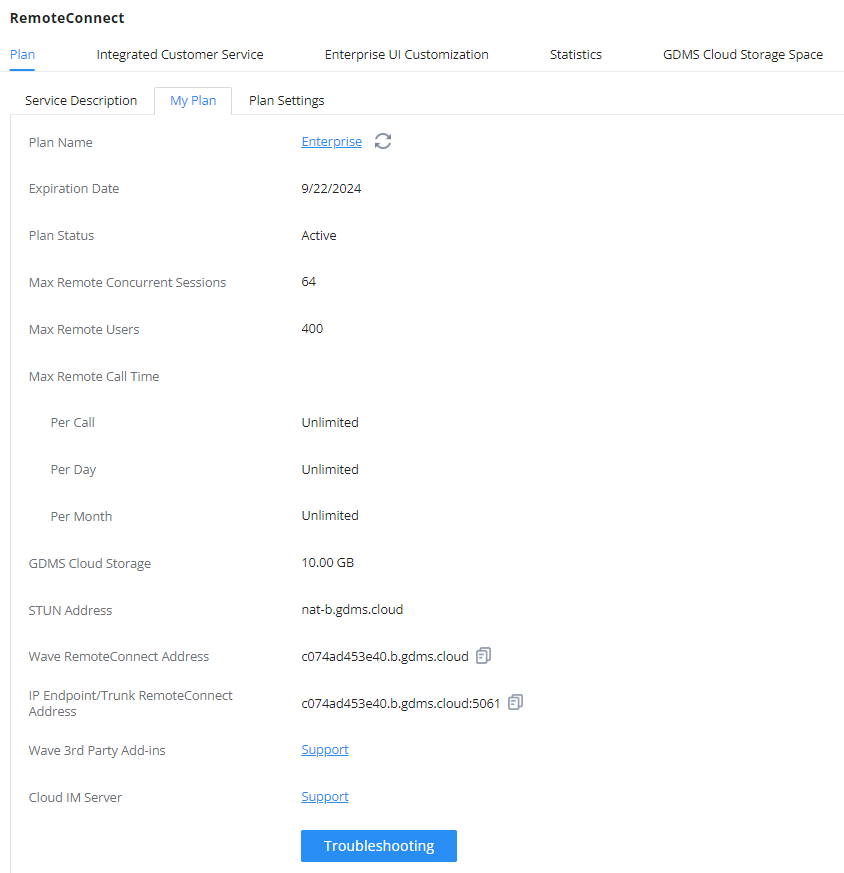
The UCM RemoteConnect service on the UCM6300 series must be used with Grandstream Device Management System (GDMS). Before the UCM is connected with GDMS, the RemoteConnect information displays as below on UCM6300 web GUI → RemoteConnect→Plan→My Plan page.
Before using the service, please log in to your GDMS account. If you do not have a GDMS account, please sign up here and then log in: https://www.gdms.cloud/login
On the GDMS platform, sign in and go to Device → PBX Device page, click on “Add Device” to add your UCM6300 device to the GDMS system. Please refer to the section “Managing UCM6300 on GDMS → Add UCM Device” for more details.

CONFIGURING UCM REMOTECONNECT
Purchase RemoteConnect Plan
Log in UCM6300 web GUI with the admin account. Go to UCM Web UI 🡪 RemoteConnect. An initial introduction page will be displayed as below.
On the GDMS platform, sign in and go to Device → PBX Device page, click on “Add Device” to add your UCM6300 device to the GDMS system. Please refer to the section “Managing UCM6300 on GDMS → Add UCM Device” for more details.
After UCM is successfully connected to GDMS, the Basic plan will be assigned to the UCM for users to start with.
Now log in UCM web GUI and go to RemoteConnect tab. The following plan details will be displayed with related configurations available on the web page.
RemoteConnect Plan Expiration and Renewal
- After the paid plan expires, it will be downgraded to “Basic” plan and the UCM630x device will permanently stay on the Basic plan, until the user decides to upgrade it.
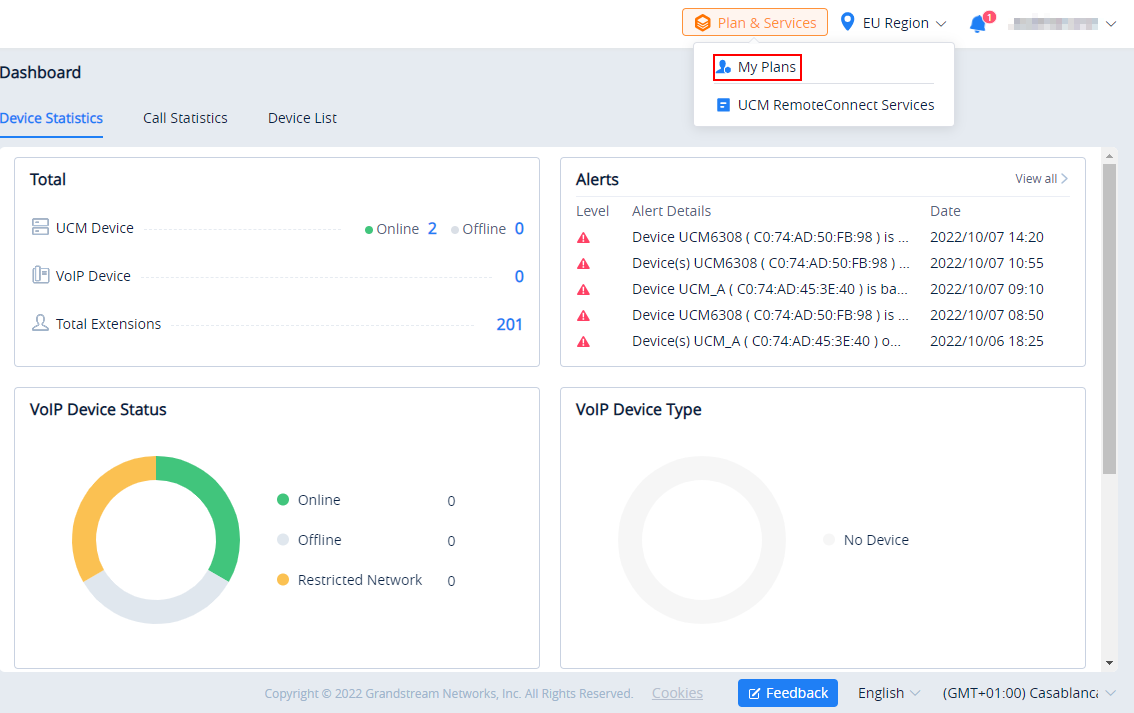
On the GDMS web UI, please hover the mouse pointer over ![]() , then a drop-down menu will appear and then choose My Plans.
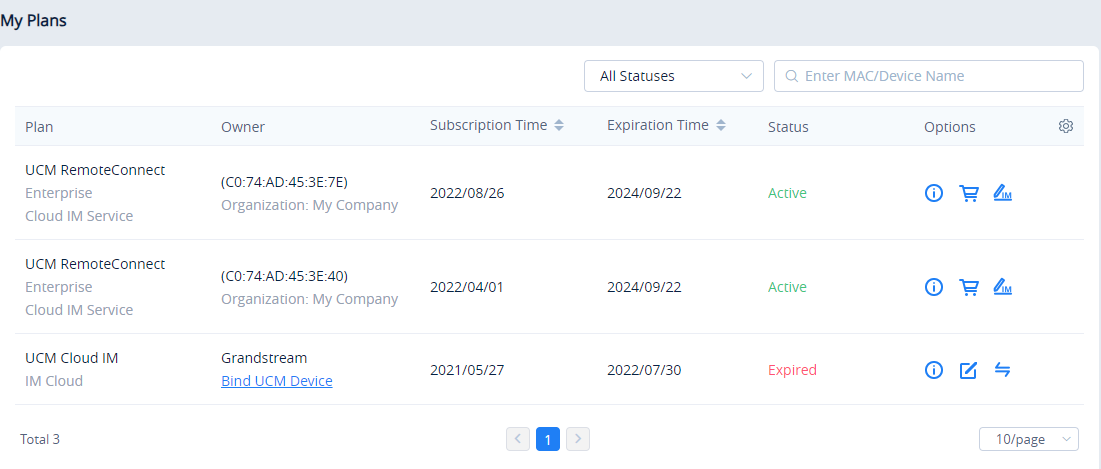
, then a drop-down menu will appear and then choose My Plans.
2. The user can go to “My Plans” menu and move the cursor to the corresponding tip, the user will see the notification “After the previous plan expires, your UCM device can always use the Basic plan for free.”
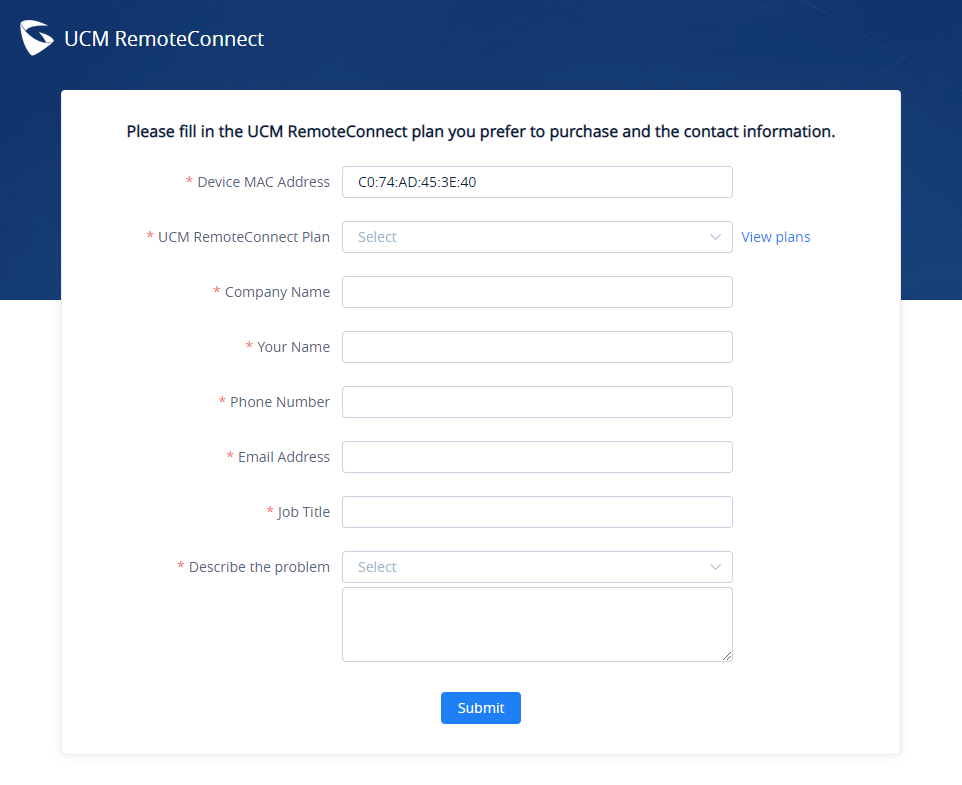
3. If the user cannot contact the dealer in the process of purchasing the plan, the user can click the shopping cart icon ![]() then a prompt will appear to specify the kind of help that you are requesting. Please choose the first option if you can’t contact the dealer.
then a prompt will appear to specify the kind of help that you are requesting. Please choose the first option if you can’t contact the dealer.

4. This form will appear in which you can fill the necessary information, then the dealer will contact as soon as possible.
UCM RemoteConnect Remote Service Diagnosis
In daily operation, the user can click the “Troubleshooting” button to diagnose the remote service system. The specific diagnosis content includes media service (STUN/TURN), GDMS link and heartbeat detection, tunnel service (SIP/Web Socket), Cloud IM, UCM bandwidth speed measurement.
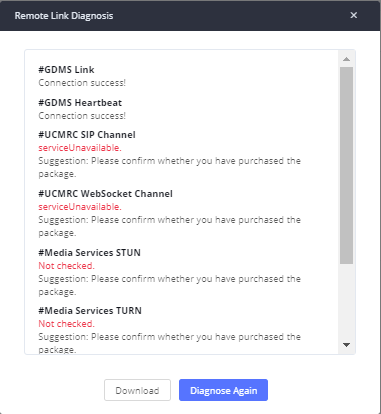
If the UCM does not have an RC plan the option will be called Remote Link Diagnosis
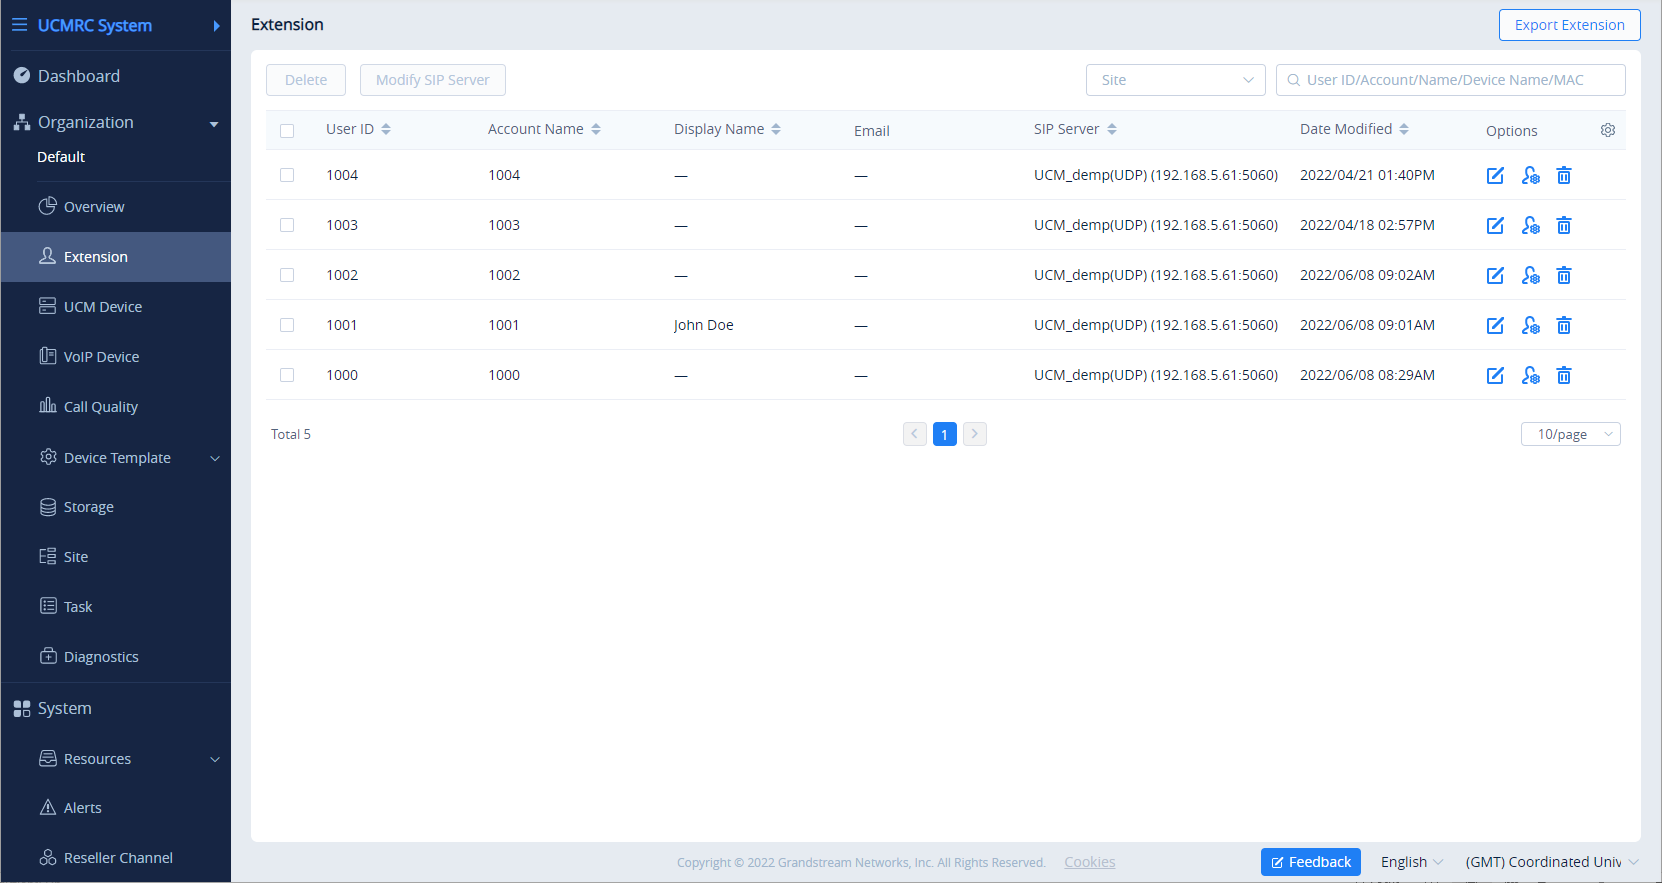
SIP Extension Sync-Up
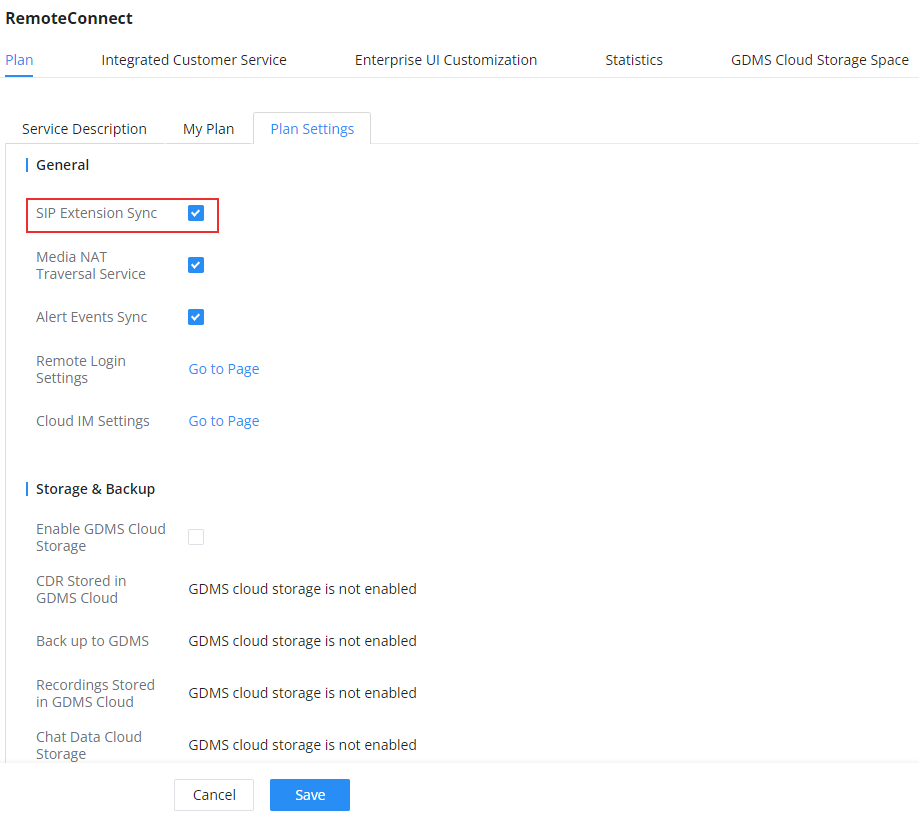
After UCM is added into GDMS, all SIP extensions on the UCM will be synchronized up to GDMS automatically for users to allocate and manage SIP extensions for their end devices.
The setting “SIP Extension Sync” is under UCM web GUI: RemoteConnect 🡪 Plan Settings. By default, it is enabled.
The SIP extensions synchronized up from UCM will be displayed on UCMRC System 🡪 Extension.
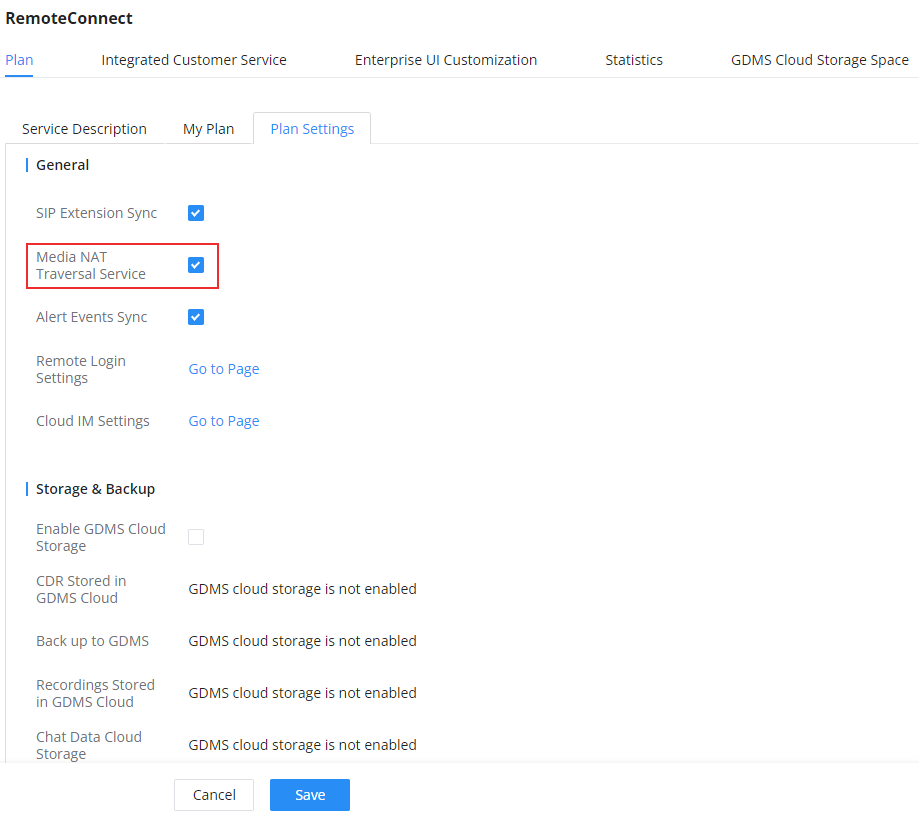
Media NAT Traversal Service
The media NAT traversal provides an automated NAT traversal service for users to make calls and attend meetings from an external network without NAT issues.
The setting “Media NAT Traversal Service” is under UCM web GUI → RemoteConnect → Plan Settings. By default, it is enabled.
CDR data will be synchronized to the GDMS server at 2:00 AM on the 1st of each month based on the UCM’s system time.
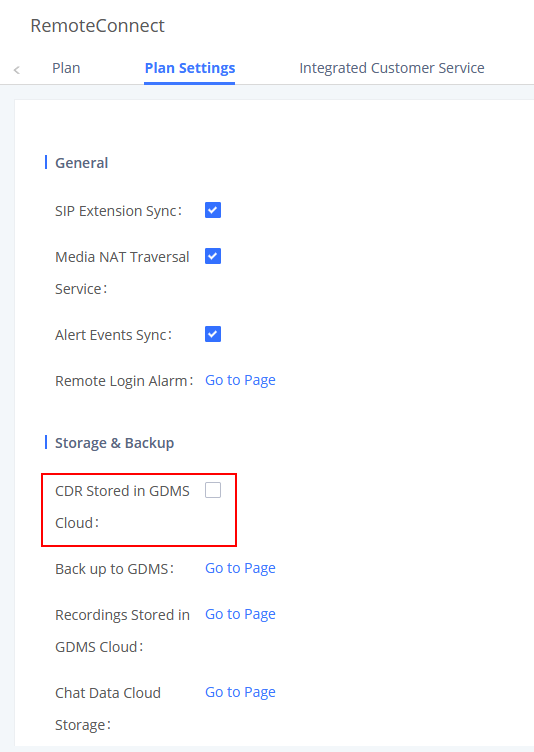
CDR Stored in GDMS Cloud
UCM6300 series provide the service of automatically storing CDR data in the GDMS cloud, the related configuration can be found under the UCM RemoteConnect → Plan Settings page, the option is called CDR Stored in GDMS Cloud, which is disabled by default, so please make sure to enable this service on the UCM to start storing the CDR data in GDMS.
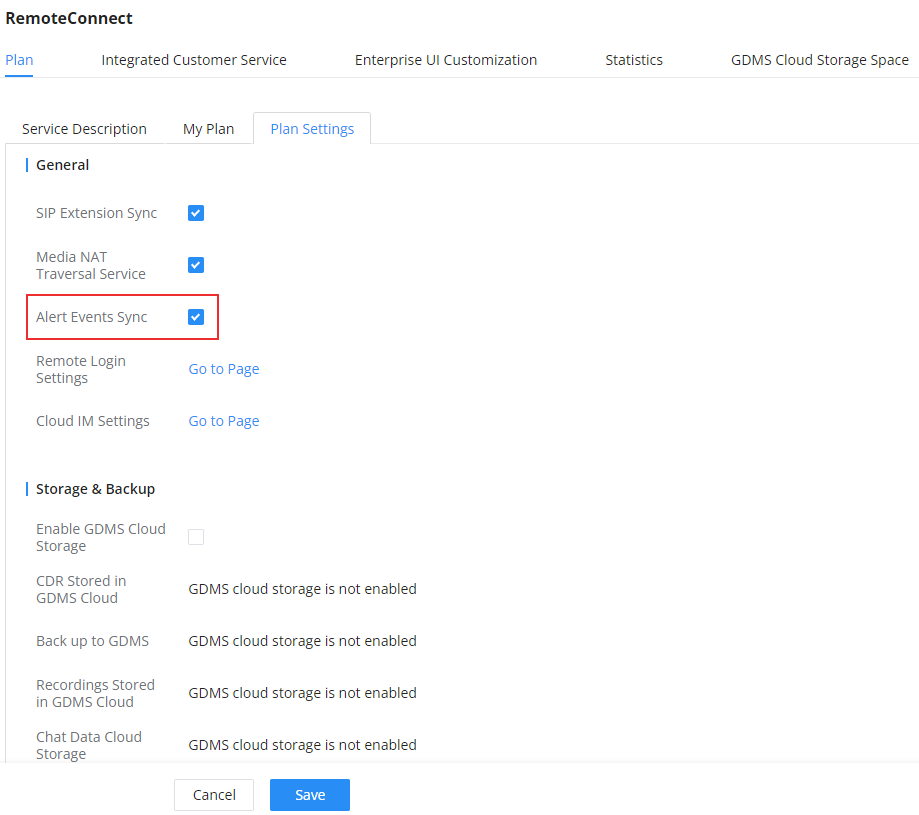
GDMS Alert Management
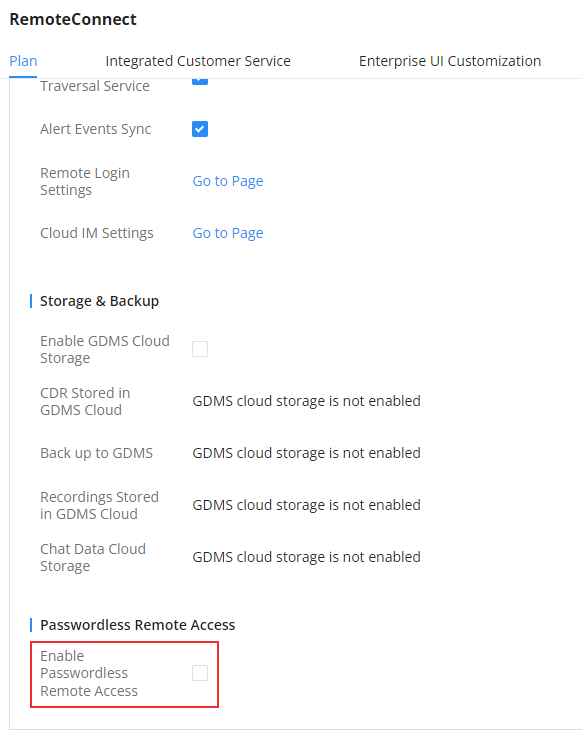
To synchronize the UCM alert info with the GDMS, under the UCM RemoteConnect Plan Settings, users need to make sure that the “Alert Events Sync” is enabled.
GDMS has Alert Notification System that will be triggered when certain conditions are met. Three Alert Level: High, Medium, and Low.
There are three ways to notify users about alert notifications, this section will describe these three ways.
Passwordless Remote Access
When enabling this feature, GDMS will not need to not enter the account password to log in when accessing UCM. The default setting is disabled.
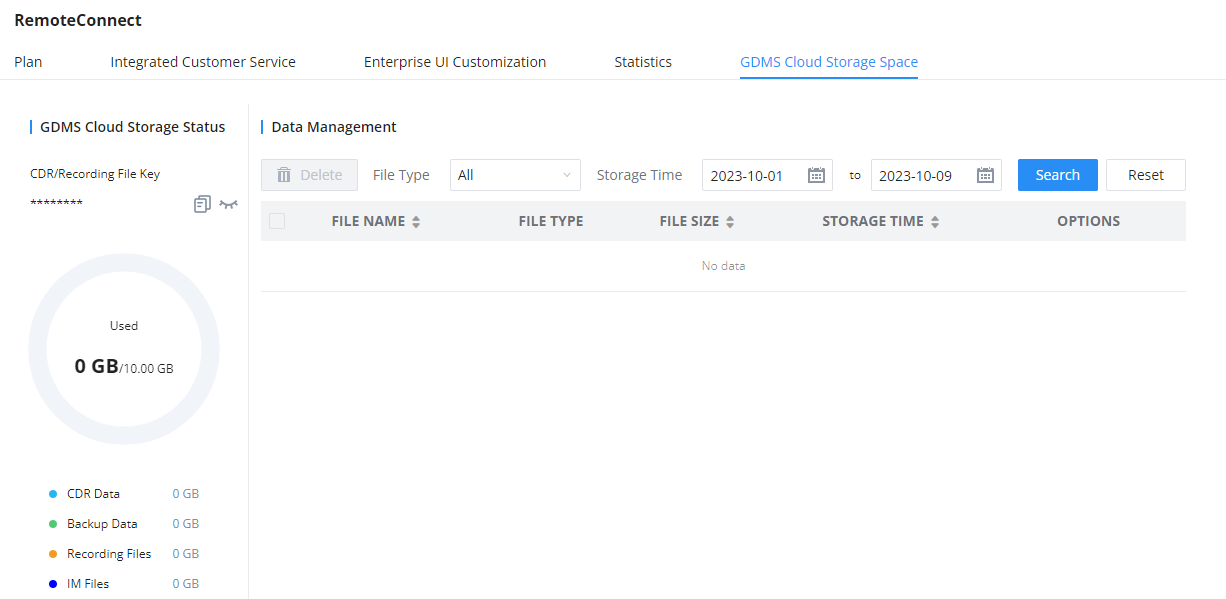
GDMS CLOUD STORAGE SPACE
GDMS Cloud Storage Space feature on the UCM630x offers an overview about how you are using the storage space offered by RemoteConnect. It displays the amount of storage occupied, the amount of free space, also the percentage taken by each type of files. The type of files displayed are the following: CDR Data, Backup Data, Recording Files, and IM Files.
USING REMOTECONNECT FOR CALLS AND MEETINGS
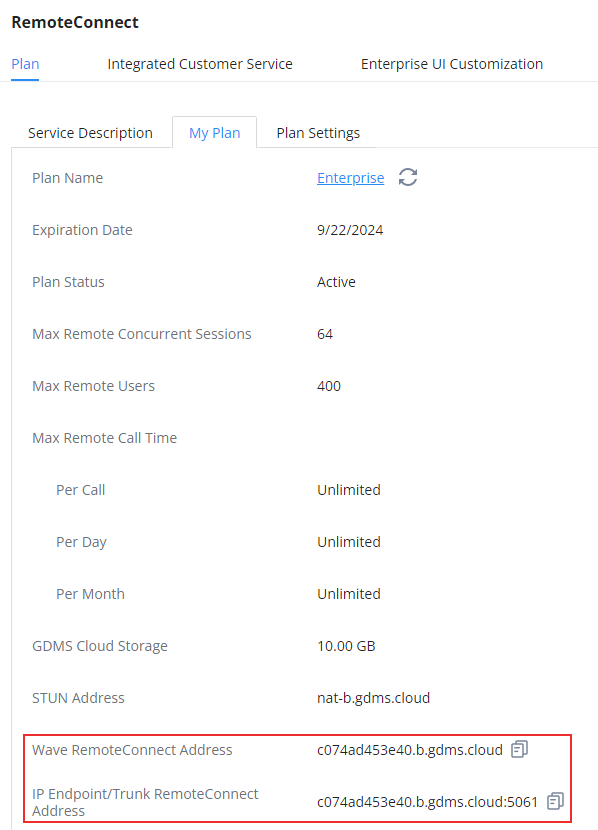
Users can start using UCM RemoteConnect for calls and meetings from an external network. The public address to access UCM can be found under UCM Web GUI → RemoteConnect→Plan→My Plan.
Using Wave Web
Before using the Wave web application for audio and video calls, please verify the following:
- Log in to UCM web GUI and go to Extension/Trunk → Extension/Trunk then click on the edit button
 of a specific extension , then go to “Wave” tab and make sure that “Enable Wave” option is enabled. (Wave is enabled by default when an extension is created)
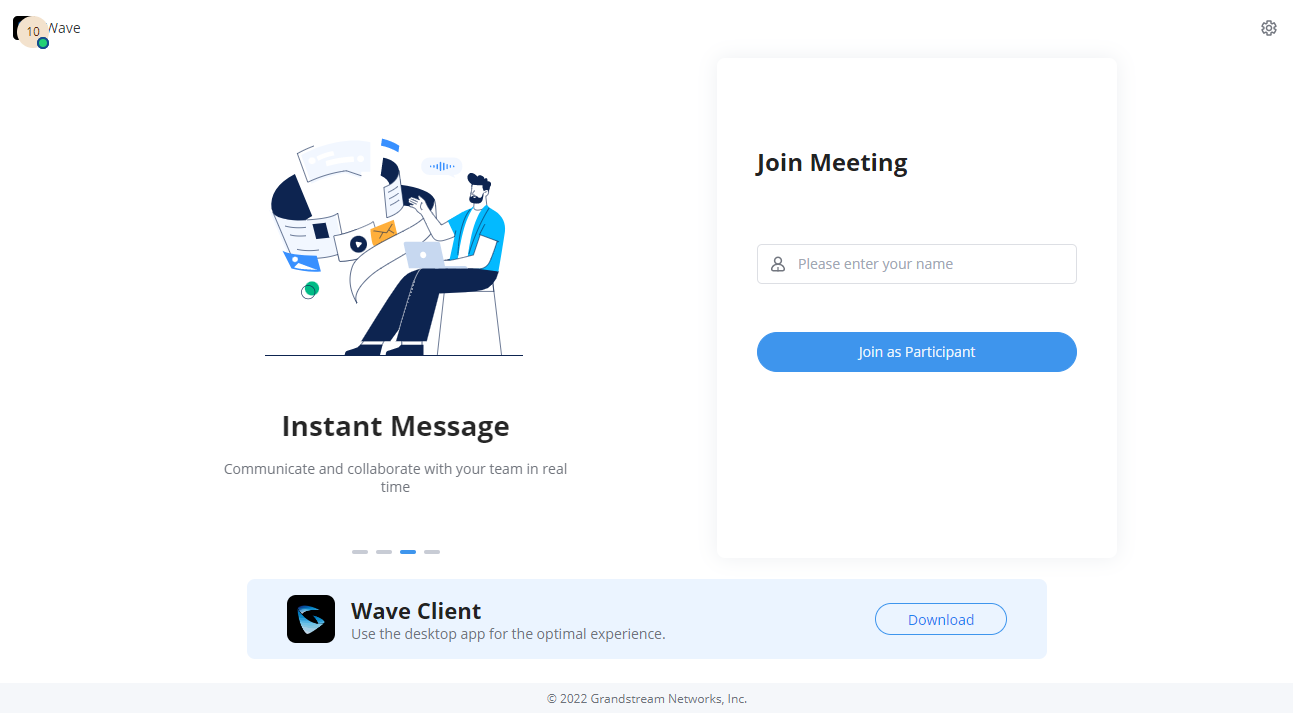
Joining Meeting Anonymously on Wave Web
Users can join UCM meetings anonymously from the link in the invitation email, or the link directly shared by the host. On the below page, enter the preferred display name to join the meeting.
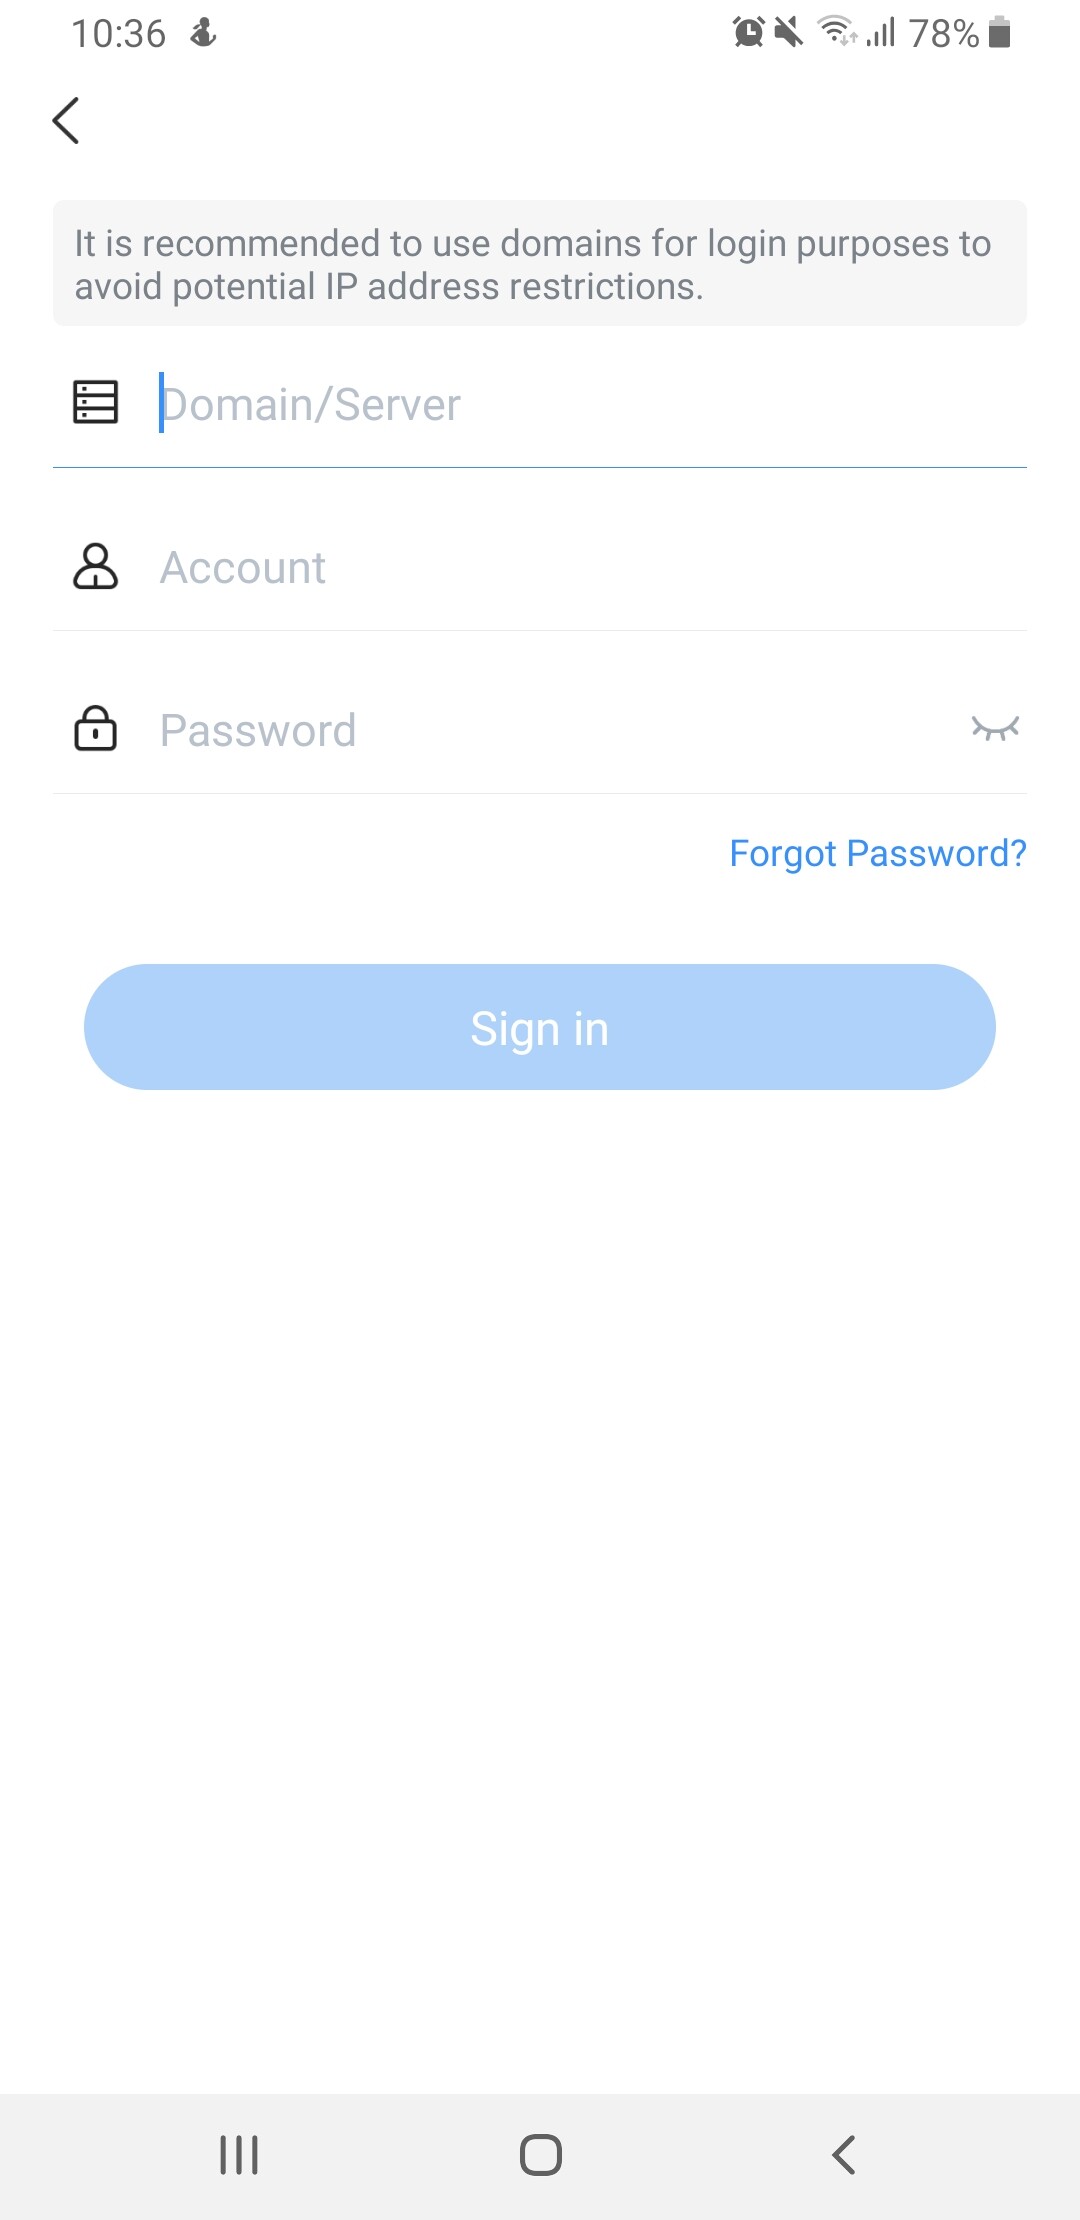
Logging in Wave Web
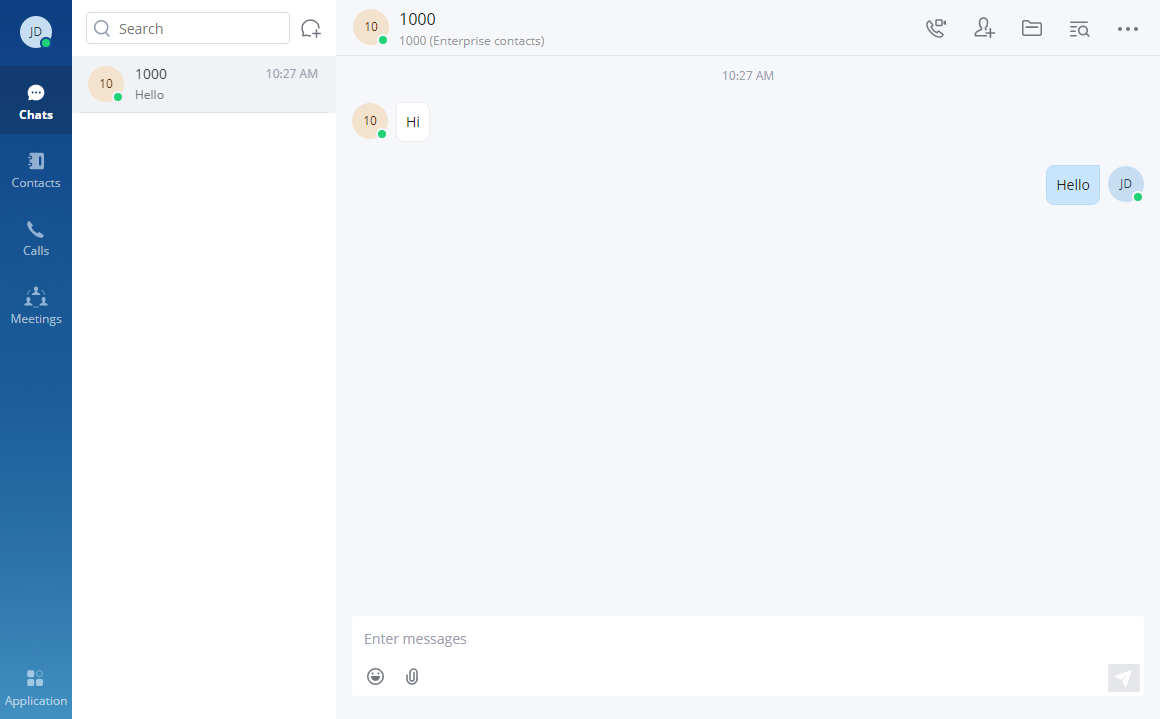
UCM users can log in to Wave web using the SIP extension number and the user password. After the user logs in to Wave web, the user can host meetings, schedule meetings, access and manage contacts, make calls, transfer a call and chat during a call.
The Wave web page is formed by adding “/wave” to the UCM access page. For example https://c074ad0axx8e.a.gdms.cloud/wave/
External users can also open the UCM login page and click on “Grandstream Wave” under the login button to access the Wave web login page.
For internal users, the Wave web page can be accessed by UCM IP with default port 8090, For example, https://192.168.100.50:8090

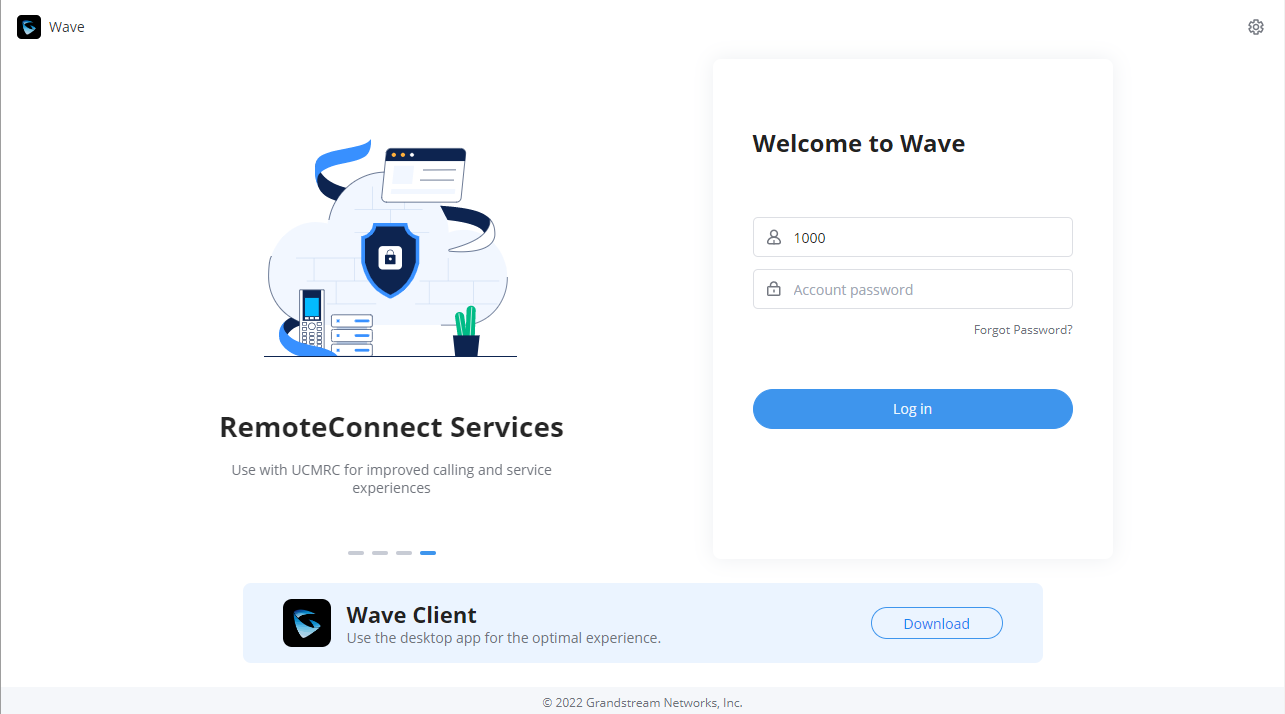
Here is the display after users log in to UCM Wave web using the SIP extension number and User/Wave password.
Using Wave app on Mobile Devices
Wave is a softphone app for Android and iOS systems that can be used with UCM6300. After downloading and installing the Wave app, users can see the following interface when launching the app on the mobile device.
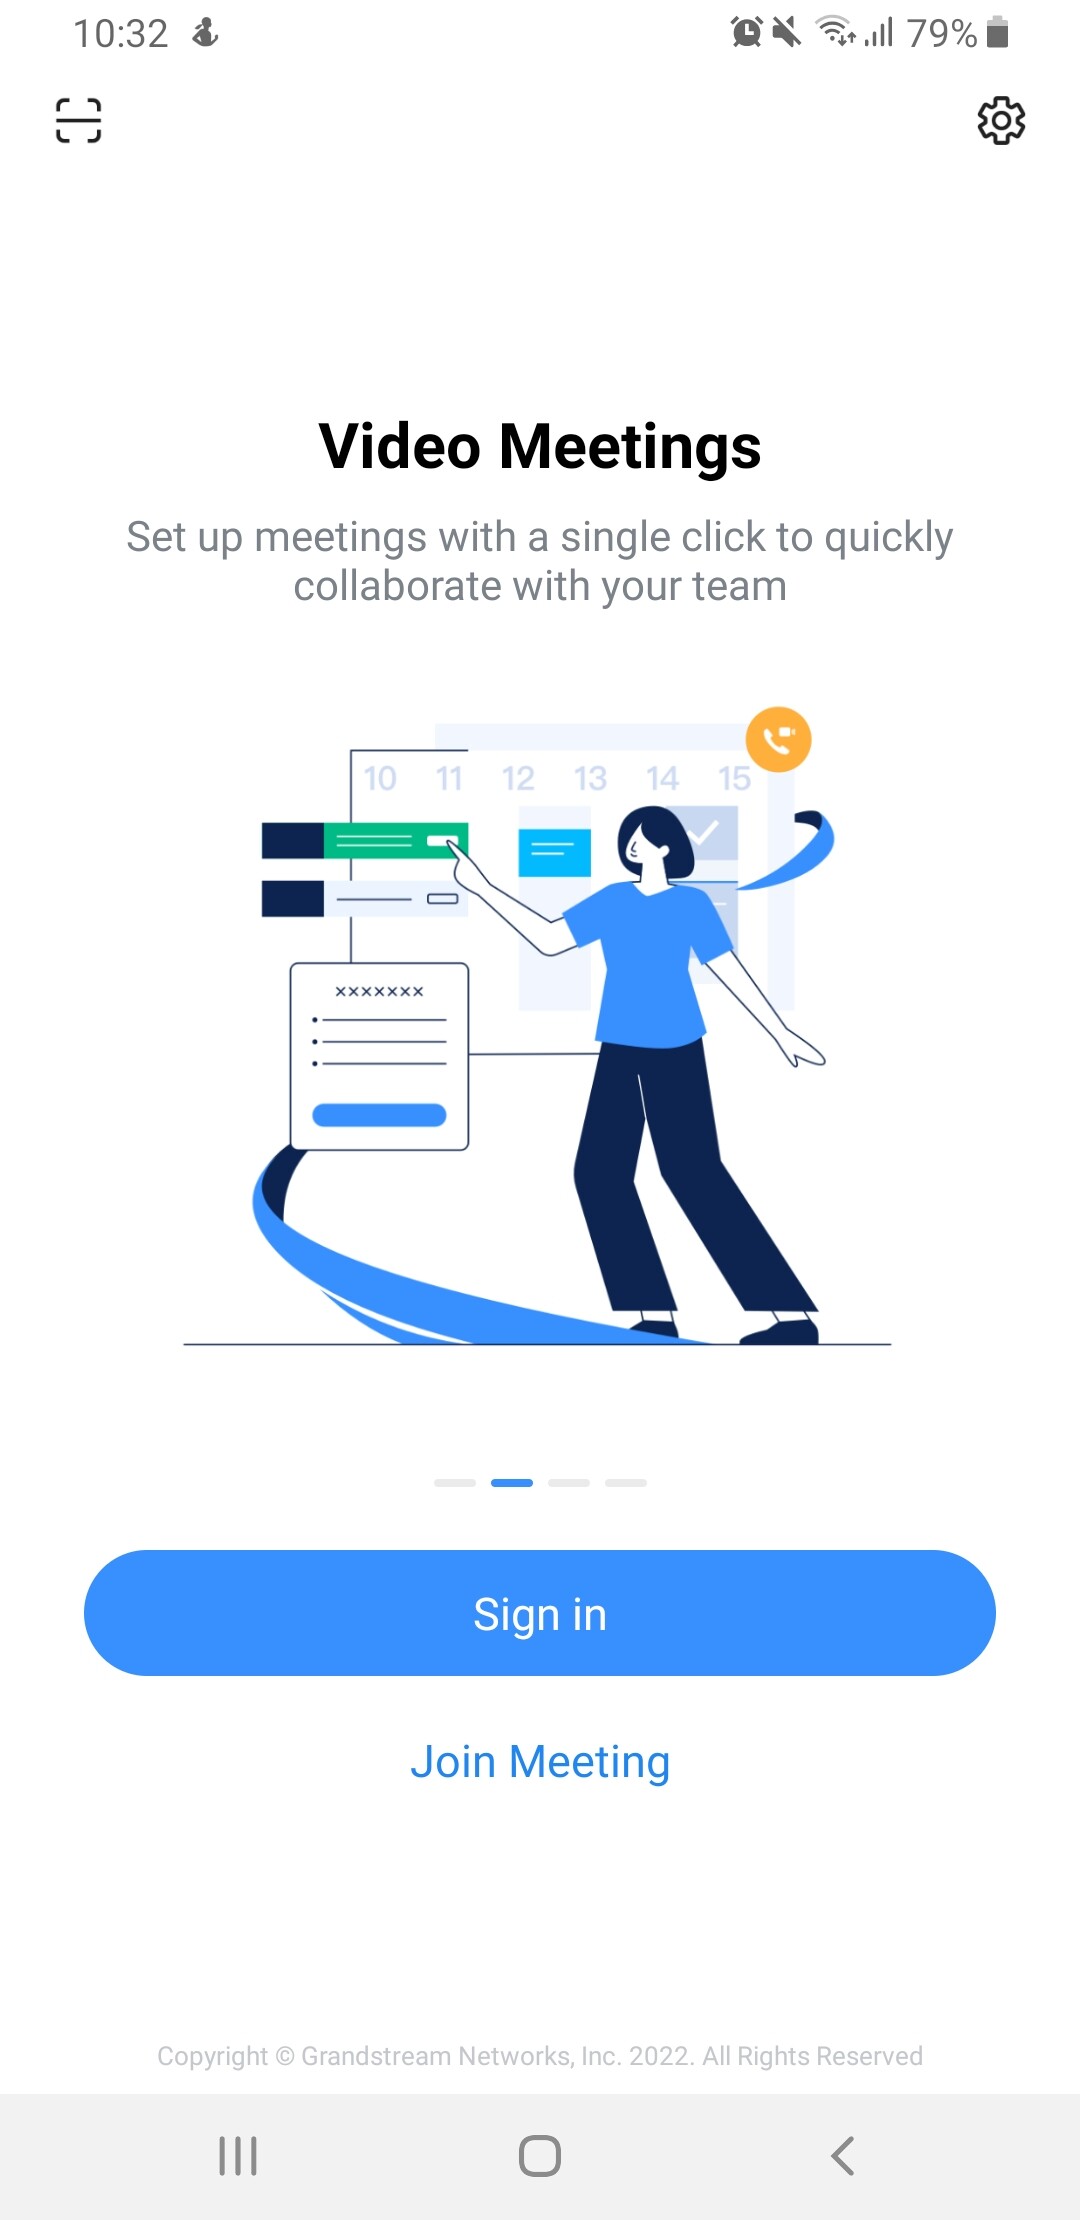
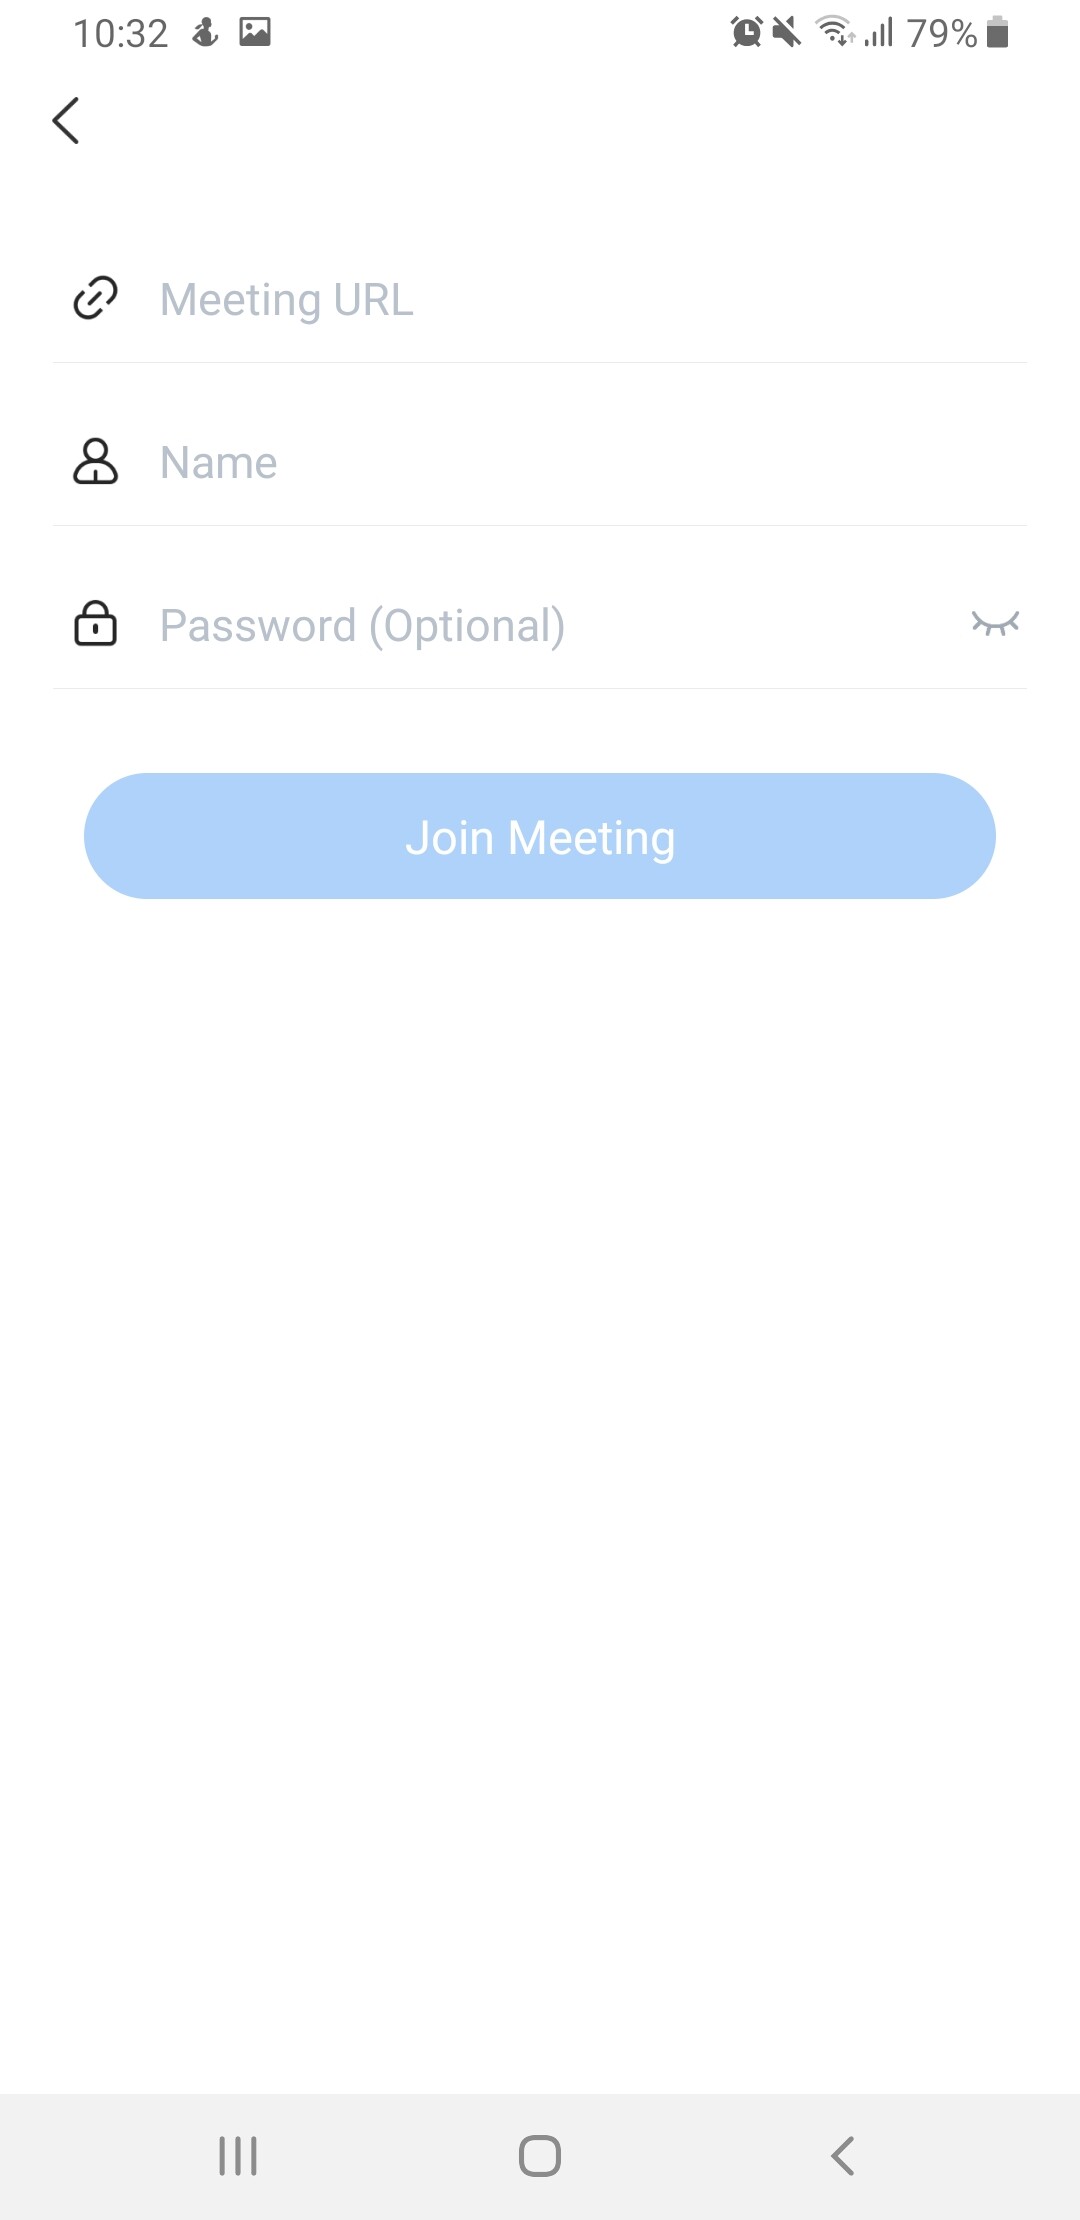
Joining Meeting Anonymously on Wave Mobile
After the user clicks on the “Join Meeting” button, the following interface will show. Users can paste the meeting URL there, enter the user’s display name for the meeting and password (if required), then click on “Join Meeting” to start joining the meeting.
Logging in Wave App
After the user clicks on the “Login” button, the following interface will show. Enter the UCM public access address in the “Server” field (e.g., c074ad0axx8e.a.gdms.work), enter the Account name with the SIP extension number and the user password, and then click on “login.”
Users can also log into the Wave app using a QR code generated by theUCM63xx and sent on their SIP extension emails.
Packet Loss Resistance Configurations
To achieve good audio and video quality when many participants are joining the meeting from a link, it is recommended to configure below packet loss resistance-related settings on the UCM.
Log in UCM web UI → Call Features → Multimedia Meeting, open Meeting Settings page to configure the following options:
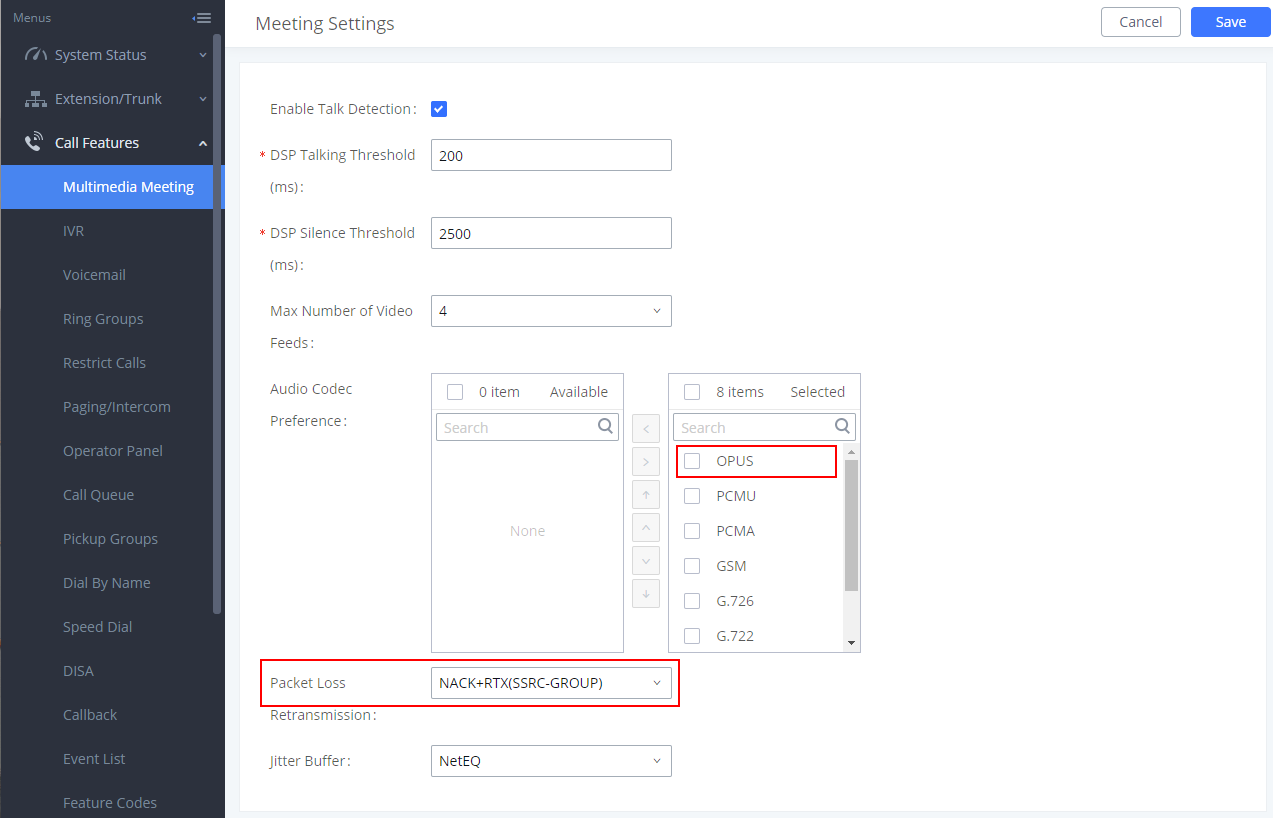
- Audio Codec Preference:
Select Opus to add to the selected codec list. Opus has built-in in-band FEC support which can prevent packet loss.
- Packet Loss Retransmission:
- NACK: Retransmit original packet
- NACK+RTX: Retransmit packet with new RTP header. This option provides more accurate packet loss statistics compared to NACK.
UCM CLOUD BACKUP
Besides local backup and network backup that are already supported on UCM6300, cloud backup is also supported with UCM RemoteConnect. The backup file can be stored in the GDMS cloud storage.
Manual Backup
Go to UCM Web GUI → Maintenance → Backup → Backup/Restore page, users can manually perform backup for the config file and user data.
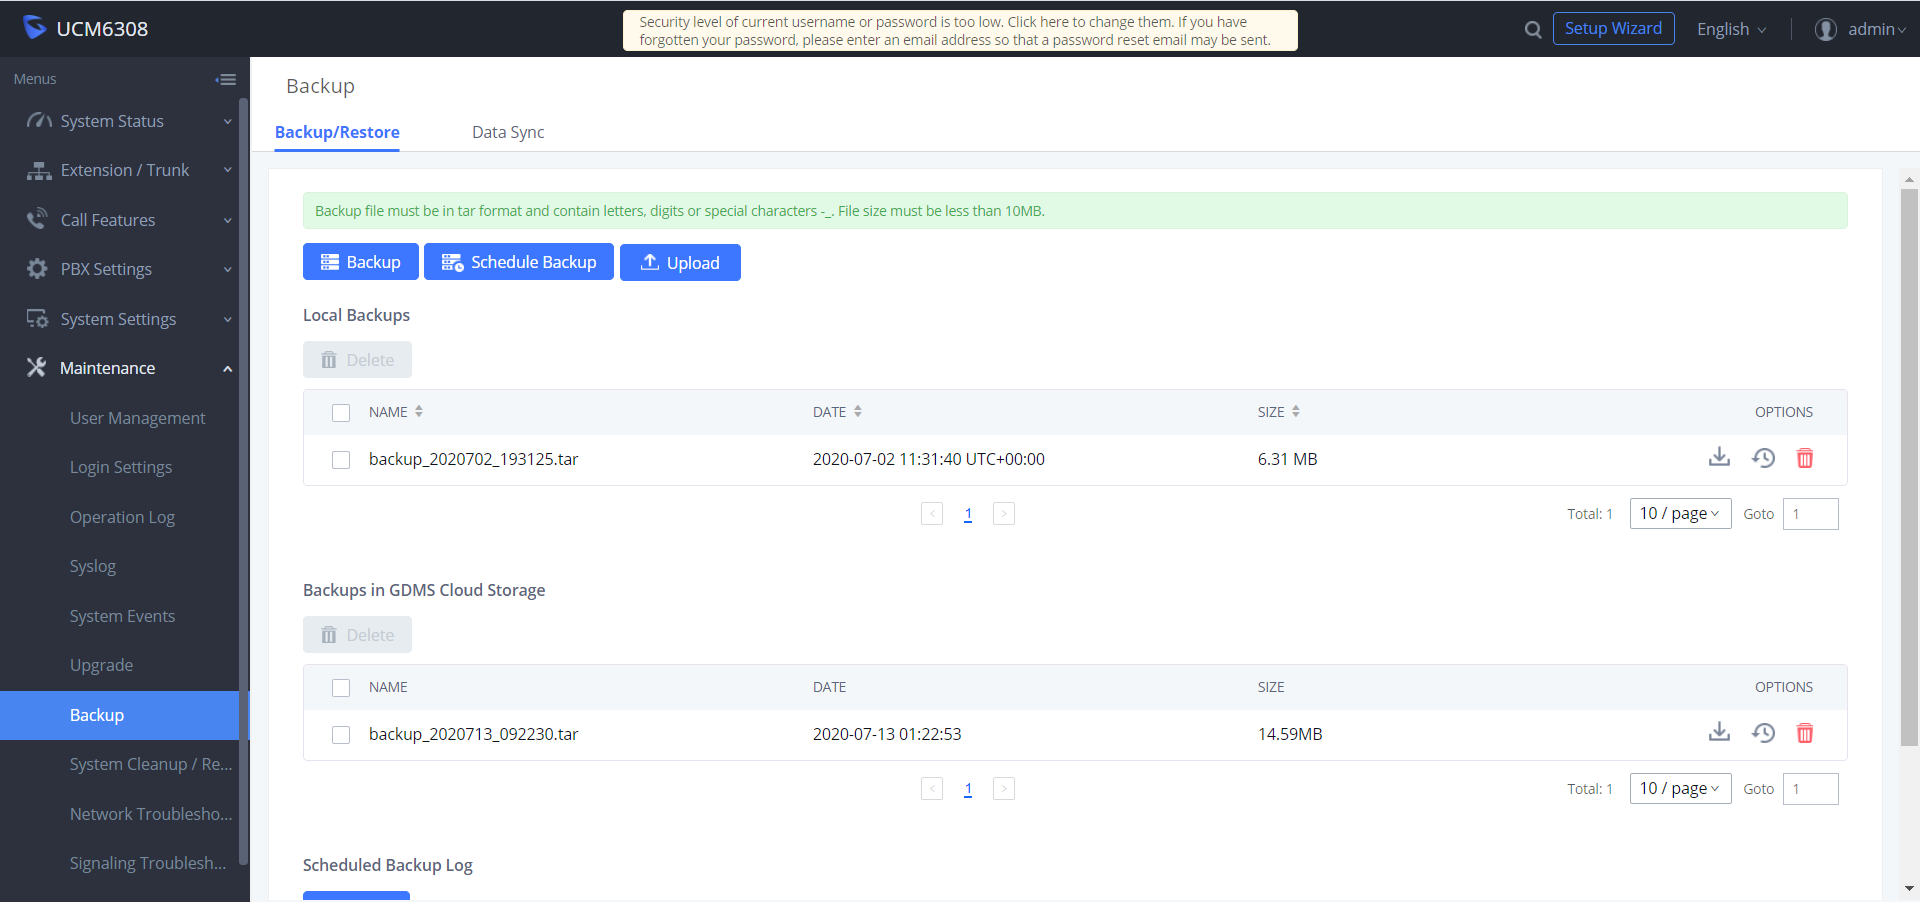
Click on the “Backup” button to bring up the backup configuration page as shown below:
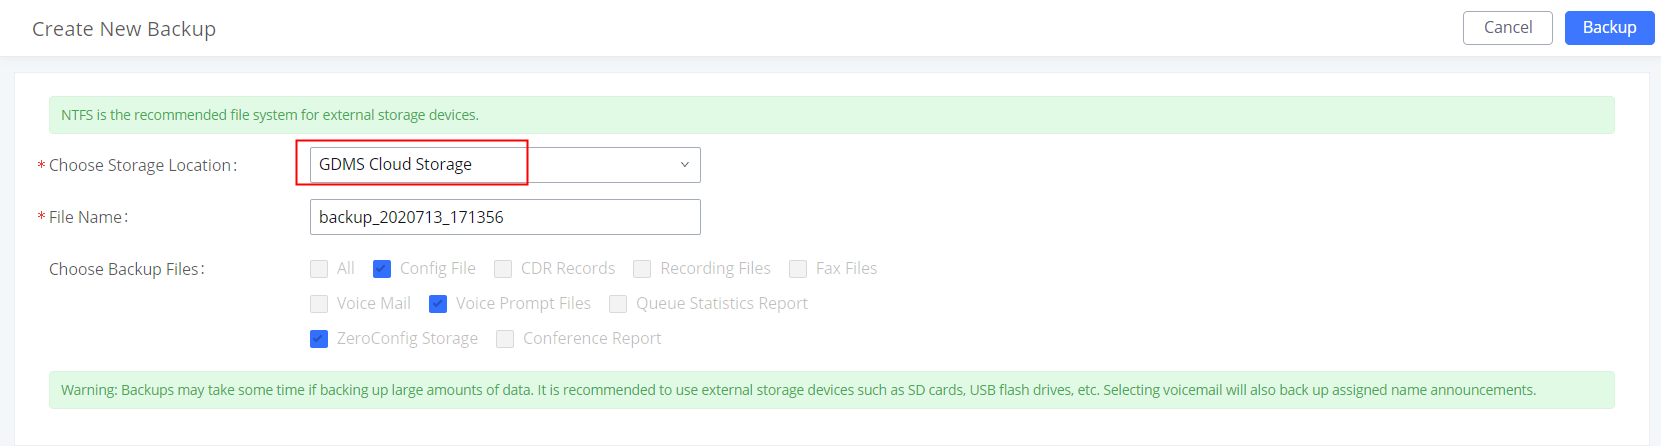
And to take a backup that will be stored on the GDMS cloud, please follow the below steps:
- Step 1: Select storage location as “GDMS Cloud Storage.
- Step 2: Rename the backup file in “File Name” as needed.
- Step 3: Select the backup files as needed. Please note currently only “Config File” is supported for GDMS cloud storage.
- Step 4: On the upper right corner, click on “Backup” to perform the backup.
After the backup is completed, the backup file will be listed for users to download, restore, or delete.
Schedule Backup
To take schedule a backup that will be stored on the GDMS cloud, please follow the below steps:
- Step 1: Go to UCM web GUI 🡪 Maintenance 🡪 Backup 🡪 Backup/Restore page, click on “Schedule Backup”.
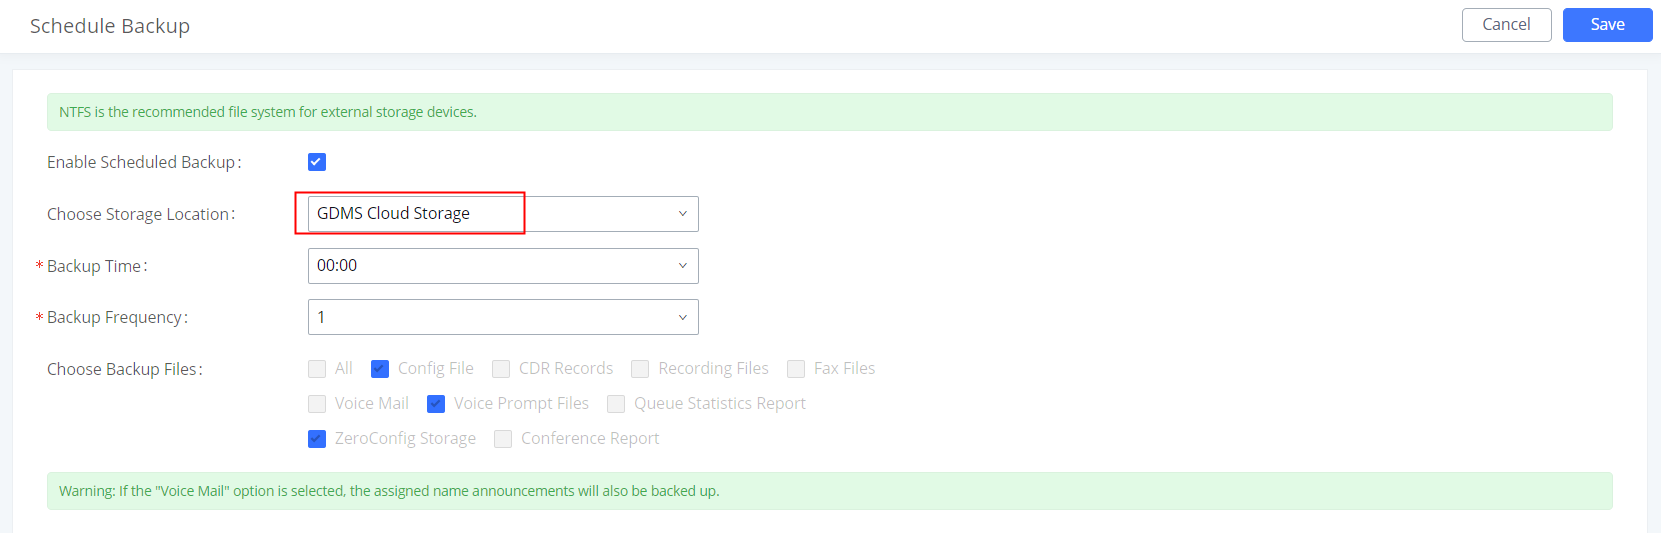
- Step 2: Select storage location as “GDMS Cloud Storage”.
- Step 3: Configure backup time, backup frequency, and backup files.
- Step 4: Click on “Save”.
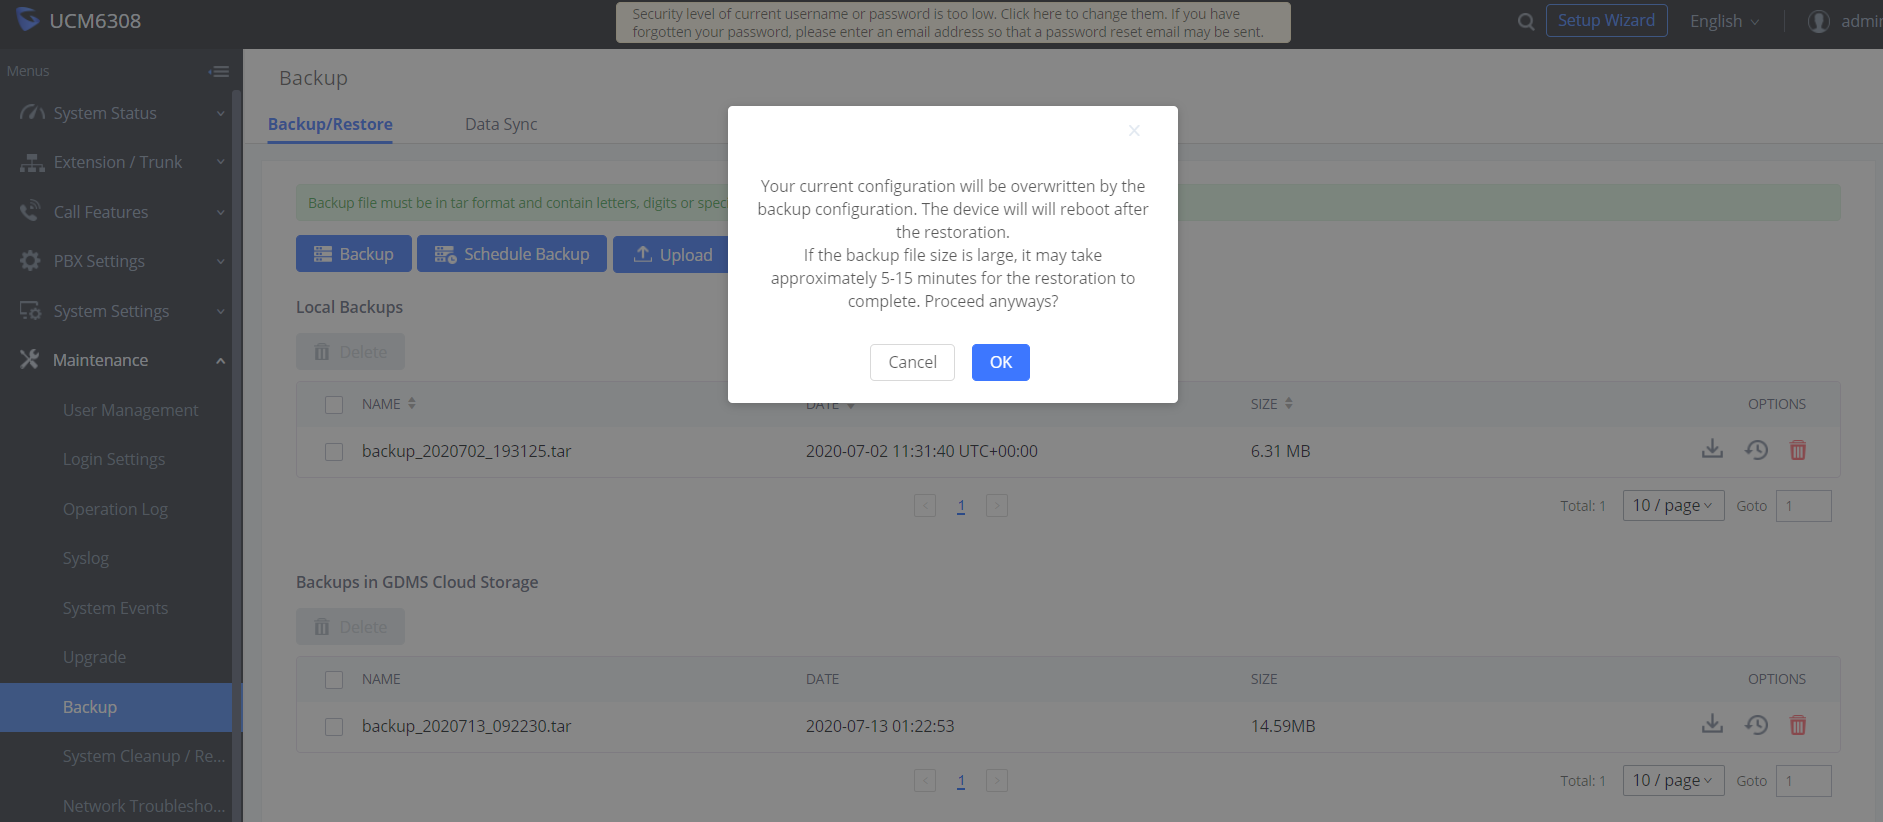
Restore
- Step 1: Go to UCM web GUI 🡪 Maintenance 🡪 Backup 🡪 Backup/Restore page.
-
Step 2: In the list for “Backups in GDMS Cloud Storage”, select the Config file you would like to restore, then click on the “Restore” button
 .
.
Convert Backup File
If the user has upgraded the UCM device model, the user can use this function to convert the configuration file of UCM62xx/UCM65xx to the configuration file of UCM63xx.
- Go to UCMRC → UCM Backup interface, the user can click the “Convert Config File” button to access the conversion interface, as the screenshot shows below:
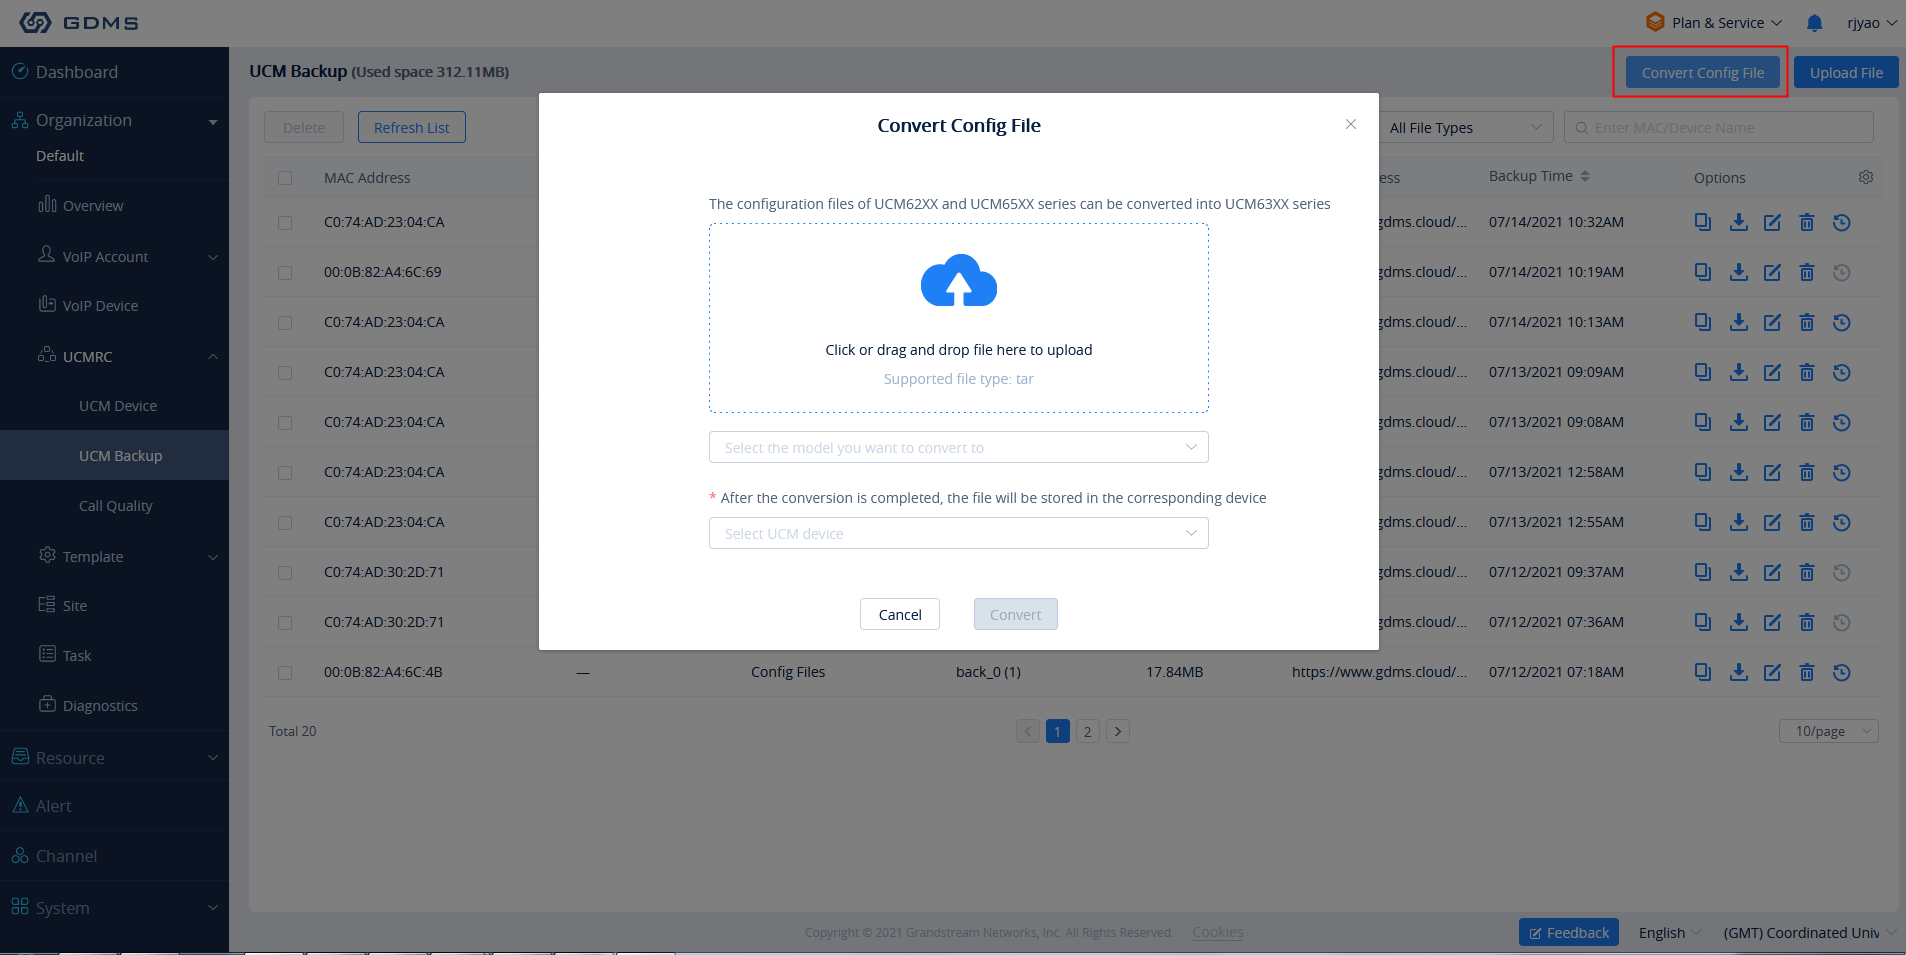
2. The user can click to upload or drag the configuration file of UCM62xx/UCM65xx to the uploading area.
3. Select the target model to be converted, which means the model of your new UCM device.
4. Select the converted configuration file and save it to the cloud storage space of the new UCM device.
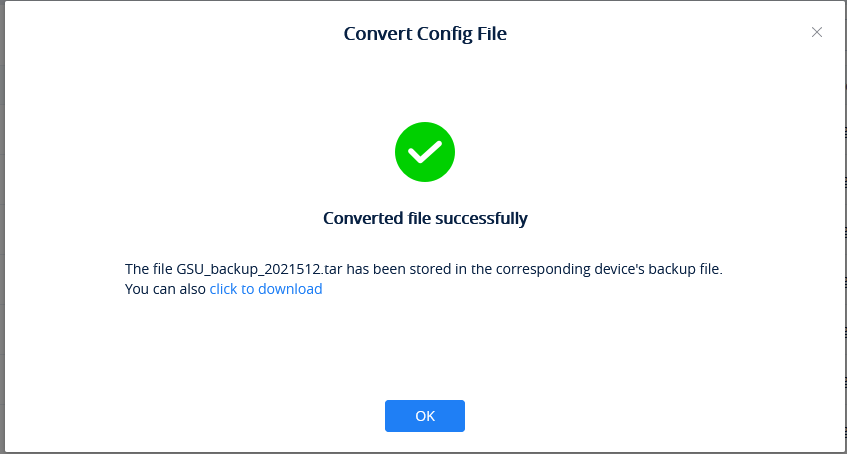
5. The converting duration will last for several minutes. When the conversion is done, the user can download the converted configuration file on the UCM Backup interface. Or the user can click to download the converted configuration file directly to the local PC. The user can also restore the configuration file in the new UCM device directly.
UCM CDR
CDR (Call Details Report) is the data generated from PBX calls. It includes call details and properties for all calls processed by the PBX. The CDR record includes caller number, callee number, call type, start time, call time, talk time, etc. This section describes CDR related to calls from remote networks.
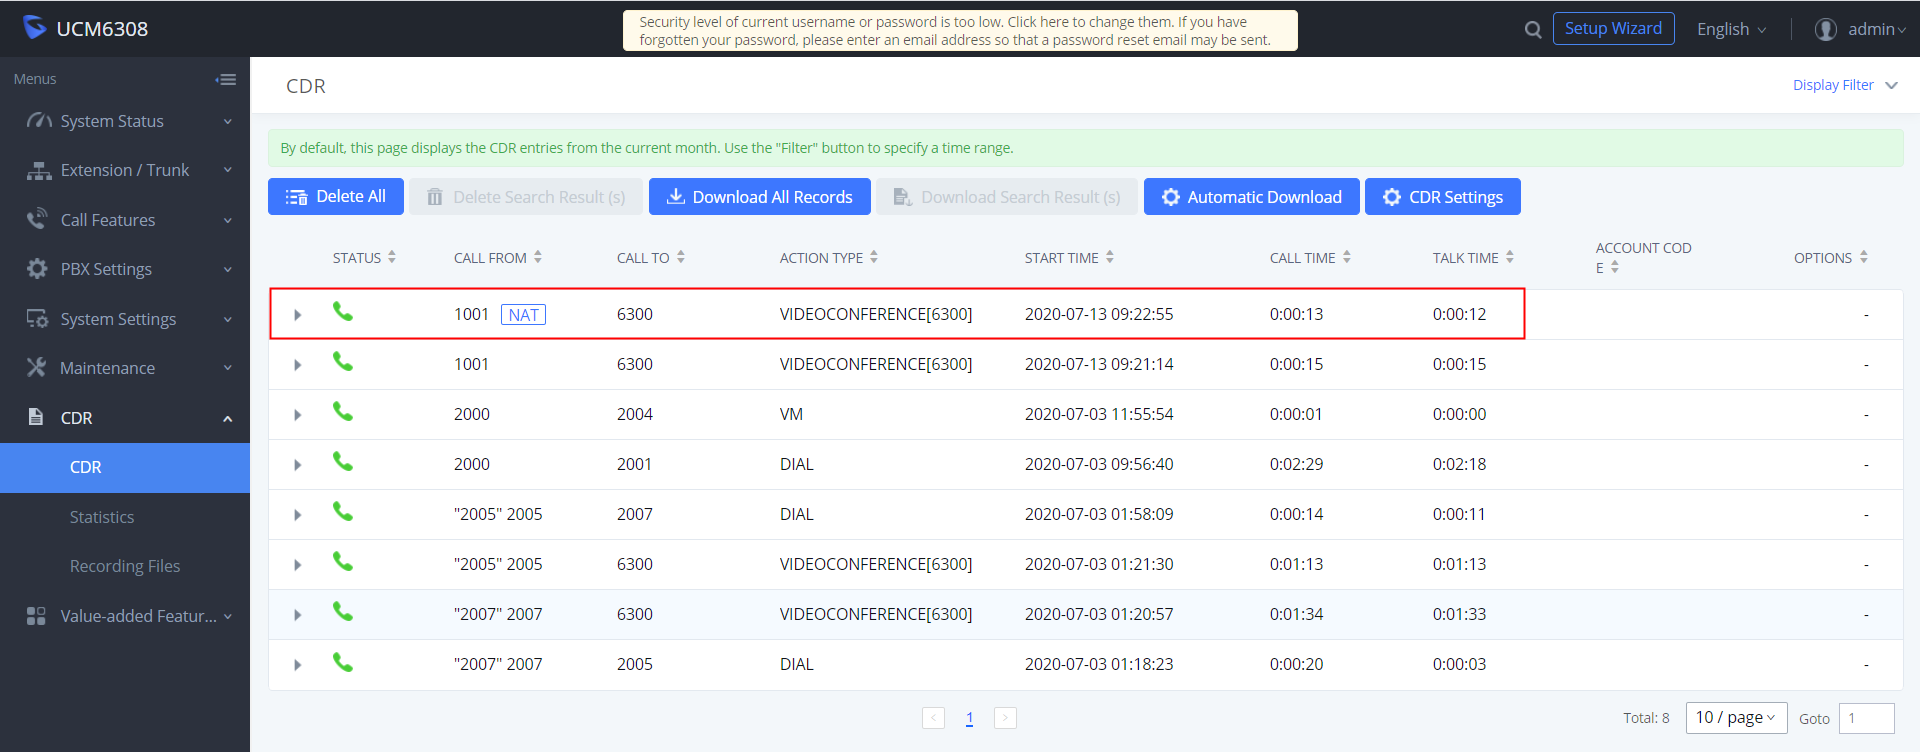
UCM6300 CDR can be accessed from UCM web GUI 🡪 CDR 🡪 CDR page. In the “Call Type” field, click on “Remote Calls” to filter the page to display remote calls CDR.

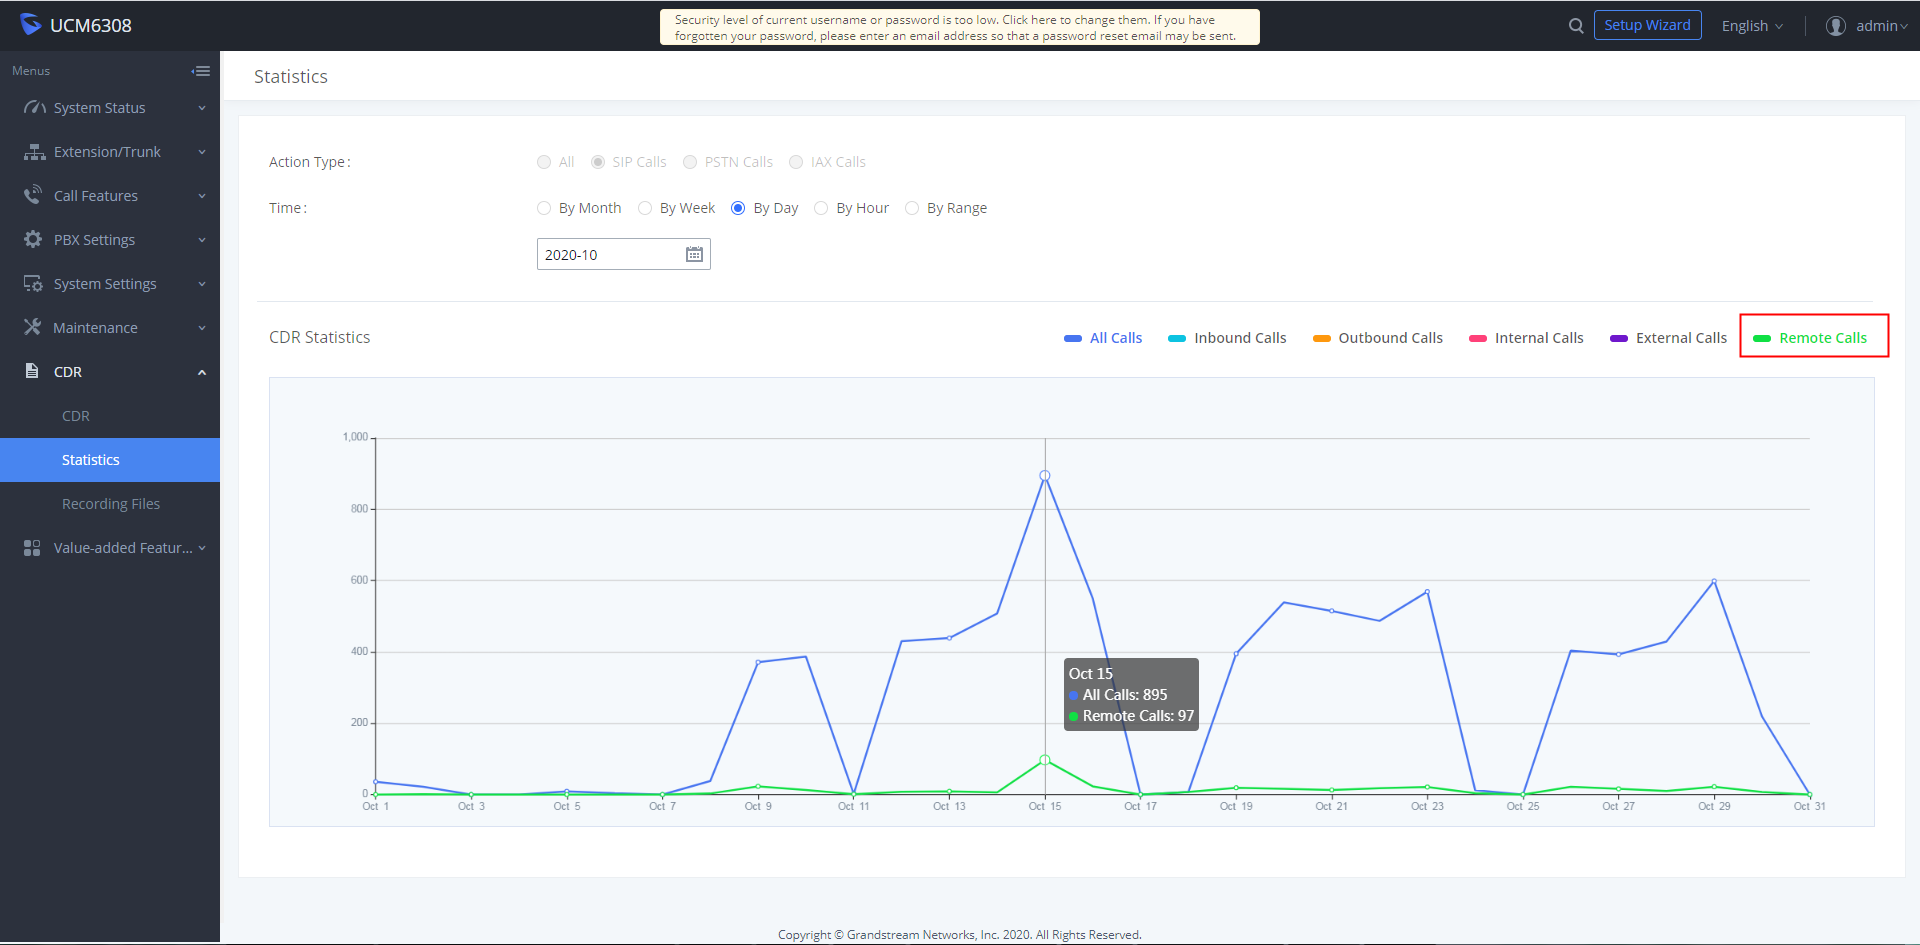
The UCM630x supports display CDR statistics to provide users a graphical view of the CDR. On the Statistics page, click on “Remote Calls” to filter the display.
Recordings Stored in GDMS Cloud
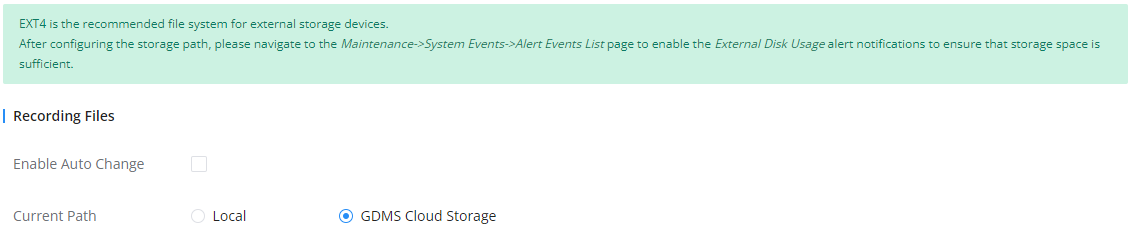
UCM6300 series also provides the ability to store the recordings in GDMS Cloud under PBX Settings → Recordings Storage, by enabling the option GDMS Cloud Storage like shown below:
UCM CONCURRENT REMOTE CALLS
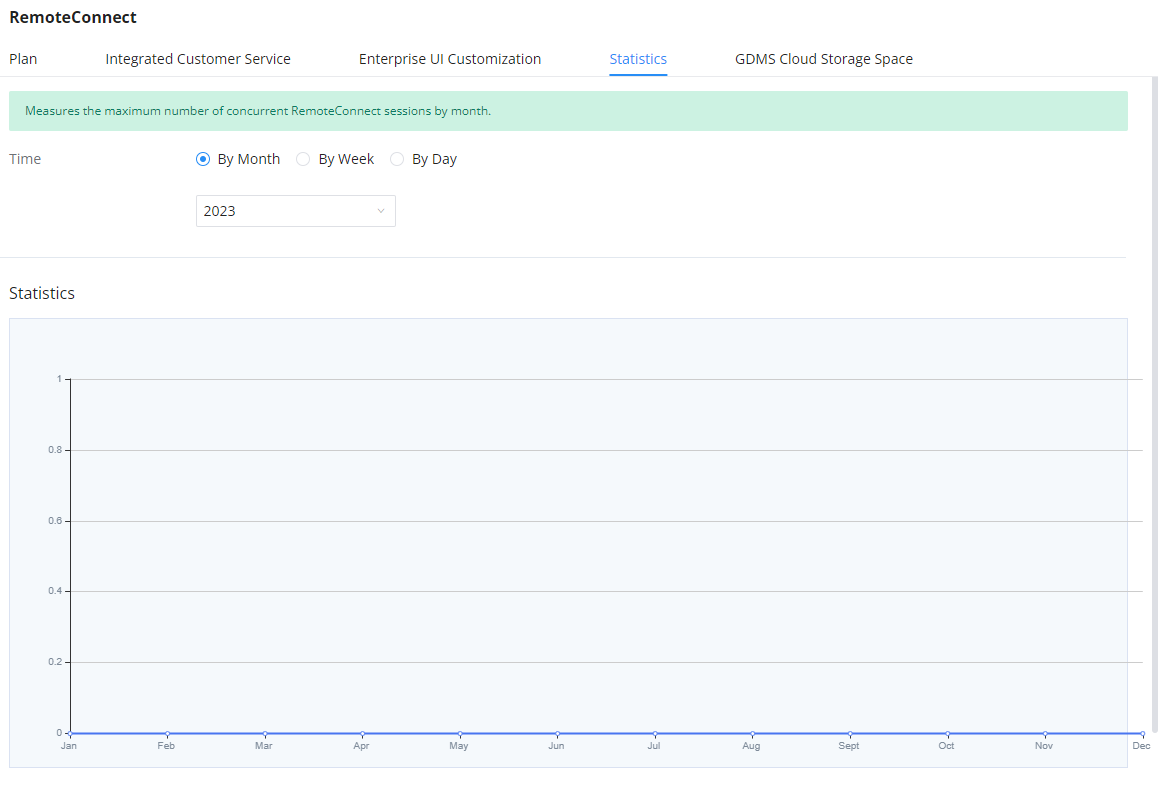
After using UCM RemoteConnect, all remote calls will be logged, and concurrent remote calls will be displayed on the UCM. The concurrent remote calls can be viewed under UCM web GUI RemoteConnect → Statistics page.
CONFIGURING PEER TRUNK WITH REMOTECONNECT
For 2 x UCM6300 IP PBX that are connected to GDMS, SIP peer trunks can be configured between them using the public address provided by GDMS. After the SIP peer trunk is configured, calls can be made between the extensions on both UCM6300. Steps:
- Log in UCM6300 A’s web GUI and go to Extension/Trunk 🡪 VoIP Trunks page. Add a new SIP trunk.
- Type:
- Select “Peer SIP Trunk.”
- Provider Name:
- Enter a provider name for identification purposes.
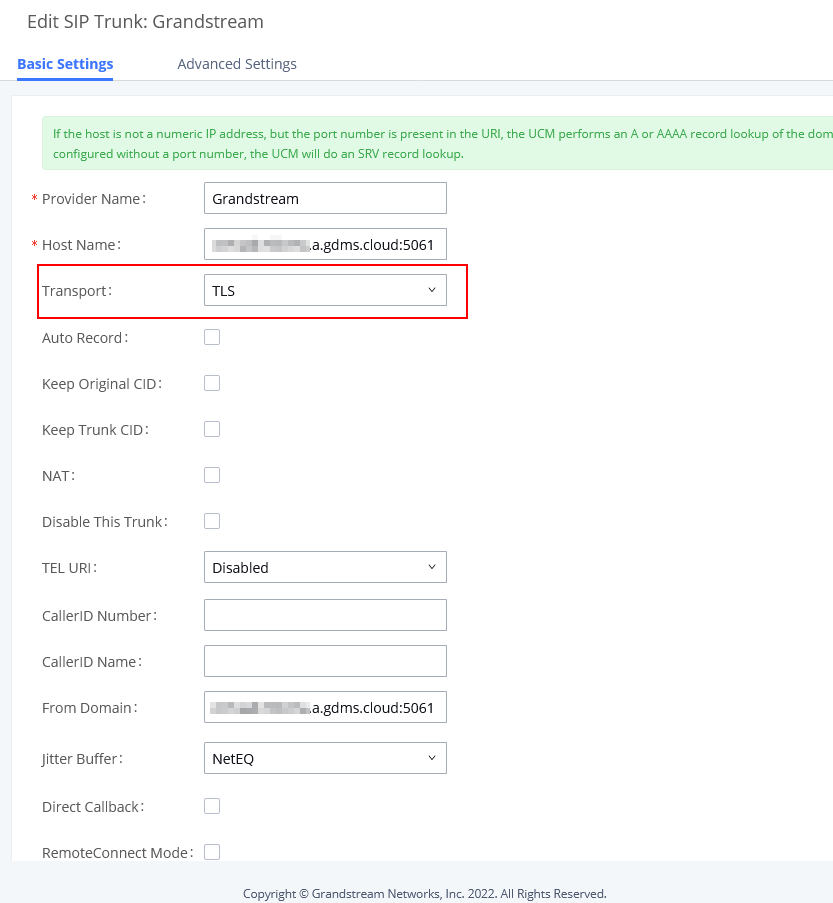
- Host Name:
- Enter UCM B’s address as the host name. It needs to be UCM B’s “Public address: Public TLS port.” The public address and public TLS port of UCM B can be found under UCM B’s web GUI UCM RemoteConnect.
- Type:

2. Save the configuration. On the VoIP trunk page, click on the edit icon ![]() for the newly created trunk to edit this SIP peer trunk.
for the newly created trunk to edit this SIP peer trunk.
3. Under Basic Settings, configure the following options for the SIP peer trunk:
- From Domain: Enter the UCM public address for this UCM (UCM A).
- Transport: TLS
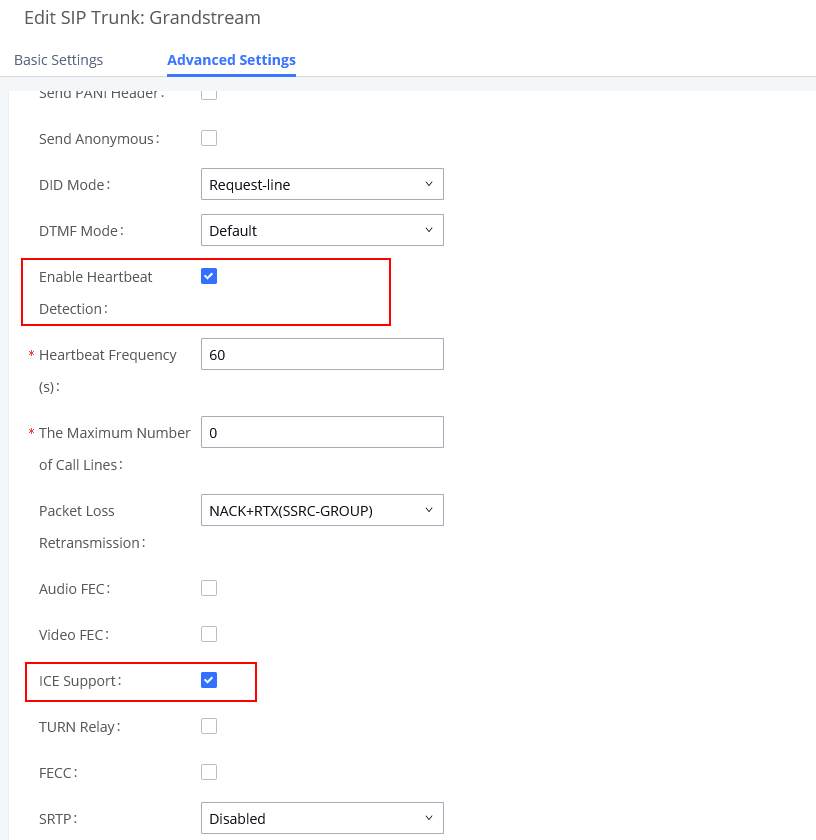
4. Under Advanced Settings, configure the following options for the SIP peer trunk:
- Enabled Heartbeat Detection: Yes
- ICE Support: Yes
5. Log in UCM B web GUI and configure it the same way as UCM A.
6. After configuration is completed, please check the SIP trunk status under the dashboard. Configure outbound route and inbound route as needed to make calls go through between the 2 UCMs.
MANAGING UCM ON GDMS
Add UCM6300 Device
Once the UCM is added GDMS, it will be assigned with the Basic plan for UCM RemoteConnect service. Currently, only UCM6300 series devices are supported with GDMS.
Below are the steps to follow to add an UCM63xx to the GDMS:
- Step 1: Go to the GDMS website and log in to your GDMS account. http://www.gdms.cloud/login
- Step 2: Under UCMRC → UCM Device page, click on “Add Device”.
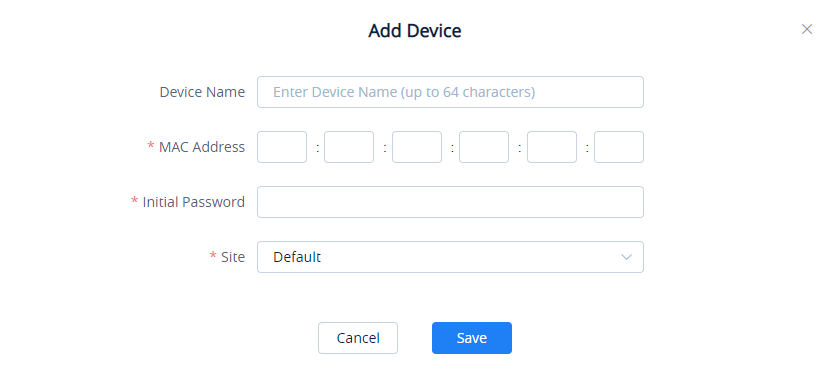
- Step 3: Enter the device name for identification purposes.
- Step 4: Enter UCM MAC address. This can be found on the label located on the back of the UCM device. If you are obtaining MAC address from UCM web GUI, go to UCM web GUI → System Status → System Information → Network page. If the device is using Route mode, the LAN MAC address needs to be used. If it is on Switch mode, LAN 2 address needs to be used.
- Step 5: Enter the factory password of the UCM device. The initial password can be viewed on the LCD of the UCM device or found on the device chassis.
- Step 6: Select a “Site” on GDMS to connect the GDMS to. Sites can be configured under GDMS → Site.
- Step 7: Click on “Save”. Once the UCM is successfully connected to GDMS, it will be assigned with the Basic plan for UCM RemoteConnect service automatically.
View UCM Devices on GDMS
To view the connected UCM devices list, please make sure that UCMRC Sub-system is chosen then go to UCM Device.
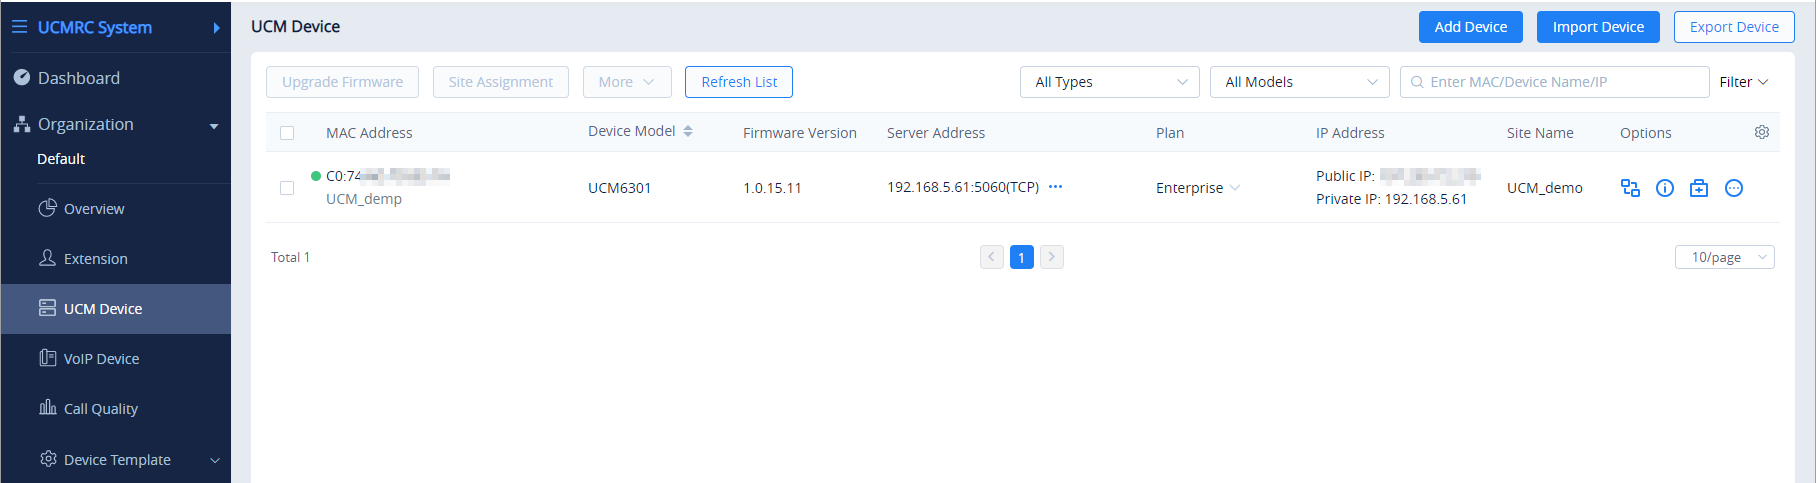
Status | Descriptions |
Status indicator | |
Firmware version too low | This icon indicates the device firmware version is too low, and the device cannot be used normally with GDMS. |
Plan expiring | This indicator means the plan is expiring soon or already expired. |
Custom display | Click on the gear icom on the right of the table, to choose the items to display as preferred.  |
Table 6: View UCM Devices on GDMS
Custom UCM Public Address
The UCM public address is for Wave web and Wave mobile app to log in using the extension number and the user password.
Users can also customize the public address for the enterprise to use. Here are the steps to customize UCM public address:
- Step 1: Go to the GDMS website and log in to your GDMS account. Navigate to UCMRC 🡪 UCM Device page, click on
 for the UCM6300 device and click on “Edit Device”.
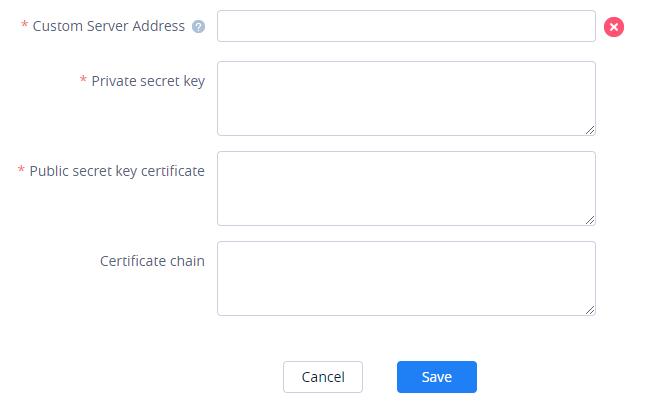
- Step 2: In the Edit Device window, click on “Personal URL” to edit the first part of the URL, or click on “Custom Domain” to customize the full URL.
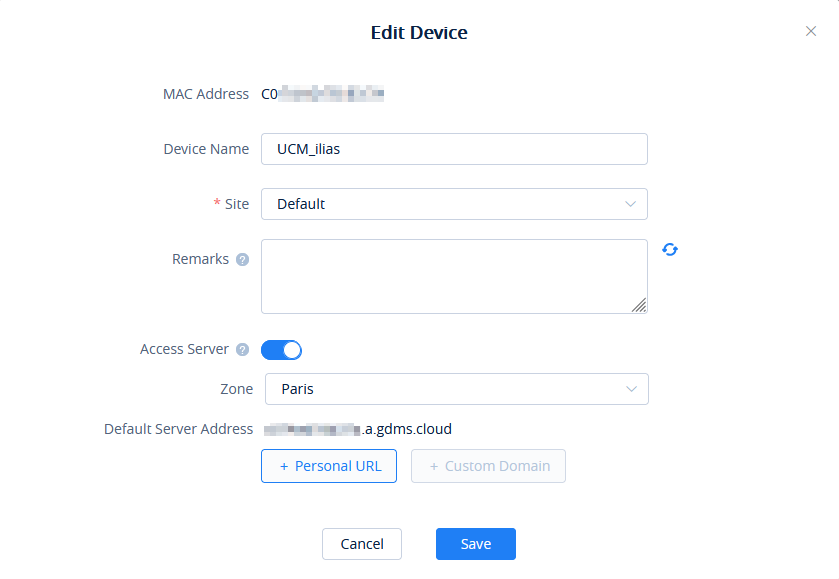
- Step 3: If “Personal URL” is selected, the user could enter the first part of the URL in the field below to generate their own link as UCM public address.

If “Custom Domain” is selected, the user can enter the full URL as a custom server address, and configure the private keys and certificate.
- Step 4: Click on Save to save the setting. The user now can use the default public UCM address and the custom UCM address.
Accessing UCM Web GUI from GDMS
With GDMS, the user can access the UCM Web GUI as an admin even if the UCM is behind NAT. If you have firmware version 1.0.11.x installed, you can enable an option in the UCM that will allow you to access the UCM remotely without having to enter a password when using GDMS.
- Step 1: Go to the GDMS website and log in to your GDMS account. Navigate to UCMRC 🡪 UCM Device page, click on
 for the UCM6300 device.

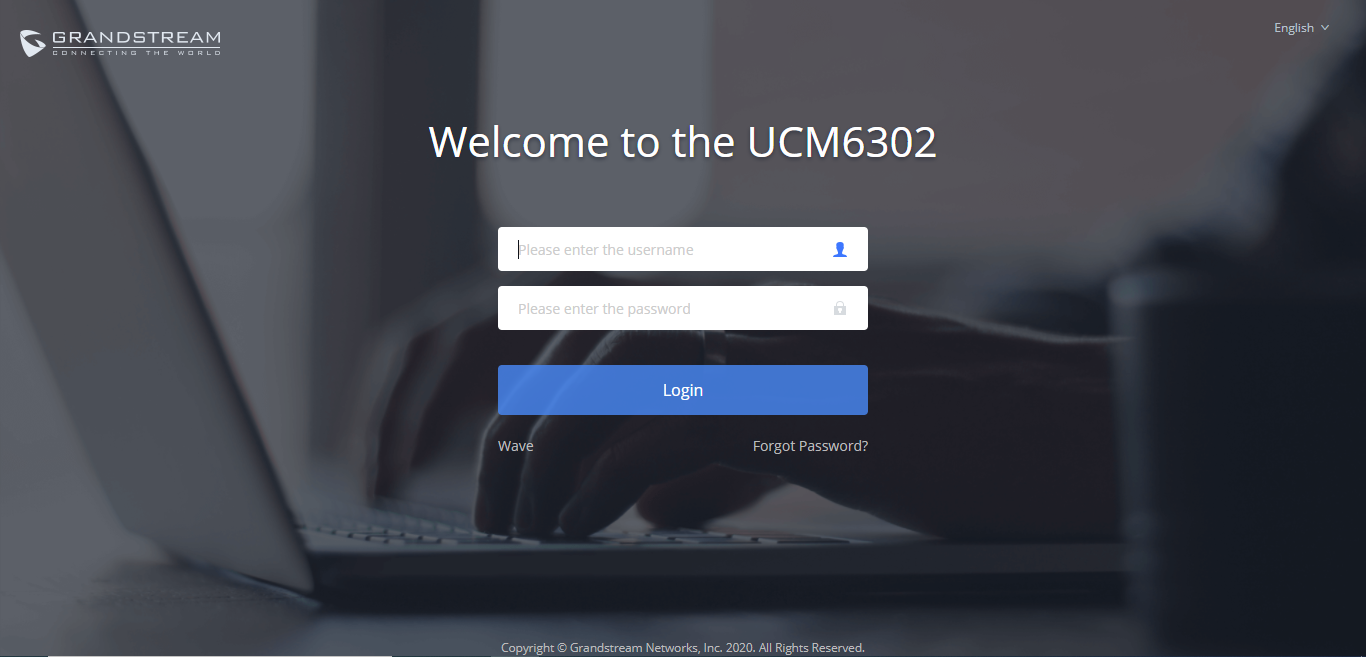
- Step 2: A new page will be opened and the UCM web UI login page will be loaded shortly. Users can log in with the UCM admin credentials.
- Step 3: After logging in successfully, the user can now configure the UCM remotely.
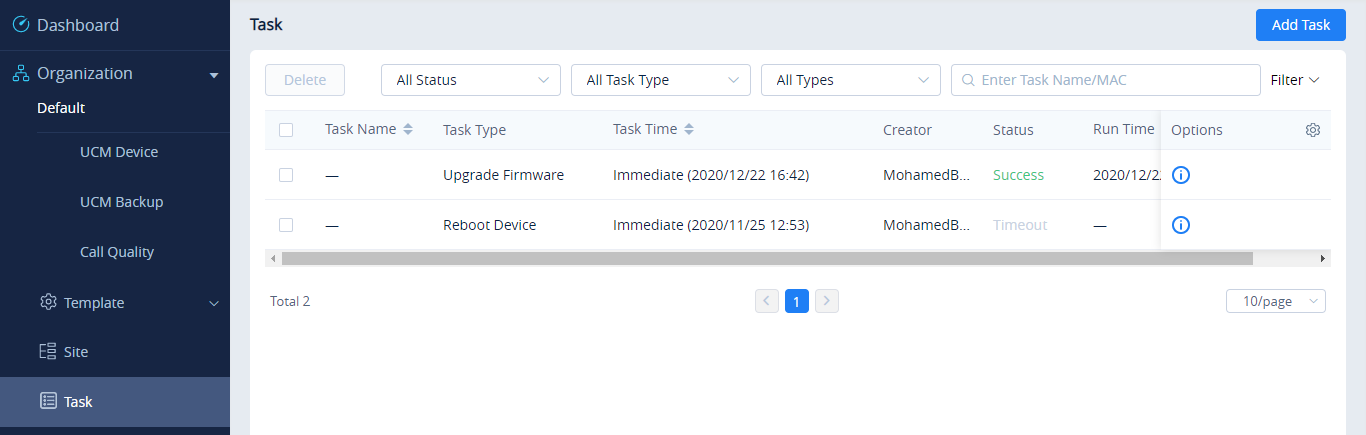
Rebooting UCM from GDMS
GDMS supports rebooting UCM immediately and scheduling a reboot.
- Step 1: Go to the GDMS website and log in to your GDMS account. Make sure that you have selected UCMRC System as a sub-system UCMRC 🡪 UCM Device page, click on
 for the UCM and select Reboot Device.
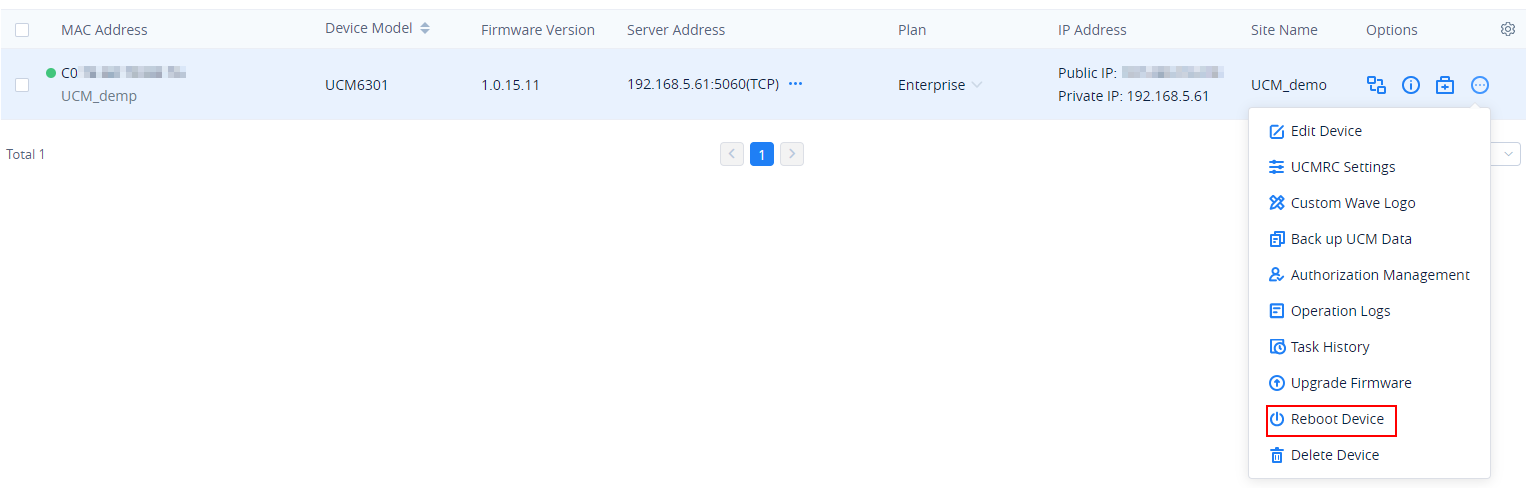
- Step 2: On GDMS, select whether to upgrade immediately or schedule the reboot. For a scheduled reboot, please select the start and end times. Reboot will happen between start time and end time.
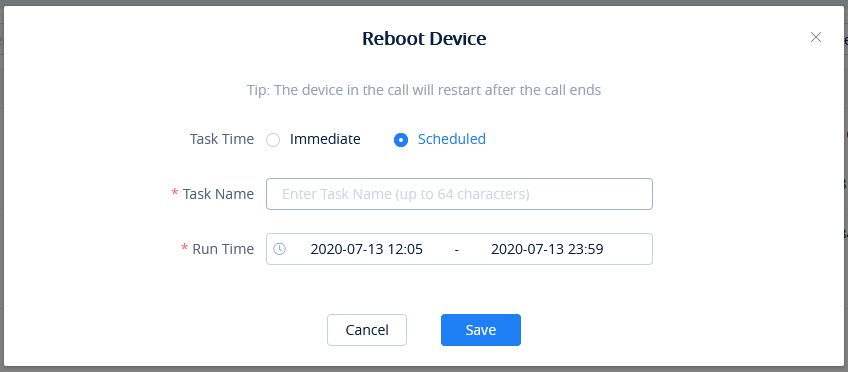
- Step 3: Save the setting. Users can see all tasks for the devices on the GDMS Task page.

Upgrading UCM via GDMS
The UCM firmware can be uploaded to GDMS and the UCM can be upgraded via GDMS.
- Step 1: Go to the GDMS website and log in to your GDMS account. Make sure that UCMRC System is the subsystem chosen then click on UCM Device page. Select the UCM to upgrade and click on “Upgrade Firmware.”
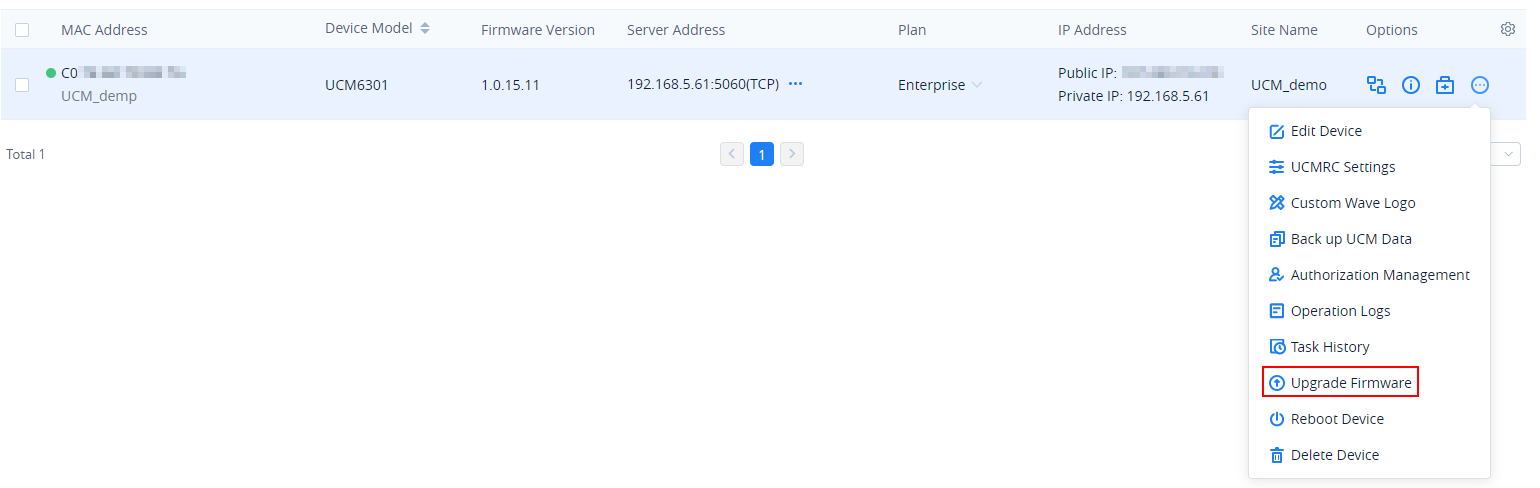
- Step 2: In the Upgrade Firmware window, select whether to upgrade immediately or schedule the upgrade. If “Scheduled” is selected, enter the start time and end time. The UCM will be upgraded during this period.
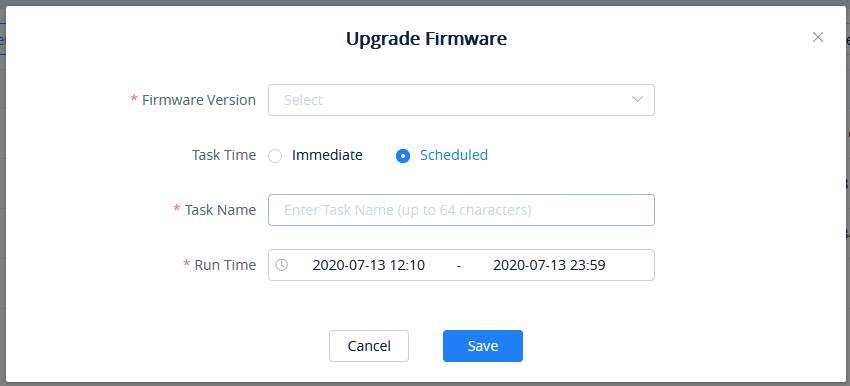
- Step 3: Save the setting. The user can view task status on the GDMS Task page.
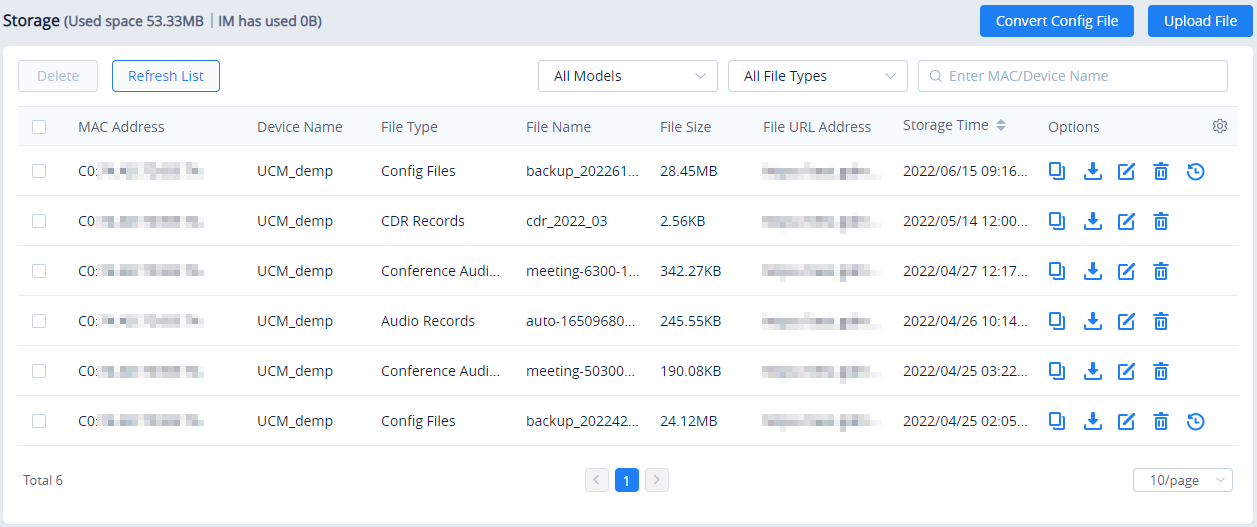
Cloud Storage and Backup
Users can perform backup manually or automatically on UCM. The backup file can be stored on GDMS cloud storage. To view the backup files stored on GDMS cloud storage, make sure that UCMRC System is chosen, then go to Storage.
- All files in different types including CDR and config files will be listed.
- Users can filter the backup files by file type and can download the backup files.
- If the storage space becomes low, users can delete the files no longer needed.
Remotely Restore Configuration File
Users can remotely restore configuration files for UCM devices on GDMS.
On the “UCM Backup” page, select a UCM backup file and click
![]() Perform recovery.
Perform recovery.
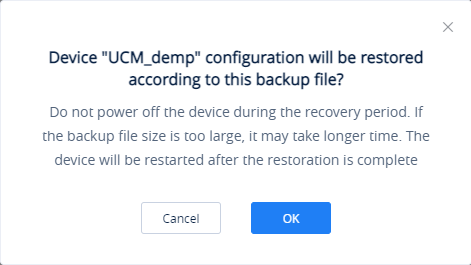
After clicking “Confirm”, the task will be immediately issued to this UCM device to restore this configuration file. It may take a few minutes to restore the configuration file. You can refresh the page to view the results, and view the results next to the MAC address in the following interface, as shown in the following figure:
![]() : Indicates that the recovery is successful, hover to view the last recovery time.
: Indicates that the recovery is successful, hover to view the last recovery time.
![]() : Indicates that the restoration failed, hover to view the time when the last operation was restored.
: Indicates that the restoration failed, hover to view the time when the last operation was restored.
View Statistics and Reports
Daily Statistics Report
UCM devices collect device data and provide statistical reports daily. The report will be sent to the GDMS user or the configured email address. The below picture shows the report attachment sent to the user’s email.
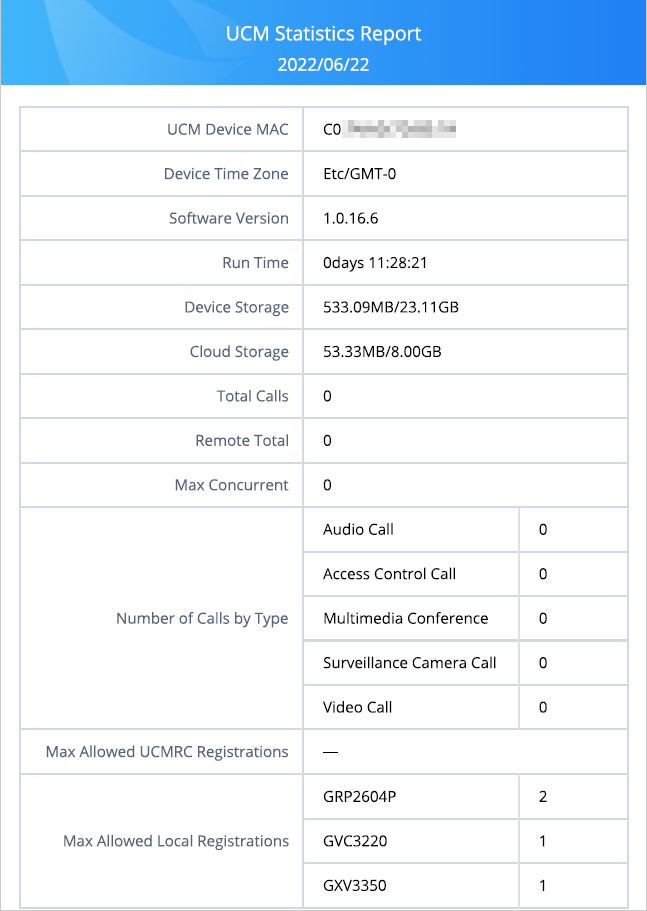
View Statistics Report for the Past Month
Please go to GDMS web GUI 🡪 UCM Device, on the UCM device you would like to check, click on the “Device Details” icon ![]() to get an overview look about the statistics of the specific UCM63XX
to get an overview look about the statistics of the specific UCM63XX

Currently, only the previous 1-month statistics can be viewed here. The statistics are displayed based on UCM’s local time zone.
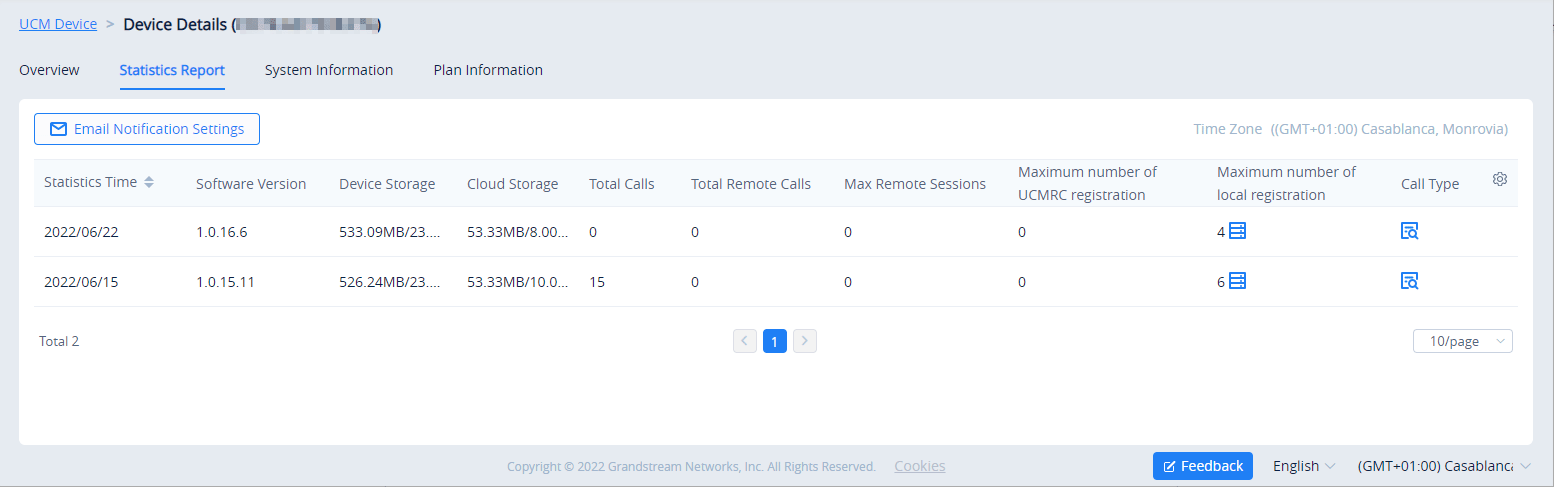
| Parameters | Description |
|---|---|
Statistics Time | This is the time when the data is reported to GDMS, displayed based on UCM local time zone. |
Software version | This is the firmware version running on the UCM. |
Running Time | This is the device running time. |
Device Storage | This is the device’s local storage status. If the used storage exceeds 80%, it will be highlighted in red. |
Cloud Storage | This is the device’s cloud storage status. If the used storage exceeds 80%, it will be highlighted in red. |
Total Calls | The total number of calls on the day when the time was reported. |
Total Remote Calls | Total remote calls from remote users on the same day as “Statistics Time.” |
Max Concurrent Remote Users | Max concurrent remote users on the same day as “Statistics Time.” If it exceeds the max allowed concurrent remote users, it will be highlighted in red. |
Number Extensions | On the day when the time is reported, the model type and quantity of the extension device connected to this UCM. 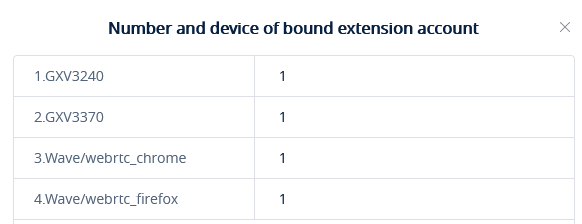
|
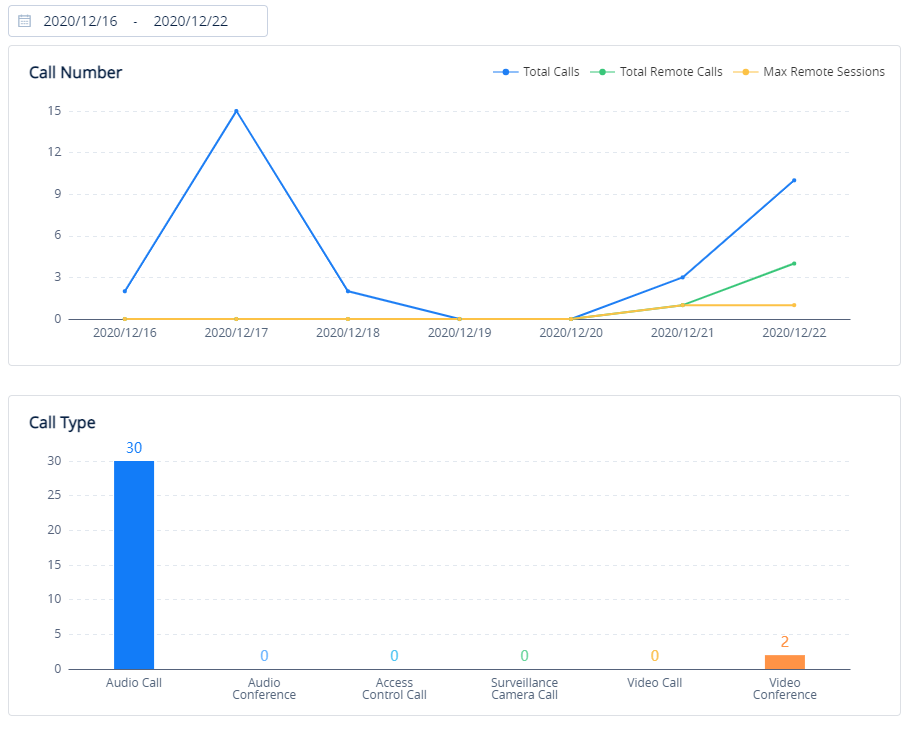
Call Type | Statistics on the type of distribution of all calls on the day when the time is reported.  |
Click on icon
![]() to view the chart statistics of the number of calls/types of calls in a certain period of time, and you can view the last week and the last month. As shown below:
to view the chart statistics of the number of calls/types of calls in a certain period of time, and you can view the last week and the last month. As shown below:
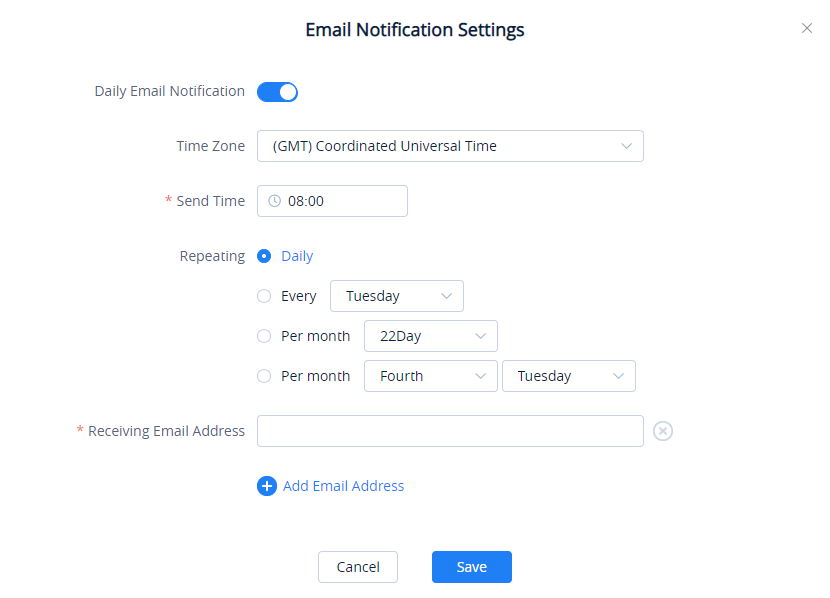
Configure Email to Receive Daily UCM Report
GDMS system will send daily emails of UCM equipment every day, click on
![]() to set the receiving mailbox, as shown in the figure below:
to set the receiving mailbox, as shown in the figure below:
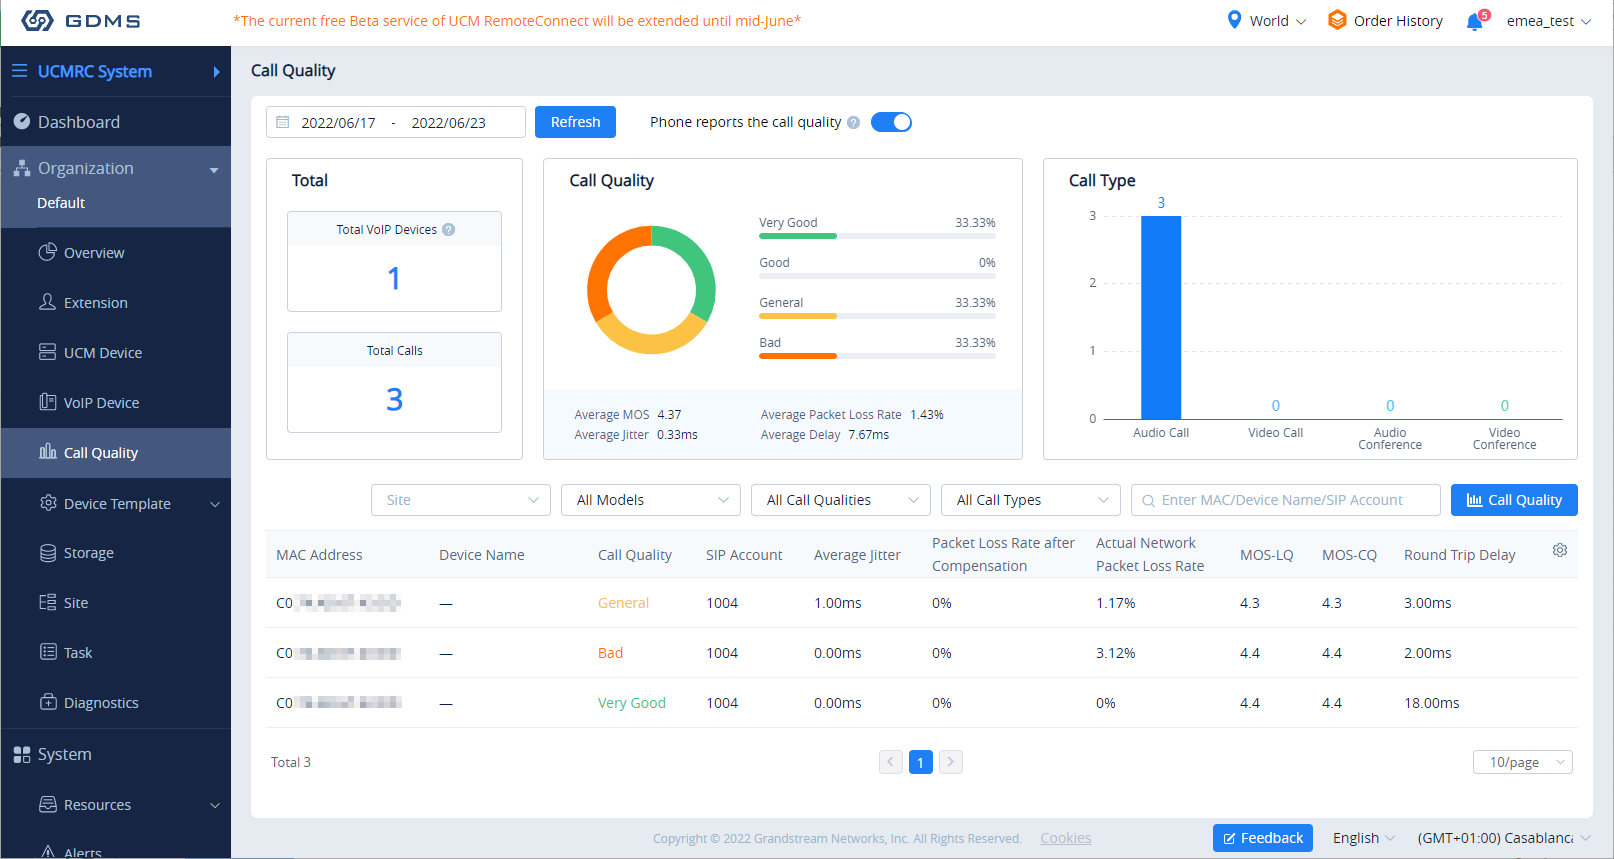
Call Quality Statistics
Under the UCMRC🡪Call Quality page, you can view the call records reported by all phones under the UCM server and the call quality statistics. So far, this feature is supported by some Grandstream devices:
- HT813 with firmware version 1.0.13.1 or higher
- HT8xx with firmware version 1.0.27.1 or higher
- GXV33xx with firmware version 1.0.3.25 or higher
- GRP260x with firmware version 1.0.1.7 or higher
You can filter call quality records based on time, site, device model, call quality, call type, and UCM server address.
View Plan and UCM Cloud Storage Status
Please go to GDMS → UCMRC → UCM Device, click on the plan for the UCM device to view the plan details including the expiration date, used storage, and total storage.
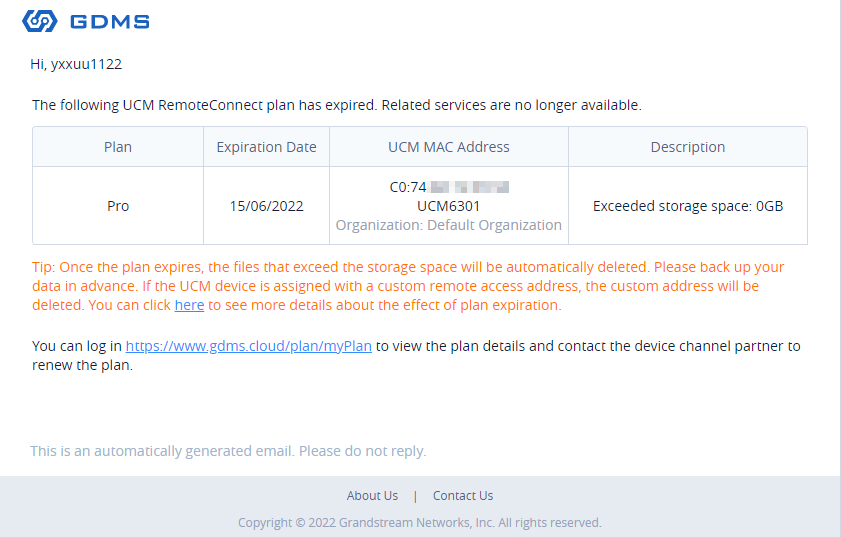
When the plan expires, the user will receive an email notification as shown in the figure below:
Cloud IM Service
Cloud IM provides cloud-based IM services for UCM devices. It supports unified communications and IM interoperability for enterprises with multiple UCM devices across regions while providing high-performance, large-storage, and multi-functional cloud communication services.
Users could follow the steps below to activate this service:
- Access the GDMS page, click on
 in the upper right corner of the page, then click on the IM Cloud icon
  of the UCM that you wish to enable cloud instant messaging for, as shown in the figure below.

2. Click on the “Free Trial” button at the bottom of the “UCM CloudIM” service, select the CloudIM service region and enter the enterprise name for the plan. It is recommended to select the nearest region to the UCM device. Please see the screenshot below:
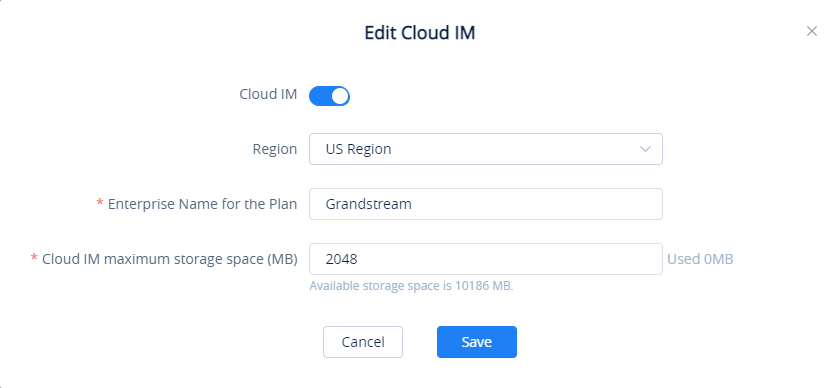
3. Click the “Save” button to get the UCM CloudIM plan, after it the user can view the CloudIM service domain name, service ID, and Key.
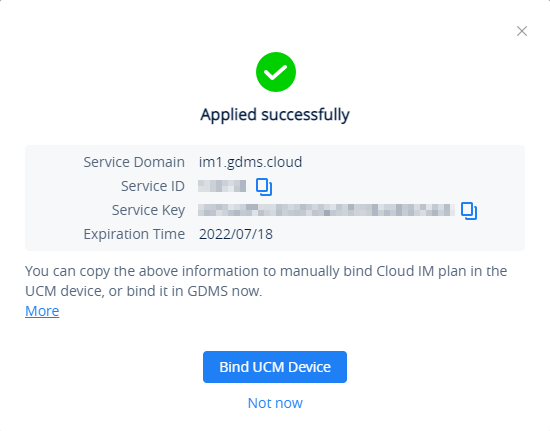
4. The user can quickly bind the UCM device for the CloudIM plan so that the UCM device can start to apply the CloudIM plan.
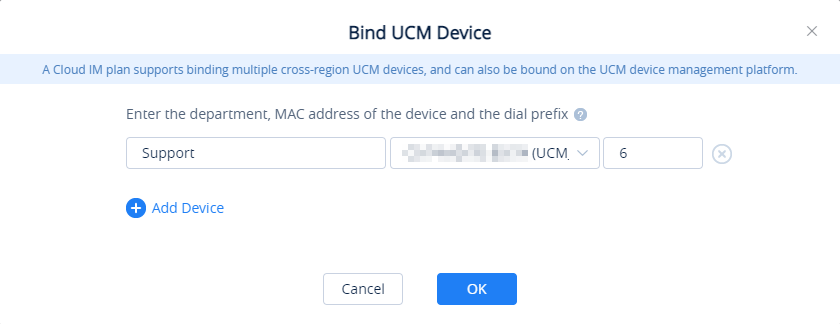
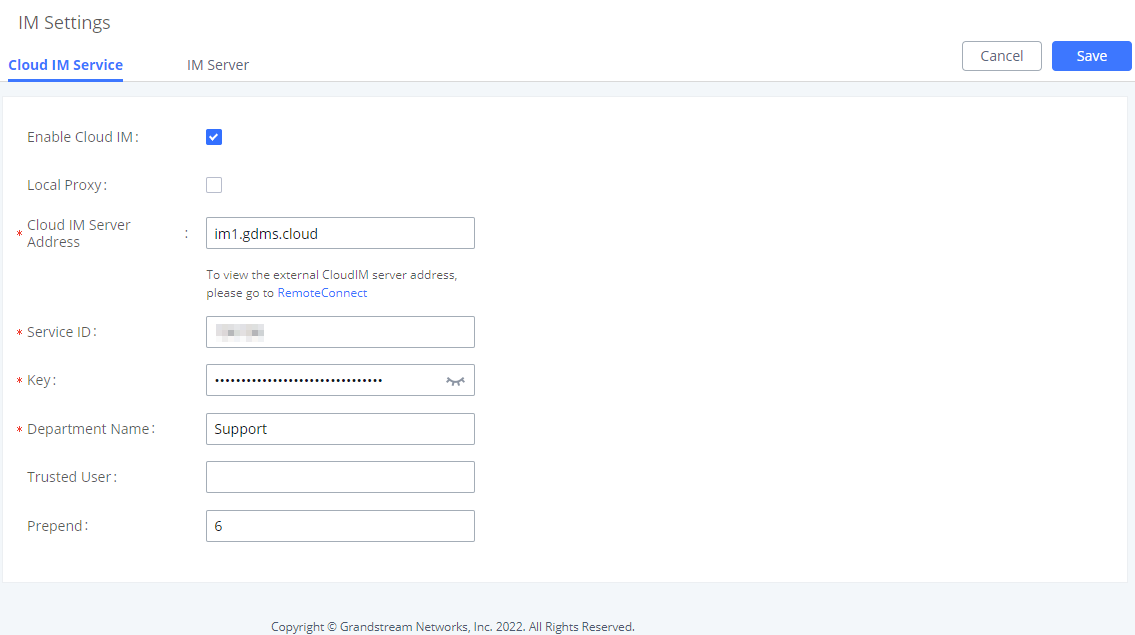
5. The user can also copy the service ID and service key and bind the UCM device to the UCM device management platform. The user can go to UCM Web UI 🡪 System Settings 🡪 CloudIM interface and enter the CloudIM involved information in the blanks. The corresponding IM data are placed in the CloudIM external server.
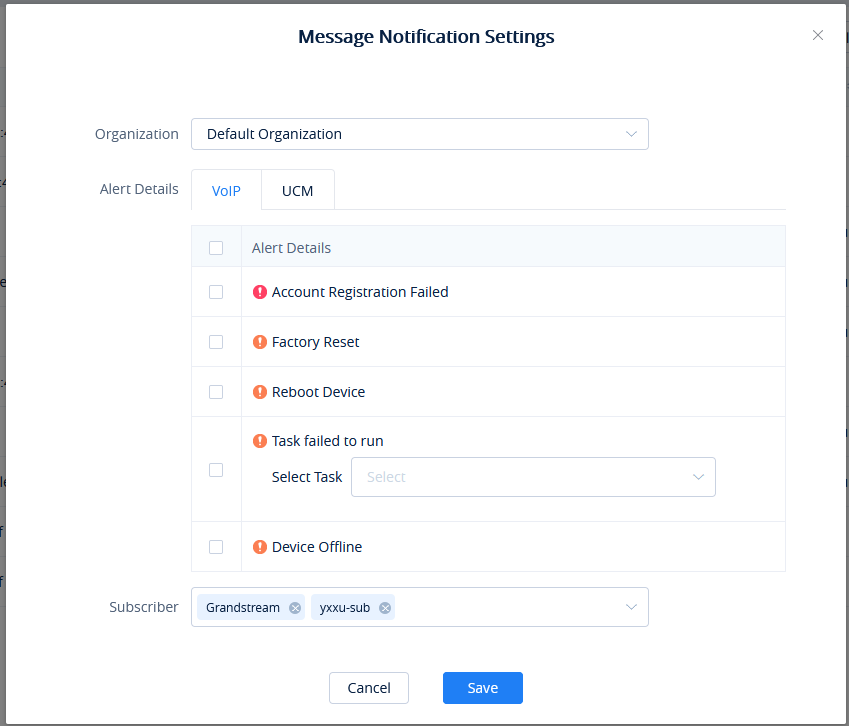
Alert Notification Settings
Message Notification Settings
To manage the message alert notification, under the Alert page, please click on
![]() .
.
Please note that only the alerts marked with the GDMS logo![]() are synced to the GDMS.
are synced to the GDMS.
Organization | Select the organization. |
Subscriber | Select which use will be receiving the message notifications. |
Alert Details | The alarm information is divided into alarms of VoIP devices and alarms of UCM devices. The user can choose the alarm contents that need to be notified. The user can specify what to receive as an alert. The following alarm priority levels can be divided into: VoIP:
UCM:
|
Subscriber | Select the users who will be reminded. Only sub-users created by the current user can be selected. |
Table 8: Message Notification Settings
Email Notification Settings
To manage email alert notifications, under the Alert page, please click on ![]() .
.
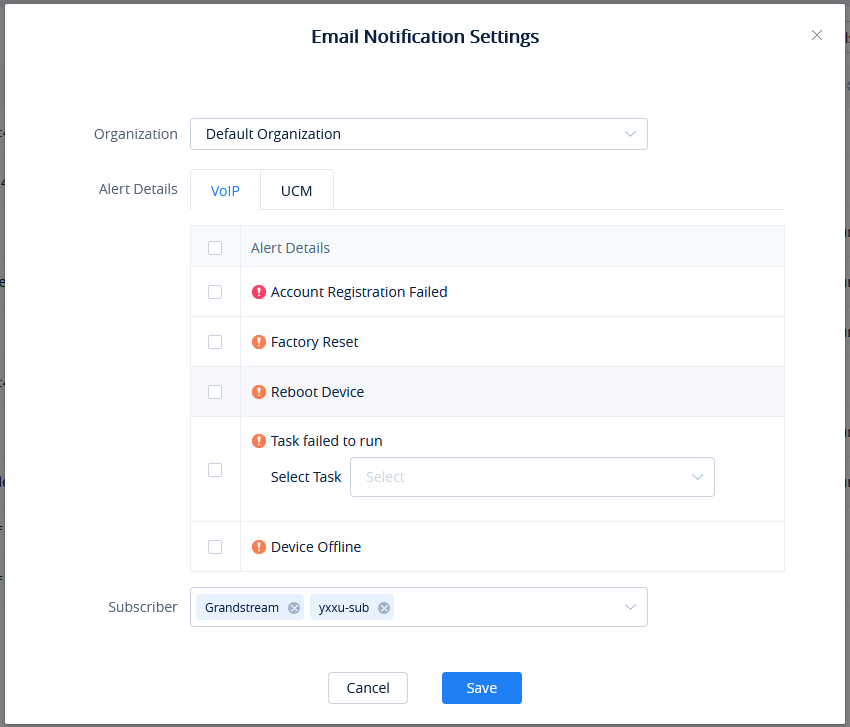
Organization | Select the organization. |
Subscriber | Select which use will be receiving the message notifications. |
Alert Details | The alarm information is divided into alarms of VoIP devices and alarms of UCM devices. The user can choose the alarm contents that need to be notified. The user can specify what to receive as an alert. The following alarm priority levels can be divided into: VoIP:
UCM:
|
Subscriber | Select the users who will be reminded. Only sub-users created by the current user can be selected. |
Table 9: Email Notification Settings
App Notification Settings
GDMS users can also monitor their Grandstream VoIP and UCM devices using their smartphone. We offer GDMS mobile application on Android™ and iOS™ smartphones. Using this application, GDMS users can receive alert Push notifications in real-time once an event happens.
SMS Notification Settings
Only UCM devices with SMS notification functions send SMS notifications for alarms.
To manage SMS alert notifications, under the Alert page, please click on ![]() .
.
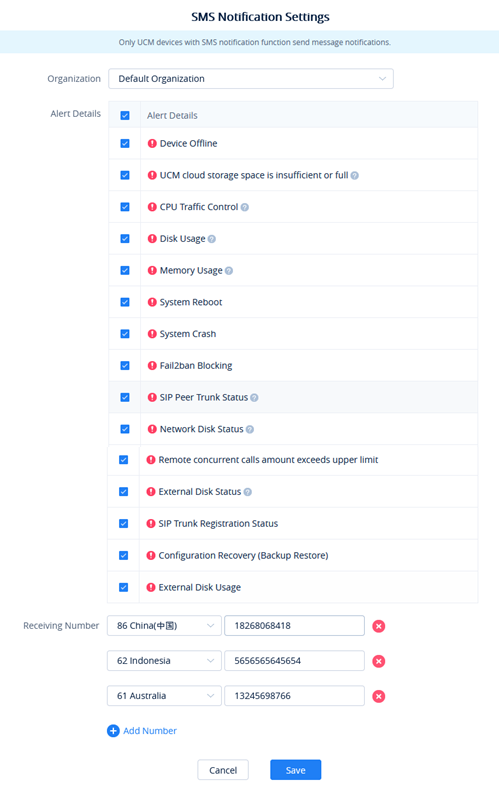
Organization | Select the organization. |
Subscriber | Select which use will be receiving the message notifications. |
Alert Details | The alarm information is divided into alarms of VoIP devices and alarms of UCM devices. The user can choose the alarm contents that need to be notified. The user can specify what to receive as an alert. The following alarm priority levels can be divided into: VoIP:
UCM:
|
Subscriber | Select the users who will be reminded. Only sub-users created by the current user can be selected. |
Table 10: SMS Notification Settings
View Alert Notice
The alert notice can be viewed under the Alert page.

- Search: Users can use the alert filter and search function in the page upper right corner to find the corresponding alert message.
- Newest Alert Notification: if the alert notice in the list contains a red dot at the beginning, it means that the alert notification is an unread notification. Users can click the button
 to mark all unread notifications as “read”.
- View details: users can click an alert button after notification
 to view the alert notification details, then the red dot will disappear.
- Device diagnosis: For faulty devices, users can click
 Option to access the “Device Diagnostics” page to diagnose the device.
- Delete Alert: The user can delete the notification by selecting one or more items and clicking the “Delete” button.
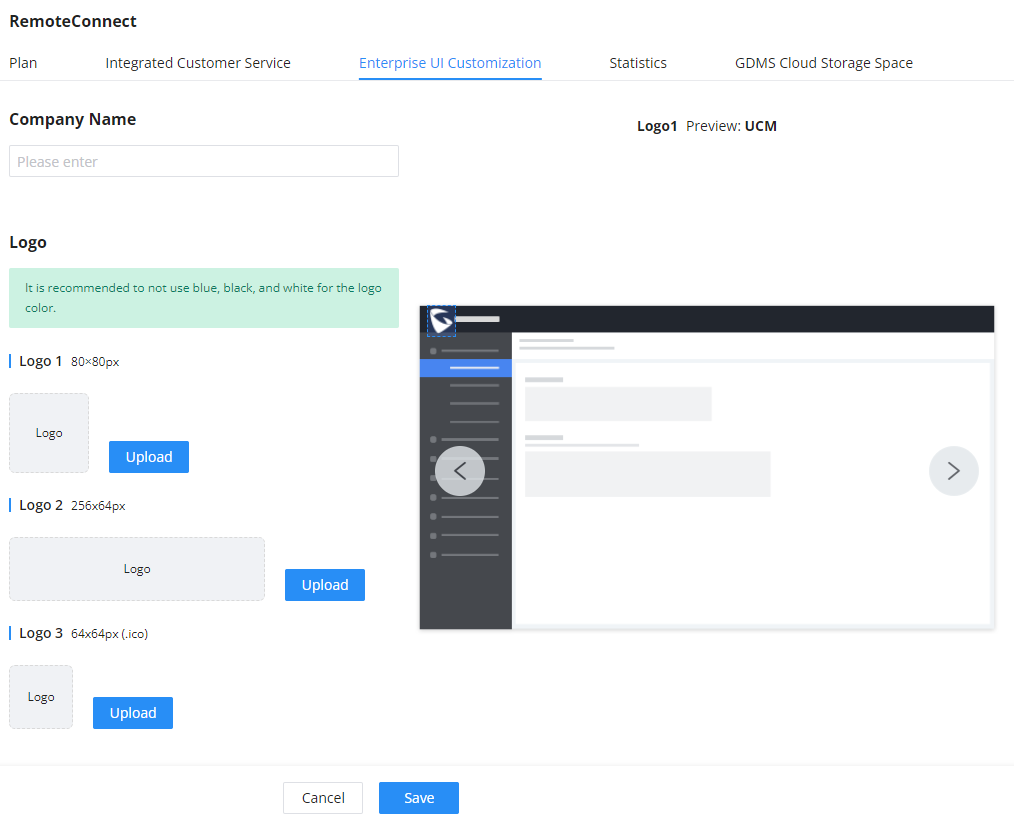
ENTERPRISE UI CUSTOMIZATION
Custom logo feature allows users to select a local image file as the new logo as well as enter the company name. The pictures are in different formats and sizes according to the location of the logo. They are 64*64px (only ico format is supported), 256*256px, 80*80px, which applies for “UCM Login”, “Reset Password”, “Email Template”, “Wave/Login”, “Browser Tab interface preview”.
- LOGO 1: Replaces Browser tab icon
- LOGO 2: Replaces the Grandstream banner on the top left corner of the management login page and emails.
- LOGO 3: Replaces the Grandstream logo on the top left corner of the Wave Web interface and UCM management interface.
INTEGRATED CUSTOMER SERVICE
The Integrated Customer Service allows users to download the SDK provided by the customer service system and integrate it on the website so that the website can contact customer service for call operations. The call queue is used as the customer service number. The users can use this SDK to embed a simple Click2Call link into their websites. This will allow visitors to quickly call an agent in case they need help, without having to dial any number or leave the web page.
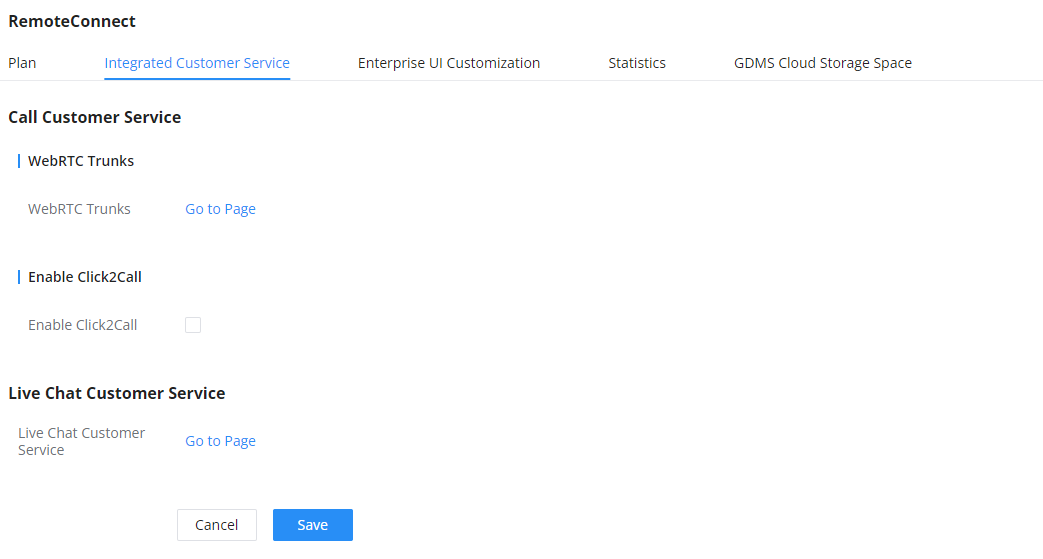
For further information and how to configure this feature, please refer to this link detailing all the steps needed:
Click2Call SDK
CHANGELOG
This section lists the major new features and significant changes from previous versions of the user guide for RemoteConnect. Minor updates for corrections or editing are not documented here.
Version 1.0.17.11
- No major change.
Version 1.0.15.13
- New RemoteConnect plans are available to purchase. [Prerequisites]
- Added option to enable and disable password less for remote access. [Passwordless Remote Access]
- Support for CDR data cloud storage (only manual update, no functional changes). [CDR Stored in GDMS Cloud]
- Support alarm event synchronization (only manual update, no function changes).
- Added support for “Troubleshooting” and “Remote Link” diagnosis tools for troubleshooting network connection to the RemoteConnect service. [UCM RemoteConnect Remote Service Diagnosis]
- Added the Company Name option to the Enterprise UI Customization. [ENTERPRISE UI CUSTOMIZATION]
- No major change.
- Added support for Cloud IM service. [Cloud IM Service]
- Added support for integrated customer service. [INTEGRATED CUSTOMER SERVICE]
- Added ability to add a custom browser tab icon and custom logos on various pages of the web management portal and Wave Web portal. [ENTERPRISE UI CUSTOMIZATION]
- Added ability to synchronize UCM system event alerts to GDMS. [GDMS ALERT MANAGEMENT]
- Added ability to remotely restore backups from GDMS. [Remotely Restore Configuration File]
- Added ability to remotely detect UCM bandwidth on GDMS. [Call Quality Statistics]
- Added CDR stored in GDMS cloud. [CDR Stored in GDMS Cloud]
- Added GDMS Cloud Storage for recordings. [Recordings Stored in GDMS Cloud]
- Added Call Quality Statistics. [Call Quality Statistics]
- Added SMS Notification. [SMS Notification Settings]
- This is the initial version